


目录
我们将介绍如何使用AForge和Baidu AI来构建一个简单的Windows应用程序,实现人脸检测与识别功能。通过这篇文章,您将了解到如何设置视频源,捕获图像,并通过调用Baidu AI的API进行人脸检测和识别。
项目简介
我们将开发一个C# WinForms应用程序,该应用程序能够:
- 从摄像头获取视频流并捕捉单帧图像。
- 将捕捉到的图像发送到Baidu AI人脸识别API进行人脸检测和识别。
- 显示识别结果,如年龄、性别、颜值等。
主要技术栈
- AForge.NET: 一个用于计算机视觉和人工智能的.NET框架。
- Baidu AI: 百度的人工智能平台,提供了包括人脸识别在内的多种AI服务。
- WinForms: Windows Forms,是用于开发Windows桌面应用程序的GUI工具包。
一、项目实现步骤
1. 初始化项目
首先,我们需要在Visual Studio中创建一个新的WinForms项目,并安装以下NuGet包:
AForge.ControlsAForge.VideoAForge.Video.DirectShowNewtonsoft.Json
2. 设置百度AI的API密钥
在代码中,我们需要设置百度AI的API密钥和ID,用于认证和调用百度AI的服务。
此处调用步骤依然使用外部链接,人脸识别具体操作和手写体识别操作差不多。
private string APP_ID = "your_app_id";
private string API_KEY = "your_api_key";
private string SECRET_KEY = "your_secret_key";

private Face client = null;
在初始化时创建百度AI客户端实例:
client = new Face(API_KEY, SECRET_KEY);
3. 配置摄像头
使用AForge库获取摄像头设备,并设置视频源。
private FilterInfoCollection videoDevices = null;
private VideoCaptureDevice videoSource;

private void Form1_Load(object sender, EventArgs e)
{
    videoDevices = new FilterInfoCollection(FilterCategory.VideoInputDevice);
    if (videoDevices != null && videoDevices.Count > 0)
    {
        foreach (FilterInfo device in videoDevices)
        {
            comboBox1.Items.Add(device.Name);
        }
        comboBox1.SelectedIndex = 0;
    }
    videoSourcePlayer1.NewFrame += VideoSourcePlayer1_NewFrame;
}
4. 启动和捕获视频流
创建方法用于连接摄像头并开始视频捕捉。
private void CameraConn()
{
    videoSource = new VideoCaptureDevice(videoDevices[comboBox1.SelectedIndex].MonikerString);
    videoSource.DesiredFrameSize = new System.Drawing.Size(320, 240);
    videoSource.DesiredFrameRate = 1;
    videoSourcePlayer1.VideoSource = videoSource;
    videoSourcePlayer1.Start();
}
在NewFrame事件中处理每帧图像,并进行人脸检测。
private void VideoSourcePlayer1_NewFrame(object sender, ref Bitmap image)
{
    if (IsStart)
    {
        IsStart = false;
        ThreadPool.QueueUserWorkItem(new WaitCallback(this.Detect), image.Clone());
    }
    if (location != null)
    {
        Graphics g = Graphics.FromImage(image);
        g.DrawRectangle(new Pen(Color.Red), location.left, location.top, location.width, location.height);
        g.Dispose();
    }
}
5. 人脸检测与识别
捕获图像并转换为Base64格式,发送到百度AI进行检测和识别。
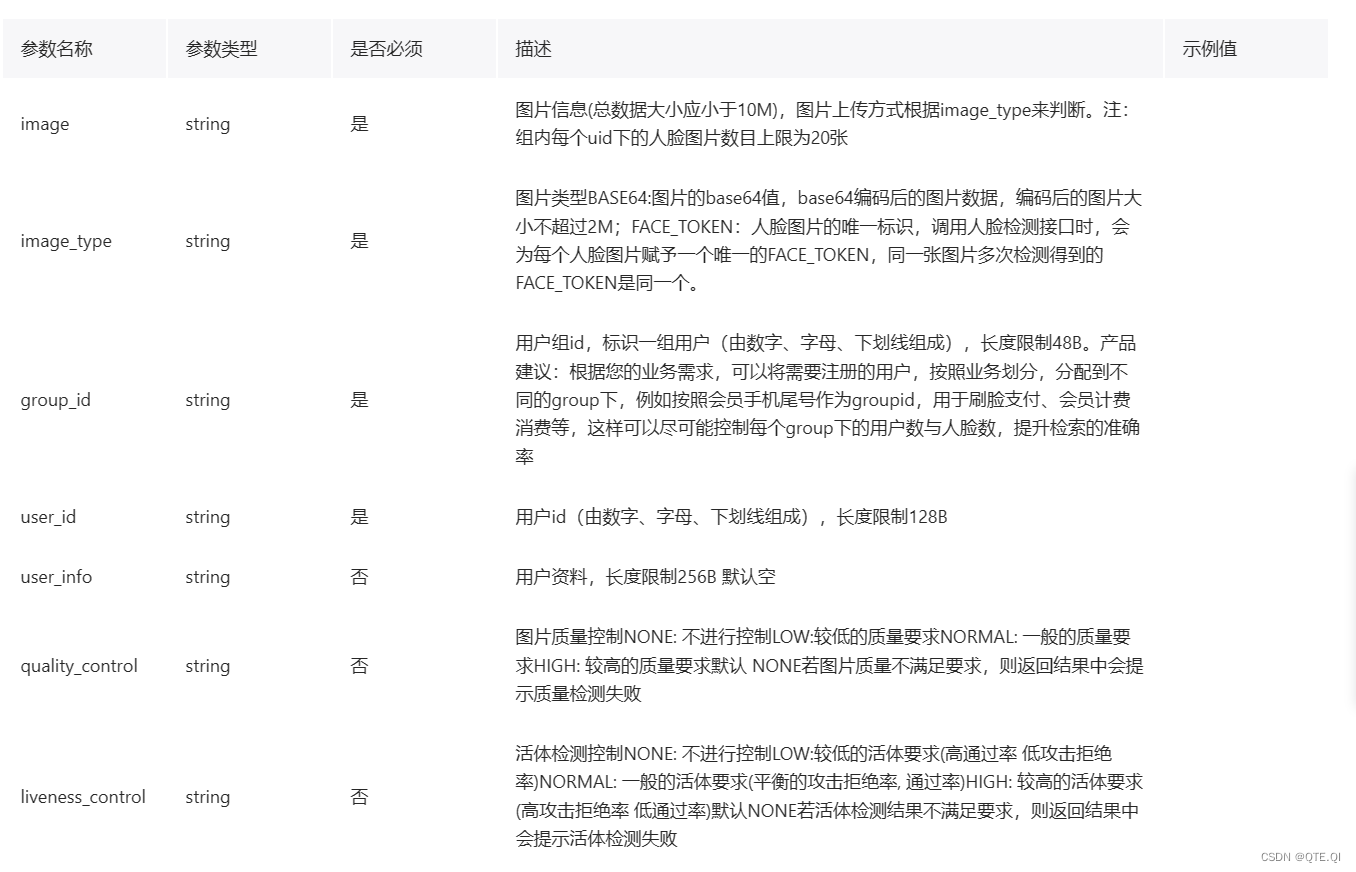
此处需要严格说明,相关参数需要参考百度官方给出的API文档进行编写。(本项目中图片需要使用string,image_type也是,需要根据文档中是否必须给出参数列表,否则就会报错)
public string ConvertImageToBase64(Image file)
{
    using (MemoryStream memoryStream = new MemoryStream())
    {
        file.Save(memoryStream, file.RawFormat);
        byte[] imageBytes = memoryStream.ToArray();
        return Convert.ToBase64String(imageBytes);
    }
}

private void Detect(object image)
{
    if (image != null && image is Bitmap)
    {
        Bitmap img = (Bitmap)image;
        string image1 = ConvertImageToBase64(img);
        string imageType = "BASE64";
        var options = new Dictionary<string, object>{
            {"max_face_num", 2},
            {"face_fields", "age,qualities,beauty"}
        };
        var result = client.Detect(image1, imageType, options);
        // 处理检测结果...
    }
}
6. 界面与功能
在WinForms中创建按钮和文本框,用于操作和显示检测结果。
private void button1_Click(object sender, EventArgs e)
{
    OpenFileDialog dialog = new OpenFileDialog();
    dialog.InitialDirectory = "C:\\Images";
    dialog.Filter = "所有文件|*.*";
    if (dialog.ShowDialog() == DialogResult.OK)
    {
        string filename = dialog.FileName;
        Image im = Image.FromFile(filename);
        var image = ConvertImageToBase64(im);
        string imageType = "BASE64";
        var options = new Dictionary<string, object>{
            {"face_field", "age,beauty"}
        };
        var result = client.Detect(image, imageType, options);
        var jsonResult = JObject.Parse(result.ToString());
        textBox1.Text = result.ToString();
    }
}
二、运行与测试
启动应用程序,连接摄像头并进行人脸检测。通过UI操作捕捉图像并调用百度AI API进行识别,并在文本框中显示结果。
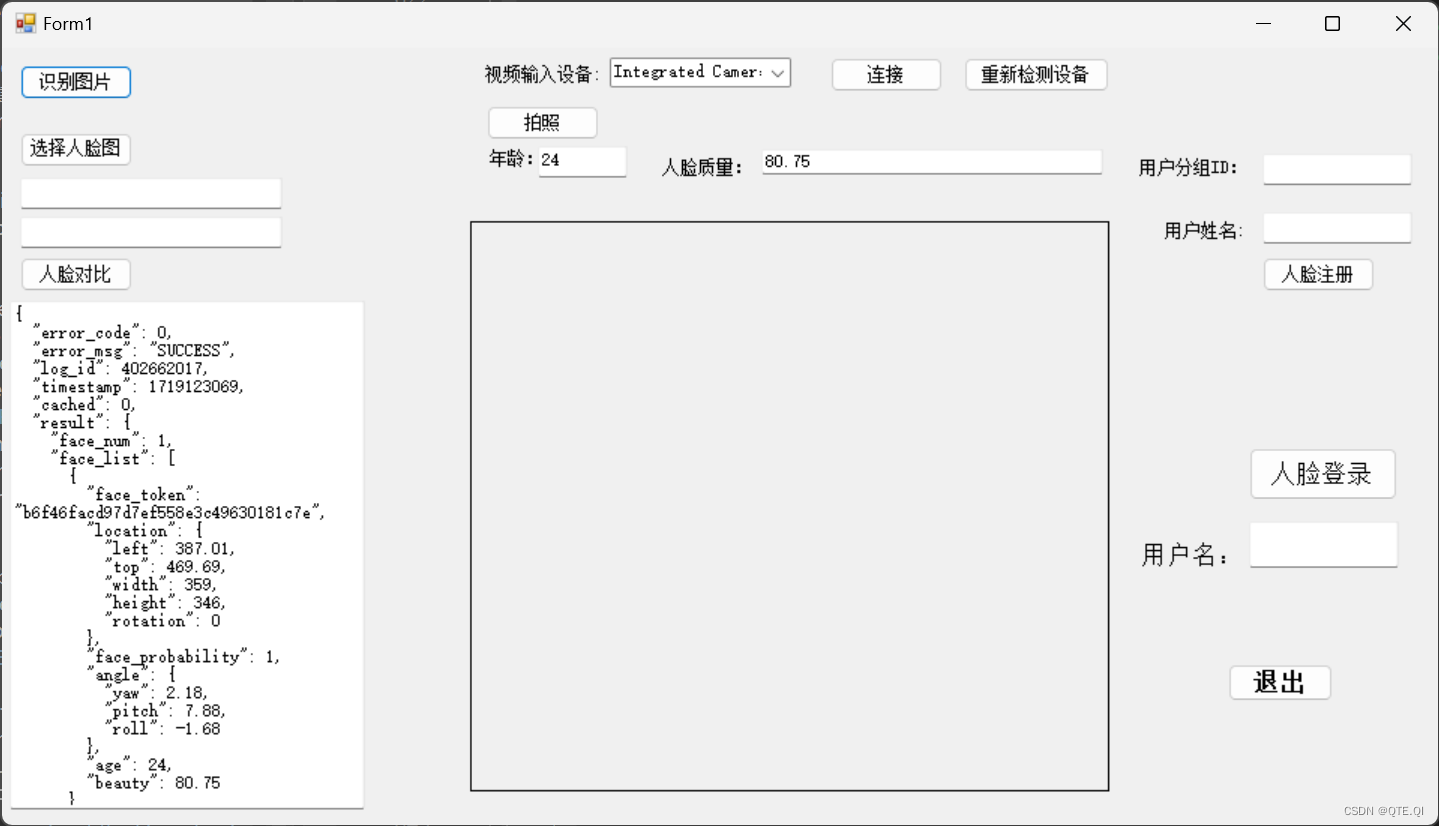
图片展示,此照片年龄为24岁,美貌程度是80分。(本人照片,可能拍老了)
由于源代码涉及到个人隐私等方面因素,本项目源代码不公布。
三、总结
通过这篇文章,我们成功创建了一个简单的WinForms应用程序,实现了摄像头视频流捕捉、人脸检测和识别功能。使用AForge进行视频处理和百度AI进行人脸识别,使得我们可以快速构建出功能丰富的智能应用程序。如果您有任何疑问或建议,欢迎在评论区留言。


 838
838

 被折叠的 条评论
为什么被折叠?
被折叠的 条评论
为什么被折叠?
 到【灌水乐园】发言


