


- 世界时钟
做一个非常简单世界时钟的基础效果,这里我们总共分了四个大部分:主页面(主页面的时钟用的图片,无转动之类的效果)、菜单、弹窗、点击效果。
效果展示:
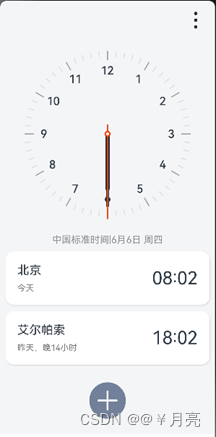
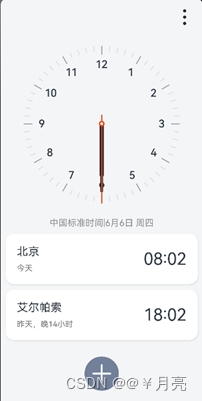
- 主页面
主页面我们利用的Column布局,第一行我们需要添加一张图片,第二行添加时钟,第四行添加文字,第五行添加卡片,最后一行是图片。
build() {
Column(){
Row(){
Image($r('app.media.gengduo')).width(45)
}.justifyContent(FlexAlign.End).width('100%').padding(10)
Stack() {
Image($r('app.media.ic_clock_pan')).width(300)
Image($r('app.media.ic_hour_pointer')).width(10)
Image($r('app.media.ic_minute_pointer')).width(10)
Image($r('app.media.ic_second_pointer')).width(10)
Text('中国标准时间|6月6日 周四').fontColor('#8D8E8E').padding(10)
Row(){
Column({space:10}){
Text('北京').fontSize(20)
Text('今天').fontColor('#727272').fontSize(14)
}.alignItems(HorizontalAlign.Start)
Text('08:02').fontSize(30)
}.justifyContent(FlexAlign.SpaceBetween)
.card()
Row(){}.height(10)
Row(){
Column({space:10}){
Text('艾尔帕索').fontSize(20)
Text('昨天,晚14小时').fontColor('#727272').fontSize(14)
}.alignItems(HorizontalAlign.Start)
Text('18:02').fontSize(30)
}.justifyContent(FlexAlign.SpaceBetween)
.card()
Image($r('app.media.jiahao'))
.width(70)
.offset({y:25})
}
.height('100%')
.backgroundColor('#F4F5F7')
}
}

在这里面我们给卡片card设计了一个样式,利用@Styles。
@Styles function card(){
.width('95%')
.padding(20)
.backgroundColor(Color.White)
.borderRadius(15)
.shadow({radius:6,color:'#1F000000',offsetX:2,offsetY:4})
}
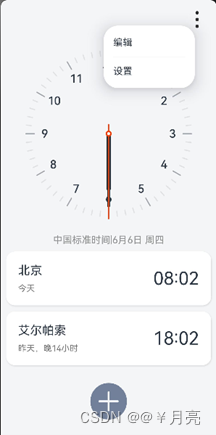
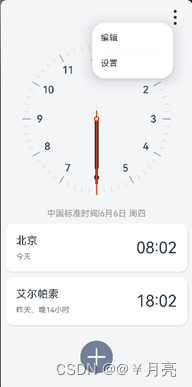
- Menu
这里是给第一行的图片添加了一个菜单,实现菜单效果。在Image下添加菜单组件,实现菜单效果。
Row(){
Image($r('app.media.gengduo')).width(45)
.bindMenu([
{
value: '编辑',
action: () => {
console.info('handle Menu1 select')
}
},
{
value: '设置',
action: () => {
console.info('handle Menu1 select')
}
}
])
}.justifyContent(FlexAlign.End).width('100%').padding(10)
- 弹窗
给最后一行的图片添加弹窗效果,我们使用的是自定义弹窗,先添加自定义组件。
dialogController: CustomDialogController = new CustomDialogController({
builder: AddCityList({
cancel: this.onCancel,
confirm: this.onAccept,
}),
alignment: DialogAlignment.Bottom,// 可设置dialog的对齐方式,设定显示在底部或中间等,默认为底部显示
customStyle:true,
})
onCancel() {
console.info('Callback when the first button is clicked')
}
onAccept() {
console.info('Callback when the second button is clicked')
}
最下面写:
AddCityList
弹窗内容使用另一个页面Add_City写的,我们需要将这个页面导入到主页面Clock_World。导出export,导入import。
Clock_World中写入:
import {AddCityList} from '../../component/GNF/Add_City'
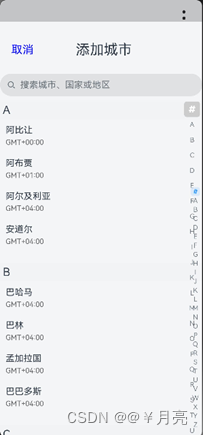
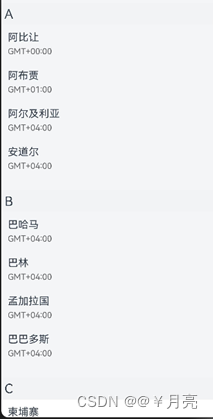
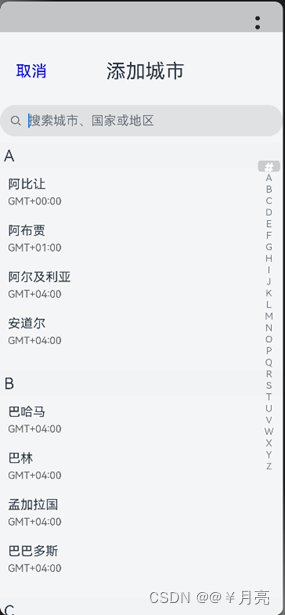
3.1 Add_City页面:
Add_City页面是一个弹窗,里边是由列表组成的,侧边导航栏。这里是嵌套了两个循环来实现分组列表。
先做第一行内容,第一行是由取消键和标题组成的。
Row({space:75}){
Text('取消').fontColor('blue').fontSize('20')
.onClick(()=>{
this.controller.close()
this.cancel()
})
Text('添加城市').fontSize('25')
}.padding(20).margin({top:15}).width('100%')

第二行是一个搜索栏。
Search({ value: this.changeValue,placeholder:'搜索城市、国家或地区' })

接下来是列表内容,列表内容我们先要添加数据。我们需要先做列表的数据,先定义一个类。
class Contact {
name: string;
time:string
constructor(name: string,time:string) {
this.name = name;
this.time=time
}
然后添加数据。
contactsGroups: object[] = [
{
title: 'A',
contacts: [
new Contact('阿比让','GMT+00:00'),
new Contact('阿布贾','GMT+01:00'),
new Contact('阿尔及利亚','GMT+04:00' ),
new Contact('安道尔','GMT+04:00' ),
],
},
{
title: 'B',
contacts: [
new Contact('巴哈马','GMT+04:00'),
new Contact('巴林','GMT+04:00'),
new Contact('孟加拉国','GMT+04:00'),
new Contact('巴巴多斯','GMT+04:00')
],
},
{
title: 'C',
contacts: [
new Contact('柬埔寨','GMT+04:00'),
new Contact('喀麦隆','GMT+04:00'),
new Contact('加拿大','GMT+04:00'),
new Contact('佛得角','GMT+04:00')
],
}
]
这里给title设置一下样式。
@Builder itemHead(text: string) {
// 列表分组的头部组件,对应联系人分组A、B等位置的组件AddCity
Text(text)
.fontSize(20)
.backgroundColor('#fff1f3f5')
.width('100%')
.padding(5)
}
在循环前使用Stack层叠效果,后面添加侧边栏时会需要。
ListItemGroup({ header: this.itemHead(item.title) }) {
// 循环渲染ListItem
ForEach(item.contacts, contact => {
ListItem() {
Column({space:5}){
Text(contact.name)
Text(contact.time).fontSize(13).fontColor('#626365')
}.padding(10).alignItems(HorizontalAlign.Start)
}
.onClick(()=>{
this.controller.close()
this.confirm()
})
})
}
})
}
添加几个属性:
这个是在struct中添加
private listScroller: Scroller = new Scroller()
下面是在list后添加的属性
.sticky(StickyStyle.Header)// 设置吸顶,实现粘性标题效果
.width('100%')
.height('100%')
.onScrollIndex((firstIndex: number) => {
this.selectedIndex = firstIndex})//控制滚动位置
下面是添加侧边栏:
先添加数据,26个英文字母。
const alphabets = ['#', 'A', 'B', 'C', 'D', 'E', 'F', 'G',
'H', 'I', 'J', 'K', 'L', 'M', 'N',
'O', 'P', 'Q', 'R', 'S', 'T', 'U',
'V', 'W', 'X', 'Y', 'Z']
@State selectedIndex: number = 0;
这里添加的组件是AlphabetIndexer,调用alphabets数据。
AlphabetIndexer({ arrayValue: alphabets, selected: 0})
.selected(this.selectedIndex)
.selectedColor(0xFFFFFF) // 选中项文本颜色
.popupColor(0xFFFAF0) // 弹出框文本颜色
.selectedBackgroundColor(0xCCCCCC) // 选中项背景颜色
.popupBackground(0xD2B48C) // 弹出框背景颜色
.usingPopup(true) // 是否显示弹出框
.selectedFont({ size: 16, weight: FontWeight.Bolder }) // 选中项字体样式
.popupFont({ size: 30, weight: FontWeight.Bolder }) // 弹出框内容的字体样式
.itemSize(28) // 每一项的尺寸大小
.alignStyle(IndexerAlign.Right) // 弹出框在索引条右侧弹出
.height('400')
.margin({bottom:300})
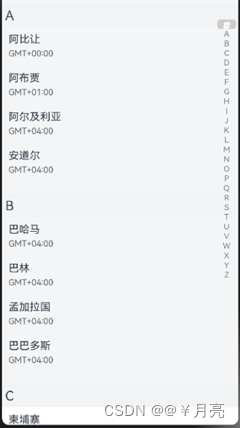
效果——>最终效果:
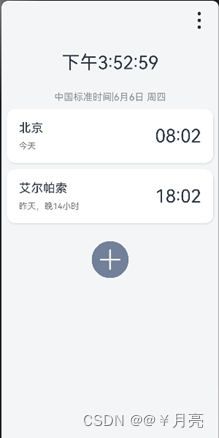
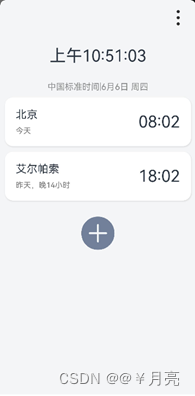
- 时钟切换效果
这个效果是点击时钟切换效果。先制作数字时钟。
导入对象:
controller: TextClockController = new TextClockController()
我们采用的是东八区时间,格式时分秒,提供时间回调。
TextClock({ timeZoneOffset: -8, controller: this.controller })
.format('hms')
.onDateChange((value: number) => {
this.accumulateTime = value
})
.margin(20)
.fontSize(30)
.onClick(()=>{
this.showclok=false
})
现在制作时钟切换效果,这个效果比较简单,只需要一个if-else即可。先写一个变量为boolean类型并赋值为false。将原本的图片时钟放在if中,数字时钟放在else中。If中变量为false,点击图片时变为true,同样的else中点击后变成false。
if (this.showclok==false){
Stack() {
Image($r('app.media.ic_clock_pan')).width(300)
Image($r('app.media.ic_hour_pointer')).width(10)
Image($r('app.media.ic_minute_pointer')).width(10)
Image($r('app.media.ic_second_pointer')).width(10)
}
.onClick(()=>{
this.showclok=true
})
}
else {
// 以12小时制显示东八区的系统时间,精确到秒。
TextClock({ timeZoneOffset: -8, controller: this.controller })
.format('hms')
.onDateChange((value: number) => {
this.accumulateTime = value
})
.margin(20)
.fontSize(30)
.onClick(()=>{
this.showclok=false
})
}
- 源代码
Clock_World页面:
import {AddCityList} from '../../component/GNF/Add_City'
@Styles function card(){
.width('95%')
.padding(20)
.backgroundColor(Color.White)
.borderRadius(15)
.shadow({radius:6,color:'#1F000000',offsetX:2,offsetY:4})
}
@Component
export struct ClockWorld {
//自定义弹窗
dialogController: CustomDialogController = new CustomDialogController({
builder: AddCityList({
cancel: this.onCancel,
confirm: this.onAccept,
}),
alignment: DialogAlignment.Bottom,// 可设置dialog的对齐方式,设定显示在底部或中间等,默认为底部显示
customStyle:true,
})
onCancel() {
console.info('Callback when the first button is clicked')
}
onAccept() {
console.info('Callback when the second button is clicked')
}
@State accumulateTime: number = 0
// 导入对象
controller: TextClockController = new TextClockController()
@State showclok:boolean=false
build() {
Column(){
Row(){
Image($r('app.media.gengduo')).width(45)
.bindMenu([
{
value: '编辑',
action: () => {
console.info('handle Menu1 select')
}
},
{
value: '设置',
action: () => {
console.info('handle Menu1 select')
}
}
])
}.justifyContent(FlexAlign.End).width('100%').padding(10)
if (this.showclok==false){
Stack() {
Image($r('app.media.ic_clock_pan')).width(300)
Image($r('app.media.ic_hour_pointer')).width(10)
Image($r('app.media.ic_minute_pointer')).width(10)
Image($r('app.media.ic_second_pointer')).width(10)
}
.onClick(()=>{
this.showclok=true
})
}
else {
// 以12小时制显示东八区的系统时间,精确到秒。
TextClock({ timeZoneOffset: -8, controller: this.controller })
.format('hms')
.onDateChange((value: number) => {
this.accumulateTime = value
})
.margin(20)
.fontSize(30)
.onClick(()=>{
this.showclok=false
})
}
Text('中国标准时间|6月6日 周四').fontColor('#8D8E8E').padding(10)
Row(){
Column({space:10}){
Text('北京').fontSize(20)
Text('今天').fontColor('#727272').fontSize(14)
}.alignItems(HorizontalAlign.Start)
Text('08:02').fontSize(30)
}.justifyContent(FlexAlign.SpaceBetween)
.card()
Row(){}.height(10)
Row(){
Column({space:10}){
Text('艾尔帕索').fontSize(20)
Text('昨天,晚14小时').fontColor('#727272').fontSize(14)
}.alignItems(HorizontalAlign.Start)
Text('18:02').fontSize(30)
}.justifyContent(FlexAlign.SpaceBetween)
.card()
Image($r('app.media.jiahao'))
.width(70)
.offset({y:25})
.onClick(()=>{
this.dialogController.open()
})
}
.height('100%')
.backgroundColor('#F4F5F7')
}
}
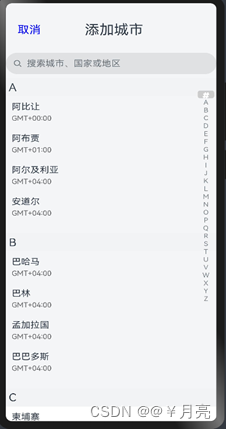
AddCityList
效果:
弹窗Add_City页面:
import util from '@ohos.util';
import contact from '@ohos.contact';
class Contact {
name: string;
time:string
constructor(name: string,time:string) {
this.name = name;
this.time=time
}
}
const alphabets = ['#', 'A', 'B', 'C', 'D', 'E', 'F', 'G',
'H', 'I', 'J', 'K', 'L', 'M', 'N',
'O', 'P', 'Q', 'R', 'S', 'T', 'U',
'V', 'W', 'X', 'Y', 'Z']
@Entry
// @Entry
@CustomDialog
@Component
export struct AddCityList{
controller: CustomDialogController
cancel: () => void
confirm: () => void
@Builder itemHead(text: string) {
// 列表分组的头部组件,对应联系人分组A、B等位置的组件AddCity
Text(text)
.fontSize(20)
.backgroundColor('#fff1f3f5')
.width('100%')
.padding(5)
}
@State selectedIndex: number = 0;
private listScroller: Scroller = new Scroller()
contactsGroups: object[] = [
{
title: 'A',
contacts: [
new Contact('阿比让','GMT+00:00'),
new Contact('阿布贾','GMT+01:00'),
new Contact('阿尔及利亚','GMT+04:00' ),
new Contact('安道尔','GMT+04:00' ),
],
},
{
title: 'B',
contacts: [
new Contact('巴哈马','GMT+04:00'),
new Contact('巴林','GMT+04:00'),
new Contact('孟加拉国','GMT+04:00'),
new Contact('巴巴多斯','GMT+04:00')
],
},
{
title: 'C',
contacts: [
new Contact('柬埔寨','GMT+04:00'),
new Contact('喀麦隆','GMT+04:00'),
new Contact('加拿大','GMT+04:00'),
new Contact('佛得角','GMT+04:00')
],
}
]
build() {
Column(){
Row({space:75}){
Text('取消').fontColor('blue').fontSize('20')
.onClick(()=>{
this.controller.close()
this.cancel()
})
Text('添加城市').fontSize('25')
}.padding(20).margin({top:15}).width('100%')
Search({placeholder:'搜索城市、国家或地区' })
.backgroundColor('#E0E1E3')
Stack({ alignContent: Alignment.End }) {
List({ space: 20,scroller: this.listScroller }) {
ForEach(this.contactsGroups, item => {
ListItemGroup({ header: this.itemHead(item.title) }) {
// 循环渲染ListItem
ForEach(item.contacts, contact => {
ListItem() {
Column({space:5}){
Text(contact.name)
Text(contact.time).fontSize(13).fontColor('#626365')
}.padding(10).alignItems(HorizontalAlign.Start)
}
.onClick(()=>{
this.controller.close()
this.confirm()
})
})
}
})
}
.sticky(StickyStyle.Header)// 设置吸顶,实现粘性标题效果
.width('100%')
.height('100%')
.onScrollIndex((firstIndex: number) => {
this.selectedIndex = firstIndex})
AlphabetIndexer({ arrayValue: alphabets, selected: 0})
.selected(this.selectedIndex)
.selectedColor(0xFFFFFF) // 选中项文本颜色
.popupColor(0xFFFAF0) // 弹出框文本颜色
.selectedBackgroundColor(0xCCCCCC) // 选中项背景颜色
.popupBackground(0xD2B48C) // 弹出框背景颜色
.usingPopup(true) // 是否显示弹出框
.selectedFont({ size: 16, weight: FontWeight.Bolder }) // 选中项字体样式
.popupFont({ size: 30, weight: FontWeight.Bolder }) // 弹出框内容的字体样式
.itemSize(28) // 每一项的尺寸大小
.alignStyle(IndexerAlign.Right) // 弹出框在索引条右侧弹出
.height('400')
.margin({bottom:300})
}
.width('100%')
.height('100%')
}.height("95%")
.width('100%')
.backgroundColor('#F4F5F7')
}
}
效果:


 2316
2316

 被折叠的 条评论
为什么被折叠?
被折叠的 条评论
为什么被折叠?
 到【灌水乐园】发言


