安装bind服务
[root@localhost ~]# yum install bind
已加载插件:fastestmirror, langpacks
Loading mirror speeds from cached hostfile
正在解决依赖关系
--> 正在检查事务
---> 软件包 bind.x86_64.32.9.11.4-26.P2.el7 将被 安装
--> 正在处理依赖关系 python-ply,它被软件包 32:bind-9.11.4-26.P2.el7.x86_64 需要
--> 正在检查事务
---> 软件包 python-ply.noarch.0.3.4-11.el7 将被 安装
--> 解决依赖关系完成
依赖关系解决
=========================================================================================================
Package 架构 版本 源 大小
=========================================================================================================
正在安装:
bind x86_64 32:9.11.4-26.P2.el7 local2.3 M
为依赖而安装:
python-ply noarch 3.4-11.el7 local123 k
事务概要
=========================================================================================================
安装 1 软件包 (+1 依赖软件包)
总下载量:2.4 M
安装大小:5.9 M
Is this ok [y/d/N]: y
Downloading packages:
---------------------------------------------------------------------------------------------------------
总计 13 MB/s |2.4 MB 00:00:00
Running transaction check
Running transaction test
Transaction test succeeded
Running transaction
正在安装 : python-ply-3.4-11.el7.noarch 1/2
正在安装 :32:bind-9.11.4-26.P2.el7.x86_64 2/2
验证中 :32:bind-9.11.4-26.P2.el7.x86_64 1/2
验证中 : python-ply-3.4-11.el7.noarch 2/2
已安装:
bind.x86_64 32:9.11.4-26.P2.el7
作为依赖被安装:
python-ply.noarch 0:3.4-11.el7
完毕!
修改配置文件
vim /etc/named.conf
options {
listen-on port 53{ any;}; 修改为any
listen-on-v6 port 53{ ::1;};
directory "/var/named";
dump-file "/var/named/data/cache_dump.db";
statistics-file "/var/named/data/named_stats.txt";
memstatistics-file "/var/named/data/named_mem_stats.txt";
recursing-file "/var/named/data/named.recursing";
secroots-file "/var/named/data/named.secroots";
allow-query { any;};修改为any
vim /etc/named.rfc1912.zones
zone "chen.com" IN {type master;file"chen";
allow-update { none;};};
zone "200.168.192.in-addr.arpa" IN {type master;file"192.168.200";
allow-update { none;};};[root@localhost named]# cp -a named.loopback 192.168.200 拷贝反向解析文件[root@localhost named]# cp -a named.localhost chen 拷贝正向解析文件[root@localhost named]# vim 192.168.200 修改反向解析文件[root@localhost named]# vim chen 修改正向解析文件[root@localhost named]# systemctl restart named 重启服务[root@localhost named]# nslookup >192.168.200.100
100.200.168.192.in-addr.arpa name = ftp.chen.com.
>192.168.200.101
101.200.168.192.in-addr.arpa name = www.chen.com.
>192.168.200.102
102.200.168.192.in-addr.arpa name = dns.chen.com.
>192.168.200.103
103.200.168.192.in-addr.arpa name = bai.chen.com.
> www.chen.com
Server: 127.0.0.1
Address: 127.0.0.1#53
Name: www.chen.com
Address: 192.168.200.101
> dns.chen.conm
Server: 127.0.0.1
Address: 127.0.0.1#53
Name: dns.chen.com
Address: 192.168.200.102
> bai.chen.com
Server: 127.0.0.1
Address: 127.0.0.1#53
Name: bai.chen.com
Address: 192.168.200.103
>
网站服务配置
apach网站服务部署
安装apach服务
[root@localhost named]# yum install http -y
已加载插件:fastestmirror, langpacks
Loading mirror speeds from cached hostfile
没有可用软件包 http。
错误:无须任何处理
[root@localhost named]# yum install httpd -y
已加载插件:fastestmirror, langpacks
Loading mirror speeds from cached hostfile
正在解决依赖关系
--> 正在检查事务
---> 软件包 httpd.x86_64.0.2.4.6-95.el7.centos 将被 安装
--> 正在处理依赖关系 httpd-tools =2.4.6-95.el7.centos,它被软件包 httpd-2.4.6-95.el7.centos.x86_64 需要
--> 正在处理依赖关系 /etc/mime.types,它被软件包 httpd-2.4.6-95.el7.centos.x86_64 需要
--> 正在处理依赖关系 libaprutil-1.so.0()(64bit),它被软件包 httpd-2.4.6-95.el7.centos.x86_64 需要
--> 正在处理依赖关系 libapr-1.so.0()(64bit),它被软件包 httpd-2.4.6-95.el7.centos.x86_64 需要
--> 正在检查事务
---> 软件包 apr.x86_64.0.1.4.8-7.el7 将被 安装
---> 软件包 apr-util.x86_64.0.1.5.2-6.el7 将被 安装
---> 软件包 httpd-tools.x86_64.0.2.4.6-95.el7.centos 将被 安装
---> 软件包 mailcap.noarch.0.2.1.41-2.el7 将被 安装
--> 解决依赖关系完成
依赖关系解决
================================================================================
Package 架构 版本 源 大小
================================================================================
正在安装:
httpd x86_64 2.4.6-95.el7.centos local2.7 M
为依赖而安装:
apr x86_64 1.4.8-7.el7 local104 k
apr-util x86_64 1.5.2-6.el7 local92 k
httpd-tools x86_64 2.4.6-95.el7.centos local93 k
mailcap noarch 2.1.41-2.el7 local31 k
事务概要
================================================================================
安装 1 软件包 (+4 依赖软件包)
总下载量:3.0 M
安装大小:10 M
Downloading packages:
--------------------------------------------------------------------------------
总计 23 MB/s |3.0 MB 00:00
Running transaction check
Running transaction test
Transaction test succeeded
Running transaction
正在安装 : apr-1.4.8-7.el7.x86_64 1/5
正在安装 : apr-util-1.5.2-6.el7.x86_64 2/5
正在安装 : httpd-tools-2.4.6-95.el7.centos.x86_64 3/5
正在安装 : mailcap-2.1.41-2.el7.noarch 4/5
正在安装 : httpd-2.4.6-95.el7.centos.x86_64 5/5
验证中 : httpd-tools-2.4.6-95.el7.centos.x86_64 1/5
验证中 : mailcap-2.1.41-2.el7.noarch 2/5
验证中 : apr-1.4.8-7.el7.x86_64 3/5
验证中 : httpd-2.4.6-95.el7.centos.x86_64 4/5
验证中 : apr-util-1.5.2-6.el7.x86_64 5/5
已安装:
httpd.x86_64 0:2.4.6-95.el7.centos
作为依赖被安装:
apr.x86_64 0:1.4.8-7.el7 apr-util.x86_64 0:1.5.2-6.el7
httpd-tools.x86_64 0:2.4.6-95.el7.centos mailcap.noarch 0:2.1.41-2.el7
完毕!
关闭防火墙 关闭selinux 启动httpd服务测试
[root@localhost named]# setenforce 0[root@localhost named]# systemctl disable httpd.service [root@localhost named]# systemctl stop httpd.service [root@localhost named]# systemctl restart httpd[root@localhost named]# curl 192.168.200.154<!DOCTYPE html PUBLIC "-//W3C//DTD XHTML 1.1//EN""http://www.w3.org/TR/xhtml11/DTD/xhtml11.dtd"><html><head><meta http-equiv="content-type"content="text/html; charset=UTF-8"><title>Apache HTTP Server Test Page powered by CentOS</title><meta http-equiv="Content-Type"content="text/html; charset=UTF-8"><!-- Bootstrap --><link href="/noindex/css/bootstrap.min.css"rel="stylesheet"><link rel="stylesheet"href="noindex/css/open-sans.css"type="text/css" /><style type="text/css"><!--
body {
font-family: "Open Sans", Helvetica, sans-serif;
font-weight: 100;
color: #ccc;
background: rgba(10, 24, 55, 1);
font-size: 16px;}
h2, h3, h4 {
font-weight: 200;}
h2 {
font-size: 28px;}
.jumbotron {
margin-bottom: 0;
color: #333;
background: rgb(212,212,221); /* Old browsers */
background: radial-gradient(ellipse at center top, rgba(255,255,255,1)0%,rgba(174,174,183,1)100%); /* W3C */
}
.jumbotron h1 {
font-size: 128px;
font-weight: 700;
color: white;
text-shadow: 0px 2px 0px #abc,
0px 4px 10px rgba(0,0,0,0.15),
0px 5px 2px rgba(0,0,0,0.1),
0px 6px 30px rgba(0,0,0,0.1);}
.jumbotron p {
font-size: 28px;
font-weight: 100;}
.main {
background: white;
color: #234;
border-top: 1px solid rgba(0,0,0,0.12);
padding-top: 30px;
padding-bottom: 40px;}
.footer {
border-top: 1px solid rgba(255,255,255,0.2);
padding-top: 30px;}
--></style></head><body><div class="jumbotron text-center"><div class="container"><h1>Testing 123..</h1><p class="lead">This page is used to test the proper operation of the <a href="http://apache.org">Apache HTTP server</a> after it has been installed. If you can read this page it means that this site is working properly. This server is powered by <a href="http://centos.org">CentOS</a>.</p></div></div><div class="main"><div class="container"><div class="row"><div class="col-sm-6"><h2>Just visiting?</h2><p class="lead">The website you just visited is either experiencing problems or is undergoing routine maintenance.</p><p>If you would like to let the administrators of this website know that you've seen this page instead of the page you expected, you should send them e-mail. In general, mail sent to the name "webmaster" and directed to the website's domain should reach the appropriate person.</p><p>For example, if you experienced problems while visiting www.example.com, you should send e-mail to "webmaster@example.com".</p></div><div class="col-sm-6"><h2>Are you the Administrator?</h2><p>You should add your website content to the directory <tt>/var/www/html/</tt>.</p><p>To prevent this page from ever being used, follow the instructions in the file<tt>/etc/httpd/conf.d/welcome.conf</tt>.</p><h2>Promoting Apache and CentOS</h2><p>You are free to use the images below on Apache and CentOS Linux powered HTTP servers. Thanks for using Apache and CentOS!</p><p><a href="http://httpd.apache.org/"><img src="images/apache_pb.gif"alt="[ Powered by Apache ]"></a><a href="http://www.centos.org/"><img src="images/poweredby.png"alt="[ Powered by CentOS Linux ]"height="31"width="88"></a></p></div></div></div></div></div><div class="footer"><div class="container"><div class="row"><div class="col-sm-6"><h2>Important note:</h2><p class="lead">The CentOS Project has nothing to do with this website or its content,
it just provides the software that makes the website run.</p><p>If you have issues with the content of this site, contact the owner of the domain, not the CentOS project.
Unless you intended to visit CentOS.org, the CentOS Project does not have anything to do with this website,
the content or the lack of it.</p><p>For example, if this website is www.example.com, you would find the owner of the example.com domain at the following WHOIS server:</p><p><a href="http://www.internic.net/whois.html">http://www.internic.net/whois.html</a></p></div><div class="col-sm-6"><h2>The CentOS Project</h2><p>The CentOS Linux distribution is a stable, predictable, manageable and reproduceable platform derived from
the sources of Red Hat Enterprise Linux (RHEL).<p><p>Additionally to being a popular choice for web hosting, CentOS also provides a rich platform foropensource communities to build upon. For more information
please visit the <a href="http://www.centos.org/">CentOS website</a>.</p></div></div></div></div></div></body></html>
修改默认目录测试内容
1.创建一个默认目录
[root@localhost]mkdir /home/www
[root@server ~]#[root@localhost]echo"welcome huayu">/home/www/index.html
[root@localhost www]# cat /home/www/index.html
this is www home`2.修改配置文件
DocumentRoot "/home/www"修改为你创建目录的路径
## Relax access to content within /var/www.#<Directory "/var/www"> 同理
AllowOverride None
# Allow open access:
Require all granted
</Directory>3.重启服务
[root@localhost www]# systemctl restart httpd.service4.测试
[root@localhost www]# curl 192.168.200.154
this is www home`
搭建个人主页网站
创建用户hh并设置密码
[root@localhost network-scripts]# useradd hh[root@localhost hh]# passwd hh
更改用户 hh 的密码 。
新的 密码:
无效的密码: 密码少于 8 个字符
重新输入新的 密码:
passwd:所有的身份验证令牌已经成功更新。
在hh的家目录下创建一个目录
[root@localhost hh]# mkdir public_html[root@localhost hh]# echo "whelcom to hh home" > public_html/index.html
修改配置文件
[root@localhost hh]# vim /etc/httpd/conf.d/userdir.conf # UserDir disabled 注释此行## To enable requests to /~user/ to serve the user's public_html# directory, remove the "UserDir disabled" line above, and uncomment# the following line instead:#
UserDir public_html 取消注释此行
切换到用户hh
修改public_html权限
[hh@localhost ~]$ chmod-Rf755 ./
[hh@localhost ~]$ ll
总用量 0
drwxr-xr-x. 2 root root 247月 3015:23 public_html
切换到root用户 重启服务
[root@localhost hh]# systemctl restart httpd.service
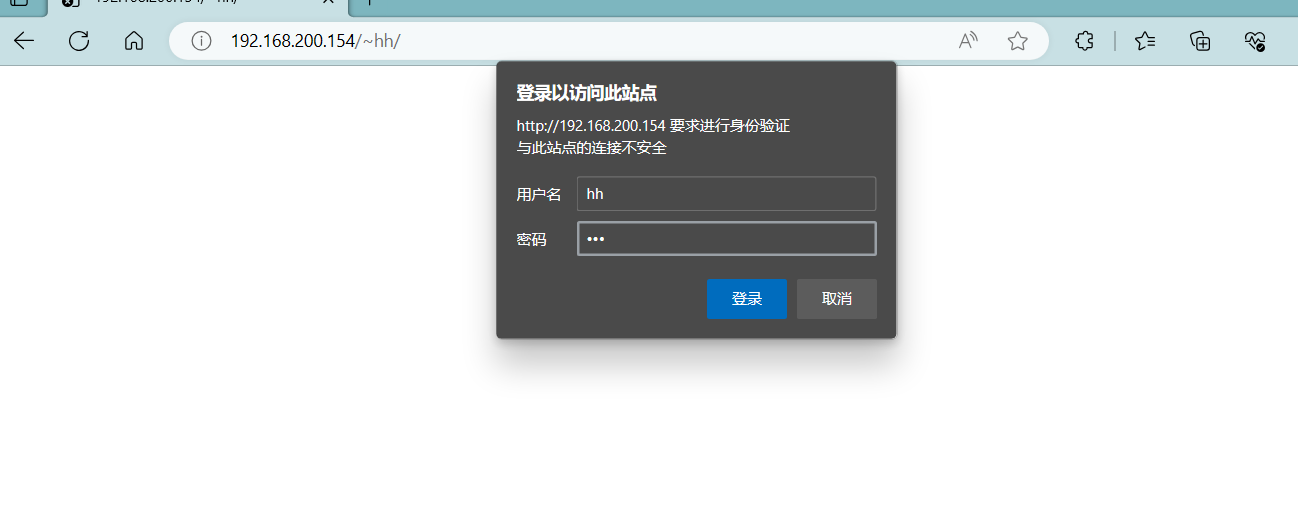
测试
给个人主页设置密码
[root@localhost hh]# htpasswd -c /etc/httpd/passwd.txt hh
New password:
Re-type new password:
Adding password for user hh
修改配置文件
将文件末尾修改为以下内容
[root@localhost hh]# tail /etc/httpd/conf.d/userdir.conf # for a site where these directories are restricted to read-only.#<Directory "/home/*/public_html">
AllowOverride all
authuserfile "/etc/httpd/passwd"
authname "hh's home"
authtype basic
require user hh
</Directory>
基于虚拟目录的服务器
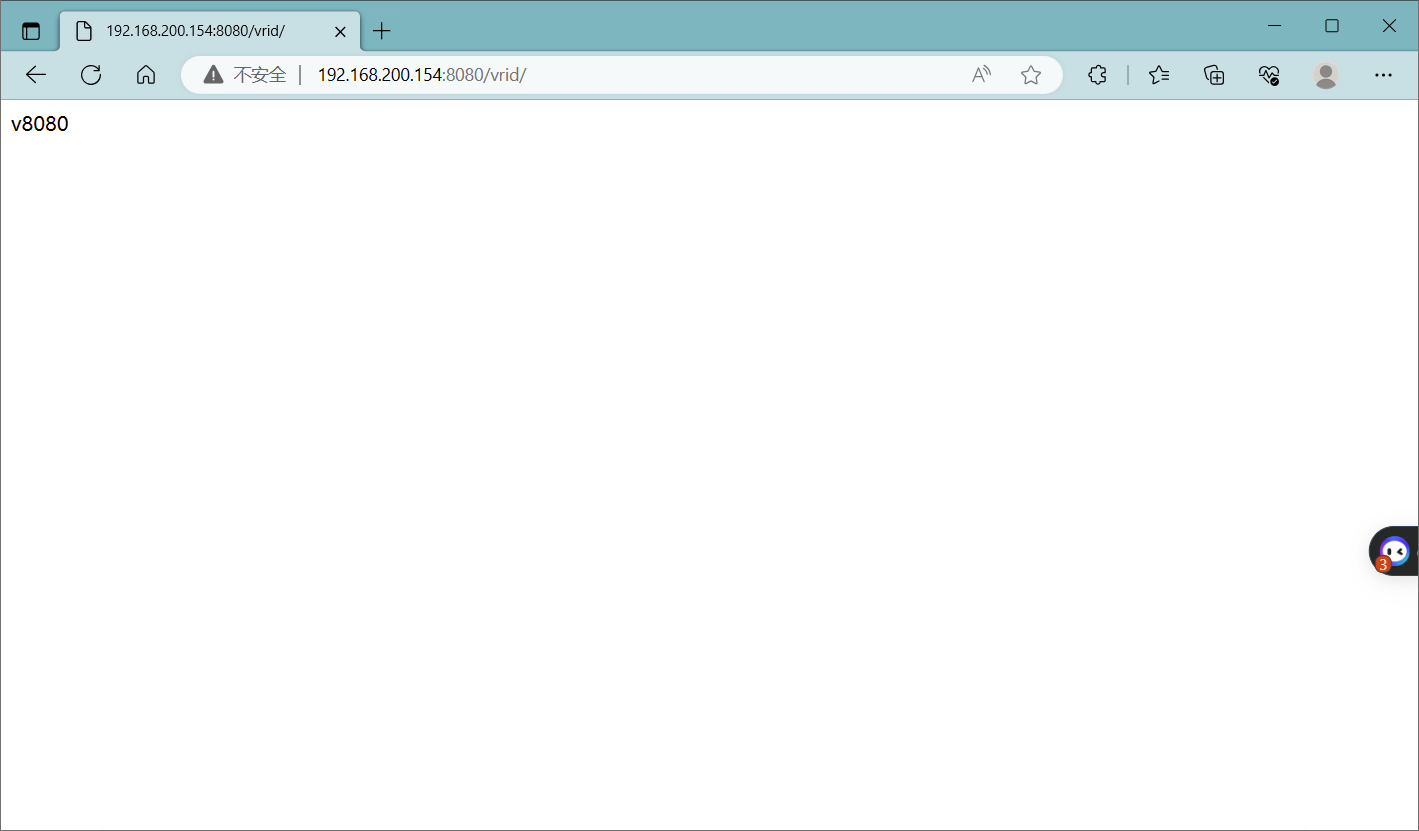
创建目录
[root@localhost ~]# mkdir /vrid[root@localhost ~]# mkdir -p /www/8080[root@localhost ~]# cd /www/8080[root@localhost 8080]# ls[root@localhost8080]# echo "v8080" >index.html[root@localhost 8080]# ls
index.html
[root@server 8080]# cat index.html
v8080
[root@server 8080]# cd
修改配置文件
[root@server ~]# vim /etc/httpd/conf/httpd.conf[root@localhost ~]# tail -n 15 /etc/httpd/conf/httpd.conf
EnableSendfile on
<Directory "/www/8080">
Require all granted
</Directory>
listen 8080<VirtualHost 192.168.200.154:8080>
DocumentRoot "/vrid"
ServerName www.linux.com
</VirtualHost>
Alias /vrid "/www/8080"# Supplemental configuration## Load config files in the "/etc/httpd/conf.d" directory, if any.
重启服务
[root@localhost 8080]# systemctl restart httpd.service
测试
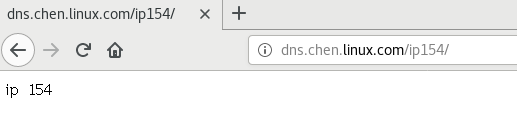
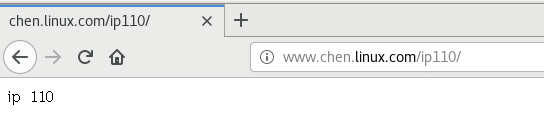
基于IP的虚拟主机(建议使用两张网卡的虚拟机)
修改配置文件
DocumentRoot "/home/wwwroot" 修改为自己创建的目录
## Relax access to content within /var/www.#<Directory "/var/www">
AllowOverride None
# Allow open access:
Require all granted
</Directory># Further relax access to the default document root:<Directory "/home/wwwroot"> 修改
进入/home/wwwroot创建ip154 ip110
[root@localhost wwwroot]# ll
总用量 0
drwxr-xr-x. 2 root root 247月 3016:43 ip110
drwxr-xr-x. 2 root root 247月 3016:44 ip154
分别写入基础网页文件 index
[root@localhost ip110]# ls
index.html
[root@localhost wwwroot]# ls ip154
index.html
修改虚拟ip配置文件
[root@localhost wwwroot]# vim /etc/httpd/conf.d/virtual.conf 以下全部手动添加<VirtualHost 192.168.200.154:80>
ServerName ip154
Documentroot "/home/wwwroot/ip154"</VirtualHost><VirtualHost 192.168.200.110:80>
ServerName ip110
Documentroot "/home/wwwroot/ip110"</VirtualHost>
重启服务
[root@localhost wwwroot]# systemctl restart httpd.service
测试
[root@localhost wwwroot]# curl 192.168.200.154ip154[root@localhost wwwroot]# curl 192.168.200.110ip110
下载相关服务
[root@localhost hh]# yum install mod_ssl
已加载插件:fastestmirror, langpacks
Loading mirror speeds from cached hostfile
正在解决依赖关系
--> 正在检查事务
---> 软件包 mod_ssl.x86_64.1.2.4.6-95.el7.centos 将被 安装
--> 解决依赖关系完成
依赖关系解决
================================================================================
Package 架构 版本 源 大小
================================================================================
正在安装:
mod_ssl x86_64 1:2.4.6-95.el7.centos local114 k
事务概要
================================================================================
安装 1 软件包
总下载量:114 k
安装大小:224 k
Is this ok [y/d/N]: y
Downloading packages:
Running transaction check
Running transaction test
Transaction test succeeded
Running transaction
正在安装 :1:mod_ssl-2.4.6-95.el7.centos.x86_64 1/1
验证中 :1:mod_ssl-2.4.6-95.el7.centos.x86_64 1/1
已安装:
mod_ssl.x86_64 1:2.4.6-95.el7.centos
完毕!
[root@localhost hh]# #修改配置文件[root@localhost hh]# vim /etc/httpd/conf.d/ssl.conf[root@localhost hh]# head -n 12 /etc/httpd/conf.d/ssl.conf ## When we also provide SSL we have to listen to the # the HTTPS port in addition.#
Listen 443 https
#### SSL Global Context#### All SSL configuration in this context applies both to## the main server and all SSL-enabled virtual hosts.
LoadModule ssl_module modules/mod_ssl.so
生成密钥
[root@server ~]# openssl genrsa -out server.key 1024[root@server ~]# openssl req -new -x509 -days 365 -key server.key -out
server.crt
You are about to be asked to enter information that will be incorporated
into your certificate request.
What you are about to enter is what is called a Distinguished Name or a
DN.
There are quite a few fields but you can leave some blank
For some fields there will be a default value,
If you enter '.', the field will be left blank.
-----
Country Name (2 letter code)[XX]:
State or Province Name (full name)[]:
Locality Name (eg, city)[Default City]:
Organization Name (eg, company)[Default Company Ltd]:
Organizational Unit Name (eg, section)[]:
Common Name (eg, your name or your server's hostname) []:
Email Address []:
修改配置文件
100 SSLCertificateFile /etc/pki/tls/certs/server.crt
101
102 # Server Private Key:
103 # If the key is not combined with the certificate, use this
104 # directive to point at the key file. Keep in mind that if
105 # you've both a RSA and a DSA private key you can configure
106# both in parallel (to also allow the use of DSA ciphers, etc.)107 SSLCertificateKeyFile /etc/pki/tls/private/server.key
重启服务
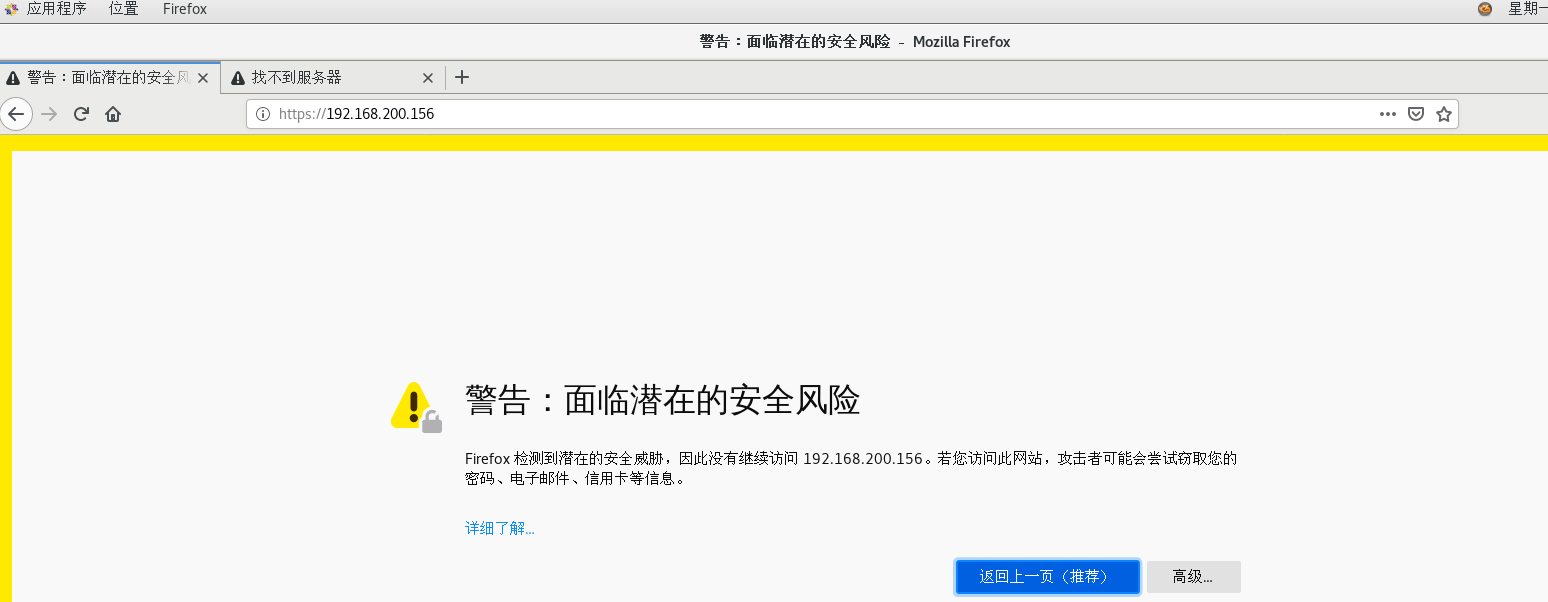
测试
pany)[Default Company Ltd]:
Organizational Unit Name (eg, section)[]:
Common Name (eg, your name or your server's hostname) []:
Email Address []:
修改配置文件
100 SSLCertificateFile /etc/pki/tls/certs/server.crt
101
102 # Server Private Key:
103 # If the key is not combined with the certificate, use this
104 # directive to point at the key file. Keep in mind that if
105 # you've both a RSA and a DSA private key you can configure
106# both in parallel (to also allow the use of DSA ciphers, etc.)107 SSLCertificateKeyFile /etc/pki/tls/private/server.key


 1万+
1万+

 被折叠的 条评论
为什么被折叠?
被折叠的 条评论
为什么被折叠?
 到【灌水乐园】发言


