


学习笔记
- 46.标签群组通配等选择器
- 47.层次选择器
- 48.属性选择器
- 49.hover等伪类选择器
- 50.after等伪类选择器
- 52.结构伪类选择器
- 52.CSS样式的继承
- 53.单一样式的优先级
- 54.important群组等优先级
- 55.层次的优先级
- 56.CSS盒子模型
- 57.box-sizing改变盒模型
- 58.盒模型之margin叠加问题
- 59.margin传递问题
- 61.盒子模型的嵌套练习
- 62.按类型划分标签
- 63.按内容划分标签
- 64.按显示划分标签
- 65.dispiay显示框类型
- 66.标签嵌套规范
- 67.overflow溢出隐藏
- 68.透明度与手势
- 69.最大最小宽高
- 70.css默认样式
- 71.css重置样式
- 78.float浮动概念及原理
- 79.float注意点整理
- 80.清除float浮动(上)
- 81.清除float浮动(下)
- 82.float制作页面小结构(上)
- 83.float制作页面小结构(下)
46.标签群组通配等选择器


47.层次选择器

 <style>
         #list>li{ border:1px green solid}
    </style>
</head>
<body>
<ul id="list">
    <li>123
        <ul>
            <li>456</li>
            <li>789</li>
        </ul>
    </li>
    <li>3333</li>
</ul>
<ol>
    <li>da</li>
    <li>ds</li>

 <style>
        div+h2{ background: green;}
    </style>
</head>
<body>
    <h2>二级标题</h2>
    <div>块</div>
    <p>段落</p>
    <h2>标题</h2>
</body>
</html>

48.属性选择器

<style>
        div[class]{ background: green;}
    </style>
</head>
<body>
    <div>1</div>
    <div class="box">2</div>
    <div class="searrch">3</div>

<style>
        div[class$=search]{ background:red;}
    </style>
</head>
<body>
    <div>1</div>
    <div class="box">2</div>
    <div class="search">3</div>
    <div class="search-button">4</div>
    <div class="button-search">5</div>

49.hover等伪类选择器


<style>
        a{color:black}
        a:hover{color:red}
    </style>
</head>
<body>
    <a href="#">南邮通达</a>
50.after等伪类选择器
:after :before通过伪类的方式给元素添加一段文本内容,使用content属性
:checked :disabled :focus都是针对表单元素的
<style>
       div:after{content:"world";color:blueviolet}
    </style>
</head>
<body>
    <div>hello</div>

52.结构伪类选择器

 <style>
    li:nth-of-type(2){ background:red}
    </style>
</head>
<body>
  <ul>
    <li>1</li>
    <li>2</li>
    <li>3</li>
  </ul>
52.CSS样式的继承


53.单一样式的优先级
内部样式与外部样式(显示为黄色)
 	<style>
        div{ color:blueviolet}
    </style>
    <link rel="stylesheet" href="./base.css">
</head>
<body>
    <div>什么颜色</div>
style的优先级大于id (显示为红色)权重(等级)1000
	<style>
        #elem{color:blue}
    </style>
</head>
<body>
    <div id="elem" style="color:red;">什么颜色</div>
id的优先级大于class (显示为蓝色)权重100
	<style>
       #elem{color:blue}
       .box{color:red}
   </style>
</head>
<body>
   <div id="elem" class="box">什么颜色</div>
</body>
</html>
class的优先级大于tag标签 (显示为红色)权重10
	<style>
        .box{color:red}
        div{color:green;}
    </style>
</head>
<body>
    <div id="elem" class="box">什么颜色</div>
</body>
</html>
标签的优先级大于通配 (显示为绿色)权重1
	<style>
        div{ color:green;}
        *{ color:black;}
    </style>
</head>
<body>
    <div id="elem" class="box">什么颜色</div>
</body>
</html>
通配的优先级大于继承 (显示为黑色)
	<style>
        /* div{ color:green;} */
        *{ color:black;}
        body{ color:blue;}
    </style>
</head>
<body>
    <div id="elem" class="box">什么颜色</div>
54.important群组等优先级

!important不能对继承的属性进行优先级的提升
 <style>
        div{ color:green;}
        *{ color:black !important;}
        body{ color:blue;}
    </style>
</head>
<body>
    <div id="elem" class="box">什么颜色</div>
标签+类的优先级大于单类 (显示为蓝色)
 	<style>
       div.box{color:blue}
       .box{color:red}
    </style>
</head>
<body>
    <div class="box">什么颜色</div>


55.层次的优先级

56.CSS盒子模型


57.box-sizing改变盒模型

58.盒模型之margin叠加问题
<style>
        #box1{ width:200px; height:200px; background:red; margin-bottom:30px;}
        #box2{ width:200px; height:200px; background:blue; margin-top: 40px;}
    </style>
</head>
<body>
    <div id="box1"></div>
    <div id="box2"></div>
59.margin传递问题

盒子
# 60.css盒子模型之拓展 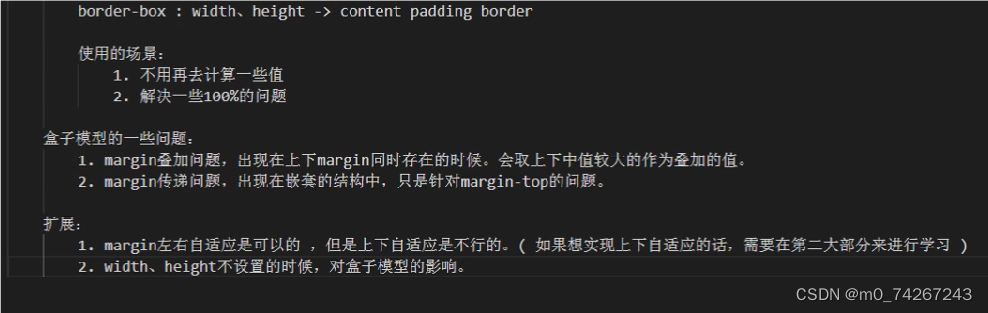
<style>
        #box1{ width:200px; height:200px; background:red; }
        #box2{ height:100px; background:blue; color:white; padding-left:30px; border-left:10px black solid;}
    </style>
</head>
<body>
    <div id="box1">盒子</div>
    <div id="box2">内容</div>
</body>
</html>
61.盒子模型的嵌套练习
 <style>
    #box1{ width:350px; height;350px; border:1px black dashed; padding:20px;}}
    #box2{ border:5px #d7effe solid; paddig:27px;}
    #box3{ background:#ffa0df; padding:41px}
    #box4{ border:1px white dashed; padding:3px}
    #box5{ border:1px white dashed; padding:49px;}
    #box6{ width:100px; height;100px; background:#96ff38; border:#fcff00 5px solid;}
    </style>
</head>
<body>
    <div id="box1">
        <div id="box2">
            <div id="box3">
                <div id="box4">
                    <div id="box5">
                        <div id="box6"></div>
                    </div>
                 </div>
            </div>
        </div>
    </div>
</body>
</html>
62.按类型划分标签

<style>
    body{ font-size:0;}
    #content,#content{ width:100px; height:100px; background:red; font-size:16px;}
    input{ width:100ox; height;100px;}
    </style>
</head>
<body>
    <span id="content1">内联1</span>
    <span id="content2">内联2</span>
    <input type="text">
    <input type="text">
</body>
</html>
63.按内容划分标签

64.按显示划分标签

<style>
        img{ width:100px; height:100px;}
    </style>
</head>
<body>
    <img src="./img/1.jpg" alt="">
</body>
</html>
65.dispiay显示框类型


66.标签嵌套规范

67.overflow溢出隐藏

 <style>
        div{ width:300px; height:200px; border:1px black solid; overflow-y: auto; overflow-x;}
    </style>
</head>
<body>
    <div>
   溢出隐藏
   溢出隐藏
   溢出隐藏
   溢出隐藏
   溢出隐藏
   溢出隐藏
   溢出隐藏
   溢出隐藏
   溢出隐藏
   溢出隐藏
   溢出隐藏
   溢出隐藏
   溢出隐藏
   溢出隐藏
   </div>
</body>
68.透明度与手势

<style>
        #div{ width:100px; height:100px; background:red; opacity: 0.5;}
        #div{ idth:100px; height:100px; background: rgba(255,0,0,1);}
    </style>
</head>
<body>
    <div id="div1">块</div>
    <p>段落</p>
    <div id="div2">块</div>
69.最大最小宽高

  <style>
        #div{ width:100px; min-height:100px; border:1px red solid;}
    </style>
</head>
<body>
    <div>
        这是一个段落
        这是一个段落
        这是一个段落
    </div>
<style>
        body{ height:500px;}
        #box1{ width:200px; background:red}
        #box2 {width:100%; height:80%; background:blue;}
    </style>
</head>
<body>
    <div>
        这是一个段落
        这是一个段落
        这是一个段落
    </div>
70.css默认样式

71.css重置样式

<style>
       div{ border:1px black solid;}
       img{ vertical-align:bottom;}
    </style>
</head>
<body>
    <div>
        <img src="" alt="">
    </div>
</body>
</html>
78.float浮动概念及原理

 <style>
         body{ border:1px black solid;}
        #box1{ width:200px; height:100px; background:red; float:left;}
        #box2 {width:200px; height:200px; background:blue; float:left;}
    </style>
</head>
<body>
    <div id="box1">块</div>
    <div id="box2">块</div>
</body>
</html>
79.float注意点整理

80.清除float浮动(上)
<style>
        #box1{ width:200px; height:100px; background:red; float:left;}
        #box2 {width:200px; height:200px; background:blue; clear:left;}
    </style>
</head>
<body>
    <div id="box1">块</div>
    <div id="box2">块</div>
</body>
</html>
<style>
        #box1{ width:200px; height:100px; background:red; float:left;}
        #box2 {width:200px; height:200px; background:blue; clear:both;}
    </style>

81.清除float浮动(下)
<style>
        #box1{ width:200px; height:1px; black solid ;}
        #box2 {width:200px; height:200px; background:blue; float:left ;}
        .clear{ clear:both;}
    </style>
</head>
<body>
    <div id="box1">
    <div id="box2">块</div>
    <div class="clear">块</div>
    </div>
    aaaa
</body>
</html>

82.float制作页面小结构(上)

83.float制作页面小结构(下)


 64
64

 被折叠的 条评论
为什么被折叠?
被折叠的 条评论
为什么被折叠?
 到【灌水乐园】发言


