


Spring Authorization Server OAuth 2.0获取授权码流程
记录了获取授权码的代码逻辑,比较啰嗦,见谅。参考了授权端点的相关介绍。
我们就暂时把 Authorization Request 翻译成授权请求,把Consent翻译成授权同意。
OAuth2 Authorization Endpoint
官网参考:https://docs.spring.io/spring-authorization-server/docs/current/reference/html/protocol-endpoints.html#oauth2-authorization-endpoint
官网给了参考例子:
@Bean
public SecurityFilterChain authorizationServerSecurityFilterChain(HttpSecurity http) throws Exception {
	OAuth2AuthorizationServerConfigurer<HttpSecurity> authorizationServerConfigurer =
		new OAuth2AuthorizationServerConfigurer<>();
	http.apply(authorizationServerConfigurer);

	authorizationServerConfigurer
		.authorizationEndpoint(authorizationEndpoint ->
			authorizationEndpoint
				.authorizationRequestConverter(authorizationRequestConverter)   // 1
				.authenticationProvider(authenticationProvider) // 2
				.authorizationResponseHandler(authorizationResponseHandler) // 3
				.errorResponseHandler(errorResponseHandler) // 4
				.consentPage("/oauth2/v1/authorize")    // 5
		);

	return http.build();
}
1、authorizationRequestConverter():AuthenticationConverter尝试从HttpServletRequest中提取OAuth2 authorization request (or consent)相关的参数,为实例OAuth2AuthorizationCodeRequestAuthenticationToken使用(可以理解AuthenticationConverter是一个预处理器)。也就是从请求中提取OAuth2 authorization request相关参数封装成OAuth2AuthorizationCodeRequestAuthenticationToken。这里默认的AuthenticationConverter是OAuth2AuthorizationCodeRequestAuthenticationConverter
2、authenticationProvider() :用于验证 OAuth2 授权 CodeRequestAuthenticationToken 的 Authentication Provider(主处理器)。 (可以添加一个或多个来替换默认值。)默认的authenticationProvider为OAuth2AuthorizationCodeRequestAuthenticationProvider。
3、authorizationResponseHandler():AuthenticationSuccessHandler(后处理器)用于处理“经过身份验证的”OAuth2AuthorizationCodeRequestAuthenticationToken 并返回 OAuth2AuthorizationResponse。
4、errorResponseHandler():AuthenticationFailureHandler(后处理器)用于处理 OAuth2AuthorizationCodeRequestAuthenticationException 并返回 OAuth2Error 响应。
5、consentPage():如果在授权请求流转期间需要授权同意,则将资源所有者重定向到的自定义同意页面的 URI上。
上面这5个可以自定义配置,根据自己的需求来。
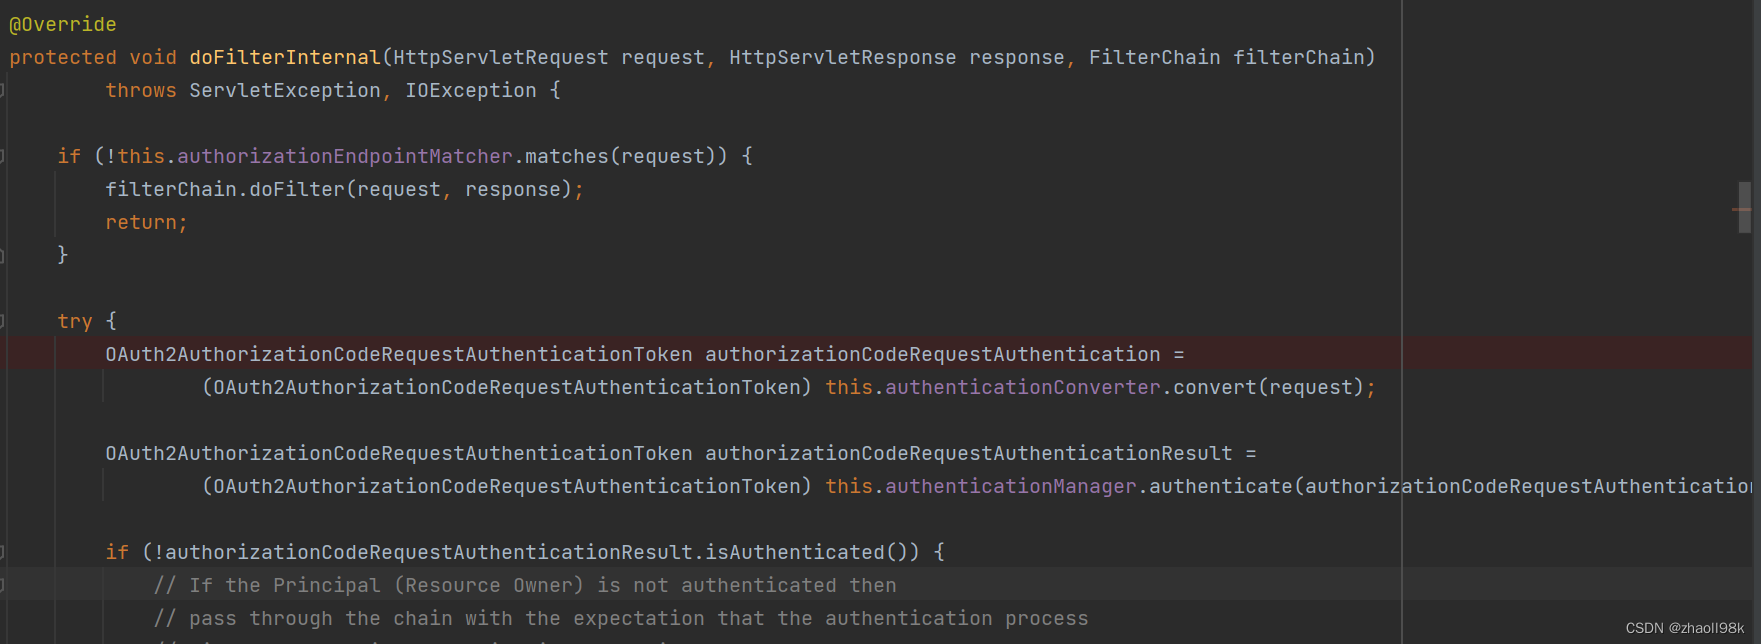
OAuth2AuthorizationEndpointFilter
用来拦截/oauth2/authorize请求
OAuth2AuthorizationCodeRequestAuthenticationConverter
OAuth2AuthorizationCodeRequestAuthenticationConverter对默认请求端点"/oauth2/authorize"携带的参数 进行提取封装成实例OAuth2AuthorizationCodeRequestAuthenticationToken。这些携带的参数对应的就是 OAuth2 authorization request中的参数,当然也可能包括 Proof Key for Code Exchange by OAuth Public Clients相关参数:
| 参数名称 | 是否携带 | 简介 |
|---|---|---|
| response_type | 是 | 值必须是 “code” |
| client_id | 是 | 唯一标识 ClientRegistration 的 ID |
| redirect_uri | 可选 | 指授权请求完,需要转发的地址,也是客户端的地址,把生成的code对应的值拼接在redirect_uri后,例如你的redirect_uri为redirect_uri=http://127.0.0.1/oauth2/code,转发后为:http://127.0.0.1/oauth2/code?code=xxxxxxxxx |
| scope | 可选 | 指客户端需要请求的范围,多个值用空格隔开,这个值必须在ClientRegistration注册时scopes值的范围内 |
| state | 可选 | 一个base64字符串,客户端自动生成的一个base64字符串 |
| code_challenge | 可选 | (公共客户端需要)- RFC 7636 (PKCE) |
| code_challenge_method | 可选 | 如果设置请设置为S256 |
首先以GET方法访问/oauth2/authorize例如:/oauth2/authorize?response_type=code&client_id=bulv-app&scope=user_info%20openid%20client.create&state=wWxnPj3KQeJYjFZIWZ1e_KvHpZOvlyp8DK9tQczrg6E%3D&redirect_uri=http://127.0.0.1/oauth2/code&nonce=-CyFrwZsxGOzu67cdN80FV1V893gRcprFy7DKDfTkg4
@Override
public Authentication convert(HttpServletRequest request) {
	MultiValueMap<String, String> parameters = OAuth2EndpointUtils.getParameters(request);

	boolean authorizationRequest = false;
	// 以get请求或者以post请求并且请求中包含“response_type”参数并且请求参数scope中包含“openid”
	if ("GET".equals(request.getMethod()) || OIDC_REQUEST_MATCHER.matches(request)) {
		authorizationRequest = true;
	}
	.......
}
convert相关的执行流程
1、获取请求参数中是否包含client_id参数,如果不包含抛出异常
2、从上下文中获取已验证的身份信息,如果principal 为null则设置为匿名。但如果principal 为null说明资源所有者没有进行登录,后面的操作就会提醒需要资源所有者进行登录 OAuth2 Login操作。
Authentication principal = SecurityContextHolder.getContext().getAuthentication();
if (principal == null) {
	principal = ANONYMOUS_AUTHENTICATION;
}
3、如果redirect_uri不为空且redirect_uri存在多个值则抛出异常。
4、如果authorizationRequest=true,同时请求参数中scope不为空,且scope存在多个值则抛出异常。scope只有一个值则通过分割“空格符”转化成Set集合。如果是授权同意请求,请求参数中包含scope,则直接把scope转化成set集合。
请求例子:
Authorization Request:GET:/oauth2/authorize?response_type=code&client_id=bulv-app&scope=user_info%20openid%20client.create&state=wWxnPj3KQeJYjFZIWZ1e_KvHpZOvlyp8DK9tQczrg6E%3D&redirect_uri=http://127.0.0.1/oauth2/code&nonce=-CyFrwZsxGOzu67cdN80FV1V893gRcprFy7DKDfTkg4
Authorization Consent:POST:/oauth2/authorize?client_id=bulv-app&state=&scope=
6、如果authorizationRequest=true,state不为空的情况且state存在多个值抛出异常。如果是授权同意请求state空,或者state存在多个值则抛出异常。
7、如果code_challenge不为空且code_challenge存在多个值则抛出异常。
8、如果code_challenge_method不为空且code_challenge_method存在多个值则抛出异常。
9、把请求的不在response_type、client_id、redirect_uri、scope、state、范围的参数添加到additionalParameters Map集合中
Map<String, Object> additionalParameters = new HashMap<>();
parameters.forEach((key, value) -> {
	if (!key.equals(OAuth2ParameterNames.RESPONSE_TYPE) &&
			!key.equals(OAuth2ParameterNames.CLIENT_ID) &&
			!key.equals(OAuth2ParameterNames.REDIRECT_URI) &&
			!key.equals(OAuth2ParameterNames.SCOPE) &&
			!key.equals(OAuth2ParameterNames.STATE)) {
		additionalParameters.put(key, value.get(0));
	}
});
10、把OAuth2AuthorizationCodeRequestAuthenticationToken实例返回。这里需要注意的是consent(!authorizationRequest)这行代码,如果authorizationRequest为false则需要授权同意操作,否则不需要,在后面的OAuth 2.0 Authorization Request (and Consent)操作会判断。
return OAuth2AuthorizationCodeRequestAuthenticationToken.with(clientId, principal)
				.authorizationUri(authorizationUri)
				.redirectUri(redirectUri)
				.scopes(scopes)
				.state(state)
				.additionalParameters(additionalParameters)
				// authorizationRequest为false则需要授权同意操作
				.consent(!authorizationRequest)
				.build();
OAuth 2.0 Authorization Request (and Consent)
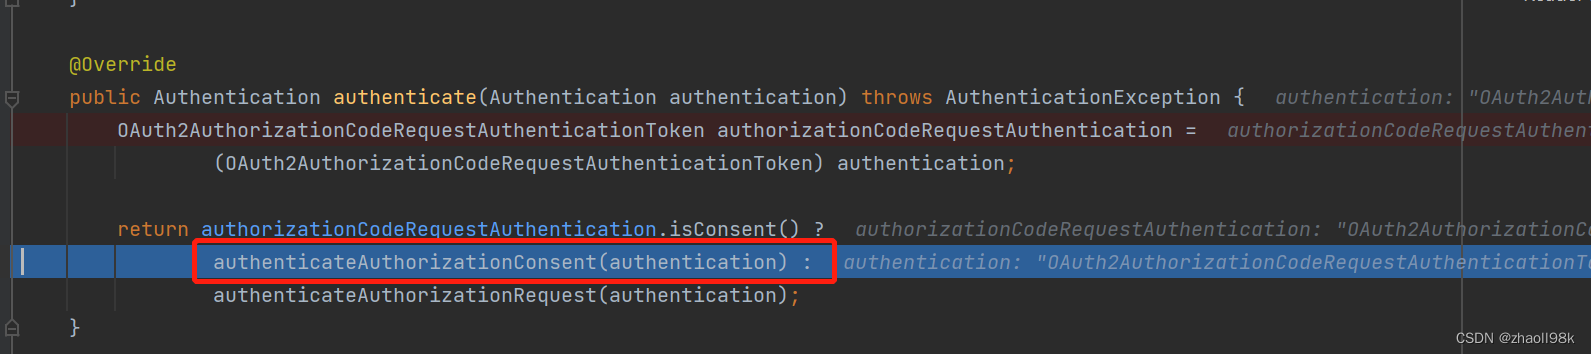
默认OAuth 2.0 Authorization Request (and Consent)实现为OAuth2AuthorizationCodeRequestAuthenticationProvider。
首先判断是否需要授权同意,根据上面的逻辑判断是不需要的,因为consent为false,所以先执行authenticateAuthorizationRequest(authentication)的逻辑。
@Override
public Authentication authenticate(Authentication authentication) throws AuthenticationException {
	OAuth2AuthorizationCodeRequestAuthenticationToken authorizationCodeRequestAuthentication =
			(OAuth2AuthorizationCodeRequestAuthenticationToken) authentication;

	return authorizationCodeRequestAuthentication.isConsent() ?
			authenticateAuthorizationConsent(authentication) :
			authenticateAuthorizationRequest(authentication);
}
authenticateAuthorizationRequest(授权验证请求)
authenticateAuthorizationRequest(authentication)相关处理流程:
1、根据clientId获取内存或者数据库表(oauth2_registered_client)对应clientId的RegisteredClient数据,不存在则抛出异常。然后实例化OAuth2AuthenticationContext把RegisteredClient和authentication存在放context(Map)中。
2、检验authentication中的redirect_uri,如果redirect_uri IP不能为null或者为localhostze返回false。判断redirect_uri IP是不是等于回环地址[0:0:0:0:0:0:0:1]、[::1],或者IP地址在127.0.0.1 到 127.255.255.255区间,不是则检验RegisteredClient的redirectUris是否包含redirect_uri,包含返回true,不包含返回false。如果redirect_uri IP等于回环地址或者在127.0.0.1 到 127.255.255.255区间内则比较RegisteredClient#redirectUris和redirect_uri 是否存在相等的地址,存在返回true,不存在返回false,如果返回false则抛出异常。
3、判断RegisteredClient#authorizationGrantTypes是否包含authorization_code参数,不包含抛出异常
4、如果scopes参数不为空,校验RegisteredClient#scopes是否包含全部authentication#scopes数据,不包含抛出异常。
5、code_challenge不为空,获取code_challenge_method参数从authentication中
code_challenge_method也不为空,如果code_challenge_method不等于S256抛出异常。code_challenge为空,判断registeredClient.getClientSettings().isRequireProofKey()是否为true,是则抛出异常。为true说明如果客户端在执行授权码授予流程时需要提供证明密钥质询(code_challenge)和验证者(code_verifier),默认值为false 。
6、判断principal不为null,不为AnonymousAuthenticationToken以及身份验证了。如果不符合条件则流程终止,返回authentication,后面会抛出异常因为没有进行登录进行身份验证。
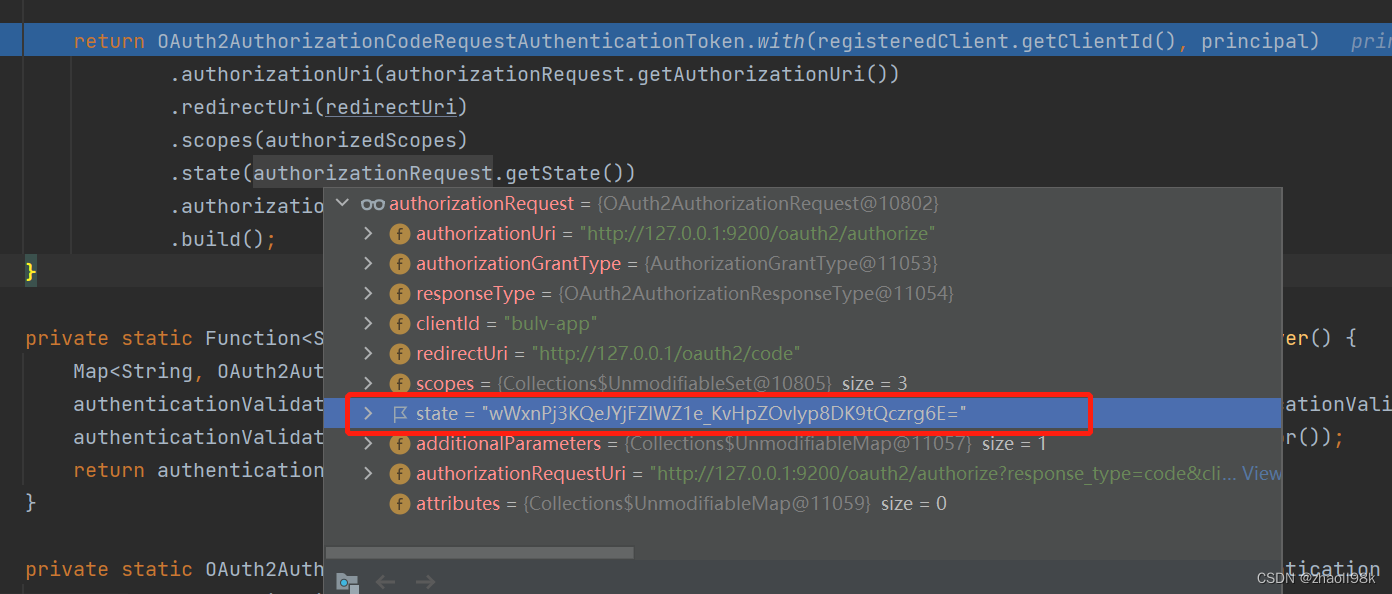
7、构建OAuth2AuthorizationRequest实例
OAuth2AuthorizationRequest authorizationRequest = OAuth2AuthorizationRequest.authorizationCode()
				.authorizationUri(authorizationCodeRequestAuthentication.getAuthorizationUri())
				.clientId(registeredClient.getClientId())
				.redirectUri(authorizationCodeRequestAuthentication.getRedirectUri())
				.scopes(authorizationCodeRequestAuthentication.getScopes())
				.state(authorizationCodeRequestAuthentication.getState())
				.additionalParameters(authorizationCodeRequestAuthentication.getAdditionalParameters())
				.build();
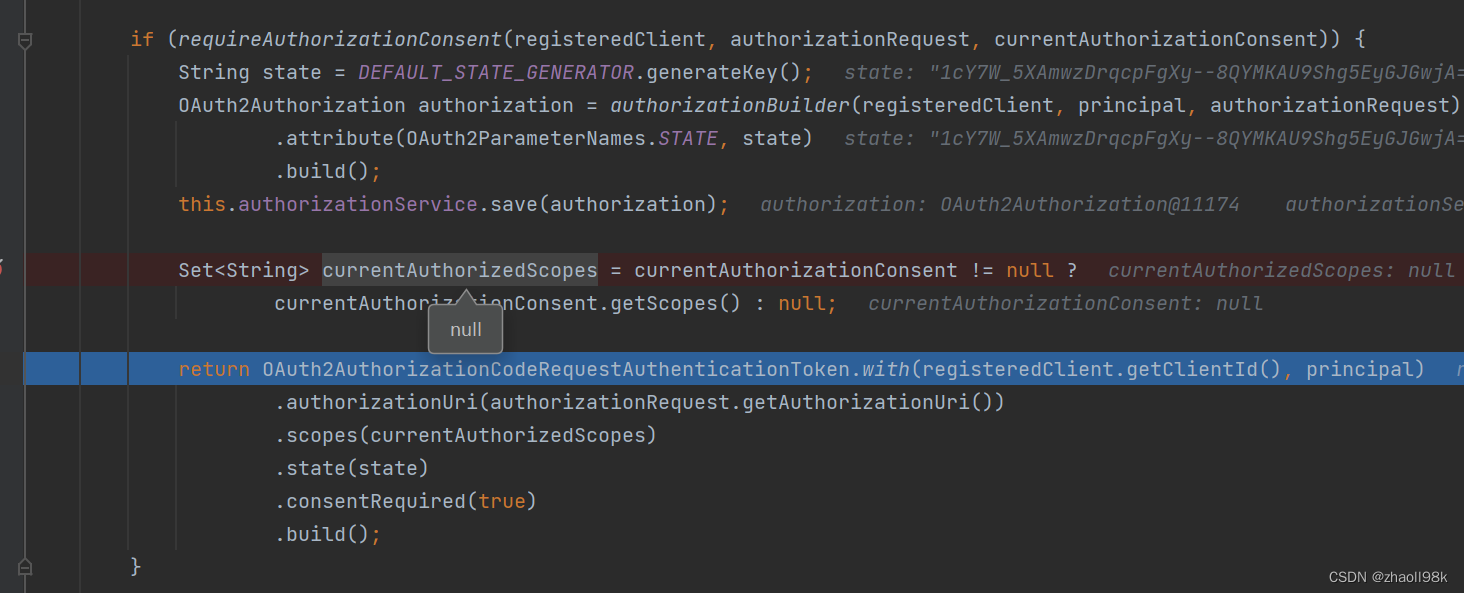
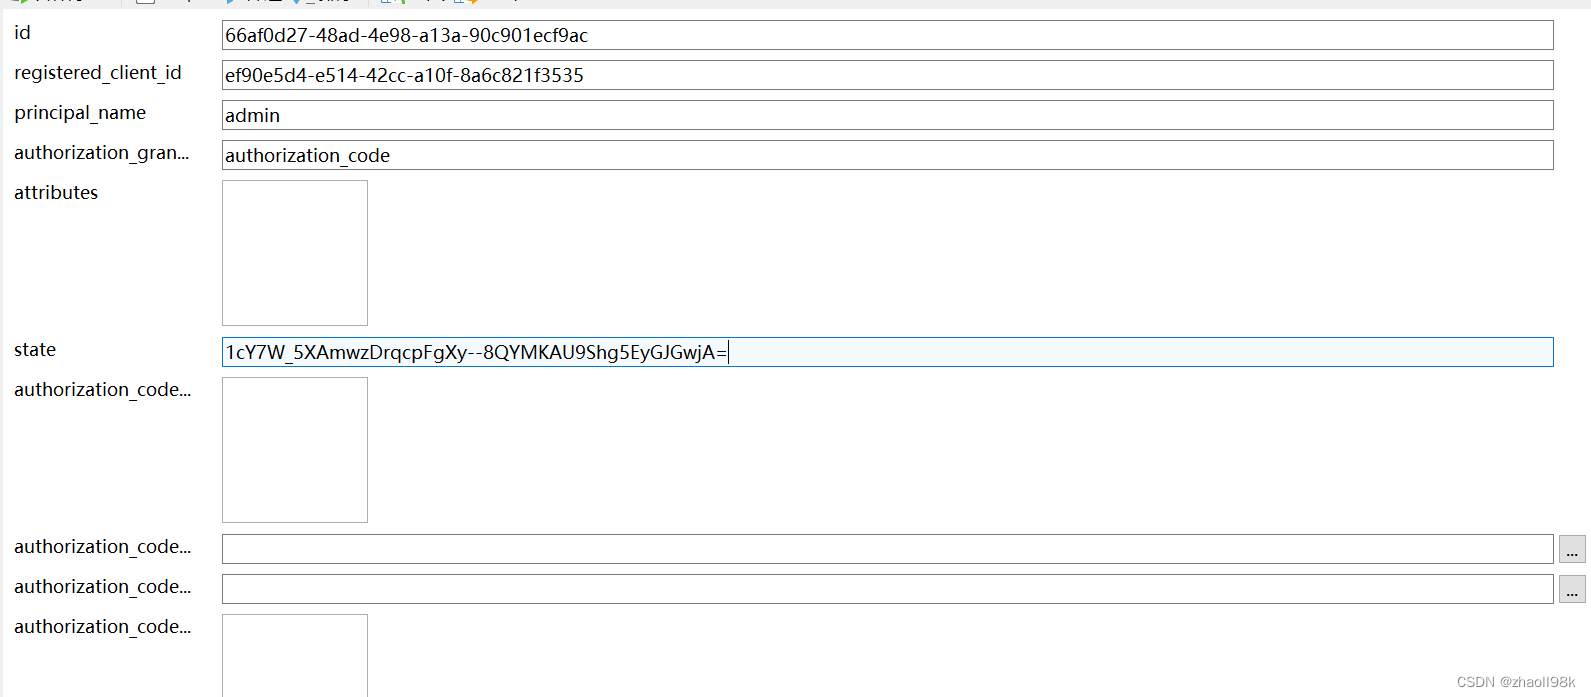
8、根据registeredClient#getId(), authentication#principal#getName() 获取内存或者数据库表(oauth2_authorization_consent)对应的数据OAuth2AuthorizationConsent。然后检验registeredClient的ClientSettings中require-authorization-consent值是否为true;或者OAuth2AuthorizationRequest的scopes中有且只包含openid;或者OAuth2AuthorizationConsent不为空而且OAuth2AuthorizationConsent的scopes包含OAuth2AuthorizationRequest中的scopes 如果满足上面的三个条件的一个则不需要授权同意操作否则需要。如果需要,则构建OAuth2AuthorizationCodeRequestAuthenticationToken实例返回,这返回之前构建OAuth2Authorization实例保存到内存或者数据库表(oauth2_authorization)中。注意这里的state是从新生成的,currentAuthorizedScopes为null。如果需要授权同意执行到这就结束了。
this.authorizationService.save(authorization)对应表(oauth2_authorization)生成的记录:
9、需要授权通知在OAuth2AuthorizationEndpointFilter进行请求转发:
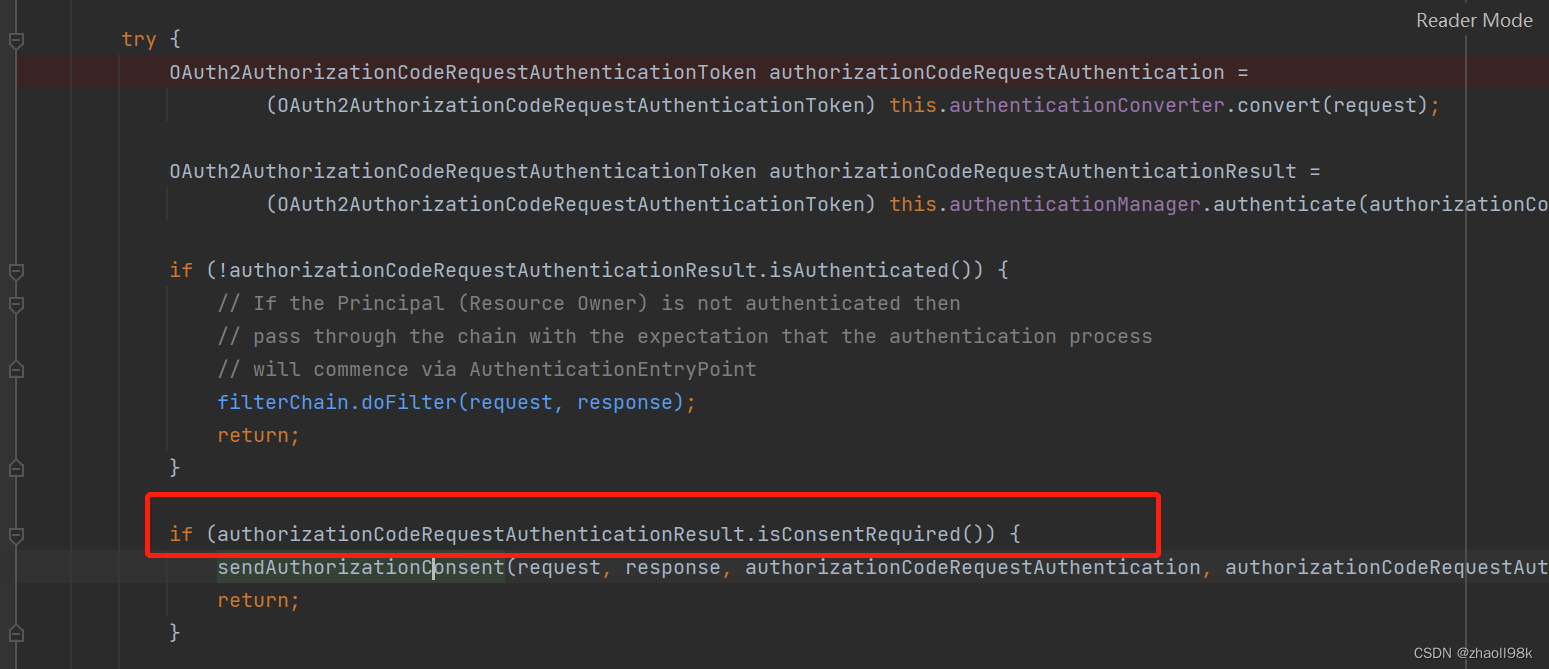
注意:转发链接中的scope用的是授权请求的链接中的scope
private void sendAuthorizationConsent(HttpServletRequest request, HttpServletResponse response,
		OAuth2AuthorizationCodeRequestAuthenticationToken authorizationCodeRequestAuthentication,
		OAuth2AuthorizationCodeRequestAuthenticationToken authorizationCodeRequestAuthenticationResult) throws IOException {

	String clientId = authorizationCodeRequestAuthenticationResult.getClientId();
	Authentication principal = (Authentication) authorizationCodeRequestAuthenticationResult.getPrincipal();
	Set<String> requestedScopes = authorizationCodeRequestAuthentication.getScopes();
	Set<String> authorizedScopes = authorizationCodeRequestAuthenticationResult.getScopes();
	String state = authorizationCodeRequestAuthenticationResult.getState();

	if (hasConsentUri()) {
		String redirectUri = UriComponentsBuilder.fromUriString(resolveConsentUri(request))
				.queryParam(OAuth2ParameterNames.SCOPE, String.join(" ", requestedScopes))
				.queryParam(OAuth2ParameterNames.CLIENT_ID, clientId)
				.queryParam(OAuth2ParameterNames.STATE, state)
				.toUriString();
		this.redirectStrategy.sendRedirect(request, response, redirectUri);
	} else {
		DefaultConsentPage.displayConsent(request, response, clientId, principal, requestedScopes, authorizedScopes, state);
	}
}
所以转发的地址为:
http://127.0.0.1/consentPage?scope=user_info%20openid%20client.create&client_id=bulv-app&state=1cY7W_5XAmwzDrqcpFgXy–8QYMKAU9Shg5EyGJGwjA%3D
因为我配置了consentPage:
.authorizationEndpoint(authorization -> authorization.consentPage("http://127.0.0.1/consentPage"))
授权页面配置
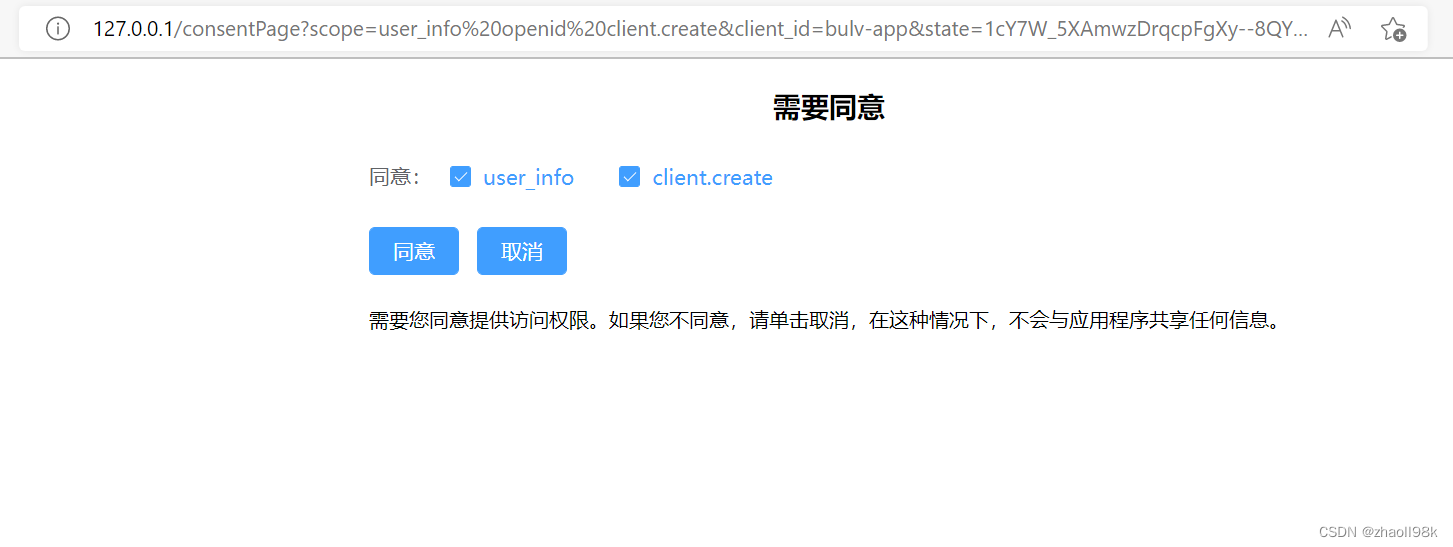
openid是不需要设置的,可以过滤掉,只要在以GET方式请求/oauth2/authorize中scope中包含就可以,点击同意后openId会自动被设置在scope中
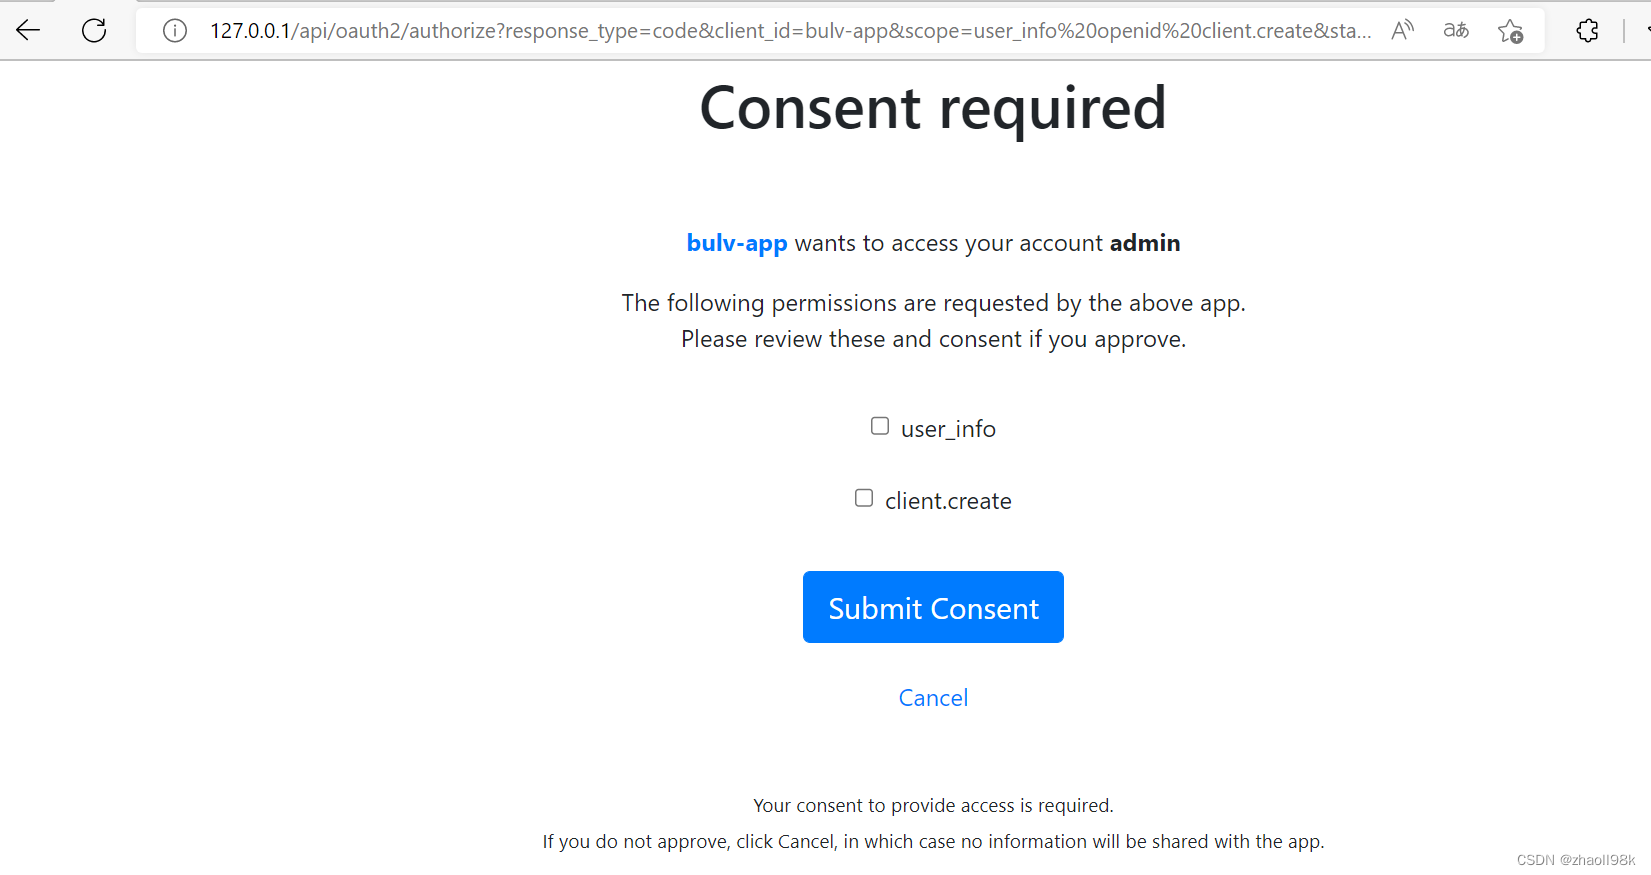
这是不制定consentPage时,默认输出的页面内容:
authenticateAuthorizationConsent(验证授权同意)
选择scope后进行提交,以post方式
content-type: application/x-www-form-urlencoded
请求url: /oauth2/authorize?client_id=&state=&scope
执行authenticateAuthorizationConsent(authentication) 逻辑:
authenticateAuthorizationConsent的基本逻辑:
1、根据authentication中的state(此处的state是构建OAuth2AuthorizationCodeRequestAuthenticationToken自动生成)从内存中或者数据库表(oauth2_authorization)获取OAuth2Authorization数据。
2、验证OAuth2Authorization是否为空,为空抛出异常
3、验证Authentication.getPrincipal()非null同时Authentication非匿名AnonymousAuthenticationToken并且是身份验证的。 同时Authentication.getPrincipal().getName()和OAuth2Authorization的PrincipalName()是相等的否则抛出异常。
4、根据authentication中的cientId从内存或者数据库表(oauth2_registered_client)查询已经注册的客户端信息(RegisteredClient)如果RegisteredClient为空或者RegisteredClient的id和OAuth2Authorization的registeredClientId不一致则抛出异常
5、从OAuth2Authorization中获取OAuth2AuthorizationRequest、获取Scopes;从authentication中获取Scopes,判断OAuth2AuthorizationRequest中Scopes是否包含全部的authentication中获取Scopes,如果不包含抛出异常。其实就是验证授权同意页面勾选的scope是否在oauth2_authorization表记录scope范围内。
授权同意提交的scopes <= oauth2_authorization#attributes#org.springframework.security.oauth2.core.endpoint.OAuth2AuthorizationRequest #scopes <= oauth2_registered_client#scopes
OAuth2Authorization属性如下:
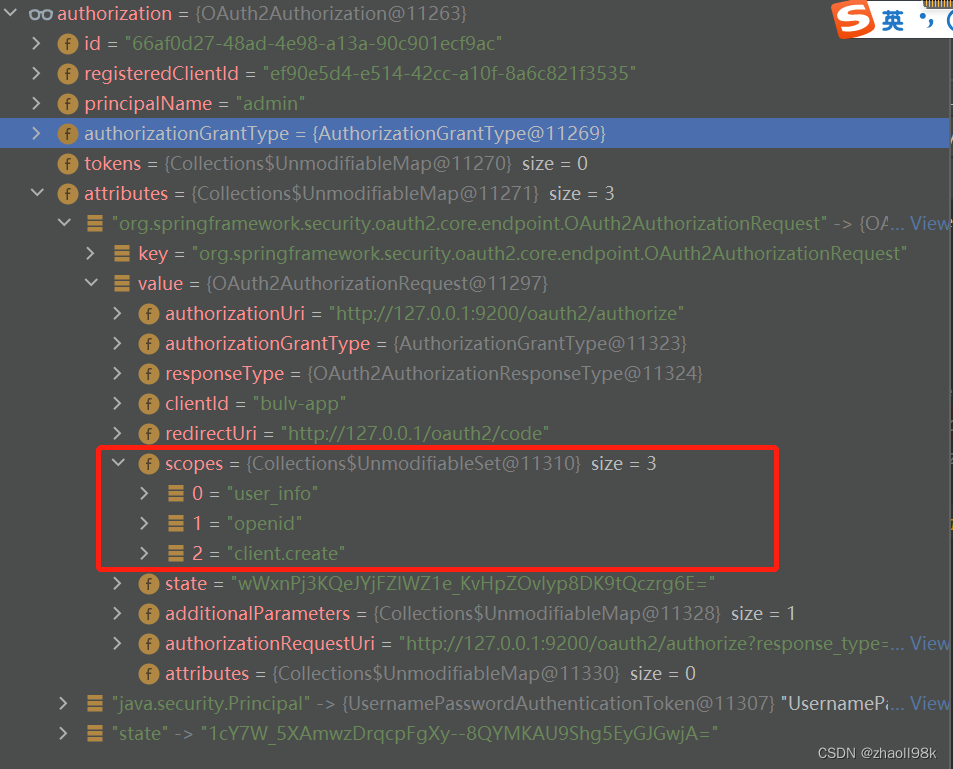
6、根据OAuth2Authorization的registeredClientId和principalName获取内存或者数据表(oauth2_authorization_consent)的OAuth2AuthorizationConsent记录
如果OAuth2AuthorizationConsent不为空则获取它的scopes属性,遍历OAuth2Authorization(也就是表oauth2_registered_client)的scope属性,判断OAuth2AuthorizationConsent#scopes是否包含对应的scope,包含则添加到authentication#scopes集合中。就是把已经存在的OAuth2AuthorizationConsent中的scope和现在勾选的进行合并。
7、如果OAuth2Authorization中scopes包含openId,则自动往已经勾选的scope集合中添加openid,也就是说,在授权同意页面不用单独设置openid,只要你的OAuth2Authorization存在openid就可以。
if (!authorizedScopes.isEmpty() && requestedScopes.contains(OidcScopes.OPENID)) {
	// 'openid' scope is auto-approved as it does not require consent
	authorizedScopes.add(OidcScopes.OPENID);
}
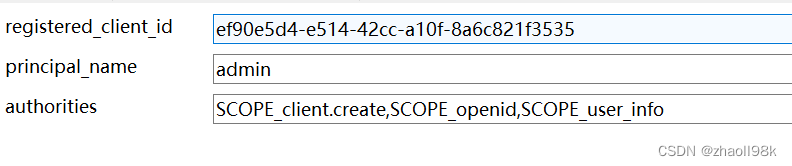
8、构建新OAuth2AuthorizationConsent,和currentAuthorizationConsent比较如果不相等则进行保存。保存前根据authorization.getRegisteredClientId(), authorization.getPrincipalName()查找数据是否存在,存在更新不存在插入,操作内存或者数据库表(oauth2_authorization_consent)。
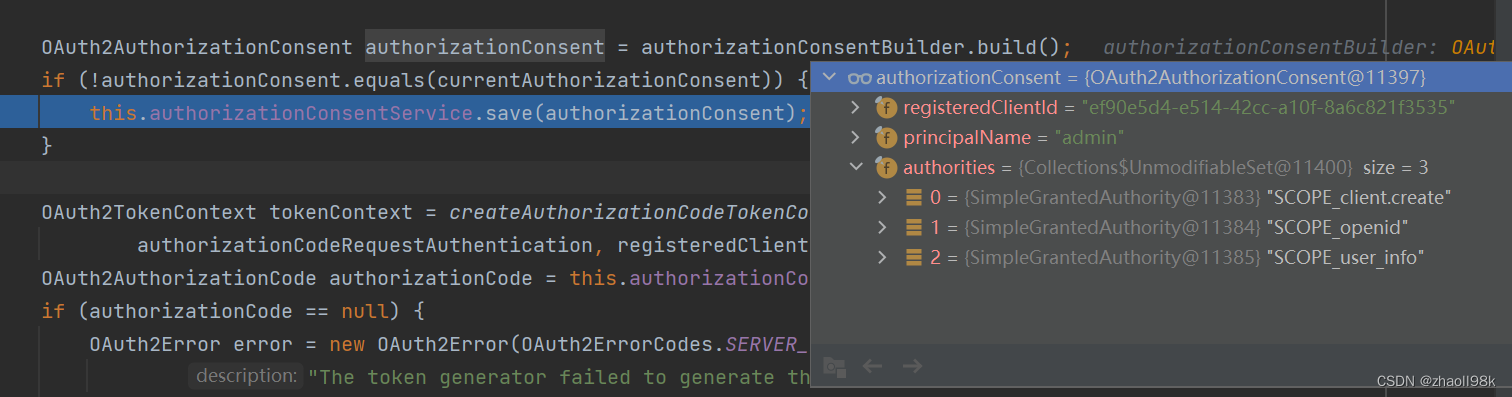
保存在表oauth2_authorization_consent的记录:
9、通过OAuth2AuthorizationCodeGenerator生成一个授权码,此授权码是通过Base64.getUrlEncoder().withoutPadding()对96位的随机字节进行base64编码,生成的字符串。设置超时时间为5分钟。
private static class OAuth2AuthorizationCodeGenerator implements OAuth2TokenGenerator<OAuth2AuthorizationCode> {
	private final StringKeyGenerator authorizationCodeGenerator =
			new Base64StringKeyGenerator(Base64.getUrlEncoder().withoutPadding(), 96);

	@Nullable
	@Override
	public OAuth2AuthorizationCode generate(OAuth2TokenContext context) {
		if (context.getTokenType() == null ||
				!OAuth2ParameterNames.CODE.equals(context.getTokenType().getValue())) {
			return null;
		}
		Instant issuedAt = Instant.now();
		Instant expiresAt = issuedAt.plus(5, ChronoUnit.MINUTES);		// TODO Allow configuration for authorization code time-to-live
		return new OAuth2AuthorizationCode(this.authorizationCodeGenerator.generateKey(), issuedAt, expiresAt);
	}

}
10、根据生成的code、scopes等信息更新内存或者数据库表(oauth2_authorization)的信息,这时表oauth2_authorization的state字段会被更新成null。
数据库表(oauth2_authorization)更新sql:
"UPDATE oauth2_authorization"
			+ " SET registered_client_id = ?, principal_name = ?, authorization_grant_type = ?, attributes = ?, state = ?,"
			+ " authorization_code_value = ?, authorization_code_issued_at = ?, authorization_code_expires_at = ?, authorization_code_metadata = ?,"
			+ " access_token_value = ?, access_token_issued_at = ?, access_token_expires_at = ?, access_token_metadata = ?, access_token_type = ?, access_token_scopes = ?,"
			+ " oidc_id_token_value = ?, oidc_id_token_issued_at = ?, oidc_id_token_expires_at = ?, oidc_id_token_metadata = ?,"
			+ " refresh_token_value = ?, refresh_token_issued_at = ?, refresh_token_expires_at = ?, refresh_token_metadata = ?"
			+ " WHERE id = ?";

11、构建OAuth2AuthorizationCodeRequestAuthenticationToken实例返回。
注意state是第一次请求携带的state。
12、转发到地址,此地址就是redirect_uri配置的路径,授权码code和state被拼接在url后面,下一步就可以根据code获取token了。
http://127.0.0.1/oauth2/code?code=ijkIg3itP_P6fD0CHWDwg343pWYV55EhZ7l-J5xY4qmmZX7I6mNPrR_4Z4BVmQ2oiQaRiqYzeNG4tsQkYjxWfvc4AYE7w3ZmPmoqGytMmMSzybQzY4lVJQ1KsRYpf7Eh&state=wWxnPj3KQeJYjFZIWZ1e_KvHpZOvlyp8DK9tQczrg6E%3D


 1558
1558


 被折叠的 条评论
为什么被折叠?
被折叠的 条评论
为什么被折叠?
 到【灌水乐园】发言


