


目录
a、在dao子模块的pom中添加domain子模块的引用关系
b、在service子模块的pom中添加dao子模块的引用关系
c、在controller子模块的pom中添加dao子模块的引用关系
传统项目管理分析(导入jar包形式)
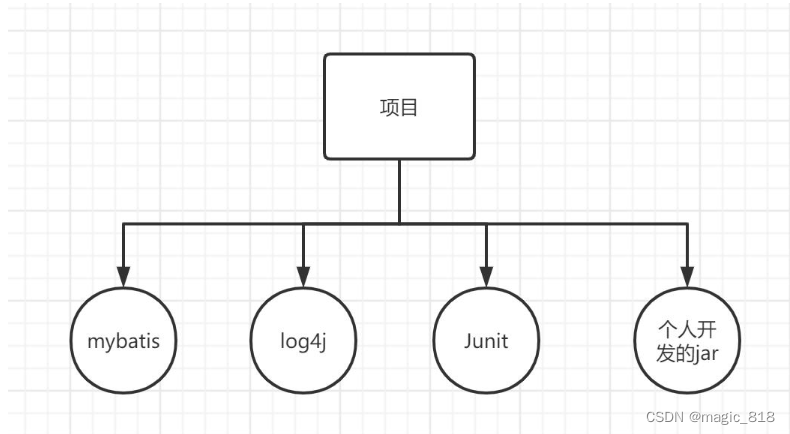
- jar包不统一,jar包不兼容
- 工程上线升级维护过程操作繁琐等
maven组成部分
- maven本身是一个项目管理工具,将项目开发和管理抽象成一个项目对象模型(POM)
- POM (project object model) : 项目对象模型
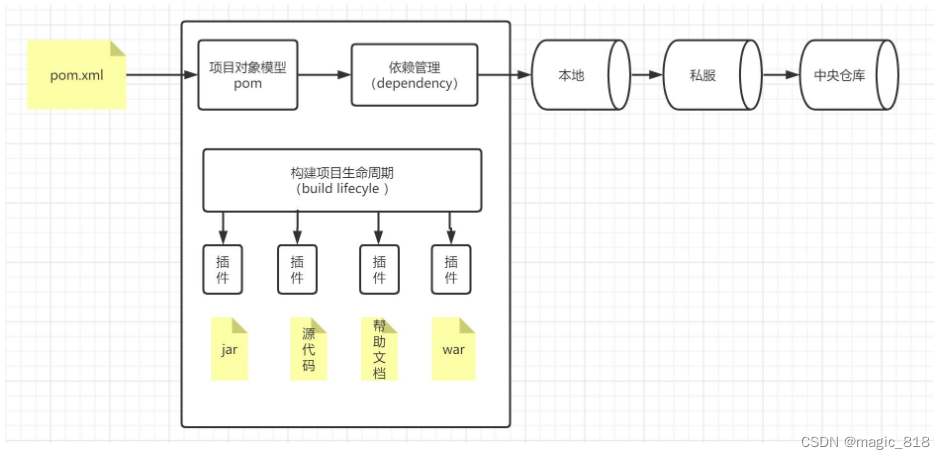
maven中央仓库地址:https://mvnrepository.com/
maven项目构建命令
-
mvn compile #编译
-
mvn clean #清理
-
mvn test #测试
-
mvn package #打包
-
mvn install #安装到本地仓库
maven高级
-
maven工程拆分与聚合思想
-
maven子父工程
-
maven 私服
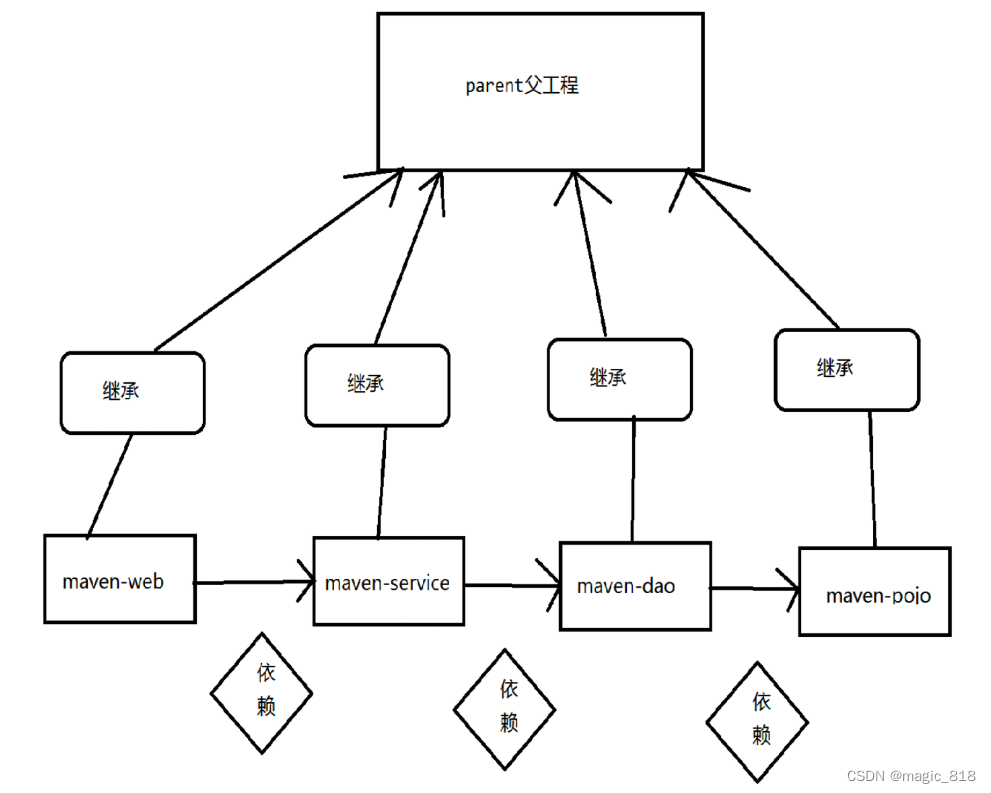
项目的聚合与继承
通常一个项目中聚合和继承是同时使用
-
聚合:项目开发通常是分组分模块开发,每个模块开发完成要运行整个工程需要将每个模块聚合在一起运行,比如:dao、service、 web三个工程最终会打一个独立的war运行
聚合目的是:一次构件多个项目
-
继承:是为了消除重复,如果将dao、service、web分开创建独立的工程则每个工程的pom.xml文件中的内容存在重复,比如:设置 编译版本、锁定spring的版本的等,可以将这些重复的配置提取出来在父工程的pom.xml中定义需求
继承目的是:为了消除重复配置
maven子父工程
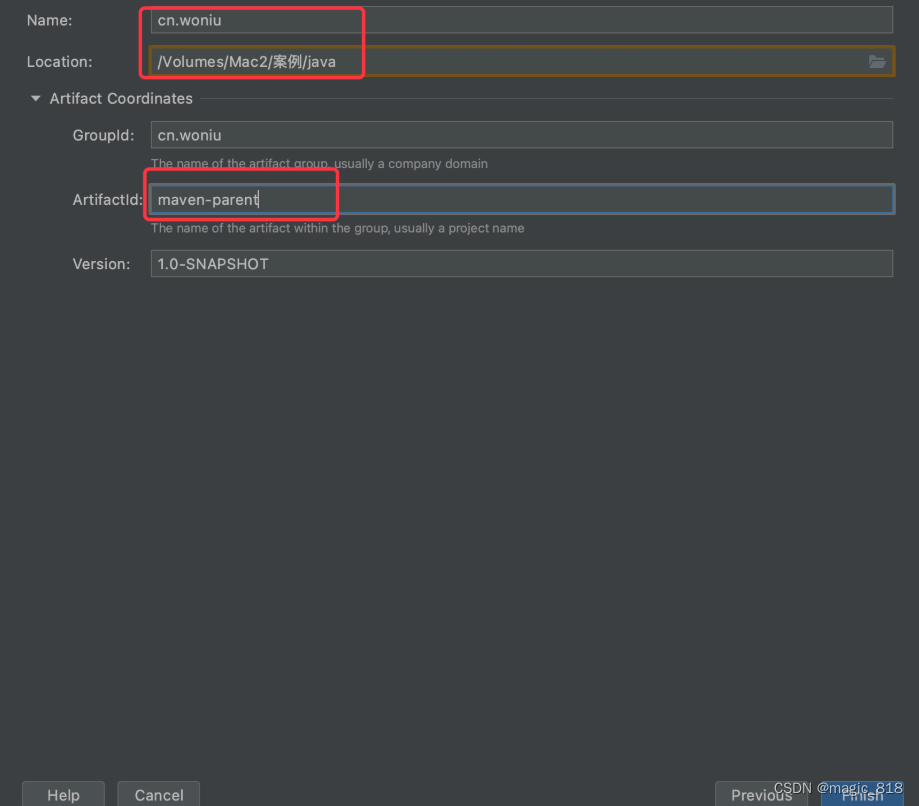
需求:使用maven子父工程完成登录并跳转到首页列表
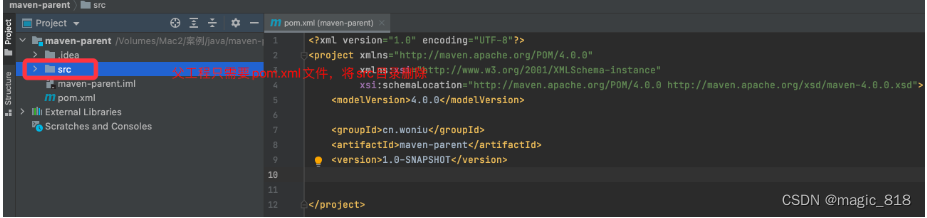
创建父工程
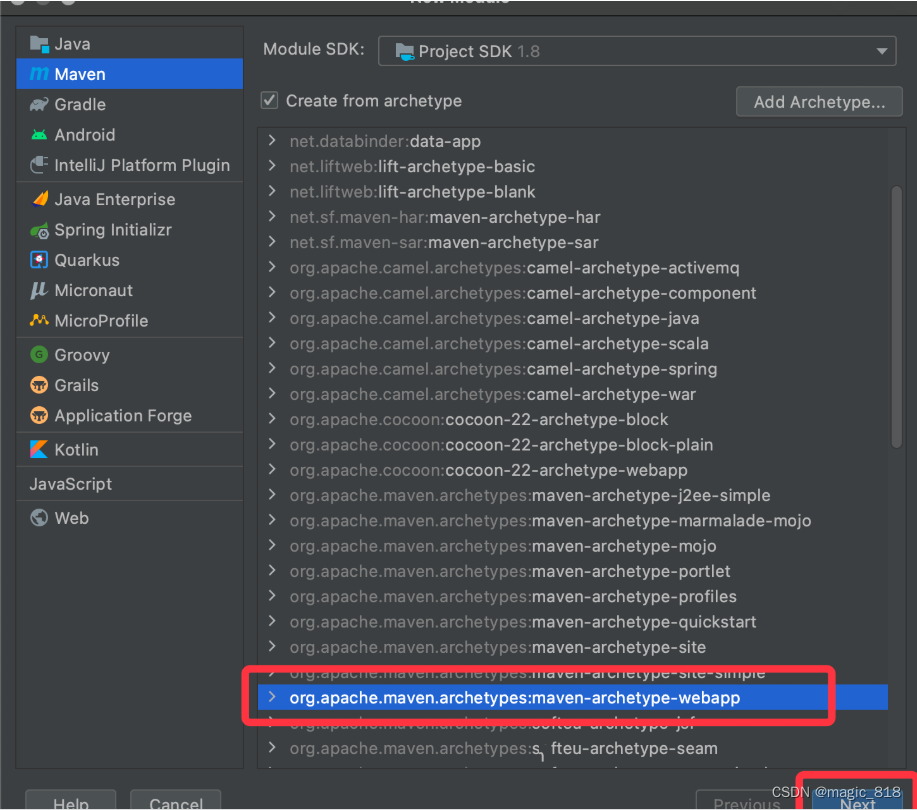
在父工程中以module的形式创建子模块


注意:以domain方式依次创建 maven-dao, maven-service 子模块
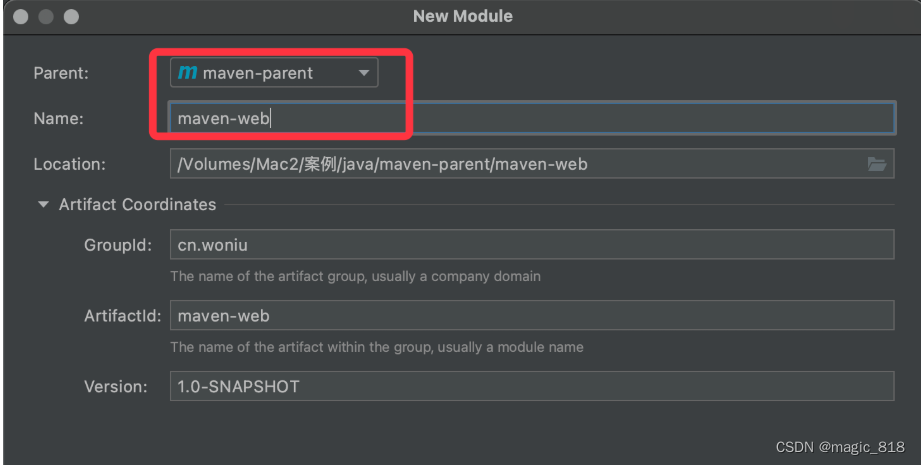
在父工程中以module的形式创建web子模块
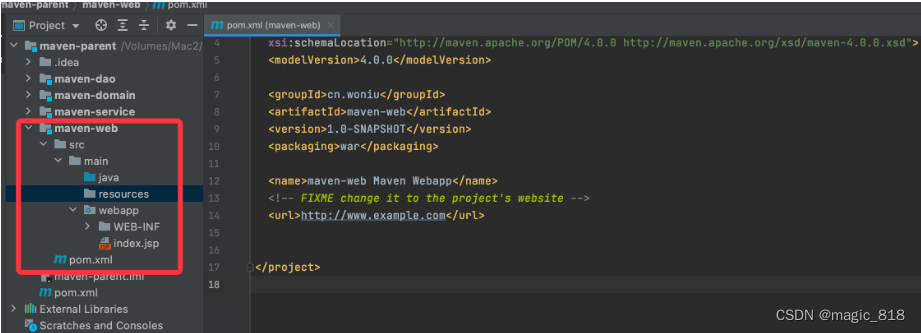
给每个模块添加依赖
在开发中,service要调用dao中的数据,而web又要调用service的数据,且domain又要被其他三层所调用,他们之间的调用关系如下:web->service->dao->domain
但是现在四个子工程相互是没有任何关系的,没有关系就不能调用。我们应该将他们之间关联起来
注意:maven项目之间的引用是通过本地仓库中的jar包进行引用,所以引用前要先将对应的模块打成jar包到本地仓库
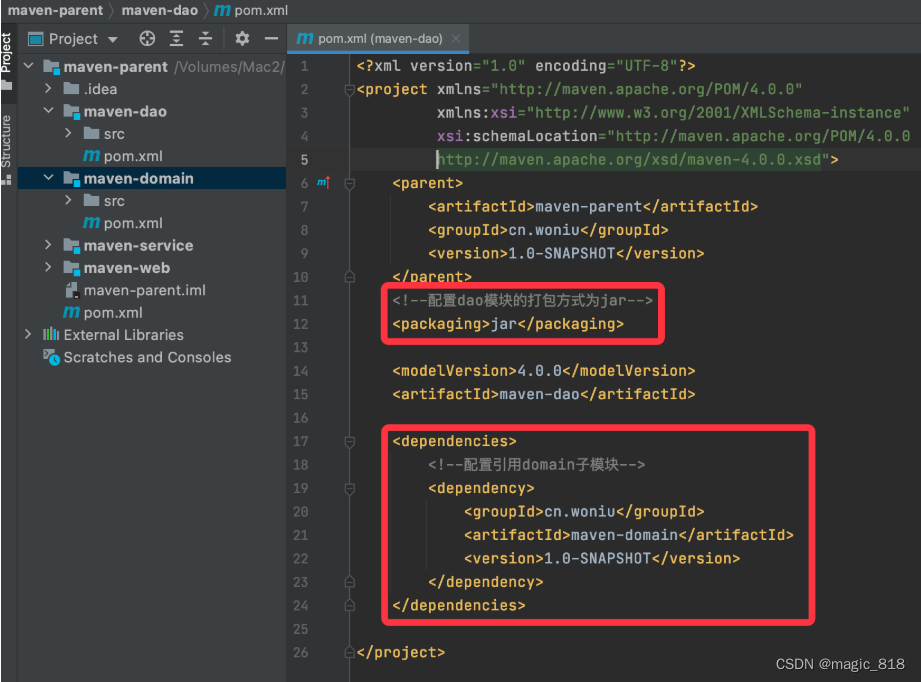
a、在dao子模块的pom中添加domain子模块的引用关系
b、在service子模块的pom中添加dao子模块的引用关系

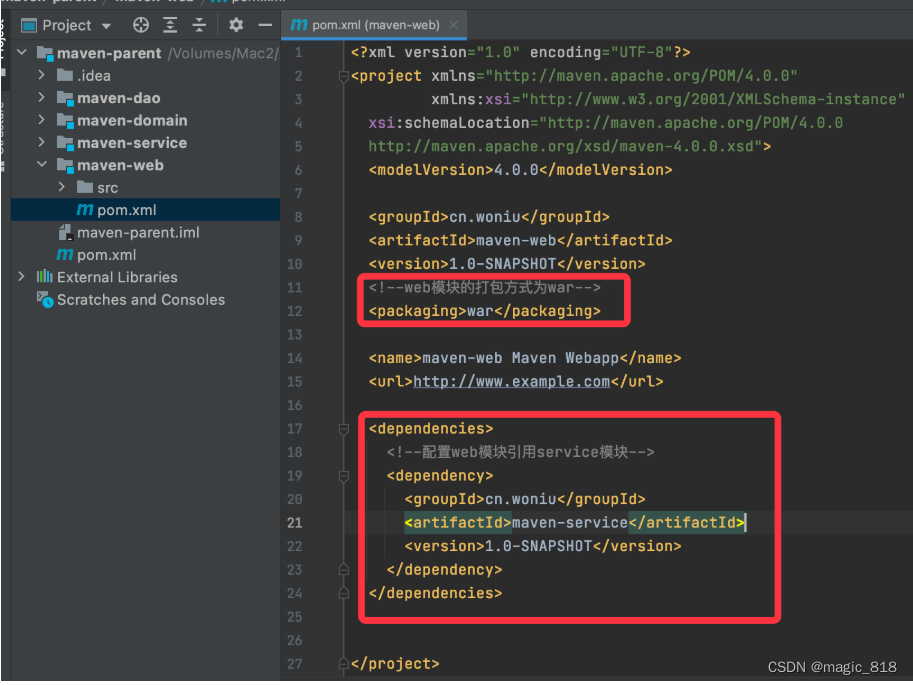
c、在controller子模块的pom中添加dao子模块的引用关系
d、在父工程的pom中添加ssm所需坐标
<?xml version="1.0" encoding="UTF-8"?>
<project xmlns="http://maven.apache.org/POM/4.0.0"
xmlns:xsi="http://www.w3.org/2001/XMLSchema-instance"
xsi:schemaLocation="http://maven.apache.org/POM/4.0.0
http://maven.apache.org/xsd/maven-4.0.0.xsd">
<modelVersion>4.0.0</modelVersion>
<groupId>cn.woniu</groupId>
<artifactId>maven-parent</artifactId>
<packaging>pom</packaging>
<version>1.0-SNAPSHOT</version>
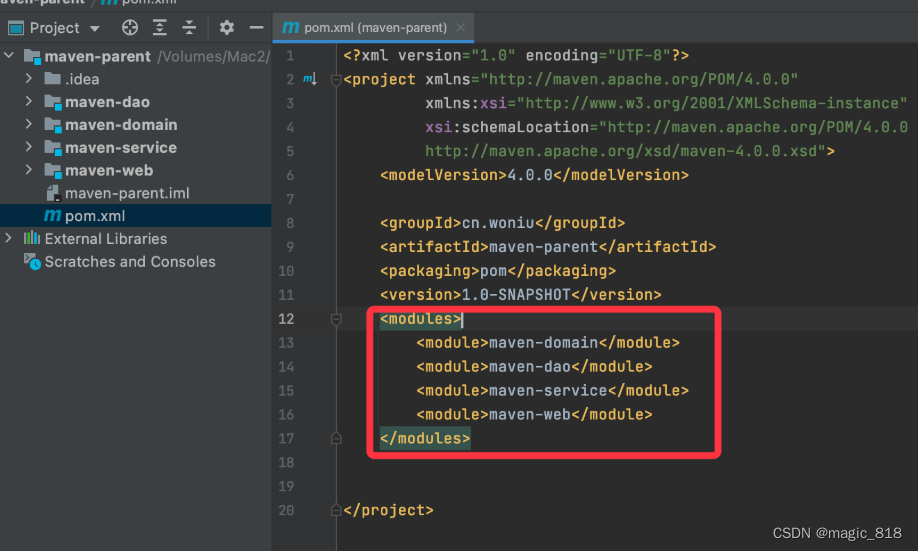
<modules>
<module>maven-domain</module>
<module>maven-dao</module>
<module>maven-service</module>
<module>maven-web</module>
</modules>
<!-- 锁定(统一管理)jar包版本 -->
<properties>
<spring.version>5.0.9.RELEASE</spring.version>
<mysql.version>8.0.19</mysql.version>
<mybatis.version>3.5.1</mybatis.version>
</properties>
<dependencies> <!--mybaits包-->
<dependency>
<groupId>org.mybatis</groupId>
<artifactId>mybatis</artifactId>
<version>${mybatis.version}</version>
</dependency>
<!--mysql驱动-->
<dependency>
<groupId>mysql</groupId>
<artifactId>mysql-connector-java</artifactId>
<version>${mysql.version}</version>
</dependency>
<!--druid数据源-->
<dependency>
<groupId>com.alibaba</groupId>
<artifactId>druid</artifactId>
<version>1.2.3</version>
</dependency>
<!--junit测试包-->
<dependency>
<groupId>junit</groupId>
<artifactId>junit</artifactId>
<version>4.12</version>
<scope>test</scope>
</dependency>
<!--logback 日志包-->
<dependency>
<groupId>ch.qos.logback</groupId>
<artifactId>logback-classic</artifactId>
<version>1.2.3</version>
</dependency>
<dependency>
<groupId>ch.qos.logback</groupId>
<artifactId>logback-core</artifactId>
<version>1.2.3</version>
</dependency>
<dependency>
<groupId>org.slf4j</groupId>
<artifactId>slf4j-api</artifactId>
<version>1.7.30</version>
</dependency>
<!--spring核心-->
<dependency>
<groupId>org.springframework</groupId>
<artifactId>spring-context</artifactId>
<version>${spring.version}</version>
</dependency>
<!--spring与mybaits整合包-->
<dependency>
<groupId>org.mybatis</groupId>
<artifactId>mybatis-spring</artifactId>
<version>2.0.1</version>
</dependency>
<!--spring与jdbc整合包-->
<dependency>
<groupId>org.springframework</groupId>
<artifactId>spring-jdbc</artifactId>
<version>${spring.version}</version>
</dependency>
<!--spring测试整合包-->
<dependency>
<groupId>org.springframework</groupId>
<artifactId>spring-test</artifactId>
<version>${spring.version}</version>
</dependency>
<!--解析切入点表达式-->
<dependency>
<groupId>org.springframework</groupId>
<artifactId>spring-aspects</artifactId>
<version>${spring.version}</version>
</dependency>
<!-- spring事务包 -->
<dependency>
<groupId>org.springframework</groupId>
<artifactId>spring-tx</artifactId>
<version>${spring.version}</version>
</dependency>
<!--springmvc所需求web包-->
<dependency>
<groupId>org.springframework</groupId>
<artifactId>spring-web</artifactId>
<version>${spring.version}</version>
</dependency>
</dependencies>
<build>
<!--配置mavenxyna插件版本-->
<plugins>
<plugin>
<groupId>org.apache.maven.plugins</groupId>
<artifactId>maven-compiler-plugin</artifactId>
<version>3.5.1</version>
<configuration>
<target>1.8</target>
<!-- 源代码使用的开发版本 -->
<source>1.8</source>
<!-- 需要生成的目标class文件的编译版本 -->
<encoding>UTF-8</encoding>
</configuration>
</plugin>
</plugins>
<resources>
<resource>
<directory>${basedir}/src/main/java</directory>
<includes>
<include>**/*.xml</include>
</includes>
</resource>
<resource>
<directory>${basedir}/src/main/resources</directory>
<includes>
<include>**/*.xml</include>
<include>**/*.properties</include>
</includes>
</resource>
</resources>
</build>
</project>
解决jar包依赖冲突
依赖冲突
当我们在maven-dao模块添加了如下坐标
<dependency>
            <groupId>log4j</groupId>
            <artifactId>log4j</artifactId>
            <version>1.2.14</version>
 </dependency>
然后在maven-service模块添加了如下坐标
<dependency>
            <groupId>log4j</groupId>
            <artifactId>log4j</artifactId>
            <version>1.3.10</version>
 </dependency>
此时项目中使用的是哪个版本的log4j?此时就产生了依赖冲突,因为service模块要依赖dao模块,但是现在有两个不同版本的jar包
说明:是否会产生依赖,跟jar坐标的作用域有关
如果在maven-dao中 jar坐标的作用域设置成test或者provided,此时就不会传递依赖给maven-service了,只有作用域为runtime和默认的compile时会产生传递依赖
maven scope 取值范围及其作用
1,compile scope默认值,在工程环境的classpath(编译环境)和打包(如果是WAR包,会包含在WAR包中)时候都有效
2,provided:容器或JDK已提供范围,表示该依赖包已经由目标容器(如tomcat)和JDK提供,只在编译的classpath中加载和使用,打包的时候不会包含在目标包中。最常见的是j2ee规范相关的servlet-api和jsp-api等jar包,一般由servlet容器提供,无需在打包到war包中,如果不配置为provided,把这些包打包到工程war包中 3,runtime:一般是运行和测试环境使用,编译时候不用加入classpath,打包时候会打包到目标包中。例如JDBC驱动
4,test:测试范围,一般是单元测试场景使用,在编译环境加入classpath,但打包时不会加入,例如junit
依赖调解原则
maven 自动按照下边的原则调解:
1、第一声明者优先原则
在 pom 文件定义依赖,如果是同级的深度话,以先声明的依赖为准。
2、路径近者优先原则
例如:还是上述情况,maven-dao传递过来 log4j,那如果直接把 log4j 的依赖直接写service到 pom 文件中,那么项目就不会再使用其他依赖传递来的log4j,因为自己直接在 pom 中定义 log4j 要比其他依赖传递过来的路径要近。
排除依赖
上边的问题也可以通过排除依赖方法辅助依赖调解,如下:
 <dependency>
      <groupId>com.woniu</groupId>
      <artifactId>maven-dao</artifactId>
      <version>1.0-SNAPSHOT</version>
      <exclusions>
          <exclusion>
              <groupId>log4j</groupId>
              <artifactId>log4j</artifactId>
          </exclusion>
      </exclusions>
</dependency>
锁定版本
面对众多的依赖,有一种方法不用考虑依赖路径、声明优化等因素可以采用直接锁定版本的方法确定依赖构件的版本,版本锁定后则不考虑依赖的声明顺序或依赖的路径,以锁定的版本的为准添加到工程中,此方法在企业开发中常用。
<?xml version="1.0" encoding="UTF-8"?>
<project xmlns="http://maven.apache.org/POM/4.0.0"
         xmlns:xsi="http://www.w3.org/2001/XMLSchema-instance"
         xsi:schemaLocation="http://maven.apache.org/POM/4.0.0 http://maven.apache.org/xsd/maven-4.0.0.xsd">
    <modelVersion>4.0.0</modelVersion>

    <groupId>com.woniu</groupId>
    <artifactId>com-woniu-dao</artifactId>
    <version>1.0-SNAPSHOT</version>

    <dependencyManagement>
        <dependencies>
            <dependency>
                <groupId>junit</groupId>
                <artifactId>junit</artifactId>
                <version>4.11</version>
                <scope>test</scope>
            </dependency>
            <dependency>
                <groupId>org.mybatis</groupId>
                <artifactId>mybatis</artifactId>
                <version>3.5.6</version>
            </dependency>
            <dependency>
                <groupId>com.alibaba</groupId>
                <artifactId>druid</artifactId>
                <version>1.1.10</version>
            </dependency>
        </dependencies>
    </dependencyManagement>

    <dependencies>
        <dependency>
            <groupId>org.mybatis</groupId>
            <artifactId>mybatis</artifactId>
        </dependency>
        <dependency>
            <groupId>com.alibaba</groupId>
            <artifactId>druid</artifactId>
        </dependency>
        <dependency>
            <groupId>junit</groupId>
            <artifactId>junit</artifactId>
            <version>4.11</version>
            <scope>test</scope>
        </dependency>
    </dependencies>
</project>
还可以把版本号提取出来,使用<properties>标签设置成变量。
 <properties>
        <mybatis.version>3.5.6</mybatis.version>
        <druid.version>1.1.10</druid.version>
 </properties>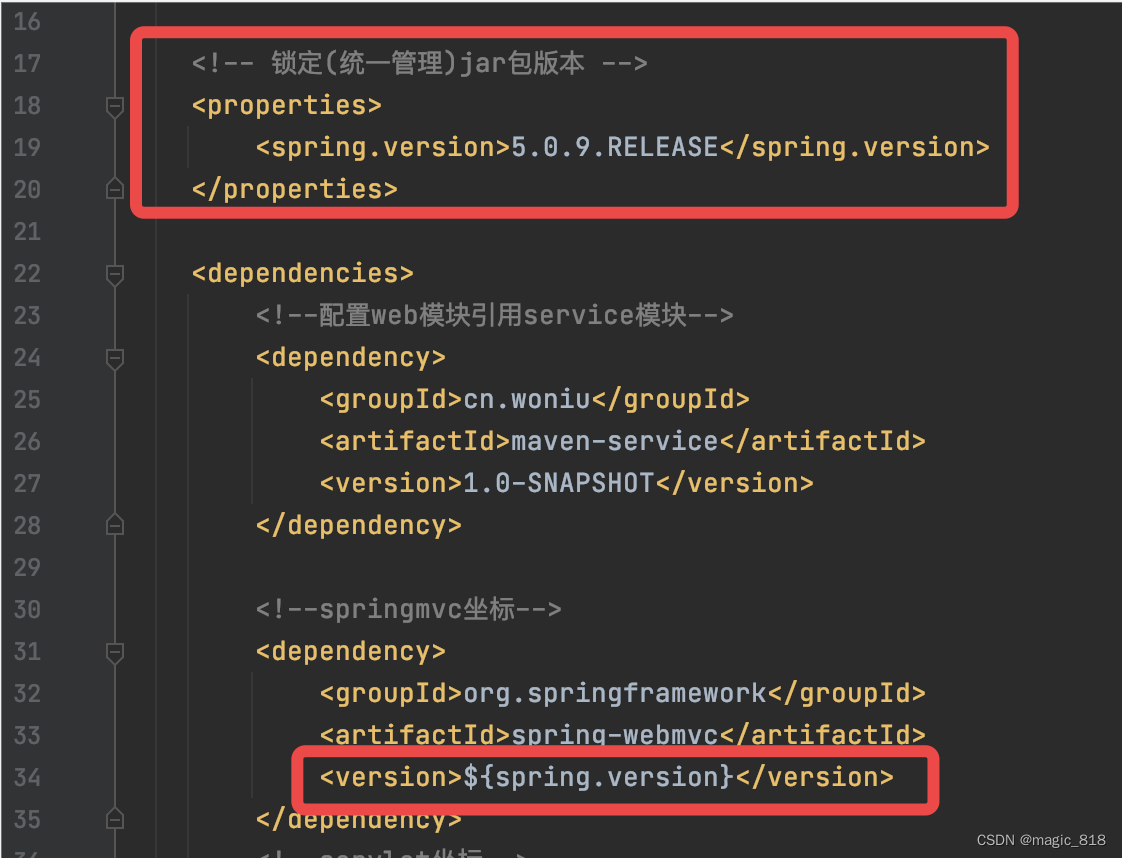
上边添加的依赖并没有指定版本,原因是已在<dependencyManagement>中锁定了版本,所以在<dependency>下不需要再指定版本 .
编写模块代码
a、编写domain模块代码
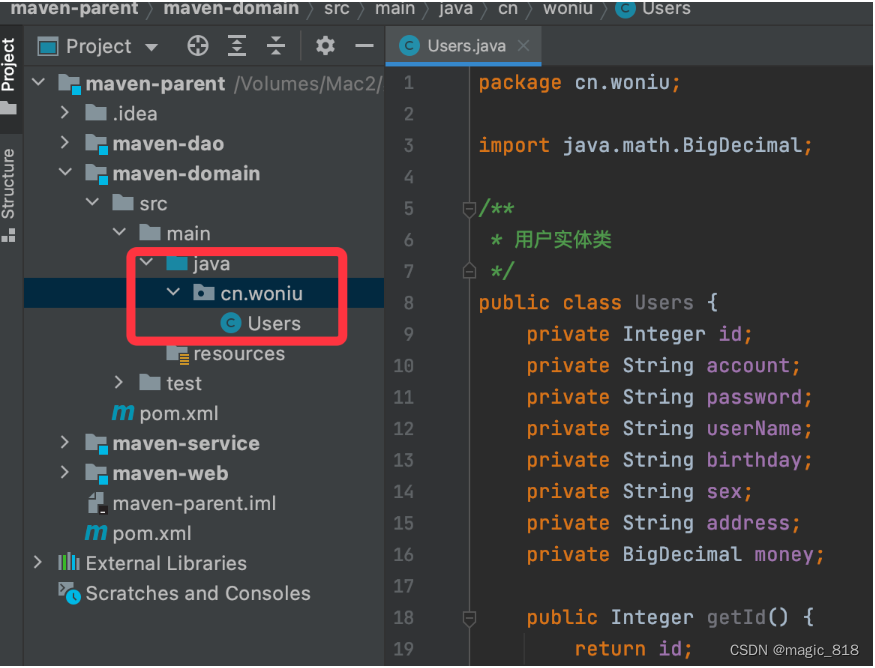
实体类编写完成后,由于需要被其他模块直接引用所以要将实体类发布到本地仓库中

b、编写dao模块代码

添加属性文件:db.properties
jdbc.driver=com.mysql.cj.jdbc.Driver
jdbc.url=jdbc:mysql://127.0.0.1:3306/test?useUnicode=true&characterEncoding=utf-8&useSSL=false&serverTimezone=GMT%2B8
jdbc.username=root
jdbc.password=123456
添加spring-config-dao.xml
<?xml version="1.0" encoding="UTF-8"?>
<beans xmlns="http://www.springframework.org/schema/beans"
       xmlns:xsi="http://www.w3.org/2001/XMLSchema-instance"
       xmlns:context="http://www.springframework.org/schema/context"
       xsi:schemaLocation="http://www.springframework.org/schema/beans
       http://www.springframework.org/schema/beans/spring-beans.xsd
       http://www.springframework.org/schema/context
       http://www.springframework.org/schema/context/spring-context.xsd">

    <!--扫描dao中的注解-->
    <context:component-scan base-package="cn.woniu.dao"></context:component-scan>

    <!--引用db.properties-->
    <context:property-placeholder location="classpath:db.properties"></context:property-placeholder>

    <!--配置数据源-->
    <bean id="dataSource" class="com.alibaba.druid.pool.DruidDataSource">
        <property name="driverClassName" value="${jdbc.driver}"/>
        <property name="url" value="${jdbc.url}"/>
        <property name="username" value="${jdbc.username}"/>
        <property name="password" value="${jdbc.password}"/>
    </bean>

    <!--配置sqlSessionFactory-->
    <bean id="sqlSessionFactory" class="org.mybatis.spring.SqlSessionFactoryBean">
        <property name="dataSource" ref="dataSource"></property>
        <!--配置别名-->
        <property name="typeAliasesPackage" value="cn.woniu.domain"> </property>
        <!--配置mapper.xml与dao可以不在同一包下-->
        <property name="mapperLocations" value="classpath:cn/woniu/mapper/*Dao.xml"></property>
    </bean>

    <!--配置dao扫描-->
    <bean id="scannerConfigurer" class="org.mybatis.spring.mapper.MapperScannerConfigurer">
        <property name="basePackage" value="cn.woniu.dao"></property>
        <property name="sqlSessionFactoryBeanName" value="sqlSessionFactory"></property>
    </bean>
</beans>
编写userDao.xml 文件
<?xml version="1.0" encoding="UTF-8" ?>
<!DOCTYPE mapper
        PUBLIC "-//mybatis.org//DTD Mapper 3.0//EN"
        "http://mybatis.org/dtd/mybatis-3-mapper.dtd">
<mapper namespace="cn.woniu.dao.UserDao">

</mapper>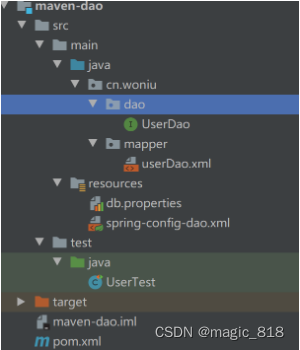
c、编写service模块代码
添加spring-config-service.xml
<?xml version="1.0" encoding="UTF-8"?>
<beans xmlns="http://www.springframework.org/schema/beans"
       xmlns:xsi="http://www.w3.org/2001/XMLSchema-instance"
       xmlns:context="http://www.springframework.org/schema/context"
       xmlns:aop="http://www.springframework.org/schema/aop"
       xmlns:tx="http://www.springframework.org/schema/tx"
       xsi:schemaLocation="http://www.springframework.org/schema/beans
       http://www.springframework.org/schema/beans/spring-beans.xsd
       http://www.springframework.org/schema/context
       http://www.springframework.org/schema/context/spring-context.xsd
       http://www.springframework.org/schema/aop
       http://www.springframework.org/schema/aop/spring-aop.xsd
       http://www.springframework.org/schema/tx
       http://www.springframework.org/schema/tx/spring-tx.xsd">

    <!--扫描service中的注解-->
    <context:component-scan base-package="cn.woniu.service.impl"></context:component-scan>

    <!--配置事务管理器  此处dataSource报错不用管-->
    <bean id="transactionManager" class="org.springframework.jdbc.datasource.DataSourceTransactionManager">
        <property name="dataSource" ref="dataSource"></property>
    </bean>

    <!--配置通知(service中的方法命名规则)-->
    <tx:advice id="txadvice" transaction-manager="transactionManager">
        <tx:attributes>
            <!--查询方法规则
				SUPPORTS:支持当前事务,如果当前没有事务,就以非事务方式执行
			-->
            <tx:method name="find*" read-only="true" propagation="SUPPORTS"/>
            <tx:method name="get*" read-only="true" propagation="SUPPORTS"/>
            <tx:method name="find*" read-only="true" propagation="SUPPORTS"/>
            <!--配置增删改方法规则
				REQUIRED:支持当前事务,如果当前没有事务,就新建一个事务。
			-->
            <tx:method name="insert*" propagation="REQUIRED"></tx:method>
            <tx:method name="save*" propagation="REQUIRED"></tx:method>
            <tx:method name="add*" propagation="REQUIRED"></tx:method>
            <tx:method name="update*" propagation="REQUIRED"></tx:method>
            <tx:method name="del*" propagation="REQUIRED"></tx:method>
            <tx:method name="delete*" propagation="REQUIRED"></tx:method>
            <!--其他方法规则-->
            <tx:method name="*" isolation="DEFAULT"/>
        </tx:attributes>
    </tx:advice>

    <!--配置aop切面-->
    <aop:config proxy-target-class="true">
        <!--配置切入点表达式-->
        <aop:pointcut id="pot"  expression="execution(* cn.woniu.service.impl.*.*(..))"></aop:pointcut>
        <!--将切入点表达式和通知关联-->
        <aop:advisor advice-ref="txadvice" pointcut-ref="pot"></aop:advisor>
    </aop:config>
</beans>
d、编写controller模块代码
d1、配置pom.xml 文件
<?xml version="1.0" encoding="UTF-8"?>
<project xmlns="http://maven.apache.org/POM/4.0.0"
         xmlns:xsi="http://www.w3.org/2001/XMLSchema-instance"
         xsi:schemaLocation="http://maven.apache.org/POM/4.0.0
  http://maven.apache.org/xsd/maven-4.0.0.xsd">
    <modelVersion>4.0.0</modelVersion>

    <groupId>cn.woniu</groupId>
    <artifactId>maven-web</artifactId>
    <version>1.0-SNAPSHOT</version>
    <!--web模块的打包方式为war-->
    <packaging>war</packaging>

    <name>maven-web Maven Webapp</name>
    <url>http://www.example.com</url>

    <!-- 锁定(统一管理)jar包版本 -->
    <properties>
        <spring.version>5.0.9.RELEASE</spring.version>
    </properties>

    <dependencies>
        <!--配置web模块引用service模块-->
        <dependency>
            <groupId>cn.woniu</groupId>
            <artifactId>maven-service</artifactId>
            <version>1.0-SNAPSHOT</version>
        </dependency>

        <!--springmvc坐标-->
        <dependency>
            <groupId>org.springframework</groupId>
            <artifactId>spring-webmvc</artifactId>
            <version>${spring.version}</version>
        </dependency>
        <!--servlet坐标-->
        <dependency>
            <groupId>javax.servlet</groupId>
            <artifactId>servlet-api</artifactId>
            <version>2.5</version>
            <scope>provided</scope>
        </dependency>
        <!--jsp api坐标-->
        <dependency>
            <groupId>javax.servlet.jsp</groupId>
            <artifactId>jsp-api</artifactId>
            <version>2.0</version>
            <scope>provided</scope>
        </dependency>
        <!--jstl标签库-->
        <dependency>
            <groupId>javax.servlet</groupId>
            <artifactId>jstl</artifactId>
            <version>1.2</version>
        </dependency>
    </dependencies>

    <build>
        <plugins>
            <!--maven tomcat插件-->
            <plugin>
                <groupId>org.apache.tomcat.maven</groupId>
                <artifactId>tomcat7-maven-plugin</artifactId>
                <version>2.2</version>
                <configuration>
                    <!--请求路径-->
                    <path>/</path>
                    <!--指定端口-->
                    <port>8080</port>
                    <!--配置tomcat插件编码格式-->
                    <uriEncoding>UTF-8</uriEncoding>
                </configuration>
            </plugin>
        </plugins>
    </build>
</project>
d2、配置logback.xml
<?xml version="1.0" encoding="UTF-8"?>
<configuration debug="false">
  <!--日志记录位置 -->
  <property name="LOG_PATH" value="${catalina.base}/logs/webapps"/>
  <property name="LOG_FILE" value="${LOG_PATH}/spring.log"/>
  <!--把日志输出到控制台 -->
  <appender name="CONSOLE" class="ch.qos.logback.core.ConsoleAppender">
    <encoder>
      <pattern>%d{yyyy-MM-dd HH:mm:ss} %5p | %-40.40logger{39} : %m%n</pattern>
      <charset>utf8</charset>
    </encoder>
  </appender>

  <!-- 指定类与<looger>的关联关系 -->
  <logger name="cn.woniu" level="DEBUG" additivity="false">
    <appender-ref ref="CONSOLE"/>
    <appender-ref ref="FILE" />
  </logger>

  <!--把日志级别大于info输出到控制台 -->
  <root level="INFO">
    <appender-ref ref="CONSOLE" />
    <appender-ref ref="FILE" />
  </root>
</configuration>
d3、配置spring-config.xml
<?xml version="1.0" encoding="UTF-8"?>
<beans xmlns="http://www.springframework.org/schema/beans"
       xmlns:xsi="http://www.w3.org/2001/XMLSchema-instance"
       xsi:schemaLocation="http://www.springframework.org/schema/beans
       http://www.springframework.org/schema/beans/spring-beans.xsd">

    <!--引用dao模块中的配置文件-->
    <import resource="classpath*:spring-config-dao.xml" />
    <!--引用service模块中的配置文件-->
    <import resource="classpath*:spring-config-service.xml" />
</beans>
d4、配置springmvc-config.xml
<?xml version="1.0" encoding="UTF-8"?>
<beans xmlns="http://www.springframework.org/schema/beans"
       xmlns:xsi="http://www.w3.org/2001/XMLSchema-instance"
       xmlns:context="http://www.springframework.org/schema/context"
       xmlns:mvc="http://www.springframework.org/schema/mvc"
       xsi:schemaLocation="http://www.springframework.org/schema/beans
       http://www.springframework.org/schema/beans/spring-beans.xsd
       http://www.springframework.org/schema/context
       http://www.springframework.org/schema/context/spring-context.xsd
       http://www.springframework.org/schema/mvc
       http://www.springframework.org/schema/mvc/spring-mvc.xsd">

    <!--扫描controller中的spring注解-->
    <context:component-scan base-package="cn.woniu.controller"></context:component-scan>
    <!--开启springmvc注解扫描-->
    <mvc:annotation-driven></mvc:annotation-driven>
    <!--springmvc忽略静态资源-->
    <mvc:default-servlet-handler></mvc:default-servlet-handler>

    <!-- 配置视图解析器 -->
    <bean id="viewResolver" class="org.springframework.web.servlet.view.InternalResourceViewResolver">
        <!--前缀-->
        <property name="prefix" value="/view/"></property>
        <!--后缀-->
        <property name="suffix" value=".jsp"></property>
    </bean>
</beans>
添加web.xml
<?xml version="1.0" encoding="UTF-8"?>
<web-app xmlns="http://java.sun.com/xml/ns/javaee" xmlns:xsi="http://www.w3.org/2001/XMLSchema-instance"
         xsi:schemaLocation="http://java.sun.com/xml/ns/javaee http://java.sun.com/xml/ns/javaee/web-app_3_0.xsd"
         version="3.0">
    <display-name>Archetype Created Web Application</display-name>

    <!--配置中文乱码过滤器-->
    <filter>
        <filter-name>characterEncodingFilter</filter-name>
        <filter-class>org.springframework.web.filter.CharacterEncodingFilter</filter-class>
        <init-param>
            <param-name>encoding</param-name>
            <param-value>UTF-8</param-value>
        </init-param>
    </filter>
    <filter-mapping>
        <filter-name>characterEncodingFilter</filter-name>
        <url-pattern>/*</url-pattern>
    </filter-mapping>

    <!--配置spring监听,让tomcat一起动就加载spring容器-->
    <context-param>
        <param-name>contextConfigLocation</param-name>
        <param-value>classpath*:spring-config-*.xml</param-value>
    </context-param>
    <listener>
        <listener-class>org.springframework.web.context.ContextLoaderListener</listener-class>
    </listener>

    <!--配置springmvc前端控制器-->
    <servlet>
        <servlet-name>dispatcherServlet</servlet-name>
        <servlet-class>org.springframework.web.servlet.DispatcherServlet</servlet-class>
        <!-- 配置初始化参数,创建完DispatcherServlet对象,加载springmvc.xml配置文件 -->
        <init-param>
            <!--创建springmvc.xml的配置文件,编写配置文件-->
            <param-name>contextConfigLocation</param-name>
            <param-value>classpath:springmvc-config.xml</param-value>
        </init-param>
        <!-- 服务器启动的时候,让DispatcherServlet对象创建 -->
        <load-on-startup>1</load-on-startup>
    </servlet>
    <servlet-mapping>
        <servlet-name>dispatcherServlet</servlet-name>
        <url-pattern>/</url-pattern>
    </servlet-mapping>
</web-app>
d5、创建login.jsp页面
<%@ page contentType="text/html;charset=UTF-8" language="java" %>
<html>
<head>
    <title>登录</title>
</head>
<body>
    <form action="/login" method="post">
        <p>帐号:<input type="text" name="account"></p>
        <p>密码:<input type="text" name="password"></p>
        <input type="submit" value="登录">
    </form>
</body>
</html>
d6、创建index.jsp页面
<%@ page contentType="text/html;charset=UTF-8" language="java" isELIgnored="false" %>
<%@ taglib prefix="c" uri="http://java.sun.com/jsp/jstl/core" %>
<html>
<head>
    <title>用户列表</title>
</head>
<body>
    <table border="1" cellpadding="3" cellspacing="0">
        <tr>
            <th>编号</th>
            <th>姓名</th>
            <th>性别</th>
            <th>生日</th>
            <th>地址</th>
            <th>余额</th>
        </tr>
        <c:forEach items="${usersList}" var="user">
        <tr>
            <td>${user.id}</td>
            <td>${user.userName}</td>
            <td>${user.sex}</td>
            <td>${user.birthday}</td>
            <td>${user.address}</td>
            <td>${user.money}</td>
        </tr>
        </c:forEach>
    </table>
</body>
</html>
d7、创建默认页面controller和登录请求controller
/**
 * 项目启动默认进入到login.jsp
 */
@Controller
public class HelloController {

    @RequestMapping("/")
    public String hello(){
        return "login";
    }
}
/**
* 处理登录请求
*/
@Controller
public class LoginController {
@Autowired
private UserService userService;
/**
* 接收登录请求
* @param model
* @param account
* @param password
* @return
*/
@RequestMapping("/login")
public String getLogin(Model model, HttpServletRequest request,String account, String password){
try{
Users users=userService.getLogin(account, password);
if(users!=null){
//登录成功
request.getSession().setAttribute("user", users);
//重定向到加载主页数据controller
return "redirect:/user/index";
}else{
model.addAttribute("msg", "帐号或密码错误");
}
}catch (Exception e){
e.printStackTrace();
}
return "loign";
}
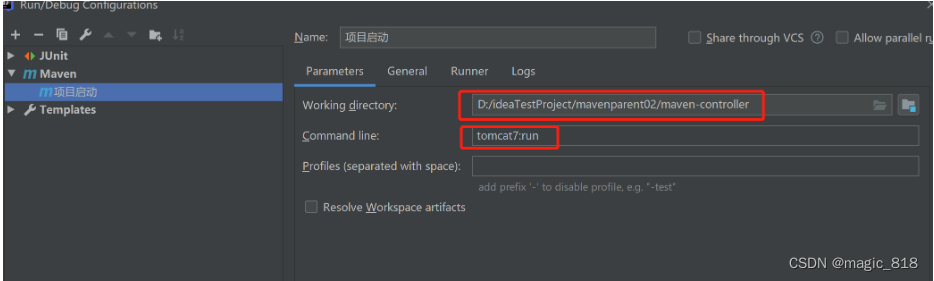
}添加maven 方式启动
maven 私服
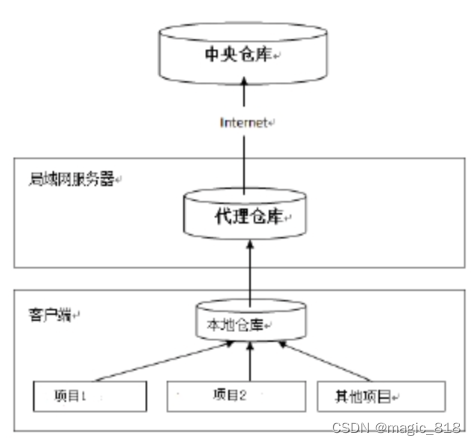
公司在自己的局域网内搭建自己的远程仓库服务器,称为私服,私服服务器即是公司内部的 maven 远程仓库,每个员工的电脑上安装 maven 软件并且连接私服服务器,员工将自己开发的项目打成 jar 并发布到私服服务器,其它项目组从私服服务器下载所依赖的构件(jar)。
私服还充当一个代理服务器,当私服上没有 jar 包会从互联网中央仓库自动下载,如下
搭建maven私服环境
a、下载 nexus
Nexus 是 Maven 仓库管理器,通过 nexus 可以搭建 maven 仓库,同时 nexus 还提供强大的仓库管理功能,构件搜索功能等。下载 Nexus, 下载地址Download Archives - Repository Manager 3 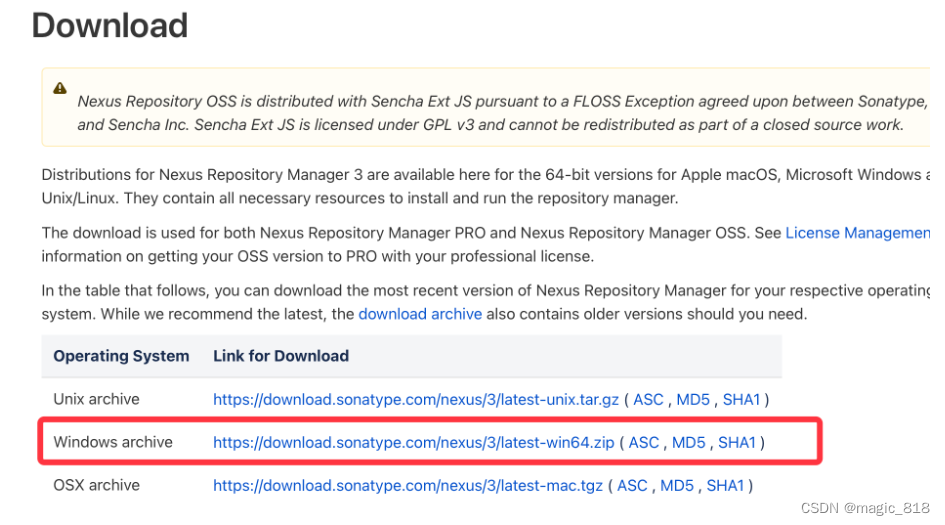
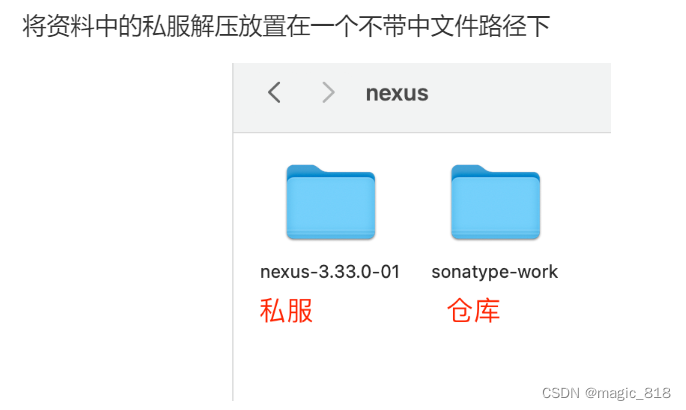

b,启动nexus服务器,进入bin 目录
nexus.exe \run nexus
c、停止私服服务器
以管理员身份运行命令提示符工具切换到刚解压的私服文件bin目录
输入停止命令:nexus.exe /stop

d、查找私服端口
找到解压目录下的nexus-3.33.0-01-win64\nexus-3.33.0-01\etc\nexus-default.properties
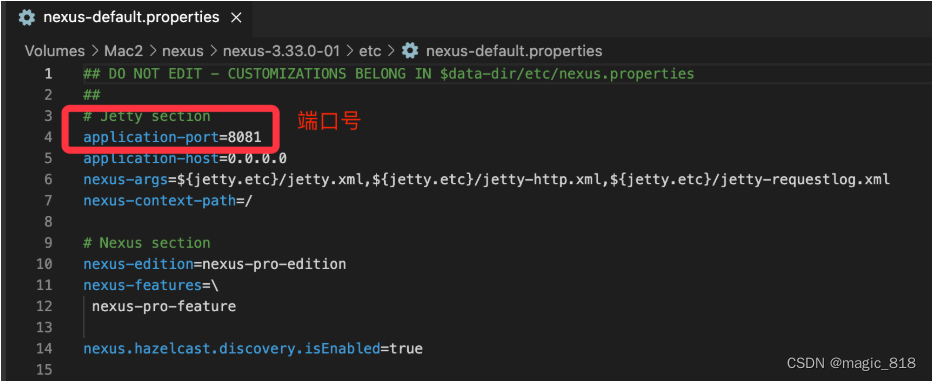
\# nexus访问端口
application-port=8081
\# nexus 主机监听配置(不用修改)
application-host=0.0.0.0

\# nexus 工程目录
nexus-webapp=${bundleBasedir}/nexus
nexus-webapp-context-path=/nexus

\# nexus 的 web 访问路径
nexus-work=${bundleBasedir}/../sonatype-work/nexus

\# nexus 仓库目录
runtime=${bundleBasedir}/nexus/WEB-INF # nexus 运行程序目录
e、访问私服
在浏览器中使用url访问私服:http://localhost:8081/
f、nexus仓库类型

nexus 的仓库有 4 种类型:
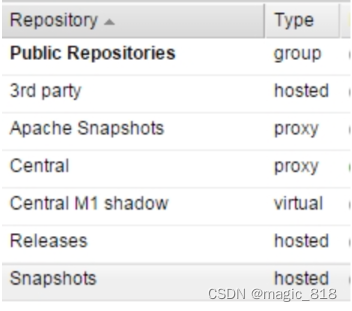
1、hosted,宿主仓库,部署自己的 jar 到这个类型的仓库,包括 releases 和 snapshot 两部分,Releases 公司内部发布版本仓库、 Snapshots 公司内部测试版本仓库,hosted仓库只面向公司内部局域网,3rd party为第三方仓库,意思是当局域网内需要网上(不是我们写的包)的第三方包时,先从网上maven官网下载下来,下载某个本地电脑,然后上传到3rd party这个仓库中
2、proxy,代理仓库,用于代理远程的公共仓库,如 maven 中央仓库,用户连接私服,私服自动去中央仓库下载 jar 包或者插件。当我们的私服没有jar时,去中央仓库下载,下载下来后,全部放到Central这个proxy仓库中,其中Apache Snapshots仓库专门用来存储从apache的中央仓库 中下载下来的
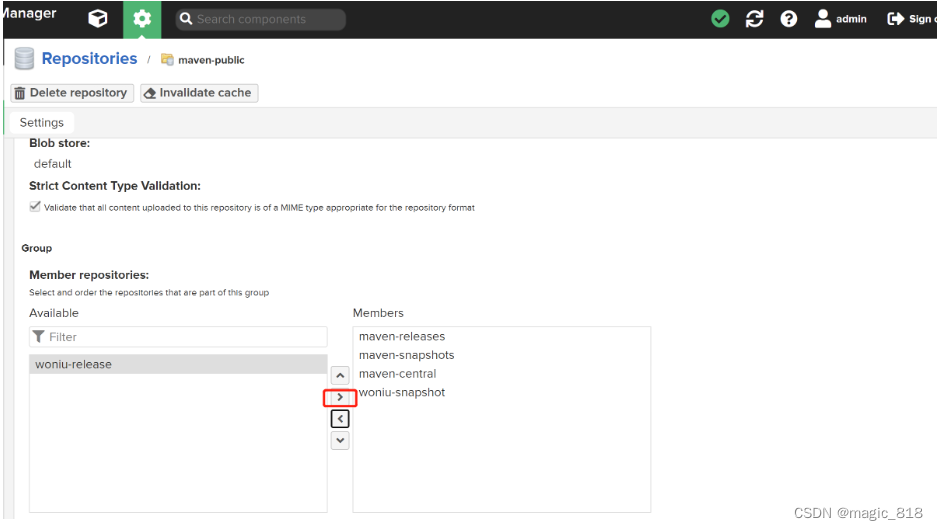
3、group,仓库组,用来合并多个 hosted/proxy 仓库,通常我们配置自己的 maven 连接仓库组。
4、virtual(虚拟):兼容 Maven1 版本的 jar 或者插件,基本上用不到了
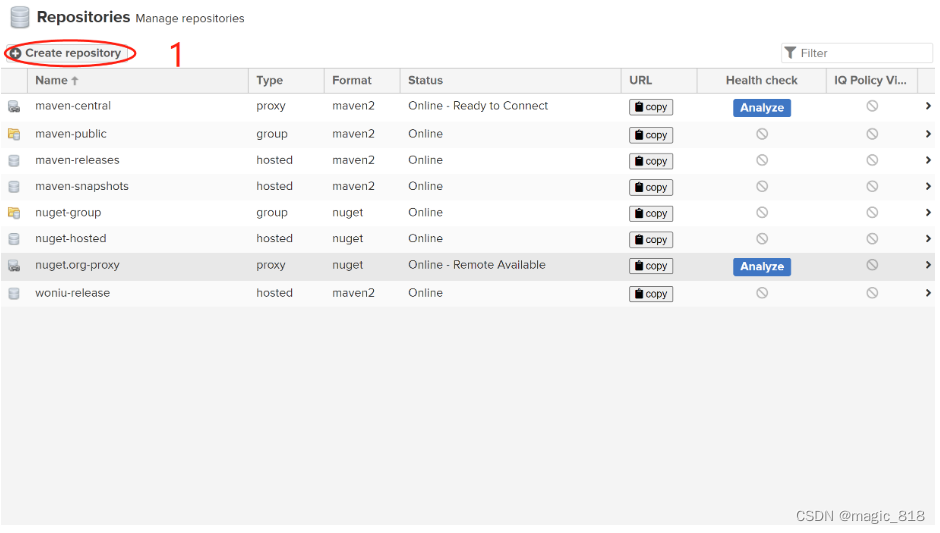
在nexus 上建立两个宿主仓库
a,新建仓库
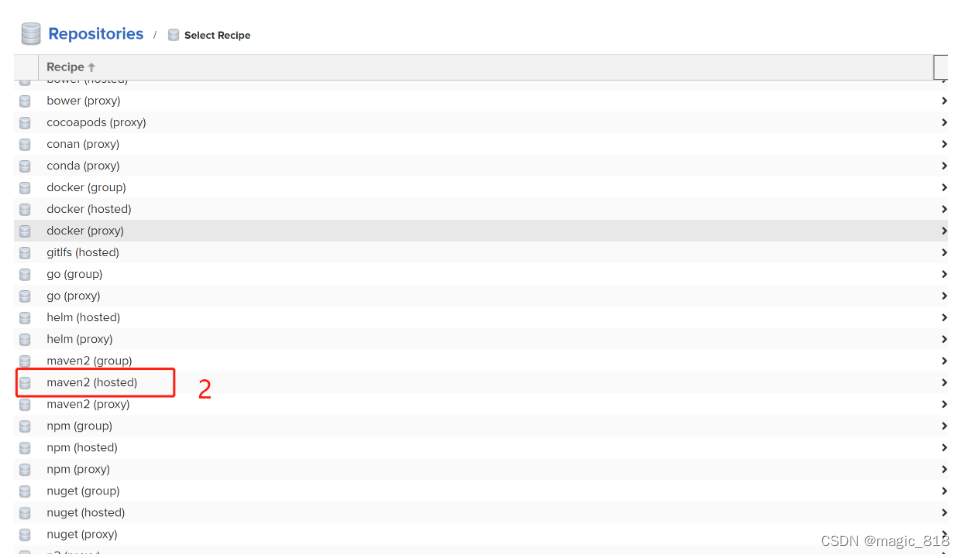
b,选中maven2(hosted)
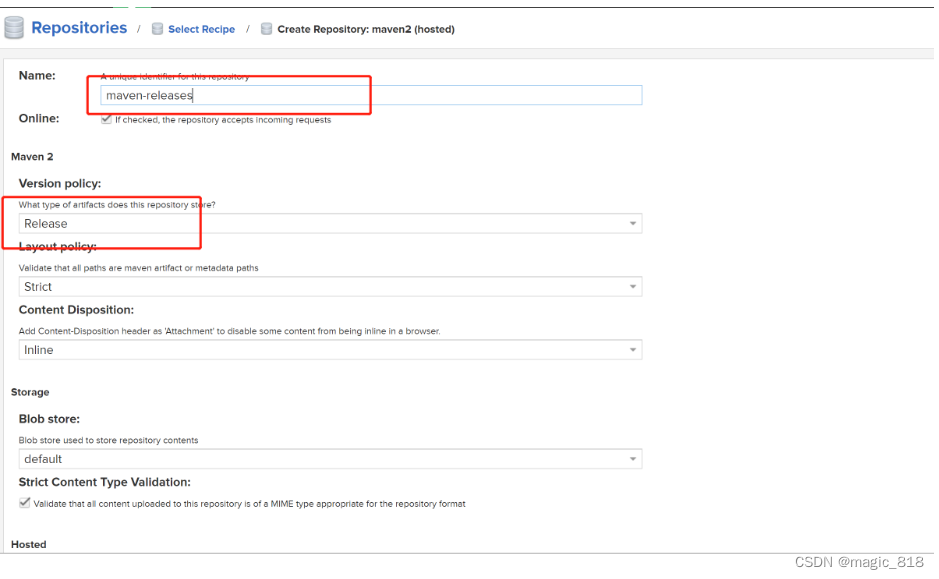
c,填写maven仓库名称和类型
d,添加到maven仓库组
上传jar到私服
a,手动上传
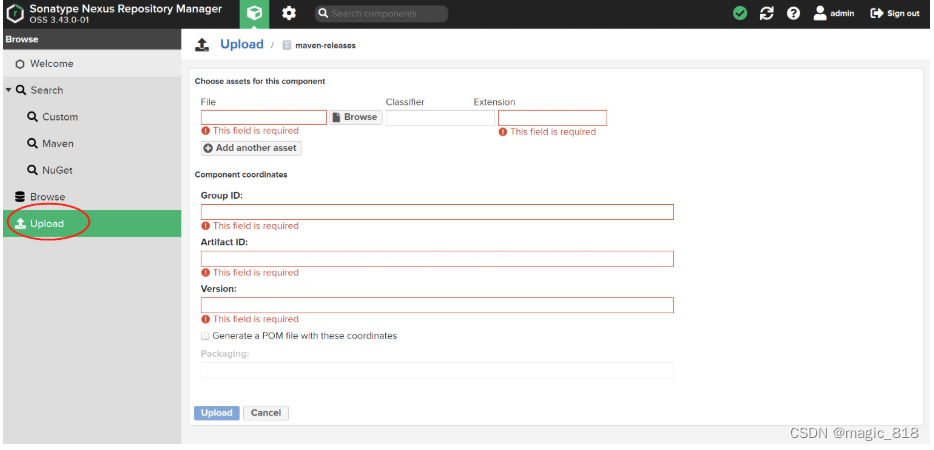
选中本地jar包,填写内容,勾选Generate a POM file with these coordinates :生成pom 文件
上传后效果: 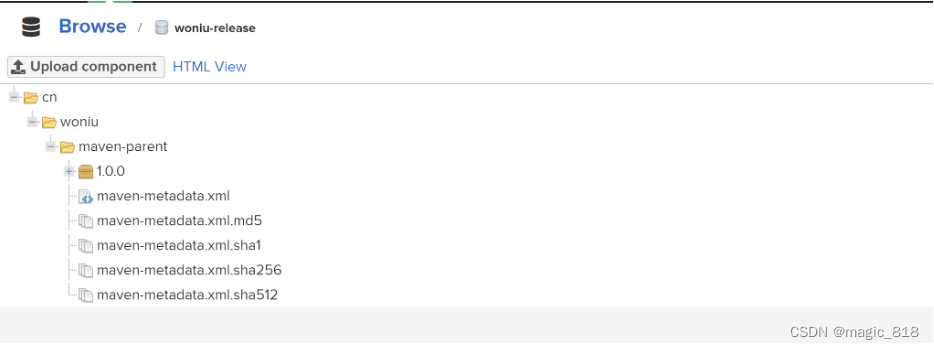
b,mvn deploy 上传
企业中多个团队协作开发通常会将一些公用的组件、开发模块等发布到私服供其它团队或模块开发人员使用。本例子假设多团队分别开发 maven-domain,maven-dao,maven-service,maven-web,某个团队开发完在maven-dao 会将 maven-dao 发布到私服供 maven-service团队使用,本例子会将 maven-parent 工程打成jar 包发布到私服。 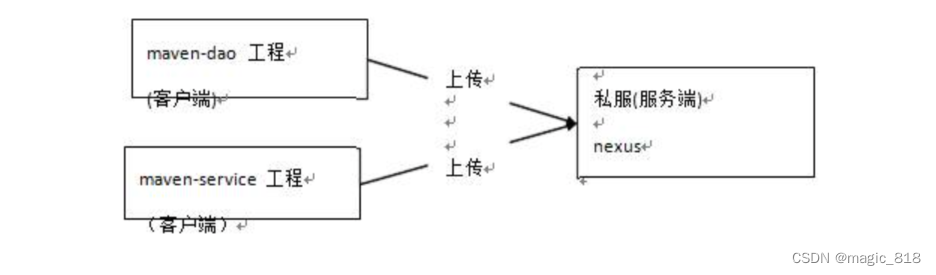
打开本地maven\conf\settings.xml在节点下添加私服登录帐号和密码
<!--配置要访问的私服帐号与密码-->
<server>
<id>releases</id>
<username>admin</username>
<password>admin123</password>
</server>
<server>
<id>snapshots</id>
<username>admin</username>
<password>admin123</password>
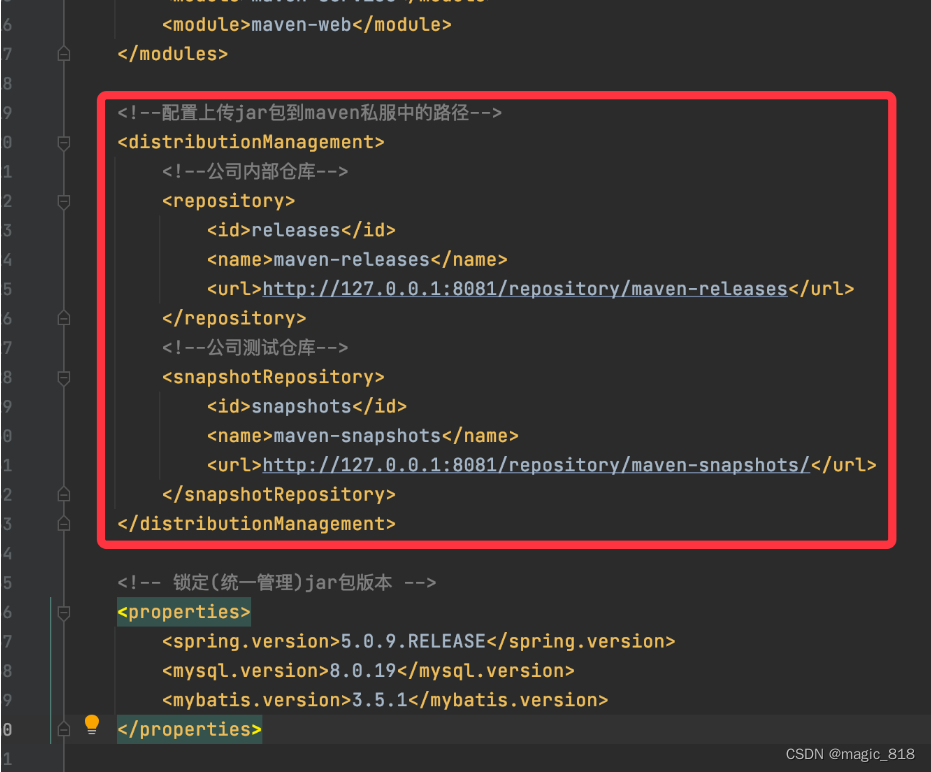
</server>在要上传到私服中的项目上配置上传路径,在ssm项目的父工程pom.xml中添加如下配置
 <!--配置上传jar包到maven私服中的路径-->
    <distributionManagement>
        <!--公司内部仓库-->
        <repository>
            <id>releases</id>
            <name>maven-releases</name>
            <url>http://localhost:8081/repository/maven-releases/</url>
        </repository>
        <!--公司测试仓库-->
        <snapshotRepository>
            <id>snapshots</id>
            <name>maven-snapshots</name>
            <url>http://localhost:8081/repository/maven-snapshots/</url>
        </snapshotRepository>
    </distributionManagement>
注意:pom.xml这里id和settings.xml配置id对应!并且要配置在坐标上面否则会报错
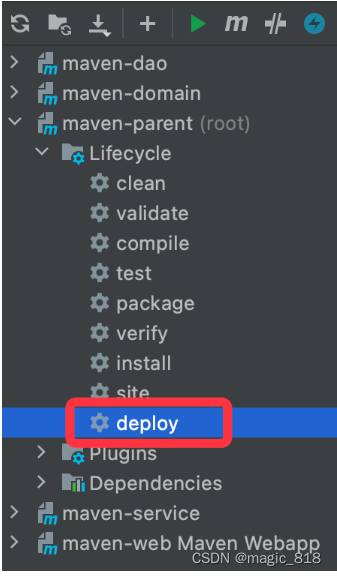
将项目中的jar包上传到私服
下载私服jar
没有配置 nexus 之前,如果本地仓库没有,去中央仓库下载,通常在企业中会在局域网内部署一台私服服务器,有了私服本地项目首先去本地仓库找 jar,如果没有找到则连接私服从私服下载 jar 包,如果私服没有 jar 包私服同时作为代理服务器从中央仓库下载 jar 包,
这样做的好处是一方面由私服对公司项目的依赖 jar 包统一管理,一方面提高下载速度项目连接私服下载 jar 包的速度要比项目连接中央仓库的速度快的多。
本例子测试从私服下载maven-dao包
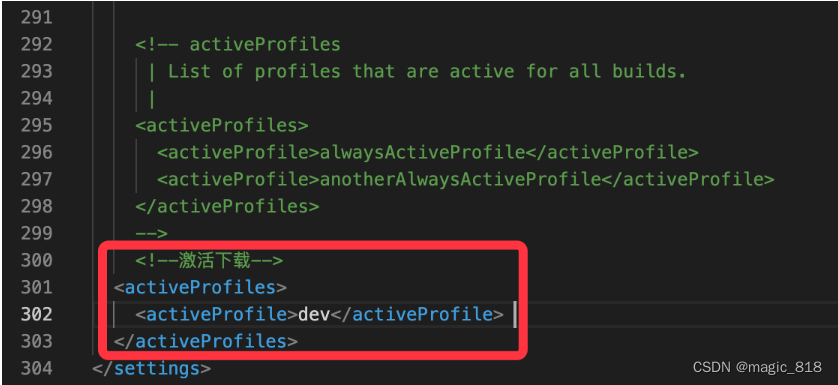
<!-- 下载jar包配置 -->
    <profiles>
	<profile>
		<!--profile的id -->
		<id>dev</id>
		<repositories>
			<repository>
        <!--仓库id,repositories可以配置多个仓库,保证id不重复 -->
				<id>nexus</id>
        <!--仓库地址,即nexus仓库组的地址 -->
				<url>http://localhost:8081/repository/maven-public/</url>
        <!--是否下载releases构件 -->
				<releases>
					<enabled>true</enabled>
				</releases>
        <!--是否下载snapshots构件 -->
				<snapshots>
					<enabled>true</enabled>
				</snapshots>
			</repository>
		</repositories>
		<pluginRepositories>
      <!-- 插件仓库,maven的运行依赖插件,也需要从私服下载插件 -->
			<pluginRepository>
        <!-- 插件仓库的id不允许重复,如果重复后边配置会覆盖前边 -->
				<id>public</id>
				<name>Public Repositories</name>
				<url>http://localhost:8081/repository/maven-public/</url>
			</pluginRepository>
		</pluginRepositories>
	</profile>
</profiles>
找到maven本地仓库中项目的打包地址,将maven-dao删除 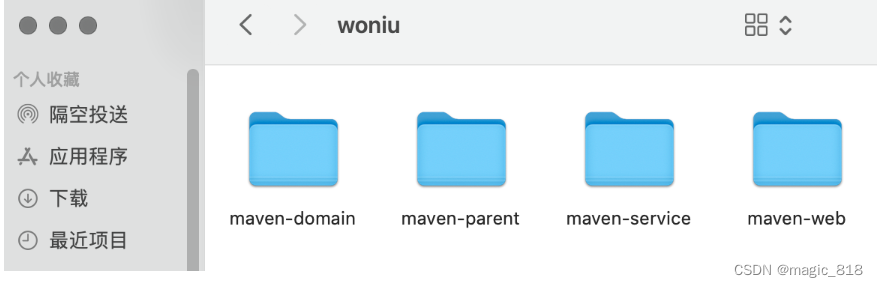
发布项目,发现提示找不到maven-dao.jar 
a,配置文件
配置本地maven的settings.xml,设置从私服下载jar
b,配置权限

重新发布项目将会自动下载maven-dao包


 9291
9291


 被折叠的 条评论
为什么被折叠?
被折叠的 条评论
为什么被折叠?
 到【灌水乐园】发言


