


 本文详细介绍了一个基于Vue的项目搭建过程,涵盖了Vue、View Design、Axios、MockJS及Webpack的配置与使用,通过实际案例展示了前端项目的基础结构与设施。
这是一个基于 vue 的项目,仅作学习,涉猎内容主要有:
- vue@2.6.10
- view-design@4.1.3-rc.2
- axios@0.18.1
- mockjs@1.1.0
- webpack@4.41.2
简介
Vue 是目前国内前端开发工程师最为熟悉的开发框架,本文特将工作中涉猎较多的几个内容整理成一个简单案例,仅供学习。主要涉及如下五个内容:
- vue
- view-design (前身是 iview)
- axios
- mockjs
- webpack
该案例是一个简单的 vue 项目,根据这个项目可以清晰知道一个前端项目需要的基础设施和基础结构,可以在此基础上做的任何拓展。源码地址:https://github.com/marvelousness/vue-view-design/
项目结构
vue-view-design
	│
	├─node_modules
	├─src							--> 源码目录
	│  ├─api						-->	 ├ API 配置文件目录
	│  ├─assets						-->	 ├ 资源文件目录
	│  │  ├─css						-->	 │ 	└ 样式表文件目录
	│  │  └─images					-->	 │	└ 图片文件目录
	│  └─mock						-->	 └ mock 配置文件
	├─target						--> 使用 wabpack 打包后的目标目录
	├─test							--> 测试目录
	└─webpack						--> webpack 配置目录
Axios 配置网络接口
在 axios 的官网上是这样描述的:易用、简洁且高效的http库。确实现在前端很多领域在使用它。本案例中以 axios 作为基础 http 库来调用后端的接口。
src/api/index.js
import axios from "axios";
import qs from "qs";

/**
 * 统一异步请求处理器
 * @param {String} _url 请求的地址
 * @param {String} _method 请求的方法
 * @param {Object || Array} _params 请求的参数
 * @param {String} type 请求的参数
 */
function request(_url, _method, _params, _type) {
	_method = _method || "GET";
	_params = _params || {};
	_type = _type || "QueryString";
	if(!_url) {
		return new Promise(function(resolve, reject) {
			reject("Unable to parse the address of the request");
		});
	}
	var config = {
		headers: {
			"X-Requested-With": "XMLHttpRequest"
		},
		method: _method,
		url: _url,
		withCredentials: true
	};
	if(_method.toUpperCase() == "PUT" || _method.toUpperCase() == "POST" || _method.toUpperCase() == "PATCH") {
		if(_type.toUpperCase() == "FORMDATA") {
			// `transformRequest` 允许在向服务器发送前,修改请求数据,
			// 只能用在 "PUT", "POST" 和 "PATCH" 这几个请求方法
			// 后面数组中的函数必须返回一个字符串,或 ArrayBuffer,或 Stream
			// 如果传递 type 值为 FormData,则认为需要进行表单提交
			// 如果请求方式为 POST 则处理为 表单提交
			config.headers["Content-Type"] = "application/x-www-form-urlencoded;charset=UTF-8";
			config.transformRequest = [function(data) {
				return qs.stringify(_params);
			}];
		} else {
			config.data = _params;
		}
	} else if(_method.toUpperCase() == "DELETE") {
		// 如果请求方式为 DELETE 则处理为 表单提交
		config.headers["Content-Type"] = "application/x-www-form-urlencoded;charset=UTF-8";
		config.transformRequest = [function(data) {
			return qs.stringify(_params);
		}];
	} else {
		config.params = _params;
	}
	return axios(config);
}

export default {
	getDataList(_params) {
		// 使用 GET 请求调用 /data/list 接口,请求体类型是 QueryString
		return request("/data/list", "GET", _params, "QueryString");
	},
	postData(_params) {
		// 使用 POST 请求调用 /data/save 接口,请求体类型是 RequestPayload
		return request("/data/save", "POST", _params, "RequestPayload");
	}
};
为了使 axios 的使用更加方便,这里将其进一步进行封装到 request 函数中,关于 axios 的配置也在其中。更加详细的配置请参考:http://www.axios-js.com/zh-cn/docs/。
该文件 export 了一个包含两个函数的对象,分别代表一个 GET 请求和一个 POST 请求。方便在 Vue 文件中 import 后使用。
Mockjs 拦截 Ajax 请求
很多时候,前端后的开发是分开的。当前端在开发过程中需要一个接口返回的数据,但是后端并未写好该接口时,可以使用 mock 拦截前端发送的 ajax 请求,并返回一个合适的数据使得前端开发的工作得以顺利开展。
src/mock/mock.js
const Mock = require("mockjs");

module.exports = function() {
	// 配置 mock 响应的时间在 120ms ~~ 2s 之间
	Mock.setup({
		timeout: '120-2000'
	});
	// 拦截 /data/list 请求,并返回合适的 JSON 结构的随机数据。
	Mock.mock(/data\/list/, function() {
		let data = Mock.mock({
		  "rows|1-10": [
			{
			  "boolean|1": true,
			  "double|100-999.4": 1.0,
			  "float|1-100.2": 1.0,
			  "integer|1-999": 1,
			  "long|100-999999": 1,
			  "uuid|1-20": "@character",
			}
		  ]
		});
		return data.rows;
	});
	// 拦截 /data/save 请求,并返回合适的 JSON 结构的随机数据。
	Mock.mock(/data\/save/, function(request) {
		let body = request && request.body ? JSON.parse(request.body) : null;
		if(body) {
			console.log("提交的请求体内容:", body);
			let id = parseInt(body.id);
			if(id / 1 === id) {
				// 判断只要存在 id 字段且字段的值是数字就是成功
				return "success";
			}
		}
		return "failure";
	});
};
该 js 文件返回的是一个 function ,可以在合适的时机调用该函数,实现拦截。本例中判断地址栏中的端口为 7070 则执行调用该函数实现拦截。当然,可以根据情况来调用该函数实现拦截。关于 mock 的更多内容可参考文档:http://www.axios-js.com/zh-cn/docs/
src/mock/index.js
if(window && window.location && window.location.port == 7070) {
	// 判断当前端口是 7070 则执行 mock
	require("./mock")();
}
Vue 源码
本案例中将不涉及 vue 的路由,就一个单独的 vue 文件结合 view-design(前身是 iview)做一个页面来构建一个简单的 SPA 案例。
src/main.js
import Vue from "vue";
import App from "./App";
import view from "view-design";
import "./mock";

// 引入 iview 样式文件
import "view-design/dist/styles/iview.css";

Vue.config.devtools = true;
Vue.use(view);

new Vue(App).$mount("#app");
很多文章中写到需要将 axios 添加到 vue 的原型中,其目的是在 vue 的示例中能够直接使用 this.$http.get.... 。实际上,并非所有的 vue 实例中都需要使用网络接口的,在需要的时候 import 即可。
src/App.vue
<template>
	<div>

	<Card class="card">
		<h1 slot="title">Hello World!</h1>
		<a href="#" slot="extra" @click.prevent="handleExtraClick">say hi to me!</a>
		<div class="container">
			<Tabs :value="tab.value" @on-click="handleTabClick">
				<TabPane label="简述" name="intro">
					<div class="intro">
						<p>前端涉猎的内容有:</p>
						<ol>
							<li>webpack</li>
							<li>vue</li>
							<li>view-design(前身是 iview)</li>
							<li>axios+mockjs</li>
						</ol>
						<p>后端涉猎的内容有:</p>
						<ol>
							<li>springboot</li>
						</ol>
					</div>
				</TabPane>
				<TabPane label="接口测试" name="api">
					<Tooltip content="点击此处刷新列表" placement="top" transfer>
						<Button type="primary" icon="ios-refresh" @click="handleRefresh"></Button>
					</Tooltip>
					<Tooltip content="点击此处测试表单数据提交" placement="top" transfer>
						<Button type="primary" @click="modal.visible = true">POST</Button>
					</Tooltip>
					<div class="table-container">
						<Spin size="large" fix v-if="table.loading">加载中...</Spin>
						<Table border :columns="table.columns" :data="table.data"></Table>
					</div>
				</TabPane>
			</Tabs>
			<div class="aboutme">
				<div class="description">该项目为简单的示例项目仅供学习!</div>
				<p><img src="~/statics/images/logo.jpg" /><a :href="'mailto:' + author">{{author}}</a></p>
				<p><a :href="url" target="_blank">{{url}}</a></p>
			</div>
		</div>
	</Card>
    <Modal v-model="modal.visible" width="60%" title="模拟表单数据提交">
		<div class="modal-form-container">
			<Form ref="formDynamic" :model="modal.form" :label-width="90">
				<FormItem v-for="(item, index) in modal.form.items" :key="index" :label="'field-' + index" :prop="'items.' + index" :rules="modal.rules">
					<Row>
						<Col span="10">
							<Input type="text" v-model="item.key" placeholder="enter key here..." @on-enter="handleSubmit">
								 <span slot="prepend">Key:</span>
							</Input>
						</Col>
						<Col span="10" offset="1">
							<Input type="text" v-model="item.value" placeholder="enter value here..." @on-enter="handleSubmit">
								<span slot="prepend">Value:</span>
							</Input>
						</Col>
						<Col span="3" style="text-align:center">
							<Button size="small" @click="handleRemoveModalFormItem(index)">Delete</Button>
						</Col>
					</Row>
				</FormItem>
				<FormItem>
					<Row>
						<Col span="24">
							<Button type="dashed" long @click="handleAddModalFormItem" icon="md-add">Add item</Button>
						</Col>
					</Row>
				</FormItem>
			</Form>
		</div>

		<div slot="footer" style="text-align:center">
			<Button type="primary" @click="handleSubmit" :loading="modal.pending">提交</Button>
			<Button @click="modal.visible = false">取消</Button>
		</div>
    </Modal>
	</div>
</template>

<script>
	// 引入已经配置好的网络接口工具,源文件在 src/api/index.js
	import API from "api";

	export default {
		data() {
			return {
				tab: {
					value: "intro"
				},
				table:{
					loading: false,
					columns:[{
						key: "boolean",
						title: "boolean"
					}, {
						key: "double",
						title: "double"
					}, {
						key: "float",
						title: "float"
					}, {
						key: "integer",
						title: "integer"
					}, {
						key: "long",
						title: "long"
					}, {
						key: "uuid",
						title: "string"
					}],
					data:[]
				},
				modal: {
					form: {
						items: [{
							key: null,
							value: null
						}]
					},
					rules: [{
						required: true,
						message: "此项不允许为空"
					}, {
						required: true,
						validator(rule, value, callback) {
							if(value) {
								if(value.key) {
									if(!/^([a-zA-Z]*)$/i.test(value.key)) {
										callback(new Error("key必须全部是字母"));
									}
								} else {
									callback(new Error("key为必填项"));
								}
							}
							callback();
						}
					}],
					pending: false,
					visible: false
				},
				author: "marvelousness@foxmail.com",
				url: "https://github.com/marvelousness/vue-view-design"
			}
		},
		computed: {
			length: {
				get() {
					return this.modal.form.items.length;
				}
			}
		},
		mounted() { },
		methods: {
			/**
			 * 处理 Card 标题右边的拓展位置的点击事件
			 */
			handleExtraClick() {
				this.$Message.info("Hi");
			},
			/**
			 * 处理 Tabs 点击事件
			 */
			handleTabClick(value) {
				if(value == "api") {
					this.handleRefresh();
				} else {
					this.table.data = [];
				}
			},
			/**
			 * 处理 Modal 中的表单中新增字段项事件
			 */
			handleAddModalFormItem() {
				if(this.length > 9) {
					this.$Message.error("已达上限!");
					return;
				}
				this.modal.form.items.push({
					value: null
				});
			},
			/**
			 * 处理 Modal 中的表单中移除字段项事件
			 */
			handleRemoveModalFormItem(index) {
				if(!(index > -1 && index < this.length)) {
					return;
				}
				this.modal.form.items.splice(index, 1);
			},
			/**
			 * 处理点击刷新按钮更新表格中的数据的事件
			 */
			handleRefresh() {
				let that = this;

				that.table.data = [];
				that.table.loading = true;
				API.getDataList({
					size: 100
				}).then((response) => {
					that.table.data = response.data;
					that.table.loading = false;
				}).catch((err) => {
					if(err) {
						if(err.response && err.response.data) {
							that.$Message.error(err.response.data);
						} else if(err.message) {
							that.$Message.error(err.message);
						} else {
							that.$Message.error("发生未经处理的异常!");
						}
					} else {
						that.$Message.error("服务器异常!");
					}
					that.table.loading = false;
				});
			},
			/**
			 * 处理点击提交后模拟数据提交事件
			 */
			handleSubmit() {
				let that = this;
				if(that.modal.pending) {
					that.$Message.info("数据正在处理中,请稍后再试!");
					return;
				}
				this.$refs.formDynamic.validate((valid) => {
					if(!valid) {
						that.$Message.error("表单信息异常!");
						return;
					}
					let data = {};
					let items = that.modal.form.items;
					for(let i = 0; i < items.length; i++) {
						let key = items[i].key;
						let value = items[i].value;
						if(/^([a-zA-Z]*)$/i.test(key) && value) {
							data[key] = value;
						}
					}
					that.modal.pending = true;
					API.postData(data).then((response) => {
						if(response && response.data == "success") {
							that.$Message.success("操作成功!");
						} else {
							that.$Message.warning("操作失败!");
						}
						that.modal.pending = false;
					}).catch((err) => {
						if(err) {
							if(err.response && err.response.data) {
								that.$Message.error(err.response.data);
							} else if(err.message) {
								that.$Message.error(err.message);
							} else {
								that.$Message.error("发生未经处理的异常!");
							}
						} else {
							that.$Message.error("服务器异常!");
						}
						that.modal.pending = false;
					});
				});
			}
		}
	}
</script>

<style>
	.card {
		width: 80%;
		margin: 50px auto 0px auto;
	}
	.intro {
		margin: 0px 20px;
	}
	.intro ol {
		list-style-position: inside;
	}

	.aboutme {
		text-align: center;
		border-top: solid 2px #ccc;
		margin-top: 30px;
		padding-top: 10px;
	}
	.aboutme .description {
	}
	.aboutme>p>img {
		width: 2em;
		vertical-align: middle;
		margin-right: 1em;
	}

	.table-container {
		margin-top: 10px;
		position: relative;
	}

	.modal-form-container {
		max-height: 300px;
		overflow-y: auto;
	}
</style>
本例中使用到了 iviewui (前身是 iview,从 2019 年 10 月起正式更名为 View U)的组件包括 Card、Tabs、Tooltip、Button、Spin、Table、Modal、Form、Row、Col、Input 等。模拟简单的交互,包括刷新,消息提示,数据提交等。
关于 vue 的详细文档请参考:https://cn.vuejs.org/v2/api/
关于 iviewui 的详细文档请参考:https://www.iviewui.com/
Webpack 手动编译
webpack 是一个现代 JavaScript 应用程序的静态模块打包器(module bundler)。当 webpack 处理应用程序时,它会递归地构建一个依赖关系图(dependency graph),其中包含应用程序需要的每个模块,然后将所有这些模块打包成一个或多个 bundle。
官网:https://www.webpackjs.com/
文档:https://www.webpackjs.com/concepts/
为了让这个 vue 项目得以正常部署和使用,需要使用到 webpack 打包工具使得该项目中所有依赖项被打包压缩到静态的js,css和其他资源能被浏览器直接解析的资源文件。当然,也可以使用 rollup 来打包,这里不展开作介绍。
官网首页的一张图能准确且清晰的解释 webpack 的作用:
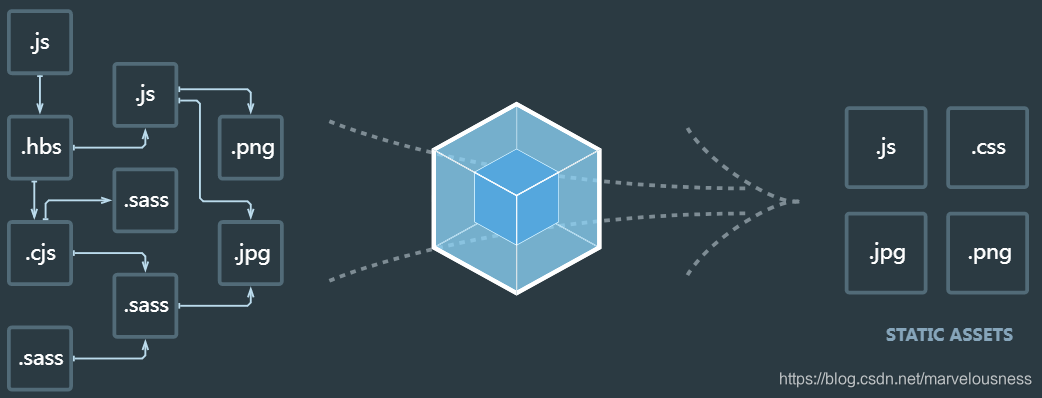
在本地开发过程中,webpack 主要提供两种模式,一种是 development 模式,提供一个本地 web 服务器使得代码的修改在浏览器上实时可见。另一种是 production 模式,直接将项目中所有依赖的东西打包成 js、css、字体和图片等静态资源。
在本案例中的 webpack 下有五个文件:
build.conf.js			--> production  模式下的配置文件
build.js				--> production  模式下的脚本文件
conf.js					--> 两种模式下的公共配置文件
dev.conf.js				--> development 模式下的配置文件
dev.js					--> development 模式下的脚本文件
关于 webpack 的更多配置,请参考:https://www.webpackjs.com/configuration/
webpack/conf.js
const PATH = require("path");
const VueLoaderPlugin = require("vue-loader/lib/plugin");
const HtmlWebpackPlugin = require("html-webpack-plugin");

function resolve(pathname) {
	return PATH.resolve(__dirname, "../" + pathname);
}

/**
 * 公共配置
 */
module.exports = {
	entry: {
		app: resolve("src/main.js")
	},
	resolve: {
		extensions: [".js", ".vue", ".less", ".json"],
		modules: [
			resolve("src"),
			resolve("node_modules")
		],
		alias: {
			src: resolve("src/"),
			statics: resolve("src/assets/"),
			api: resolve("src/api"),
			vue: resolve("node_modules/vue/dist/vue.js")
		}
	},
	plugins: [
		new VueLoaderPlugin(),
		new HtmlWebpackPlugin({
			template: resolve("index.html"),
			inject: true
		})
	]
};
在 conf.js 文件中的 api: resolve("src/api") 这一行配置就是为项目中指定的目录或者模块取别名,使得在 vue 或 js 中使用 import 时,不需要写完整的路径,所以,在上文中的 App.vue 中的 import API from "api"; 就是 import API from "./api/index"; 简写得到的。
webpack/dev.conf.js
const PATH = require("path");
const Webpack = require("webpack");
const WebpackMerge = require("webpack-merge");

module.exports = WebpackMerge(require("./conf"), {
	mode: "development",
	devtool: 'inline-source-map',
	module: {
		rules: [{
			test: /\.vue$/i,
			loader: "vue-loader",
			options: {
				sourceMap: true,
				extract: false
			}
		}, {
			test: /\.js$/i,
			loader: "babel-loader",
			exclude: PATH.resolve(__dirname, "../node_modules"),
		}, {
			test: /\.(png|jpe?g|gif|svg)(\?.*)?$/i,
			loader: "url-loader"
		}, {
			test: /\.(woff2?|eot|ttf|otf)(\?.*)?$/i,
			loader: "url-loader"
		}, {
			test: /\.css$/,
			use: ["vue-style-loader", "css-loader"]
		}, {
			test: /\.(sa|sc)ss$/,
			use: ["vue-style-loader", "css-loader", "stylus-loader"]
		}, {
			test: /\.less$/i,
			use: ["vue-style-loader", "css-loader", "less-loader"]
		}]
	},
	plugins: [
		new Webpack.NamedModulesPlugin(),
		new Webpack.HotModuleReplacementPlugin()
	]
});
在 dev.conf.js 文件中引入了 conf.js 文件中的配置并与之合并。
webpack/dev.js
const FS = require("fs");
const PATH = require("path");
const Webpack = require("webpack");
const conf = require("./dev.conf");
const WebpackDevServer = require("webpack-dev-server");

process.stdout.write("webpack compile mode: [" + conf.mode + "] .\n\n");

// 创建 Webpack 的编译器
const compiler = Webpack(require('./dev.conf'));

// 开发模式下的配置
const devServerOptions = {
	open: true,
	hot: true,
	port: 7070,
	// https: true,
	compress: true,
	host: "localhost",
	historyApiFallback: {
		disableDotRule: true
	},
	overlay: {
		warnings: true,
		errors: true
	},
	watchOptions: {
		poll: 1000,
		watch: true,
		ignored: /node_modules/,
		watchContentBase: true
	}
};

const server = new WebpackDevServer(compiler, devServerOptions);
server.listen(devServerOptions.port, "localhost", () => {
	console.log("starting server on http://localhost:" + devServerOptions.port);
});
dev.js 文件是 vue 项目本地开发的核心文件,它提供一个 web 服务器,监听本地 7070 端口,使得开发者能在浏览器中看到对应的网页。修改代码后实时通知浏览器端代码更新内容,让开发者将更多的时间投入到业务上。
如何执行?
在项目根目录执行 node webpack/dev 即可执行该脚本
webpack/build.conf.js
const OS = require("os");
const PATH = require("path");
const Webpack = require("webpack");
const WebpackMerge = require("webpack-merge");
const UglifyJsPlugin = require("uglifyjs-webpack-plugin");
const MiniCssExtractPlugin = require("mini-css-extract-plugin");
const CompressionWebpackPlugin = require("compression-webpack-plugin")
const BundleAnalyzerPlugin = require('webpack-bundle-analyzer').BundleAnalyzerPlugin;
const OptimizeCSSAssetsPlugin = require("optimize-css-assets-webpack-plugin");

function resolve(pathname) {
	return PATH.resolve(__dirname, "../" + pathname);
}

module.exports = WebpackMerge(require("./conf"), {
	output: {
		path: resolve("target/"),
		filename: "statics/js/[name].js",
		publicPath: "/"
	},
	mode: "production",
	parallelism: 10,
	target: "web",
	devtool: false,
	profile: true,
	bail: true,
	module: {
		rules: [{
			test: /\.vue$/i,
			loader: "vue-loader",
			options: {
				sourceMap: false,
				extract: true
			}
		}, {
			test: /\.js$/i,
			exclude: resolve("node_modules"),
			use: ["thread-loader", "babel-loader"]
		}, {
			test: /\.(png|jpe?g|gif|svg)(\?.*)?$/i,
			use: [{
				loader: "url-loader",
				options: {
					name: "[name].[ext]",
					// 当图片大于1k时,交给file-loader处理,
					// 否则url-loader会把图片src转成base64编码
					limit: 1000,
					publicPath: "/statics/images/",
					outputPath: "/statics/images"
				}
			}]
		}, {
			test: /\.(woff2?|eot|ttf|otf)(\?.*)?$/i,
			loader: "url-loader"
		}, {
			test: /\.css$/,
			use: [{
					loader: MiniCssExtractPlugin.loader,
					options: {
						hmr: false
					}
				},
				"css-loader"
			]
		}, {
			test: /\.(sa|sc)ss$/,
			use: [{
					loader: MiniCssExtractPlugin.loader,
					options: {
						hmr: false
					}
				},
				"css-loader",
				"postcss-loader",
				"sass-loader"
			]
		}, {
			test: /\.less$/i,
			use: [{
					loader: MiniCssExtractPlugin.loader,
					options: {
						hmr: false
					}
				},
				"css-loader",
				"postcss-loader",
				"less-loader"
			]
		}]
	},
	performance: {
		// 最大限制值:1.5MB(以字节为单位)
		maxAssetSize: 1572864,
		// 最大入口限制值:5MB(以字节为单位)
		maxEntrypointSize: 5242880,
		hints: "warning",
		assetFilter(name) {
			// 提供资源文件名的断言函数
			return name.endsWith('.css') || name.endsWith('.js');
		}
	},
	optimization: {
		minimizer: [
			new UglifyJsPlugin({
				parallel: OS.cpus().length
			}),
			new OptimizeCSSAssetsPlugin({
				assetNameRegExp: /\.css$/g,
				cssProcessor: require('cssnano'),
				// cssProcessorOptions: cssnanoOptions,
				cssProcessorPluginOptions: {
					preset: ['default', {
						discardComments: {
							removeAll: true,
						},
						normalizeUnicode: false
					}]
				},
				canPrint: true
			})
		],
		splitChunks: {
			chunks: "all",
			// 模块的最小体积
			// maxSize: 1048576,
			// 模块的最小被引用次数
			minChunks: 1,
			// 按需加载的最大并行请求数
			maxAsyncRequests: 8,
			// 一个入口最大并行请求数
			maxInitialRequests: 6,
			// 文件名的连接符
			// automaticNameDelimiter: "-",
			// name: true,
			// 缓存组
			cacheGroups: {
				vendors: {
					name: "vendors",
					test: /[\\/]node_modules[\\/]/,
					minChunks: 1,
					priority: -1,
					enforce: true
				},
				default: {
					name: "app",
					minChunks: 2,
					priority: -20,
					reuseExistingChunk: true
				}
			}
		}
	},
	plugins: [
		new MiniCssExtractPlugin({
			filename: "statics/css/[name].css",
			chunkFilename: "statics/css/[name].css",
			ignoreOrder: false
		}),
		// new BundleAnalyzerPlugin()
	]
});
在 build.conf.js 文件中引入了 conf.js 文件中的配置并与之合并。使用到了 splitChunks 参数将得到的 js 切分成 app.js 和 vendors.js 两个 js 文件。
webpack/build.js
const Webpack = require("webpack");
const rimraf = require("rimraf");
const conf = require("./build.conf");
const timestamp = Date.now();

process.stdout.write("webpack compile mode: [" + conf.mode + "] .\n\n");

rimraf(conf.output.path, function() {
	Webpack(conf, function(err, stats) {
		if(err) {
			throw err;
		}

		process.stdout.write(stats.toString({
			colors: true,
			modules: false,
			children: false,
			chunks: false,
			chunkModules: false
		}) + "\n\n");

		process.stdout.write("Build complete, use " + (Date.now() - timestamp) + "ms.\n");
	});
});
build.js 文件是 vue 项目打包的核心脚本文件。使用 rimraf 先删除目标目录(及其子目录),然后重新打包到目标目录。
如何执行?
在项目根目录执行 node webpack/build 即可执行该脚本
在该模式下除了能进行打包之外,还能打包的结果进行分析,比如该项目一共包含多少模块,每个模块占用大多的空间等。只需要将 build.conf.js 中的关于 BundleAnalyzerPlugin 插件的那一行的注释删掉,该插件就能在打包之后提供一个 web 服务器,进而在浏览器中展示每个模块的信息。如下图所示:
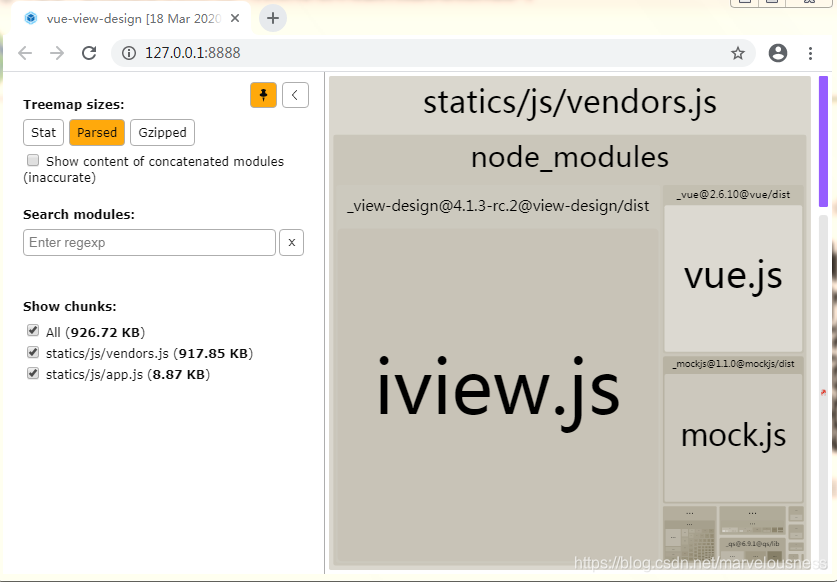
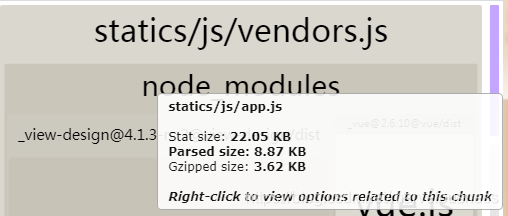
从图中可以知道,该项目打包之后产生了两个 js : app.js 和 vendors.js。由于在配置文件中 vendors.js 是切割的 node_modules,故而,在 vendors.js 中包含了 iview.js、vue.js、mock.js 等脚本。而 app 中将包含 src 目录中的脚本,因为该项目中写的内容比较少,于是在图中的布局看起来很小,也就是紫色的那一块。将鼠标滑到紫色上方,会将该模块的信息以浮动层的形式展示出来:
小结
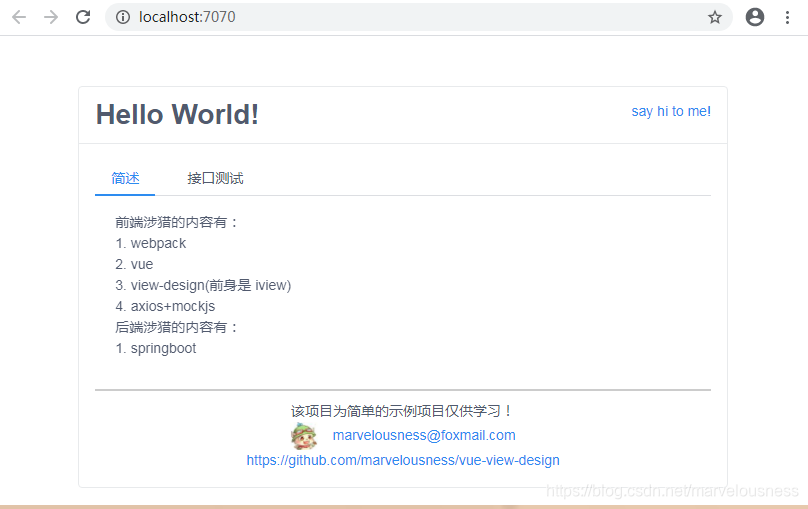
很多 vue 项目都是在一个简单的小案例的基础上进行不断的拓展,在本例中,为了将 vue、viewui、axios、mock 和 webpack 这五个内容简单的整合。并没有编写很复杂的代码。可通过这个案例,以小见大。最后附上效果图:
效果图 - 简述
效果图 - 接口测试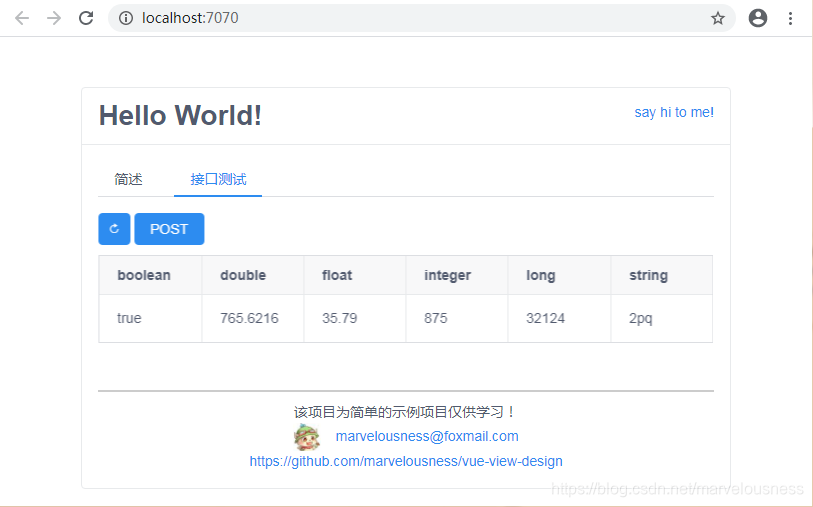


 971
971

 被折叠的 条评论
为什么被折叠?
被折叠的 条评论
为什么被折叠?
 到【灌水乐园】发言


