


笔者环境win1064位
1.anaconda python 3.5 64为安装包
2.安装tensflow1.0
第一部分(图片物体识别)
- 1.下载tensflow的源码包,并解压
2.下载 Protoc protoc-3.4.0-win32.zip
解压protoc-3.4.0-win32.zip,并将bin文件夹内的protoc.exe拷贝到c:\windows\system32目录下(也可将其添加到环境变量中)3.cd “F:\test\models-master\object_detection”在终端执行
protoc object_detection/protos/*.proto --python_out=.- 4.在终端执行ipython notebook
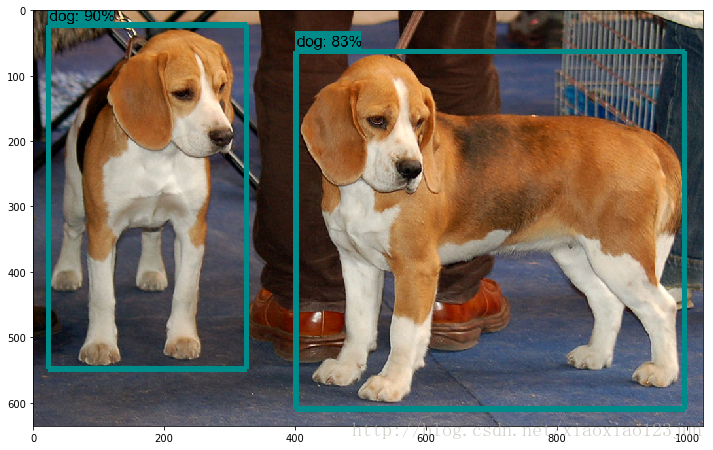
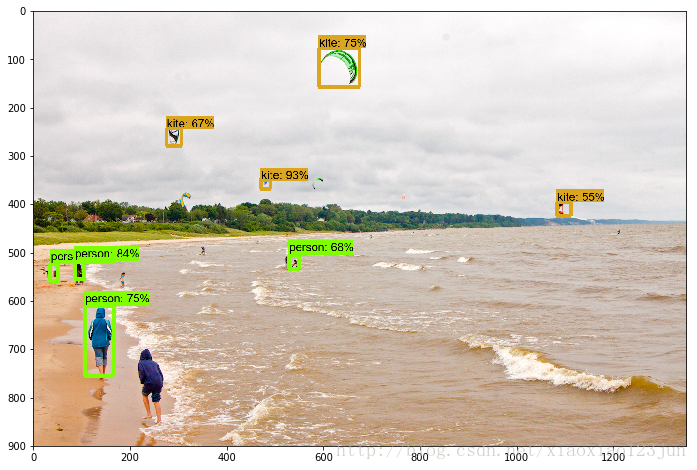
- 5.在浏览器打开object_detection_tutorial.ipynb运行
说明:
1.PATH_TO_TEST_IMAGES_DIR = ‘test_images’ 未测试文件夹
2.MODEL_NAME = ‘ssd_mobilenet_v1_coco_11_06_2017’
mode有四种:
MODEL_NAME = 'ssd_inception_v2_coco_11_06_2017'

MODEL_NAME = 'rfcn_resnet101_coco_11_06_2017'

MODEL_NAME = 'faster_rcnn_resnet101_coco_11_06_2017'

MODEL_NAME = 'faster_rcnn_inception_resnet_v2_atrous_coco_11_06_2017'
其中faster_rcnn_inception_resnet_v2_atrous_coco_11_06_2017’的准确路最高,但时间也最长
第二部分(视频中物体识别)
参考自github上面的完整代码下面我们在google的object_detection_tutorial.ipynb基础上改造。
1.安装环境准备
- a: 安装a.opencv的cv2包 :
conda install –channel https://conda.anaconda.org/menpo opencv3
可以在python 命令行中import cv2 测试一下
- b: 安装imageio: conda install -c conda-forge imageio
- c: 安装moviepy:pip install moviepy
- 导入opencv包
import cv23.下载视频剪辑程序,此处消耗时间有点长
# Import everything needed to edit/save/watch video clips
import imageio
imageio.plugins.ffmpeg.download()
下载过程如下:
Imageio: 'ffmpeg-win32-v3.2.4.exe' was not found on your computer; downloading it now.
Try 1. Download from https://github.com/imageio/imageio-binaries/raw/master/ffmpeg/ffmpeg-win32-v3.2.4.exe (34.1 MB)
Downloading: 8192/35749888 bytes (0.0%)16384/35749888 bytes (0.0%)32768/35749888 bytes (0.1%)65536/35749888 bytes (0.2%)98304/35749888 bytes (0.3%)131072/35749888 bytes (0.4%)147456/35749888 bytes (0.4%)163840/35749888 bytes (0.5%)180224/35749888 bytes (0.5%)19660**********************
 (99.7%)35651584/35749888 bytes (99.7%)35667968/35749888 bytes (99.8%)35684352/35749888 bytes (99.8%)35700736/35749888 bytes (99.9%)35717120/35749888 bytes (99.9%)35733504/35749888 bytes (100.0%)35749888/35749888 bytes (100.0%)35749888/35749888 bytes (100.0%)
  Done
File saved as C:\Users\Administrator\AppData\Local\imageio\ffmpeg\ffmpeg-win32-v3.2.4.exe.
4.
from moviepy.editor import VideoFileClip
from IPython.display import HTML
5.
def detect_objects(image_np, sess, detection_graph):
    # Expand dimensions since the model expects images to have shape: [1, None, None, 3]
    image_np_expanded = np.expand_dims(image_np, axis=0)
    image_tensor = detection_graph.get_tensor_by_name('image_tensor:0')

    # Each box represents a part of the image where a particular object was detected.
    boxes = detection_graph.get_tensor_by_name('detection_boxes:0')

    # Each score represent how level of confidence for each of the objects.
    # Score is shown on the result image, together with the class label.
    scores = detection_graph.get_tensor_by_name('detection_scores:0')
    classes = detection_graph.get_tensor_by_name('detection_classes:0')
    num_detections = detection_graph.get_tensor_by_name('num_detections:0')

    # Actual detection.
    (boxes, scores, classes, num_detections) = sess.run(
        [boxes, scores, classes, num_detections],
        feed_dict={image_tensor: image_np_expanded})

    # Visualization of the results of a detection.
    vis_util.visualize_boxes_and_labels_on_image_array(
        image_np,
        np.squeeze(boxes),
        np.squeeze(classes).astype(np.int32),
        np.squeeze(scores),
        category_index,
        use_normalized_coordinates=True,
        line_thickness=8)
    return image_np


    def process_image(image):
    # NOTE: The output you return should be a color image (3 channel) for processing video below
    # you should return the final output (image with lines are drawn on lanes)
    with detection_graph.as_default():
        with tf.Session(graph=detection_graph) as sess:
            image_process = detect_objects(image, sess, detection_graph)
            return image_process
6.开启视频标记,将视频video1.mp4放入到“”F:\test\models-master\object_detection” subclip(25,30)代表识别视频中25-30s这一时间段。
white_output = 'video1_out.mp4'
clip1 = VideoFileClip("video1.mp4").subclip(25,30)
white_clip = clip1.fl_image(process_image) #NOTE: this function expects color images!!s
%time white_clip.write_videofile(white_output, audio=False)
7.在浏览器中展示
HTML("""
<video width="960" height="540" controls>
  <source src="{0}">
</video>
""".format(white_output))
8.保存为gif格式
from moviepy.editor import *
clip1 = VideoFileClip("video1_out.mp4")
clip1.write_gif("final.gif")
本文参考:
http://m.blog.csdn.net/xiaoxiao123jun/article/details/76605928


 1496
1496

 被折叠的 条评论
为什么被折叠?
被折叠的 条评论
为什么被折叠?
 到【灌水乐园】发言


