


1. 介绍
Sharding-JDBC是ShardingSphere的第一个产品,也是ShardingSphere的前身。 它定位为轻量级Java框架,在Java的JDBC层提供的额外服务。它使用客户端直连数据库,以jar包形式提供服务,无需额外部署和依赖,可理解为增强版的JDBC驱动,完全兼容JDBC和各种ORM框架。
- 适用于任何基于JDBC的ORM框架,如:JPA, Hibernate, Mybatis, Spring JDBC Template或直接使用JDBC。
- 支持任何第三方的数据库连接池,如:DBCP, C3P0, BoneCP, Druid, HikariCP等。
- 支持任意实现JDBC规范的数据库。目前支持MySQL,Oracle,SQLServer,PostgreSQL以及任何遵循SQL92标准的数据库。
2. 构建一个springboot项目
<?xml version="1.0" encoding="UTF-8"?>
<project xmlns="http://maven.apache.org/POM/4.0.0" xmlns:xsi="http://www.w3.org/2001/XMLSchema-instance"
         xsi:schemaLocation="http://maven.apache.org/POM/4.0.0 https://maven.apache.org/xsd/maven-4.0.0.xsd">
    <modelVersion>4.0.0</modelVersion>
    <parent>
        <groupId>org.springframework.boot</groupId>
        <artifactId>spring-boot-starter-parent</artifactId>
        <version>2.7.1</version>
        <relativePath/> <!-- lookup parent from repository -->
    </parent>
    <groupId>com.sharding.jdbc</groupId>
    <artifactId>shardingjdbc</artifactId>
    <version>0.0.1-SNAPSHOT</version>
    <name>shardingjdbc</name>
    <description>Demo project for Spring Boot</description>
    <properties>
        <java.version>11</java.version>
    </properties>
    <dependencies>
        <dependency>
            <groupId>org.springframework.boot</groupId>
            <artifactId>spring-boot-starter</artifactId>
        </dependency>
        <dependency>
            <groupId>org.springframework.boot</groupId>
            <artifactId>spring-boot-starter-jdbc</artifactId>
        </dependency>
        <dependency>
            <groupId>org.mybatis.spring.boot</groupId>
            <artifactId>mybatis-spring-boot-starter</artifactId>
            <version>2.1.3</version>
        </dependency>
        <dependency>
            <groupId>com.alibaba</groupId>
            <artifactId>druid</artifactId>
            <version>1.1.23</version>
        </dependency>
        <dependency>
            <groupId>org.apache.shardingsphere</groupId>
            <artifactId>sharding-jdbc-spring-boot-starter</artifactId>
            <version>4.1.1</version>
        </dependency>
        <dependency>
            <groupId>mysql</groupId>
            <artifactId>mysql-connector-java</artifactId>
            <scope>runtime</scope>
        </dependency>
        <dependency>
            <groupId>org.springframework.boot</groupId>
            <artifactId>spring-boot-starter-test</artifactId>
            <scope>test</scope>
            <exclusions>
                <exclusion>
                    <groupId>org.junit.vintage</groupId>
                    <artifactId>junit-vintage-engine</artifactId>
                </exclusion>
            </exclusions>
        </dependency>
        <dependency>
            <groupId>org.projectlombok</groupId>
            <artifactId>lombok</artifactId>
        </dependency>
    </dependencies>

    <build>
        <plugins>
            <plugin>
                <groupId>org.springframework.boot</groupId>
                <artifactId>spring-boot-maven-plugin</artifactId>
            </plugin>
            <plugin>
                <groupId>org.apache.maven.plugins</groupId>
                <artifactId>maven-surefire-plugin</artifactId>
                <configuration>
                    <skipTests>true</skipTests>
                </configuration>
            </plugin>
        </plugins>
    </build>
</project>
3. 水平分表
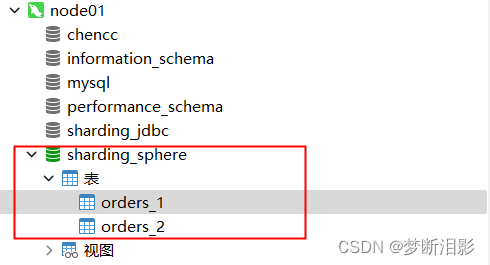
- 在node01(192.168.109.132)上创建sharding_sphere数据库
- 在数据库中创建两张表,orders_1和orders_2
CREATE TABLE `orders_1` (
  `id` int(11) NOT NULL AUTO_INCREMENT,
  `order_type` int(11) DEFAULT NULL,
  `customer_id` int(11) DEFAULT NULL,
  `amount` decimal(10,2) DEFAULT NULL,
  PRIMARY KEY (`id`)
) ENGINE=InnoDB AUTO_INCREMENT=1 DEFAULT CHARSET=utf8mb4;

CREATE TABLE `orders_2` (
  `id` int(11) NOT NULL AUTO_INCREMENT,
  `order_type` int(11) DEFAULT NULL,
  `customer_id` int(11) DEFAULT NULL,
  `amount` decimal(10,2) DEFAULT NULL,
  PRIMARY KEY (`id`)
) ENGINE=InnoDB AUTO_INCREMENT=1 DEFAULT CHARSET=utf8mb4;
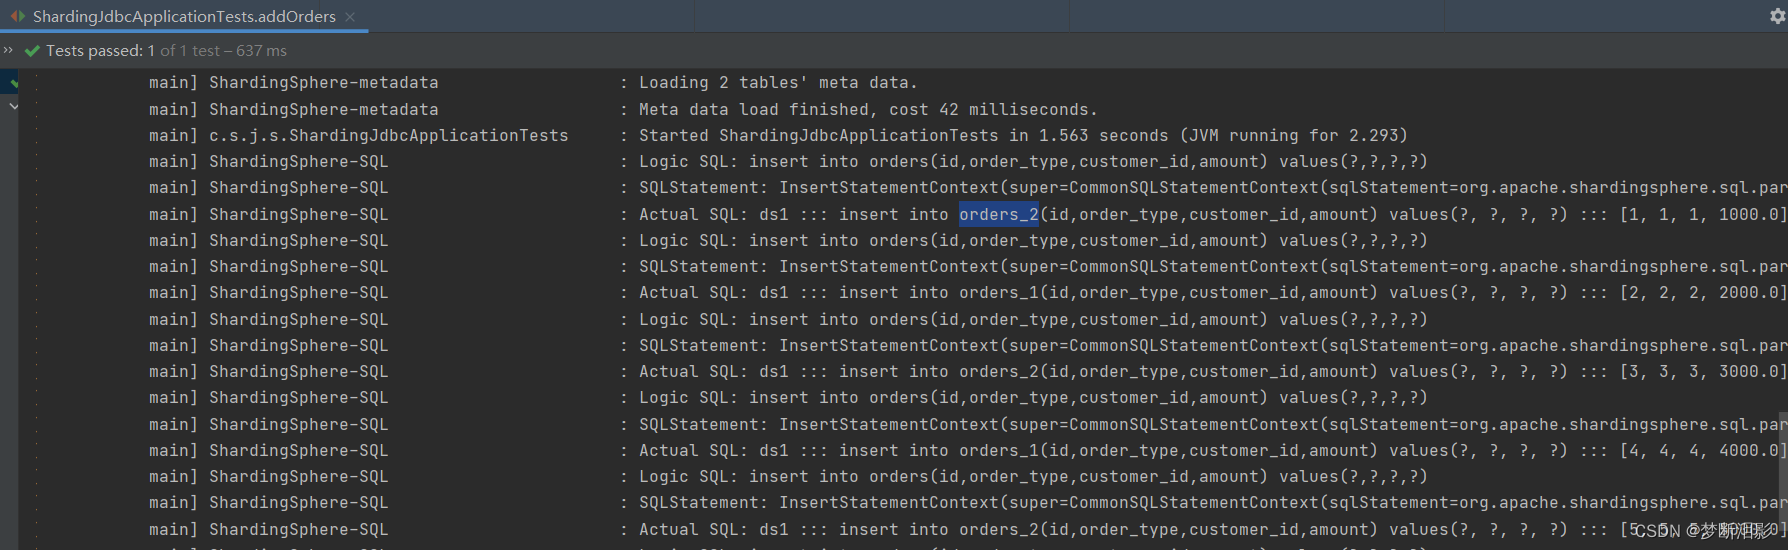
- 分片规则:如果订单编号是偶数添加到orders_1,如果是奇数添加到orders_2
- 创建配置文件
spring:
  shardingsphere:
    datasource:
      #配置数据源的名称
      names: ds1
      #配置数据源的具体内容
      ds1:
        driver-class-name: com.mysql.jdbc.Driver
        password: 123456
        type: com.alibaba.druid.pool.DruidDataSource
        url: jdbc:mysql://192.168.109.132:3306/sharding_sphere?serverTimezone=UTC
        username: root
    sharding:
      tables:
        #指定orders表的分布情况,配置表在哪个数据库中,表名称是什么
        orders:
          actual-data-nodes: ds1.orders_$->{1..2}
          #指定orders表里主键id生成策略
          key-generator:
            column: id
            type: SNOWFLAKE
          #指定分片策略。根据id的奇偶性来判断插入到哪个表
          table-strategy:
            inline:
              algorithm-expression: orders_${id%2+1}
              sharding-column: id
    #打开sql输出日志
    props:
      sql:
        show: true

#开启驼峰
mybatis:
  configuration:
    map-underscore-to-camel-case: true
- 创建实体类
@Data
public class Orders implements Serializable {

    private Integer id;
    private Integer orderType;
    private Integer customerId;
    private Double amount;

}
- 创建dao
public interface OrdersDao {

    @Insert("insert into orders(id,order_type,customer_id,amount) values(#{id},#{orderType},#{customerId},#{amount})")
    void insert(Orders orders);

    @Select("select * from orders where id = #{id}")
    public Orders selectOne(Integer id);

}
- 创建测试类
@SpringBootTest
public class ShardingJdbcApplicationTests {

    @Resource
    private OrdersDao ordersDao;

    @Test
    public void addOrders(){
        for (int i = 1; i <=10 ; i++) {
            Orders orders = new Orders();
            orders.setId(i);
            orders.setCustomerId(i);
            orders.setOrderType(i);
            orders.setAmount(1000.0*i);
            ordersDao.insert(orders);
        }
    }
    @Test
    public void queryOrders(){
        Orders orders = ordersDao.selectOne(1);
        System.out.println(orders);
    }
}
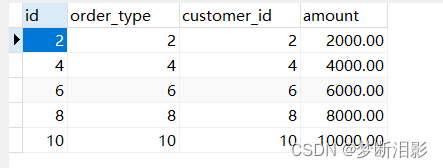
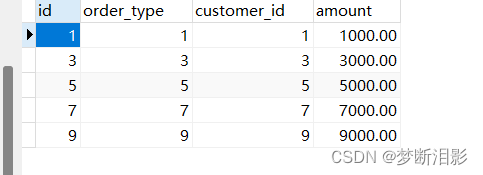
- 结果
orders_1:
orders_2:
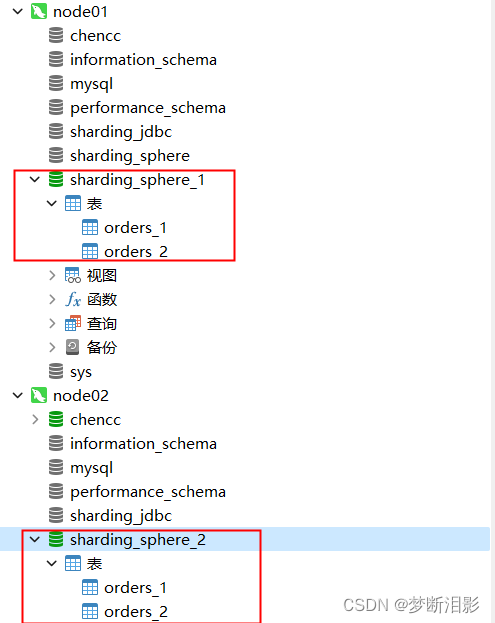
4. 水平分库
-
在不同的数据节点node01,node02上创建不同名称的数据库:sharding_sphere_1,sharding_sphere_2
-
在两个数据库上创建相同的表orders_1,orders_2
-
分片规则,按照customer_id的奇偶性来进行分库,然后按照id的奇偶性进行分表
-
配置文件
spring:
  shardingsphere:
    datasource:
      #配置数据源的名称
      names: ds1,ds2
      #配置数据源的具体内容
      ds1:
        driver-class-name: com.mysql.jdbc.Driver
        password: 123456
        type: com.alibaba.druid.pool.DruidDataSource
        url: jdbc:mysql://192.168.109.132:3306/sharding_sphere_1?serverTimezone=UTC
        username: root
      ds2:
        driver-class-name: com.mysql.jdbc.Driver
        password: 123456
        type: com.alibaba.druid.pool.DruidDataSource
        url: jdbc:mysql://192.168.109.128:3306/sharding_sphere_2?serverTimezone=UTC
        username: root
    sharding:
      tables:
        #指定orders表的分布情况,配置表在哪个数据库中,表名称是什么
        orders:
          actual-data-nodes: ds$->{1..2}.orders_$->{1..2}
          #指定orders表里主键id生成策略
          key-generator:
            column: id
            type: SNOWFLAKE
          #指定分片策略。根据id的奇偶性来判断插入到哪个表
          table-strategy:
            inline:
              algorithm-expression: orders_${id%2+1}
              sharding-column: id
          #指定库分片策略,根据customer_id的奇偶性来添加到不同的库中
          database-strategy:
            inline:
              algorithm-expression: ds$->{customer_id%2+1}
              sharding-column: customer_id
    #打开sql输出日志
    props:
      sql:
        show: true
#开启驼峰
mybatis:
  configuration:
    map-underscore-to-camel-case: true
- 修改ordersDao
public interface OrdersDao {

    @Insert("insert into orders(id,order_type,customer_id,amount) values(#{id},#{orderType},#{customerId},#{amount})")
    void insert(Orders orders);

    @Select("select * from orders where id = #{id}")
    public Orders selectOne(Integer id);

    @Select("select * from orders where id = #{id} and customer_id=#{customerId}")
    public Orders selectOneDB(Orders orders);
}
- 测试类
@SpringBootTest
public class ShardingJdbcApplicationTests {

    @Resource
    private OrdersDao ordersDao;

    @Test
    public void addOrdersDB(){
        for (int i = 1; i <=10 ; i++) {
            Orders orders = new Orders();
            orders.setId(i);
            orders.setCustomerId(new Random().nextInt(10));
            orders.setOrderType(i);
            orders.setAmount(1000.0*i);
            ordersDao.insert(orders);
        }
    }

    @Test
    public void queryOrdersDB(){
        Orders orders = new Orders();
        orders.setCustomerId(8);
        orders.setId(7);
        Orders o = ordersDao.selectOneDB(orders);
        System.out.println(o);
    }
}
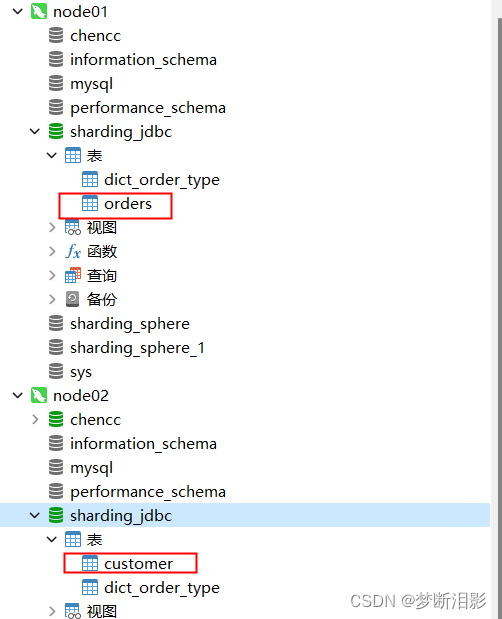
5. 垂直分库
-
在不同的数据节点node01,node02创建相同的库sharding_jdbc
-
在node01上创建orders表,在node02上创建customer表
-
分片规则:将不同的表插入到不同的库中
-
配置文件
spring:
  shardingsphere:
    datasource:
      #配置数据源的名称
      names: ds1,ds2
      #配置数据源的具体内容
      ds1:
        driver-class-name: com.mysql.jdbc.Driver
        password: 123456
        type: com.alibaba.druid.pool.DruidDataSource
        url: jdbc:mysql://192.168.109.132:3306/sharding_jdbc?serverTimezone=UTC
        username: root
      ds2:
        driver-class-name: com.mysql.jdbc.Driver
        password: 123456
        type: com.alibaba.druid.pool.DruidDataSource
        url: jdbc:mysql://192.168.109.128:3306/sharding_jdbc?serverTimezone=UTC
        username: root
    sharding:
      tables:
        #配置orders表所在的数据节点
        orders:
          actual-data-nodes: ds1.orders
          #指定orders表里主键id生成策略
          key-generator:
            column: id
            type: SNOWFLAKE
        #配置customer表所在的数据节点
        customer:
          actual-data-nodes: ds2.customer
          #指定customer表里主键id生成策略
          key-generator:
            column: id
            type: SNOWFLAKE
    #打开sql输出日志
    props:
      sql:
        show: true

#开启驼峰
mybatis:
  configuration:
    map-underscore-to-camel-case: true
- 编写customer类
@Data
public class Customer implements Serializable {

    private Integer id;
    private String name;

}
- 编写dao
public interface CustomerDao {
    @Insert("insert into customer(id,name) values(#{id},#{name})")
    public void insertCustomer(Customer customer);
}
- 测试类
@SpringBootTest
public class ShardingJdbcApplicationTests {

    @Resource
    private OrdersDao ordersDao;
    @Resource
    private CustomerDao customerDao;

    @Test
    public void addOrders(){
        for (int i = 1; i <=10 ; i++) {
            Orders orders = new Orders();
            orders.setId(i);
            orders.setCustomerId(i);
            orders.setOrderType(i);
            orders.setAmount(1000.0*i);
            ordersDao.insert(orders);
        }
    }

    @Test
    public void insertCustomer(){
        for (int i = 1; i <= 10 ; i++) {
            Customer customer = new Customer();
            customer.setId(i);
            customer.setName("zs"+i);
            customerDao.insertCustomer(customer);
        }
    }
}
6. 公共表
之前我们在学习mycat的时候接触过字典表的概念,其实在shardingsphere中也有类似的概念,只不过名字叫做公共表,也就是需要在各个库中都存在的表,方便做某些关联查询。
- 在不同节点的库上创建相同的表(node01,node02上创建dict_order_type)
CREATE TABLE `dict_order_type` (
  `id` int(11) NOT NULL AUTO_INCREMENT,
  `order_type` varchar(200) DEFAULT NULL,
  PRIMARY KEY (`id`)
) ENGINE=InnoDB AUTO_INCREMENT=1 DEFAULT CHARSET=utf8mb4;
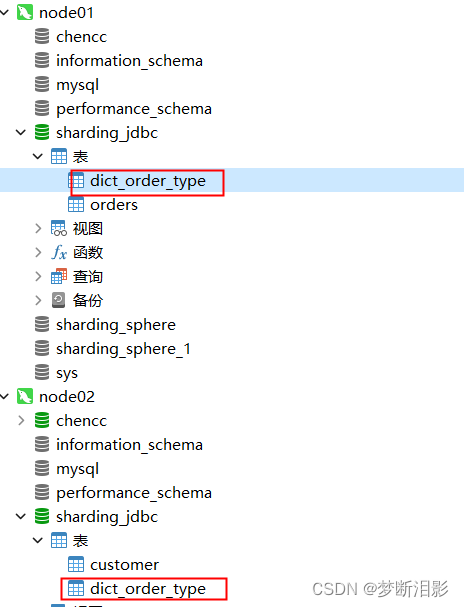
- 分片规则:公共表表示所有的库都具备相同的表
- 配置文件
spring:
  shardingsphere:
    datasource:
      #配置数据源的名称
      names: ds1,ds2
      #配置数据源的具体内容
      ds1:
        driver-class-name: com.mysql.jdbc.Driver
        password: 123456
        type: com.alibaba.druid.pool.DruidDataSource
        url: jdbc:mysql://192.168.109.132:3306/sharding_jdbc?serverTimezone=UTC
        username: root
      ds2:
        driver-class-name: com.mysql.jdbc.Driver
        password: 123456
        type: com.alibaba.druid.pool.DruidDataSource
        url: jdbc:mysql://192.168.109.128:3306/sharding_jdbc?serverTimezone=UTC
        username: root
    sharding:
      #配置广播表
      broadcast-tables: dict_order_type
      tables:
        dict_order_type:
          #指定orders表里主键id生成策略
          key-generator:
            column: id
            type: SNOWFLAKE
    #打开sql输出日志
    props:
      sql:
        show: true

#开启驼峰
mybatis:
  configuration:
    map-underscore-to-camel-case: true
- 创建实体类
@Data
public class DictOrderType {

    private Integer id;
    private String orderType;

}
- 创建dao
public interface DictOrderTypeDao {

    @Insert("insert into dict_order_type(id,order_type) values(#{id},#{orderType})")
    public void insertDictOrderType(DictOrderType dictOrderType);

    @Delete("delete from dict_order_type where id = #{id}")
    public void DeleteDictOrderType(Integer id);

}
- 测试类
@SpringBootTest
public class ShardingJdbcApplicationTests {

    @Resource
    private DictOrderTypeDao dictOrderTypeDao;

    @Test
    public void insertDictOrderType(){
        for (int i = 1; i <= 10 ; i++) {
            DictOrderType dictOrderType = new DictOrderType();
            dictOrderType.setId(i);
            dictOrderType.setOrderType("orderType"+i);
            dictOrderTypeDao.insertDictOrderType(dictOrderType);
        }
    }

    @Test
    public void deleteDictOrderType(){
        dictOrderTypeDao.DeleteDictOrderType(1);
    }

}
7. 实现读写分离
- node03,node04配置主从复制
- 在node03上创建person表
CREATE TABLE `person` (
  `id` int(11) NOT NULL AUTO_INCREMENT,
  `name` varchar(200) DEFAULT NULL,
  PRIMARY KEY (`id`)
) ENGINE=InnoDB DEFAULT CHARSET=utf8mb4;
- 配置文件
spring:
  shardingsphere:
    datasource:
      #配置数据源的名称
      names: ds1,ds2
      #配置数据源的具体内容
      ds1:
        driver-class-name: com.mysql.jdbc.Driver
        password: 123456
        type: com.alibaba.druid.pool.DruidDataSource
        url: jdbc:mysql://192.168.109.129:3306/chencc?serverTimezone=UTC
        username: root
      ds2:
        driver-class-name: com.mysql.jdbc.Driver
        password: 123456
        type: com.alibaba.druid.pool.DruidDataSource
        url: jdbc:mysql://192.168.109.130:3306/chencc?serverTimezone=UTC
        username: root
    masterslave:
      name: ms
      master-data-source-name: ds1
      slave-data-source-names: ds2
    #打开sql输出日志
    props:
      sql:
        show: true

#开启驼峰
mybatis:
  configuration:
    map-underscore-to-camel-case: true
- 创建person类
@Data
public class Person implements Serializable {
    private Integer id;
    private String name;
}
- 创建dao
public interface PersonDao {
    @Insert("insert into person(id,name) values(#{id},#{name})")
    public void insertPerson(Person person);

    @Select("select * from person where id = #{id}")
    public Person queryPerson(Integer id);
}
- 测试类
@SpringBootTest
public class ShardingJdbcApplicationTests {

    @Resource
    private PersonDao personDao;

    @Test
    public void insertPerson(){
        for (int i = 1; i <= 10; i++) {
            Person person = new Person();
            person.setId(i);
            person.setName("zhangsan"+i);
            personDao.insertPerson(person);
        }
    }

    @Test
    public void queryPerson(){
        Person person = personDao.queryPerson(1);
        System.out.println(person);
    }

}


 337
337


 被折叠的 条评论
为什么被折叠?
被折叠的 条评论
为什么被折叠?
 到【灌水乐园】发言


