


sharding-jdbc和sharding-proxy使用
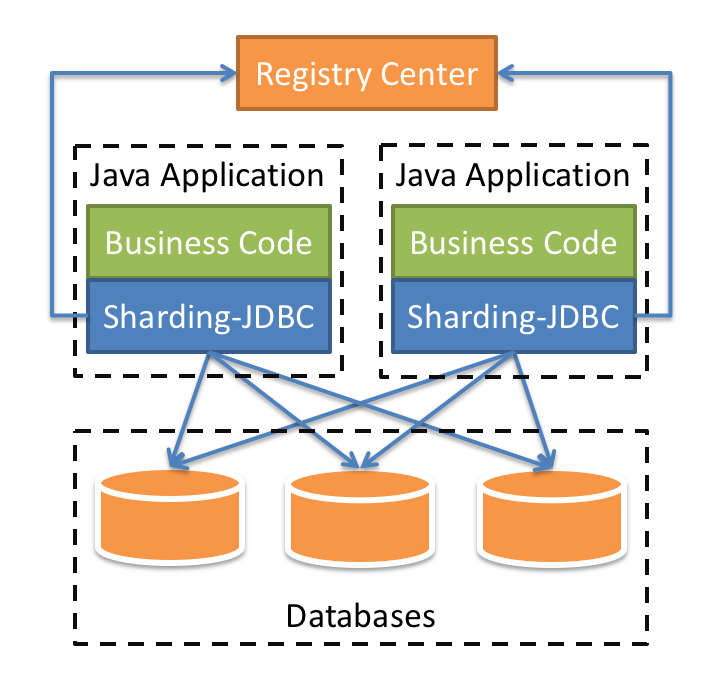
sharding-jdbc使用
本项目选择sharding-jdbc作为分表分库的组件
sharding-jdbc后续发展为Sharding-Sphere,包含sharding-jdbc、Sharding-Proxy、Sharding-Sidecar
定位为轻量级Java框架,在Java的JDBC层提供的额外服务。 它使用客户端直连数据库,以jar包形式提供服务,需
额外部署和依赖,可理解为增强版的JDBC驱动,完全兼容JDBC和各种ORM框架。
- 适用于任何基于JDBC的ORM框架,如:JPA, Hibernate, Mybatis, Spring JDBC Template或直接使用JDBC。
- 支持任何第三方的数据库连接池,如:DBCP, C3P0, BoneCP, Druid, HikariCP等。
- 支持任意实现JDBC规范的数据库。目前支持MySQL,Oracle,SQLServer,PostgreSQL以及任何遵循SQL92标准的数据库。
1、引入maven依赖
<dependency>
    <groupId>org.apache.shardingsphere</groupId>
    <artifactId>sharding-jdbc-spring-boot-starter</artifactId>
    <version>4.1.1</version>
</dependency>
<!-- 添加druid连接池;如果用druid-spring-boot-starter要在启动类加@SpringBootApplication(exclude = {DruidDataSourceAutoConfigure.class}) -->
<dependency>
    <groupId>com.alibaba</groupId>
    <artifactId>druid</artifactId>
    <version>1.1.10</version>
</dependency>
为什么配置了某个数据连接池的spring-boot-starter(比如druid)和sharding-jdbc-spring-boot-starter时,系统启动会报错?
回答:
- 因为数据连接池的starter(比如druid)可能会先加载并且其创建一个默认数据源,这将会使得sharding-jdbc创建数据源时发生冲突。
- 解决办法为,去掉数据连接池的starter即可,sharing-jdbc自己会创建数据连接池。
如果出现datasource问题按上述进行修改
数据库表

本分库分表使用了两个数据库test和test2;每个数据库中有两张结构相同的user表分别为user_0,user_1;其中user表为逻辑表,user_1,user_0为实际存在的物理表
2. 规则配置
ShardingSphere-JDBC 可以通过 Java,YAML,Spring 命名空间和 Spring Boot Starter 这 4 种方式进行配置,开发者可根据场景选择适合的配置方式。 详情请参见配置手册。
server:
  port: 8090

#spring:
#  datasource:
#    driver-class-name: com.mysql.cj.jdbc.Driver
#    url: jdbc:mysql://127.0.0.1:3306/test
#    username: root
#    password: 123456


spring:
  shardingsphere:
    datasource:
      names: ds0,ds1
      ds0:
        type: com.alibaba.druid.pool.DruidDataSource
        driver-class-name: com.mysql.cj.jdbc.Driver
        url: jdbc:mysql://127.0.0.1:3306/test
        username: root
        password: 123456
      ds1:
        type: com.alibaba.druid.pool.DruidDataSource
        driverClassName: com.mysql.cj.jdbc.Driver
        url: jdbc:mysql://127.0.0.1:3306/test2
        username: root
        password: 123456


    sharding:
#      默认查询的数据源(对于不分库分表的表使用此数据源)
      default-data-source-name: ds0
#      默认分库策略
      default-database-strategy:
        inline:
          sharding-column: id
          algorithm-expression: ds$->{(id % 4) >1?1:0}
#          分表策略
      tables:
        user:
          actual-data-nodes: ds$->{0..1}.user_$->{0..1}
          table-strategy:
            inline:
              sharding-column: id
              algorithm-expression: user_$->{id % 2}
          key-generator:
            column: id
            type: SNOWFLAKE
    props:
      sql.show: true
去除原来的spring加载数据源的配置;添加多数据源配置如上所示;
使用
import com.baomidou.mybatisplus.annotation.TableName;
import lombok.Data;

@Data
@TableName("user")
public class User {

    @TableId(type = IdType.AUTO)
    private Long id;

    private String name;

    private Integer age;
}


import com.baomidou.mybatisplus.core.mapper.BaseMapper;
import com.example.demo.entity.User;

public interface UserMapper extends BaseMapper<User> {

}


import com.baomidou.mybatisplus.core.toolkit.Wrappers;
import com.example.demo.entity.Role;
import com.example.demo.entity.User;
import com.example.demo.mapper.RoleMapper;
import com.example.demo.mapper.UserMapper;
import org.springframework.beans.factory.annotation.Autowired;
import org.springframework.stereotype.Service;

import java.util.List;

@Service
public class UserServer {

    @Autowired
    private UserMapper userMapper;

    @Autowired
    private RoleMapper roleMapper;

    public List<User> findUserList() {
        return userMapper.selectList(Wrappers.<User>lambdaQuery().orderByAsc(User::getId));
    }


    public Long insert(User user) {
        userMapper.insert(user);
        return user.getId();
    }

    public boolean update(User user) {
        userMapper.updateById(user);
        return true;
    }


    public List<Role> findRoleList() {
        return roleMapper.selectList(Wrappers.emptyWrapper());
    }
}
查询user表数据时,可以同时查询出test.user_0,test.user_1,test2.user_0,test2.user_1中的数据并把结果合并展示;

查询结果:
[{"id":1,"name":"cxh","age":20},{"id":2,"name":"cxh","age":20},{"id":3,"name":"cxh","age":20},{"id":4,"name":"cxh","age":20},{"id":1402161819524833282,"name":"test","age":20},{"id":1402161899086585857,"name":"test","age":20},{"id":1402161947165892610,"name":"test","age":20},{"id":1402162015398830082,"name":"test","age":20},{"id":1402162021056946178,"name":"test","age":20},{"id":1402162026698285058,"name":"test","age":20},{"id":1402162037330845698,"name":"test","age":20},{"id":1402162043290951681,"name":"cxh","age":20}]
这里的user表为逻辑表,对应配置中的
[外链图片转存失败,源站可能有防盗链机制,建议将图片保存下来直接上传(img-rcfLHF0y-1623312211747)(C:\Users\Administrator\AppData\Roaming\Typora\typora-user-images\image-20210609135946599.png)]
实际查询的物理表为user_0和user_1;
其他方面都是正常使用
注意事项
行表达式标识符可以使用${...}或$->{...},但前者与Spring本身的属性文件占位符冲突,因此在Spring环境中使用行表达式标识符建议使用$->{...}。
配置文件说明

数据源名称,多数据源以逗号分隔

type= #数据库连接池类名称
driver-class-name= #数据库驱动类名
url= #数据库url连接
username= #数据库用户名
password= #数据库密码
xxx= #数据库连接池的其它属性

default-data-source-name= #未配置分片规则的表将通过默认数据源定位

spring.shardingsphere.sharding.default-database-strategy.xxx= #默认数据库分片策略,同分库策略
spring.shardingsphere.sharding.default-table-strategy.xxx= #默认表分片策略,同分表策略
actual-data-nodes= #由数据源名 + 表名组成,以小数点分隔。多个表以逗号分隔,支持inline表达式。缺省表示使用已知数据源与逻辑表名称生成数据节点,用于广播表(即每个库中都需要一个同样的表用于关联查询,多为字典表)或只分库不分表且所有库的表结构完全一致的情况
其他配置
spring.shardingsphere.datasource.names= #数据源名称,多数据源以逗号分隔

spring.shardingsphere.datasource.<data-source-name>.type= #数据库连接池类名称
spring.shardingsphere.datasource.<data-source-name>.driver-class-name= #数据库驱动类名
spring.shardingsphere.datasource.<data-source-name>.url= #数据库url连接
spring.shardingsphere.datasource.<data-source-name>.username= #数据库用户名
spring.shardingsphere.datasource.<data-source-name>.password= #数据库密码
spring.shardingsphere.datasource.<data-source-name>.xxx= #数据库连接池的其它属性

spring.shardingsphere.sharding.tables.<logic-table-name>.actual-data-nodes= #由数据源名 + 表名组成,以小数点分隔。多个表以逗号分隔,支持inline表达式。缺省表示使用已知数据源与逻辑表名称生成数据节点,用于广播表(即每个库中都需要一个同样的表用于关联查询,多为字典表)或只分库不分表且所有库的表结构完全一致的情况

#分库策略,缺省表示使用默认分库策略,以下的分片策略只能选其一

#用于单分片键的标准分片场景
spring.shardingsphere.sharding.tables.<logic-table-name>.database-strategy.standard.sharding-column= #分片列名称
spring.shardingsphere.sharding.tables.<logic-table-name>.database-strategy.standard.precise-algorithm-class-name= #精确分片算法类名称,用于=和IN。该类需实现PreciseShardingAlgorithm接口并提供无参数的构造器
spring.shardingsphere.sharding.tables.<logic-table-name>.database-strategy.standard.range-algorithm-class-name= #范围分片算法类名称,用于BETWEEN,可选。该类需实现RangeShardingAlgorithm接口并提供无参数的构造器

#用于多分片键的复合分片场景
spring.shardingsphere.sharding.tables.<logic-table-name>.database-strategy.complex.sharding-columns= #分片列名称,多个列以逗号分隔
spring.shardingsphere.sharding.tables.<logic-table-name>.database-strategy.complex.algorithm-class-name= #复合分片算法类名称。该类需实现ComplexKeysShardingAlgorithm接口并提供无参数的构造器

#行表达式分片策略
spring.shardingsphere.sharding.tables.<logic-table-name>.database-strategy.inline.sharding-column= #分片列名称
spring.shardingsphere.sharding.tables.<logic-table-name>.database-strategy.inline.algorithm-expression= #分片算法行表达式,需符合groovy语法

#Hint分片策略
spring.shardingsphere.sharding.tables.<logic-table-name>.database-strategy.hint.algorithm-class-name= #Hint分片算法类名称。该类需实现HintShardingAlgorithm接口并提供无参数的构造器

#分表策略,同分库策略
spring.shardingsphere.sharding.tables.<logic-table-name>.table-strategy.xxx= #省略

spring.shardingsphere.sharding.tables.<logic-table-name>.key-generator.column= #自增列名称,缺省表示不使用自增主键生成器
spring.shardingsphere.sharding.tables.<logic-table-name>.key-generator.type= #自增列值生成器类型,缺省表示使用默认自增列值生成器。可使用用户自定义的列值生成器或选择内置类型:SNOWFLAKE/UUID
spring.shardingsphere.sharding.tables.<logic-table-name>.key-generator.props.<property-name>= #属性配置, 注意:使用SNOWFLAKE算法,需要配置worker.id与max.tolerate.time.difference.milliseconds属性。若使用此算法生成值作分片值,建议配置max.vibration.offset属性

spring.shardingsphere.sharding.binding-tables[0]= #绑定表规则列表
spring.shardingsphere.sharding.binding-tables[1]= #绑定表规则列表
spring.shardingsphere.sharding.binding-tables[x]= #绑定表规则列表

spring.shardingsphere.sharding.broadcast-tables[0]= #广播表规则列表
spring.shardingsphere.sharding.broadcast-tables[1]= #广播表规则列表
spring.shardingsphere.sharding.broadcast-tables[x]= #广播表规则列表

spring.shardingsphere.sharding.default-data-source-name= #未配置分片规则的表将通过默认数据源定位
spring.shardingsphere.sharding.default-database-strategy.xxx= #默认数据库分片策略,同分库策略
spring.shardingsphere.sharding.default-table-strategy.xxx= #默认表分片策略,同分表策略
spring.shardingsphere.sharding.default-key-generator.type= #默认自增列值生成器类型,缺省将使用org.apache.shardingsphere.core.keygen.generator.impl.SnowflakeKeyGenerator。可使用用户自定义的列值生成器或选择内置类型:SNOWFLAKE/UUID
spring.shardingsphere.sharding.default-key-generator.props.<property-name>= #自增列值生成器属性配置, 比如SNOWFLAKE算法的worker.id与max.tolerate.time.difference.milliseconds

spring.shardingsphere.sharding.master-slave-rules.<master-slave-data-source-name>.master-data-source-name= #详见读写分离部分
spring.shardingsphere.sharding.master-slave-rules.<master-slave-data-source-name>.slave-data-source-names[0]= #详见读写分离部分
spring.shardingsphere.sharding.master-slave-rules.<master-slave-data-source-name>.slave-data-source-names[1]= #详见读写分离部分
spring.shardingsphere.sharding.master-slave-rules.<master-slave-data-source-name>.slave-data-source-names[x]= #详见读写分离部分
spring.shardingsphere.sharding.master-slave-rules.<master-slave-data-source-name>.load-balance-algorithm-class-name= #详见读写分离部分
spring.shardingsphere.sharding.master-slave-rules.<master-slave-data-source-name>.load-balance-algorithm-type= #详见读写分离部分

spring.shardingsphere.props.sql.show= #是否开启SQL显示,默认值: false
spring.shardingsphere.props.executor.size= #工作线程数量,默认值: CPU核数
自定义的列值生成器
sharding-jdbc提供了两种主键生成策略UUID、SNOWFLAKE ,默认使用SNOWFLAKE,
还抽离出分布式主键生成器的接口org.apache.shardingsphere.spi.keygen.ShardingKeyGenerator,方便用户自
行实现自定义的自增主键生成器。
package com.example.demo.config;


import org.apache.shardingsphere.spi.keygen.ShardingKeyGenerator;

import java.util.Properties;

//此处用于自定义主键生成算法
public class SimpleShardingKeyGenerator implements ShardingKeyGenerator {

    private Long id = 5L;
    private Properties properties = new Properties();

    public SimpleShardingKeyGenerator() {

    }

    @Override
    public synchronized Comparable<?> generateKey() {
        System.out.println("1234567890");
        return id++;
    }
//这里的返回值对应yaml中的type;具体见下图
    @Override
    public String getType() {
        return "SIMPLE";

    }

    @Override
    public Properties getProperties() {
        return this.properties;
    }

    @Override
    public void setProperties(Properties properties) {
        this.properties = properties;
    }

}

自定义后配置,添加下面内容
META-INF/services/org.apache.shardingsphere.spi.keygen.ShardingKeyGenerator`,文件内容为:#`your_package_name.SimpleShardingKeyGenerator
com.example.demo.config.SimpleShardingKeyGenerator
注意点:

对应的分库分表的实体类中,主键字段一定要加上上面的注解,否则的话自定义的主键生成算法不生效;默认使用SNOWFLAKE算法实现
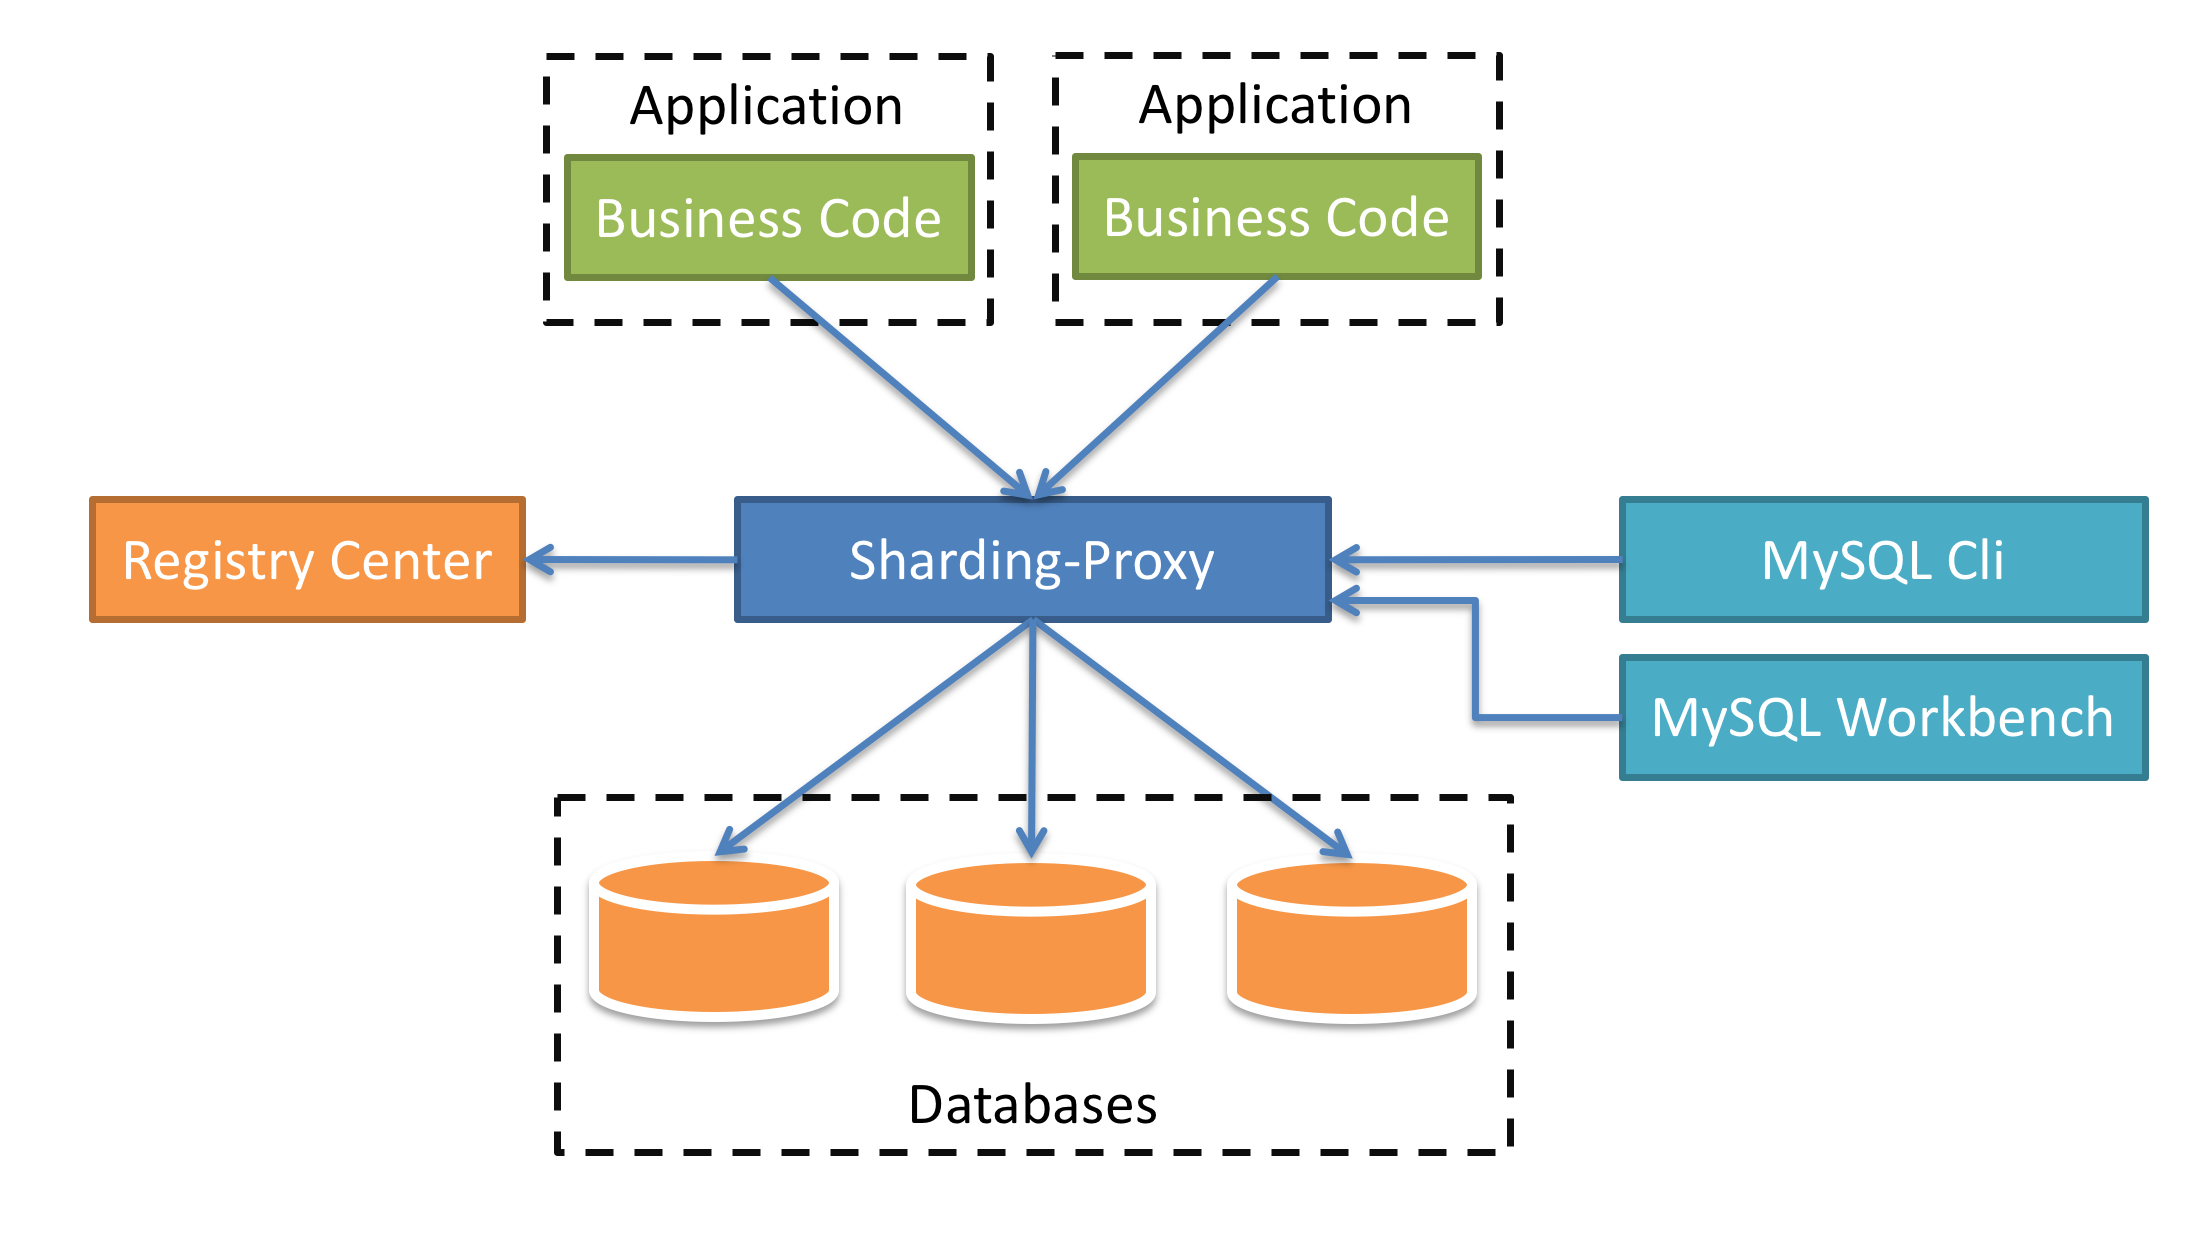
Sharding-Proxy使用
Sharding-Proxy
定位为透明化的数据库代理端,提供封装了数据库二进制协议的服务端版本,用于完成对异构语言的支持。 目前
先提供MySQL/PostgreSQL版本,它可以使用任何兼容MySQL/PostgreSQL协议的访问客户端(如:MySQL
Command Client, MySQL Workbench, Navicat等)操作数据,对DBA更加友好。
- 向应用程序完全透明,可直接当做MySQL/PostgreSQL使用。
- 适用于任何兼容MySQL/PostgreSQL协议的的客户端。
下载sharding-proxy
https://archive.apache.org/dist/shardingsphere/

本项目使用4.1.1版本

解压

添加mysql的jar包

把jar拷贝到bin目录下
修改配置文件

主要修改conf下的config-sharding.yaml和server.yaml文件
config-sharding.yaml
#
# Licensed to the Apache Software Foundation (ASF) under one or more
# contributor license agreements.  See the NOTICE file distributed with
# this work for additional information regarding copyright ownership.
# The ASF licenses this file to You under the Apache License, Version 2.0
# (the "License"); you may not use this file except in compliance with
# the License.  You may obtain a copy of the License at
#
#     http://www.apache.org/licenses/LICENSE-2.0
#
# Unless required by applicable law or agreed to in writing, software
# distributed under the License is distributed on an "AS IS" BASIS,
# WITHOUT WARRANTIES OR CONDITIONS OF ANY KIND, either express or implied.
# See the License for the specific language governing permissions and
# limitations under the License.
#

######################################################################################################
#
# Here you can configure the rules for the proxy.
# This example is configuration of sharding rule.
#
# If you want to use sharding, please refer to this file;
# if you want to use master-slave, please refer to the config-master_slave.yaml.
#
######################################################################################################
#
#schemaName: sharding_db
#
#dataSources:
#  ds_0:
#    url: jdbc:postgresql://127.0.0.1:5432/demo_ds_0?serverTimezone=UTC&useSSL=false
#    username: postgres
#    password: postgres
#    connectionTimeoutMilliseconds: 30000
#    idleTimeoutMilliseconds: 60000
#    maxLifetimeMilliseconds: 1800000
#    maxPoolSize: 50
#  ds_1:
#    url: jdbc:postgresql://127.0.0.1:5432/demo_ds_1?serverTimezone=UTC&useSSL=false
#    username: postgres
#    password: postgres
#    connectionTimeoutMilliseconds: 30000
#    idleTimeoutMilliseconds: 60000
#    maxLifetimeMilliseconds: 1800000
#    maxPoolSize: 50
#
#shardingRule:
#  tables:
#    t_order:
#      actualDataNodes: ds_${0..1}.t_order_${0..1}
#      tableStrategy:
#        inline:
#          shardingColumn: order_id
#          algorithmExpression: t_order_${order_id % 2}
#      keyGenerator:
#        type: SNOWFLAKE
#        column: order_id
#    t_order_item:
#      actualDataNodes: ds_${0..1}.t_order_item_${0..1}
#      tableStrategy:
#        inline:
#          shardingColumn: order_id
#          algorithmExpression: t_order_item_${order_id % 2}
#      keyGenerator:
#        type: SNOWFLAKE
#        column: order_item_id
#  bindingTables:
#    - t_order,t_order_item
#  defaultDatabaseStrategy:
#    inline:
#      shardingColumn: user_id
#      algorithmExpression: ds_${user_id % 2}
#  defaultTableStrategy:
#    none:

######################################################################################################
#
# If you want to connect to MySQL, you should manually copy MySQL driver to lib directory.
#
######################################################################################################

schemaName: sharding_db
# 下面是一些分库分表的配置,可参考springboot项目中的配置
dataSources:
  ds0:
    url: jdbc:mysql://127.0.0.1:3306/test?serverTimezone=UTC&useSSL=false
    username: root
    password: 123456
    connectionTimeoutMilliseconds: 30000
    idleTimeoutMilliseconds: 60000
    maxLifetimeMilliseconds: 1800000
    maxPoolSize: 50
  ds1:
    url: jdbc:mysql://127.0.0.1:3306/test2?serverTimezone=UTC&useSSL=false
    username: root
    password: 123456
    connectionTimeoutMilliseconds: 30000
    idleTimeoutMilliseconds: 60000
    maxLifetimeMilliseconds: 1800000
    maxPoolSize: 50

shardingRule:
  tables:
    user:
      actualDataNodes: ds${0..1}.user_${0..1}
      tableStrategy:
        inline:
          shardingColumn: id
          algorithmExpression: user_${id % 2}
      keyGenerator:
        type: SNOWFLAKE
        column: id

  defaultDatabaseStrategy:
    inline:
      shardingColumn: id
      algorithmExpression: ds${id % 2}
  defaultTableStrategy:
    none:
server.yaml
#
# Licensed to the Apache Software Foundation (ASF) under one or more
# contributor license agreements.  See the NOTICE file distributed with
# this work for additional information regarding copyright ownership.
# The ASF licenses this file to You under the Apache License, Version 2.0
# (the "License"); you may not use this file except in compliance with
# the License.  You may obtain a copy of the License at
#
#     http://www.apache.org/licenses/LICENSE-2.0
#
# Unless required by applicable law or agreed to in writing, software
# distributed under the License is distributed on an "AS IS" BASIS,
# WITHOUT WARRANTIES OR CONDITIONS OF ANY KIND, either express or implied.
# See the License for the specific language governing permissions and
# limitations under the License.
#

######################################################################################################
#
# If you want to configure orchestration, authorization and proxy properties, please refer to this file.
#
######################################################################################################
#
#orchestration:
#  orchestration_ds:
#    orchestrationType: registry_center,config_center,distributed_lock_manager
#    instanceType: zookeeper
#    serverLists: localhost:2181
#    namespace: orchestration
#    props:
#      overwrite: false
#      retryIntervalMilliseconds: 500
#      timeToLiveSeconds: 60
#      maxRetries: 3
#      operationTimeoutMilliseconds: 500

#proxy服务的一些用户验证信息配置
authentication:
  users:
    root:
      password: root
    sharding:
      password: sharding
      authorizedSchemas: sharding_db

props:
  max.connections.size.per.query: 1
  acceptor.size: 16  # The default value is available processors count * 2.
  executor.size: 16  # Infinite by default.
  proxy.frontend.flush.threshold: 128  # The default value is 128.
    # LOCAL: Proxy will run with LOCAL transaction.
    # XA: Proxy will run with XA transaction.
    # BASE: Proxy will run with B.A.S.E transaction.
  proxy.transaction.type: LOCAL
  proxy.opentracing.enabled: false
  proxy.hint.enabled: false
  query.with.cipher.column: true
  sql.show: true
  allow.range.query.with.inline.sharding: false
权限验证
用于执行登录Sharding Proxy的权限验证。配置用户名、密码、可访问的数据库后,必须使用正确的用户名、密码才可登录Proxy。
authentication:
  users:
    root: # 自定义用户名
      password: root # 自定义用户名
    sharding: # 自定义用户名
      password: sharding # 自定义用户名
      authorizedSchemas: sharding_db, masterslave_db # 该用户授权可访问的数据库,多个用逗号分隔。缺省将拥有root权限,可访问全部数据库。
启动服务

bin目录下的start.bat启动服务(windows)
默认服务端口为3307,
用navcat连接该服务

之后就可以查看分库分表后的数据了

参考文档地址:
https://shardingsphere.apache.org/document/legacy/4.x/document/cn/manual/sharding-jdbc/configuration/config-spring-boot/


 6568
6568

 被折叠的 条评论
为什么被折叠?
被折叠的 条评论
为什么被折叠?
 到【灌水乐园】发言


