


前些天发现了一个巨牛的人工智能学习网站,通俗易懂,风趣幽默,忍不住分享一下给大家。点击跳转到教程
搭建教程
shardingproxy可以实现数据库的分库分表,如下为搭建教程
我们使用docker搭建一主一从的mysql
主节点跑3307端口
从节点跑3317端口
提前建好相关目录。
mkdir /shardproxy/{master,slave}/mysql/{log,data,conf} -p
docker run -p 3307:3306 --name mysql-master \
-v /shardproxy/master/mysql/log:/var/log/mysql \
-v /shardproxy/master/mysql/data:/var/lib/mysql \
-v /shardproxy/master/mysql/conf:/etc/mysql \
-e MYSQL_ROOT_PASSWORD=root \
-d mysql:5.7

docker run -p 3317:3306 --name mysql-slave \
-v /shardproxy/slave/mysql/log:/var/log/mysql \
-v /shardproxy/slave/mysql/data:/var/lib/mysql \
-v /shardproxy/slave/mysql/conf:/etc/mysql \
-e MYSQL_ROOT_PASSWORD=root \
-d mysql:5.7
我们编写两个mysql的配置文件
主节点/shardproxy/master/mysql/conf/my.conf
[client]
default-character-set=utf8
[mysql]
default-character-set=utf8

[mysqld]
init_connect='SET collation_connection=utf8_unicode_ci'
init_connect='SET NAMES utf8'
character-set-server=utf8

collation-server=utf8_unicode_ci
skip-character-set-client-handshake
skip-name-resolve

server_id=1
log-bin=mysql-bin
read-only=0
binlog-do-db=demo_ds_0
binlog-do-db=demo_ds_1

replicate-ignore-db=mysql
replicate-ignore-db=sys
replicate-ignore-db=information_schema
replicate-ignore-db=performance_schema
从节点/shardproxy/master/mysql/conf/my.conf
[client]
default-character-set=utf8
[mysql]
default-character-set=utf8

[mysqld]
init_connect='SET collation_connection=utf8_unicode_ci'
init_connect='SET NAMES utf8'
character-set-server=utf8

collation-server=utf8_unicode_ci
skip-character-set-client-handshake
skip-name-resolve

server_id=2
log-bin=mysql-bin
read-only=1
binlog-do-db=demo_ds_0
binlog-do-db=demo_ds_1

replicate-ignore-db=mysql
replicate-ignore-db=sys
replicate-ignore-db=information_schema
replicate-ignore-db=performance_schema
我们建立主从关系
在master节点上新建复制日志的账号
GRANT REPLICATION SLAVE ON *.* TO 'backup'@'%' IDENTIFIED BY '123456';
在slave节点上设置
CHANGE MASTER TO MASTER_HOST='192.168.37.129',MASTER_USER='backup',MASTER_PORT=3307,MASTER_PASSWORD='123456',MASTER_LOG_FILE='mysql-bin.000001',MASTER_LOG_POS=0;
并在slave开启监听
start slave
这样我们就搭建好了一主一从的mysql
我们在主mysql上新建demo_ds_0和demo_ds_1数据库,通过修改shardingproxy的配置文件
server.yaml
authentication:
  users:
    root:
      password: root
    sharding:
      password: sharding
      authorizedSchemas: sharding_db
#
props:
#  max.connections.size.per.query: 1
#  acceptor.size: 16  # The default value is available processors count * 2.
  executor.size: 16  # Infinite by default.
#  proxy.frontend.flush.threshold: 128  # The default value is 128.
#    # LOCAL: Proxy will run with LOCAL transaction.
#    # XA: Proxy will run with XA transaction.
#    # BASE: Proxy will run with B.A.S.E transaction.
#  proxy.transaction.type: LOCAL
#  proxy.opentracing.enabled: false
#  query.with.cipher.column: true
  sql.show: false
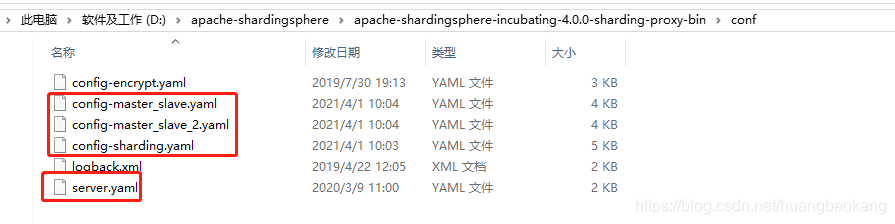
config-sharding.yaml
schemaName: sharding_db
#
dataSources:
  ds_0:
    url: jdbc:mysql://192.168.37.129:3307/demo_ds_0?serverTimezone=UTC&useSSL=false
    username: root
    password: root
    connectionTimeoutMilliseconds: 30000
    idleTimeoutMilliseconds: 60000
    maxLifetimeMilliseconds: 1800000
    maxPoolSize: 50
  ds_1:
    url: jdbc:mysql://192.168.37.129:3307/demo_ds_1?serverTimezone=UTC&useSSL=false
    username: root
    password: root
    connectionTimeoutMilliseconds: 30000
    idleTimeoutMilliseconds: 60000
    maxLifetimeMilliseconds: 1800000
    maxPoolSize: 50
#
shardingRule:
  tables:
    t_order:
      actualDataNodes: ds_${0..1}.t_order_${0..1}
      tableStrategy:
        inline:
          shardingColumn: order_id
          algorithmExpression: t_order_${order_id % 2}
      keyGenerator:
        type: SNOWFLAKE
        column: order_id
    t_order_item:
      actualDataNodes: ds_${0..1}.t_order_item_${0..1}
      tableStrategy:
        inline:
          shardingColumn: order_id
          algorithmExpression: t_order_item_${order_id % 2}
      keyGenerator:
        type: SNOWFLAKE
        column: order_item_id
  bindingTables:
    - t_order,t_order_item
  defaultDatabaseStrategy:
    inline:
      shardingColumn: user_id
      algorithmExpression: ds_${user_id % 2}
  defaultTableStrategy:
    none:
config-master_slave.yaml
schemaName: sharding_db_1
#
dataSources:
  master_0_ds:
    url: jdbc:mysql://192.168.37.129:3307/demo_ds_0?serverTimezone=UTC&useSSL=false
    username: root
    password: root
    connectionTimeoutMilliseconds: 30000
    idleTimeoutMilliseconds: 60000
    maxLifetimeMilliseconds: 1800000
    maxPoolSize: 50
  slave_ds_0:
    url: jdbc:mysql://192.168.37.129:3317/demo_ds_0?serverTimezone=UTC&useSSL=false
    username: root
    password: root
    connectionTimeoutMilliseconds: 30000
    idleTimeoutMilliseconds: 60000
    maxLifetimeMilliseconds: 1800000
    maxPoolSize: 50
masterSlaveRule:
  name: ms_ds
  masterDataSourceName: master_0_ds
  slaveDataSourceNames:
    - slave_ds_0
#    - slave_ds_1
#    - slave_ds_1
config-master_slave_2.yaml
schemaName: sharding_db_2
#
dataSources:
  master_1_ds:
    url: jdbc:mysql://192.168.37.129:3307/demo_ds_1?serverTimezone=UTC&useSSL=false
    username: root
    password: root
    connectionTimeoutMilliseconds: 30000
    idleTimeoutMilliseconds: 60000
    maxLifetimeMilliseconds: 1800000
    maxPoolSize: 50
  slave_ds_1:
    url: jdbc:mysql://192.168.37.129:3317/demo_ds_1?serverTimezone=UTC&useSSL=false
    username: root
    password: root
    connectionTimeoutMilliseconds: 30000
    idleTimeoutMilliseconds: 60000
    maxLifetimeMilliseconds: 1800000
    maxPoolSize: 50
masterSlaveRule:
  name: ms_ds_1
  masterDataSourceName: master_1_ds
  slaveDataSourceNames:
    - slave_ds_1
#    - slave_ds_1
#    - slave_ds_1
启动shardingproxy,cmd切换到bin目录,我们自定义端口启动

我们使用Navicat工具连接shardingproxy,连接成功(注意使用SQLYog会报null)
由于我们配置是分库分表策略,我们在sharding_db建立t_order和t_order_item表
建表语句如下:
create table t_order (
order_id bigint(20) not null auto_increment,
user_id int(11) not null,
status varchar(50) collate utf8_bin default null,
primary key(order_id)
)engine=innodb default charset=utf8 collate=utf8_bin;

create table t_order_item (
order_item_id bigint(20) not null ,
order_id bigint(20) not null,
user_id int(11) not null,
content VARCHAR(255) collate utf8_bin DEFAULT null,
status varchar(50) collate utf8_bin default null,
primary key(order_item_id)
)engine=innodb default charset=utf8 collate=utf8_bin;
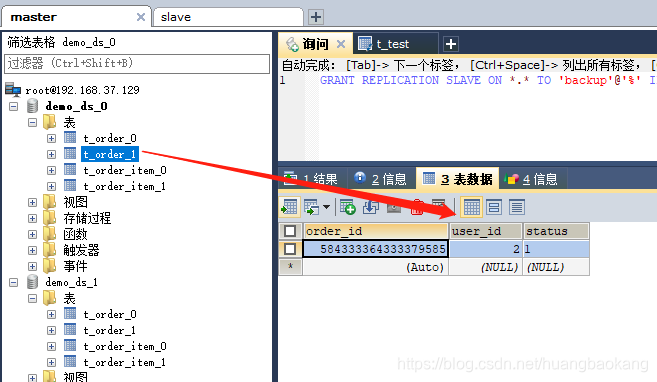
我们插入点数据
insert into t_order(user_id,status) values (1,1);
insert into t_order(user_id,status) values (2,1);
insert into t_order(user_id,status) values (3,1);
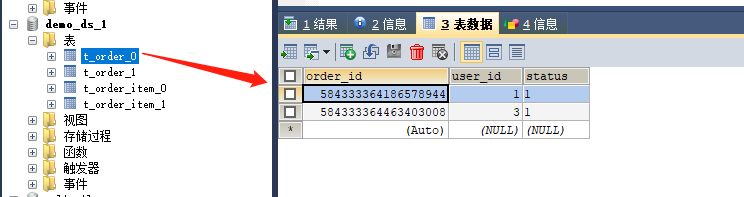
可以看到偶数user_id并且雪花算法生成的奇数存放在demo_ds_0的t_order_1,跟我们的策略一致。
demo_ds_1的t_order_0存储order_id为偶数并且user_id为奇数
博客若对你有用,欢迎扫码打赏,你的打赏是我写作的动力。


 565
565


 被折叠的 条评论
为什么被折叠?
被折叠的 条评论
为什么被折叠?
 到【灌水乐园】发言


