


12.4 Nginx配置
LNMP环境搭建好之后,其实仅仅是安装上了软件,我们还有很多具体的配置工作要做。
默认虚拟主机
默认虚拟主机指的是,任何一个域名指向这台服务器,只要是没有对应的虚拟主机,就会由这个默认虚拟主机来处理。
与httpd相同,在Nginx中也有默认虚拟主机,并且类似的,第一个被Nginx加载的虚拟主机就是默认主机。但不同的是,它还有一个配置用来标记默认虚拟主机,也就是说,如果没有这个标记,第一个虚拟主机为默认虚拟主机。
- 要先修改主配置文件:
# vim /usr/local/nginx/conf/nginx.conf
     include vhost/*.conf;				#在结束符号 } 上面加入这行配置
}
上面那行配置就是加载/usr/local/nginx/conf/vhost/下面的所有以.conf结尾的文件,这样我们就可以把所有虚拟主机的配置文件放到vhost目录下面了。
- 编辑默认主机配置文件:
# mkdir /usr/local/nginx/conf/vhost

# cd /usr/local/nginx/conf/vhost

# vim default.conf				#这里是新文件,写入下面内容

server
{

    listen 80 default_server;				#有这个 default_server 标记的就是默认虚拟主机
    server_name 123.com;
    index index.html index.htm index.php;
    root /data/nginx/default;
}
- 验证上面配置:
# /usr/local/nginx/sbin/nginx -t #检验上面配置
nginx: the configuration file /usr/local/nginx/conf/nginx.conf syntax is ok
nginx: configuration file /usr/local/nginx/conf/nginx.conf test is successful #说明配置没有问题
# /usr/local/nginx/sbin/nginx -s reload #重载配置,这样就不用重启了
# mkdir -p /data/nginx/default/
# echo "default" > /data/nginx/default/index.html #创建索引页
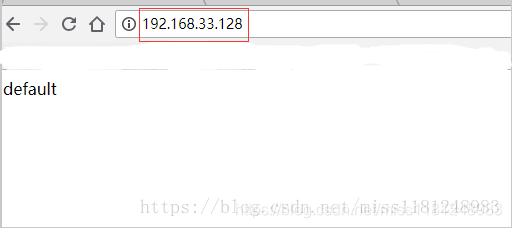
# curl -x127.0.0.1:80 123.com
default
# curl -x192.168.33.128:80 123.com
default #这里输入127.0.0.1和192.168.33.128(linux的IP)都行
# curl -x127.0.0.1:80 aaa.com
default #访问一个没有定义过的域名,也会访问到123.com
如果想让浏览器访问到这个,可以这样:
# iptables -I INPUT -p tcp --dport 80 -j ACCEPT #打开linux的80端口
然后再在浏览器上访问即可
用户认证
在用户访问网站的时候,需要输入用户名密码才能顺利访问,一些重要的站点或网站后台通常会加上用户认证,目的当然是保障安全。
- 创建一个新的虚拟主机:
# cd /usr/local/nginx/conf/vhost/

# vim test.com.conf				#这是新文件,写入下面内容

server
{

   listen 80;
   server_name test.com;
   index index.html index.htm index.php;
   root /data/nginx/test.com;
   location /
   {

      auth_basic  "Auth";				#auth_basic打开用户认证
      auth_basic_user_file   /usr/local/nginx/conf/htpasswd;				#指定用户密码文件
   }
}
- 验证上面配置:
# /usr/local/nginx/sbin/nginx -t
nginx: the configuration file /usr/local/nginx/conf/nginx.conf syntax is ok
nginx: configuration file /usr/local/nginx/conf/nginx.conf test is successful

# /usr/local/nginx/sbin/nginx -s reload

# yum install -y httpd				#安装httpd,因为生成密码文件需要用到htpasswd命令

# htpasswd -c /usr/local/nginx/conf/htpasswd lzx				#创建lzx用户,并设置密码
New password:
Re-type new password:
Adding password for user lzx

# mkdir /data/nginx/test.com

# echo "test" > /data/nginx/test.com/index.html

# curl -x127.0.0.1:80 test.com -I
HTTP/1.1 401 Unauthorized				#状态码401说明该网站需要验证
Server: nginx/1.12.1
Date: Thu, 05 Jul 2018 08:06:39 GMT
Content-Type: text/html
Content-Length: 195
Connection: keep-alive
WWW-Authenticate: Basic realm="Auth"
打开Windows的hosts文件,加入一行:
192.168.33.128 test.com
然后在浏览器中访问test.com
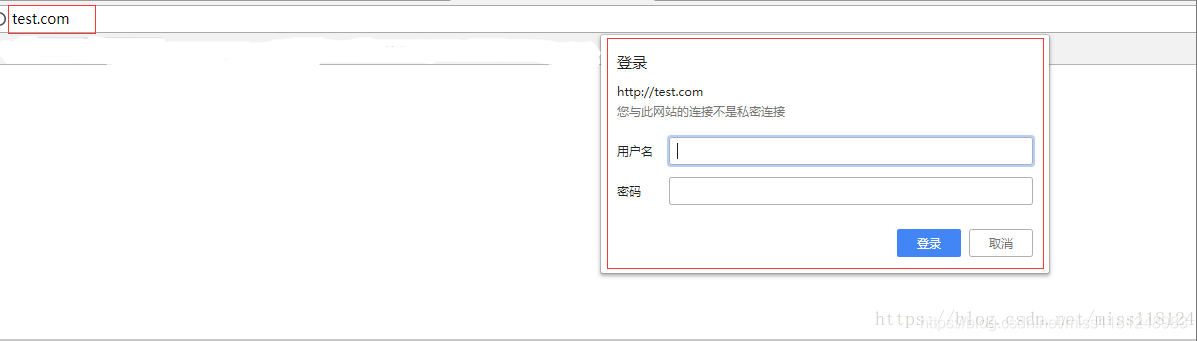
点击取消之后出现

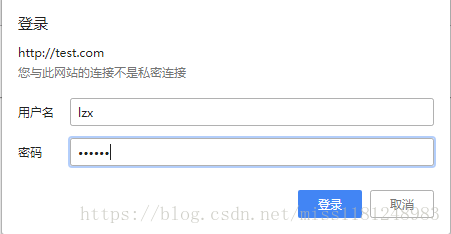
输入账号密码
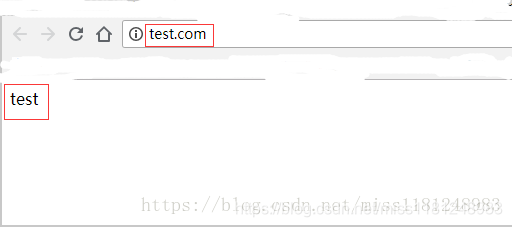
然后出现
另外,如果是针对某个目录做用户认证,需要配置location后面的路径:
location /admin/				#这里以admin目录为例
   {

      auth_basic  "Auth";
      auth_basic_user_file   /usr/local/nginx/conf/htpasswd;
   }
 最低0.47元/天 解锁文章


 683
683


 被折叠的 条评论
为什么被折叠?
被折叠的 条评论
为什么被折叠?
 到【灌水乐园】发言


