


Android架构实例分析之编写hello驱动的HAL层代码通到APP
摘要:
HAL层中文名称又叫硬件抽象层,可以理解我Linux驱动的应用层。本文实现了一个简单的hello HAL的代码,衔接hello驱动和
Android标准架构实例分析之编写最简单的hello驱动
HAL层的代码会使用open read write等系统调用操作驱动层的文件系统(dev、sysfs、proc),同时它也有自己的数据结构,为上层提供接口,并导出和本体模块相关ID号。上层可以使用hw_get_module获得HAL中写的方法。其实如果不是为了避开Linux的GPL开源协议,HAL层可以不用,直接使用JNI层或者在Java代码中访问操作驱动层的文件系统(dev、sysfs、proc)也是可行的。
详细原理可以参考:
http://blog.csdn.net/eliot_shao/article/details/50461738
HAL代码编写的基本步骤
1、编写HAL层头文件
2、填充相关的结构体
1、编写HAL层头文件
首先我们要知道关于HAL的三点要求:
1、 每一个hardware硬件模块都有一个ID;
2、 每一个hardware模块必须有一个继承struct hw_module_t common;的结构体;
3、 每一个hardware模块必须有一个继承struct hw_device_t common;的结构体;
struct hw_module_t的继承者担负了“联络员”的任务,在/system/lib/hw下面有若干hardware module,本地框架层通过ID找到对应的模块。
struct hw_device_t的继承者承担了对驱动操作方法的包装的任务。
struct hw_module_t和struct hw_device_t的内容定义在:
hardware\libhardware\include\hardware\hardware.h
所以我们的hello.h内容如下:
-
#ifndef ANDROID_HELLO_INTERFACE_H -
#define ANDROID_HELLO_INTERFACE_H -
#include <hardware/hardware.h> -
__BEGIN_DECLS -
#define HELLO_HARDWARE_MODULE_ID "hello"//ID -
struct hello_module_t { -
struct hw_module_t common; -
};//hw_module_t的继承者 -
struct hello_device_t { -
struct hw_device_t common; -
int fd; -
int (*set_val)(struct hello_device_t* dev, int val); -
int (*get_val)(struct hello_device_t* dev, int* val); -
};//hw_device_t的继承者 -
__END_DECLS -
#endif
2、填充相关的结构体
我们总结一下硬件具体的调用流程,也是hardware层的工作流程:
1、 通过ID找到硬件模块,struct hw_module_t common的结构体的继承者;
2、 通过硬件模块找到hw_module_methods_t,打开操作,获得设备的hw_device_t;
3、 调用hw_device_t中的各种操作硬件的方法;
4、 调用完成,通过hw_device_t的close关闭设备。
HAL规定了需要创一个名为HAL_MODULE_INFO_SYM结构体,如下:
-
struct hello_module_t HAL_MODULE_INFO_SYM = { -
.common = { -
.tag= HARDWARE_MODULE_TAG, -
//.module_api_version = FINGERPRINT_MODULE_API_VERSION_2_0, -
.hal_api_version= HARDWARE_HAL_API_VERSION, -
.id = HELLO_HARDWARE_MODULE_ID, -
.name = "Demo shaomingliang hello HAL", -
.author = "The Android Open Source Project", -
.methods= &hello_module_methods, -
}, -
};
填充struct hw_module_t common 并对其成员 methods进行赋值:
.methods= &hello_module_methods,
hello_module_methods的定义如下:
-
static struct hw_module_methods_t hello_module_methods = { -
.open = hello_device_open, -
};
在 hello_device_open 对 struct hello_device_t 进行填充。
下面是抽象层hello.c的详细代码:
-
#define LOG_TAG "HelloStub" -
#include <hardware/hardware.h> -
#include <hardware/hello.h> -
#include <sys/mman.h> -
#include <dlfcn.h> -
#include <cutils/ashmem.h> -
#include <cutils/log.h> -
#include <fcntl.h> -
#include <errno.h> -
#include <sys/ioctl.h> -
#include <string.h> -
#include <stdlib.h> -
#include <cutils/log.h> -
#include <cutils/atomic.h> -
#define MODULE_NAME "Hello" -
char const * const device_name = "/dev/hello" ; -
static int hello_device_open(const struct hw_module_t* module, const char* name, struct hw_device_t** device); -
static int hello_device_close(struct hw_device_t* device); -
static int hello_set_val(struct hello_device_t* dev, int val); -
static int hello_get_val(struct hello_device_t* dev, int* val); -
static struct hw_module_methods_t hello_module_methods = { -
.open = hello_device_open, -
}; -
static int hello_device_open(const struct hw_module_t* module, const char* name, struct hw_device_t** device) -
{ -
struct hello_device_t* dev; -
char name_[64]; -
//pthread_mutex_t lock; -
dev = (struct hello_device_t*)malloc(sizeof(struct hello_device_t)); -
if(!dev) { -
ALOGE("Hello Stub: failed to alloc space"); -
return -EFAULT; -
} -
ALOGE("Hello Stub: hello_device_open eliot_shao"); -
memset(dev, 0, sizeof(struct hello_device_t)); -
dev->common.tag = HARDWARE_DEVICE_TAG; -
dev->common.version = 0; -
dev->common.module = (hw_module_t*)module; -
dev->common.close = hello_device_close; -
dev->set_val = hello_set_val; -
dev->get_val = hello_get_val; -
//pthread_mutex_lock(&lock); -
dev->fd = -1 ; -
snprintf(name_, 64, device_name, 0); -
dev->fd = open(name_, O_RDWR); -
if(dev->fd == -1) { -
ALOGE("Hello Stub:eliot failed to open %s !-- %s.", name_,strerror(errno)); -
free(dev); -
return -EFAULT; -
} -
//pthread_mutex_unlock(&lock); -
*device = &(dev->common); -
ALOGI("Hello Stub: open HAL hello successfully."); -
return 0; -
} -
static int hello_device_close(struct hw_device_t* device) { -
struct hello_device_t* hello_device = (struct hello_device_t*)device; -
if(hello_device) { -
close(hello_device->fd); -
free(hello_device); -
} -
return 0; -
} -
static int hello_set_val(struct hello_device_t* dev, int val) { -
ALOGI("Hello Stub: set value to device."); -
write(dev->fd, &val, sizeof(val)); -
return 0; -
} -
static int hello_get_val(struct hello_device_t* dev, int* val) { -
if(!val) { -
ALOGE("Hello Stub: error val pointer"); -
return -EFAULT; -
} -
read(dev->fd, val, sizeof(*val)); -
ALOGI("Hello Stub: get value from device"); -
return 0; -
} -
struct hello_module_t HAL_MODULE_INFO_SYM = { -
.common = { -
.tag = HARDWARE_MODULE_TAG, -
//.module_api_version = FINGERPRINT_MODULE_API_VERSION_2_0, -
.hal_api_version = HARDWARE_HAL_API_VERSION, -
.id = HELLO_HARDWARE_MODULE_ID, -
.name = "Demo shaomingliang hello HAL", -
.author = "The Android Open Source Project", -
.methods = &hello_module_methods, -
}, -
};
Android.mk 的详细代码如下:
-
LOCAL_PATH := $(call my-dir) -
include $(CLEAR_VARS) -
LOCAL_MODULE := hello.default -
LOCAL_MODULE_RELATIVE_PATH := hw -
LOCAL_SRC_FILES := hello.c -
LOCAL_SHARED_LIBRARIES := liblog -
LOCAL_MODULE_TAGS := optional -
include $(BUILD_SHARED_LIBRARY)
hello HAL代码的编译
将hal的代码放到如下位置:
hardware\libhardware\modules\hello\hello.c
hardware\libhardware\modules\hello\Android.mk
hardware\libhardware\include\hardware\hello.h
执行:mmm hardware\libhardware\modules\hello\
将会在system/lib/hw/下生成一个hello.default.so!
Android架构实例分析之注册hello HAL的JNI方法表
摘要:
Android JNI是一种技术,提供Java调用Android native代码或者native调用Java代码的一种机制,并不提供策略。本文实现了基于前面两篇文章:
Android标准架构实例分析之编写最简单的hello驱动
http://blog.csdn.net/eliot_shao/article/details/51860229
Android架构实例分析之编写hello驱动的HAL层代码
http://blog.csdn.net/eliot_shao/article/details/51861905
所实现的JNI案例。对HAL层提供的方法进行“翻译”,并转化成android runtime的JNI方法表,当Java代码调用时候可以正确的寻找到native的代码。
JNI原理分析
首先上一张Android JNI技术的工作原理图:

在图中主要描述Java-jni-native的一个调用流程。下面进行按步骤讲解:
1、Java代码通过System.loadLibrary(“android_servers”); 加载JNI静态库;
2、Android runtime自动调用JNI静态库中的JNI_OnLoad函数;
3、JNI_OnLoad调用jniRegisterNativeMethods函数,注册多个或者一个JNINativeMethod到Android runtime的gMthods链表中;
4、Java代码声明并调用相关的native代码;
5、Android runtime查找gMthods链表找到前面注册的本地函数指针,然后执行。
注意:JNI和HAL的衔接是通过JNI的代码
hw_get_module(HELLO_HARDWARE_MODULE_ID, (const struct hw_module_t**)&module) == 0)
实现的。
本文使用的hello的案例是以system_server进程上建立的,后面会创建一个hello的本地服务。下面是对system_server进程调用JNI过程进行分析。
1、frameworks\base\services\java\com\android\server\SystemServer.java
-
// Initialize native services. -
System.loadLibrary("android_servers");
2、frameworks\base\services\core\jni\onload.cpp
-
jint JNI_OnLoad(JavaVM* vm, void* /* reserved */) -
register_android_server_HelloService(env);//add by eliot_shao
3、frameworks\base\services\core\jni\com_android_server_HelloService.cpp
-
jniRegisterNativeMethods(env, "com/android/server/HelloService", method_table, NELEM(method_table)); -
static const JNINativeMethod method_table[] = { -
{"init_native", "()Z", (void*)hello_init}, -
{"setVal_native", "(I)V", (void*)hello_setVal}, -
{"getVal_native", "()I", (void*)hello_getVal}, -
};
4、frameworks\base\services\Android.mk
LOCAL_MODULE:= libandroid_servers
- 1
- 2
hello JNI实例
rameworks\base\services\core\jni\com_android_server_HelloService.cpp
-
#define LOG_TAG "HelloService" -
#include "jni.h" -
#include "JNIHelp.h" -
#include "android_runtime/AndroidRuntime.h" -
#include <utils/misc.h> -
#include <utils/Log.h> -
#include <hardware/hardware.h> -
#include <hardware/hello.h> -
#include <stdio.h> -
namespace android -
{ -
struct hello_device_t* hello_device = NULL; -
static void hello_setVal(JNIEnv* env, jobject clazz, jint value) { -
int val = value; -
ALOGI("Hello JNI: set value %d to device.", val); -
if(!hello_device) { -
ALOGI("Hello JNI: device is not open."); -
return; -
} -
hello_device->set_val(hello_device, val); -
} -
static jint hello_getVal(JNIEnv* env, jobject clazz) { -
int val = 0; -
if(!hello_device) { -
ALOGI("Hello JNI: device is not open."); -
return val; -
} -
hello_device->get_val(hello_device, &val); -
ALOGI("Hello JNI: get value %d from device.", val); -
return val; -
} -
static inline int hello_device_open(const hw_module_t* module, struct hello_device_t** device) { -
return module->methods->open(module, HELLO_HARDWARE_MODULE_ID, (struct hw_device_t**)device); -
} -
static jboolean hello_init(JNIEnv* env, jclass clazz) { -
hello_module_t* module; -
ALOGI("Hello JNI: initializing......"); -
if(hw_get_module(HELLO_HARDWARE_MODULE_ID, (const struct hw_module_t**)&module) == 0) { -
ALOGI("Hello JNI: hello Stub found."); -
if(hello_device_open(&(module->common), &hello_device) == 0) { -
ALOGI("Hello JNI: hello device is open."); -
return 0; -
} -
ALOGE("Hello JNI: failed to open hello device."); -
return -1; -
} -
ALOGE("Hello JNI: failed to get hello stub module."); -
return -1; -
} -
static const JNINativeMethod method_table[] = { -
{"init_native", "()Z", (void*)hello_init}, -
{"setVal_native", "(I)V", (void*)hello_setVal}, -
{"getVal_native", "()I", (void*)hello_getVal}, -
}; -
int register_android_server_HelloService(JNIEnv *env) { -
return jniRegisterNativeMethods(env, "com/android/server/HelloService", method_table, NELEM(method_table)); -
} -
};
frameworks\base\services\core\jni\onload.cpp
-
/* -
* Copyright (C) 2014 MediaTek Inc. -
* Modification based on code covered by the mentioned copyright -
* and/or permission notice(s). -
*/ -
/* -
* Copyright (C) 2009 The Android Open Source Project -
* -
* Licensed under the Apache License, Version 2.0 (the "License"); -
* you may not use this file except in compliance with the License. -
* You may obtain a copy of the License at -
* -
* http://www.apache.org/licenses/LICENSE-2.0 -
* -
* Unless required by applicable law or agreed to in writing, software -
* distributed under the License is distributed on an "AS IS" BASIS, -
* WITHOUT WARRANTIES OR CONDITIONS OF ANY KIND, either express or implied. -
* See the License for the specific language governing permissions and -
* limitations under the License. -
*/ -
#include "JNIHelp.h" -
#include "jni.h" -
#include "utils/Log.h" -
#include "utils/misc.h" -
namespace android { -
int register_android_server_AlarmManagerService(JNIEnv* env); -
int register_android_server_AssetAtlasService(JNIEnv* env); -
int register_android_server_BatteryStatsService(JNIEnv* env); -
int register_android_server_ConsumerIrService(JNIEnv *env); -
int register_android_server_InputApplicationHandle(JNIEnv* env); -
int register_android_server_InputWindowHandle(JNIEnv* env); -
int register_android_server_InputManager(JNIEnv* env); -
int register_android_server_LightsService(JNIEnv* env); -
int register_android_server_PowerManagerService(JNIEnv* env); -
int register_android_server_SerialService(JNIEnv* env); -
int register_android_server_SystemServer(JNIEnv* env); -
int register_android_server_UsbDeviceManager(JNIEnv* env); -
int register_android_server_UsbMidiDevice(JNIEnv* env); -
int register_android_server_UsbHostManager(JNIEnv* env); -
int register_android_server_VibratorService(JNIEnv* env); -
int register_android_server_location_GpsLocationProvider(JNIEnv* env); -
int register_android_server_location_FlpHardwareProvider(JNIEnv* env); -
int register_android_server_connectivity_Vpn(JNIEnv* env); -
int register_android_server_hdmi_HdmiCecController(JNIEnv* env); -
int register_android_server_tv_TvInputHal(JNIEnv* env); -
int register_android_server_PersistentDataBlockService(JNIEnv* env); -
int register_android_server_Watchdog(JNIEnv* env); -
int register_com_mediatek_perfservice_PerfServiceManager(JNIEnv* env); -
#if defined (MTK_HDMI_SUPPORT) -
int register_com_mediatek_hdmi_MtkHdmiManagerService(JNIEnv* env); -
#endif -
// Mediatek AAL support -
int register_android_server_display_DisplayPowerController(JNIEnv* env); -
#ifndef MTK_BSP_PACKAGE -
int register_com_android_internal_app_ShutdownManager(JNIEnv *env); -
#endif -
int register_android_server_HelloService(JNIEnv *env);//add by eliot_shao -
}; -
using namespace android; -
extern "C" jint JNI_OnLoad(JavaVM* vm, void* /* reserved */) -
{ -
JNIEnv* env = NULL; -
jint result = -1; -
if (vm->GetEnv((void**) &env, JNI_VERSION_1_4) != JNI_OK) { -
ALOGE("GetEnv failed!"); -
return result; -
} -
ALOG_ASSERT(env, "Could not retrieve the env!"); -
register_android_server_PowerManagerService(env); -
register_android_server_SerialService(env); -
register_android_server_InputApplicationHandle(env); -
register_android_server_InputWindowHandle(env); -
register_android_server_InputManager(env); -
register_android_server_LightsService(env); -
register_android_server_AlarmManagerService(env); -
register_android_server_UsbDeviceManager(env); -
register_android_server_UsbMidiDevice(env); -
register_android_server_UsbHostManager(env); -
register_android_server_VibratorService(env); -
register_android_server_SystemServer(env); -
register_android_server_location_GpsLocationProvider(env); -
register_android_server_location_FlpHardwareProvider(env); -
register_android_server_connectivity_Vpn(env); -
register_android_server_AssetAtlasService(env); -
register_android_server_ConsumerIrService(env); -
register_android_server_BatteryStatsService(env); -
register_android_server_hdmi_HdmiCecController(env); -
register_android_server_tv_TvInputHal(env); -
register_android_server_PersistentDataBlockService(env); -
register_android_server_Watchdog(env); -
register_com_mediatek_perfservice_PerfServiceManager(env); -
#if defined (MTK_HDMI_SUPPORT) -
register_com_mediatek_hdmi_MtkHdmiManagerService(env); -
#endif -
// Mediatek AAL support -
register_android_server_display_DisplayPowerController(env); -
#ifndef MTK_BSP_PACKAGE -
register_com_android_internal_app_ShutdownManager(env); -
#endif -
register_android_server_HelloService(env);//add by eliot_shao -
return JNI_VERSION_1_4; -
}
编译:
android 2.3 和android 6.0版本的JNI位置发生了一点变化。
将com_android_server_HelloService.cpp放入frameworks\base\services\core\jni\
修改: LOGI–>ALOGI
LOGE–>ALOGE
修改onload.cpp 和 Android.mk
编译:mmm frameworks/base/services/
生成system/lib/libandroid_servers.so
摘要:
在上一文中介绍了hello驱动的JNI方法,最终更新在android runtime中的java-native函数表。本文将介绍java的世界中如何通过调用JNI定义的java函数实现hello系统服务进程,为应用程序提供系统服务。
通信代理AIDL
java的世界,硬件服务一般是运行在一个独立的进程中为各种应用程序提供服务。因此,调用这些硬件服务的应用程序与这些硬件服务之间的通信需要通过代理来进行。
AIDL (Android Interface DefinitionLanguage) 是一种IDL 语言,用于生成可以在Android设备上两个进程之间进行进程间通信(interprocess communication, IPC)的代码。如果在一个进程中(例如Activity)要调用另一个进程中(例如Service)对象的操作,就可以使用AIDL生成可序列化的参数。
如何实现
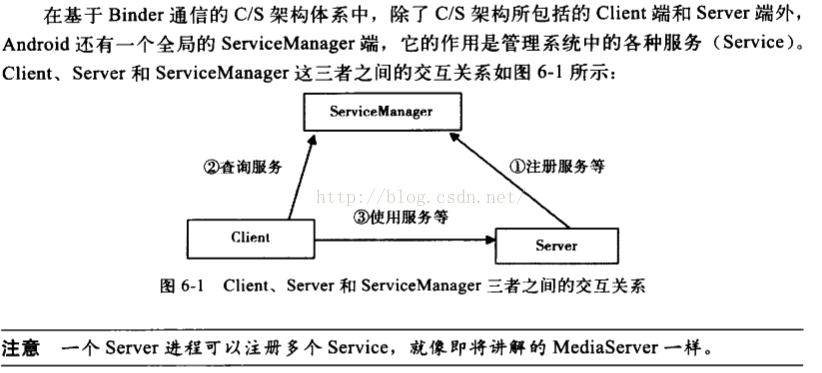
如上图,在system_server中注册很多系统服务,这些系统服务通过servicemanager进程进行管理,如果应用程序(client)需要使用某个服务就通过servicemanager来申请使用。
基于这种思路我们需要实现hello系统服务可以这样做:
1、建立aidl通信接口;
2、在system_server中注册hello_service到servicemanager;
3、实现hello_service,对应aidl中的接口函数。
4、client向servicemanager请求hello_service,成功后,调用aidl接口函数,建立client进程和hello_service进程的通信关系。
注意:关于android L 版本以后需要添加selinux策略,否则第二步向system_server中注册hello_service到servicemanager不成功,会出现:ServiceManager add_service SELinux Permission Denied !详细解决方案请参考:
http://blog.csdn.net/eliot_shao/article/details/51770558
下面是具体实现流程和测试过程,主要参考罗升阳的hello代码,感谢!。
1、建立aidl通信接口;
aidl 记得在 frameworks/base/Android.mk 加上 core\java\android\os\IHelloService.aidl
建立frameworks\base\core\java\android\os\IHelloService.aidl
内容:
-
package android.os; -
interface IHelloService { -
void setVal(int val); -
int getVal(); -
}
2、在system_server中注册hello_service到servicemanager;
修改frameworks\base\services\java\com\android\server\SystemServer.java
添加如下代码:
-
//add by eliot start -
try { -
Slog.i(TAG, "Hello Service"); -
ServiceManager.addService("hello", new HelloService());// -
} catch (Throwable e) { -
Slog.e(TAG, "Failure starting Hello Service", e); -
} -
//add by eliot end
3、实现hello_service
创建frameworks\base\services\core\java\com\android\server\HelloService.java
实现内容:
-
package com.android.server; -
import android.content.Context; -
import android.os.IHelloService; -
public class HelloService extends IHelloService.Stub { -
private static final String TAG = "HelloService"; -
HelloService() { -
init_native(); -
} -
public void setVal(int val) { -
setVal_native(val); -
} -
public int getVal() { -
return getVal_native(); -
} -
private static native boolean init_native(); -
private static native void setVal_native(int val); -
private static native int getVal_native(); -
};
4、client使用hello_service
在app中使用hello_service的大致流程如下:
-
import android.os.IHelloService;//导入通信接口 -
//请求hello_service -
private IHelloService helloService = null; -
helloService = IHelloService.Stub.asInterface( -
ServiceManager.getService("hello")); -
//使用hello_service并显示 -
int val = helloService.getVal(); -
String text = String.valueOf(val); -
valueText.setText(text);
测试
<span style="font-family: Arial, Helvetica, sans-serif; background-color: rgb(255, 255, 255);">在第三步后,就可以进行编译测试。</span>mmm frameworks/base
打包下载到机器,使用service list查看是否有hello service:


 1万+
1万+


 被折叠的 条评论
为什么被折叠?
被折叠的 条评论
为什么被折叠?
 到【灌水乐园】发言


