


正如那个经典的问题:把大象放入冰箱需要几步?
第一步:把冰箱门打开
第二步:把大象塞进去
第三步:把冰箱门关上
由于人工智能领域大佬们几十年的栽树,在现在,构建一个AI Agent已经并不复杂。我们完全可以参照如何把大象塞到冰箱里的思路,构建一个属于自己的AI机器人。经过NVIDIA AI-Agent训练营的学习,对于如何构建AI Agent还是小有心得,那我们先盘一盘具体操作思路。
让我们先从结果倒退,你想设计一款什么样的人工智能:
这里我简单举个例子:一款可以进行语音交互的可供对图片进行描述的AI Agent。应用场景可以是帮助在博物馆中,拍个照片帮我们辨认一些日常中不清楚的事物,或者是具体了解某种建筑的风格,或者是盲人的辅助app,还可以是帮你修图的好助手....这个时候,我们等于说有了建筑预览图。
这里我想做一个AI辅助图像分析的助手
OK,那我们有了这个目标,接下去我们需要去拆解这个目标。要实现这个目标需要分成如下几块:
1.语言输入系统——识别语音将语音转换成文字
2.多模态AI —— 识别输入的图像,将输出信息传入下一步
3.RAG系统——所谓RAG系统简单来说就是AI可以根据知识库检索到的信息,作为上下文输入,提高输出结果的准确度。那么我这里选取图像分析方面,目标输出是图标数据结论和更加细化的内容介绍。
TIPS:(RAG会更多用于文本检索和生成,这里用RAG的目的不是提高图像识别准确度,而是AI让输出的文本更加准确和精细。)
4.语音输出系统——AI文本转换成语音输出
上述部分把任务拆分后,构建AI Agent就是把这几块拼在一起,很像搭积木,想要替换功能只需要对其中的板块进行替换。接下去就是具体执行细化的部分了,我们要搭建环境、选择模型.....相信大家都很头大。
下面隆重出场的是:
NVIDIA 加速推理平台 :Try NVIDIA NIM APIs
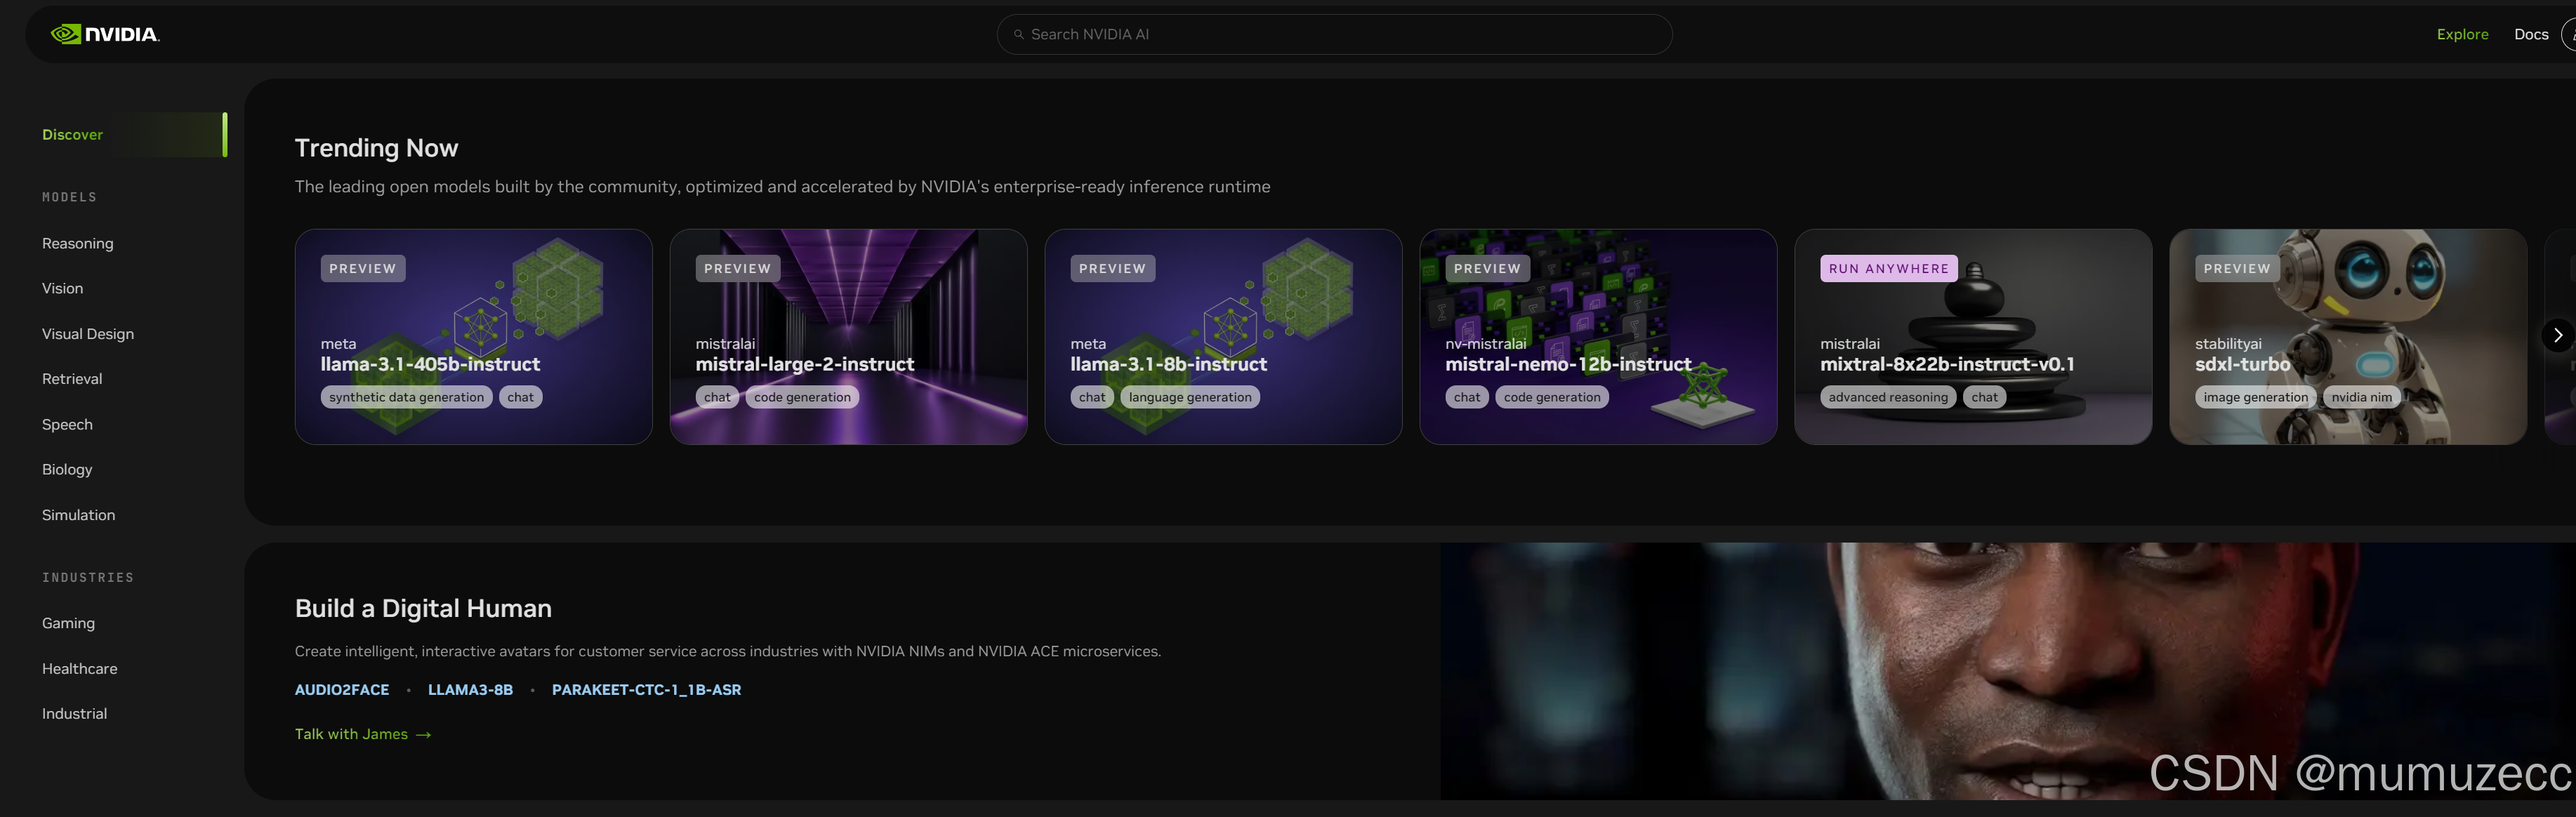
得益于英伟达的统一的接口,在这里你可以简单通过调取API接口获得不同大模型的服务,并且获得平台计算加速。注册就能获取免费的token,在我实际使用的时候感到其对于小白还是很友好的(不是广子,没收广告费,当然NVIDIA看到的话....)
建议大家在这个网站上先获取API接口
准备工作:
在jupyer里安装这些要用到的包
# ! pip install gradio
# ! pip install openai-whisper==20231117
# ! pip install ffmpeg==1.4
# ! conda install ffmpeg -y
# ! pip install edge-tts
# ! pip install transformers
# ! pip install openai
话不多说:开始工作.
1.语言输入系统——识别语音将语音转换成文字
先安装一个录音的包
!pip install pyaudio wave speechrecognition包成功安装后就可以在jupyter上直接录音了。
然后就是设置一些参数,采样数1024,一个音16位的采样,单声道...随便设置
这里做的比较简陋,音频固定录音8s,如果想调节的话可以在duration里调节。
import pyaudio
import wave

def record_audio(filename, duration=8):
    chunk = 1024
    sample_format = pyaudio.paInt16
    channels = 1
    fs = 44100

    p = pyaudio.PyAudio()

    print("Recording...")

    stream = p.open(format=sample_format,
                    channels=channels,
                    rate=fs,
                    frames_per_buffer=chunk,
                    input=True)

    frames = []  # Initialize array to store frames

    # Store data in chunks for the specified duration
    for _ in range(0, int(fs / chunk * duration)):
        data = stream.read(chunk)
        frames.append(data)

    # Stop and close the stream
    stream.stop_stream()
    stream.close()

    # Terminate the PortAudio interface
    p.terminate()

    print("Finished recording.")

    # Save the recorded data as a WAV file
    with wave.open(filename, 'wb') as wf:
        wf.setnchannels(channels)
        wf.setsampwidth(p.get_sample_size(sample_format))
        wf.setframerate(fs)
        wf.writeframes(b''.join(frames))

# 录制8秒音频并保存为 F 盘的 output.wav 文件
record_audio('F:/output.wav', duration=8)
在代码中,我把录制完的音频输出到F盘,大家也可以改自己的输出地址。
import speech_recognition as sr

def audio_to_text(audio_file, text_file):
    recognizer = sr.Recognizer()
    with sr.AudioFile(audio_file) as source:
        audio_data = recognizer.record(source)
        print("Recognizing...")
        try:
            text = recognizer.recognize_google(audio_data, language='zh-CN')
            print("Transcription: ", text)

            # Save the transcription to a text file
            with open(text_file, 'w', encoding='utf-8') as f:
                f.write(text)

        except sr.UnknownValueError:
            print("Google Speech Recognition could not understand audio")
        except sr.RequestError as e:
            print(f"Could not request results from Google Speech Recognition service; {e}")

# 将 output.wav 转换为文本并保存到 F 盘的 transcription.txt 文件中
audio_to_text('F:/output.wav', 'F:/transcription.txt')
这里也是用到了google的语音转文字包,我这里设置语言为中文。可以修改为英文,后续会解答。
这个语音输入比较粗糙,欢迎各位大佬抛砖引玉。
好咯,那么到这一步我们也是完成了语音输入的内容。下面是重头戏。
2.多模态AI —— 识别输入的图像,将输出信息传入下一步
!pip install langchain_nvidia_ai_endpoint
!pip install langchain
!pip install base64
不必多说,导入包。
from langchain_nvidia_ai_endpoints import ChatNVIDIA
from langchain_core.output_parsers import StrOutputParser
from langchain_core.prompts import ChatPromptTemplate
from langchain.schema.runnable import RunnableLambda
from langchain.schema.runnable.passthrough import RunnableAssign
from langchain_core.runnables import RunnableBranch
from langchain_core.runnables import RunnablePassthrough

from langchain.chains import ConversationChain
from langchain.memory import ConversationBufferMemory

import os
import base64
import matplotlib.pyplot as plt
import numpy as np
将上面准备好的秘钥粘贴在此处, 当我们向服务器发送计算请求时, 需要用到
os.environ["NVIDIA_API_KEY"] = "nvapi-xxxxxxx1231231322131"查看当前可用模型
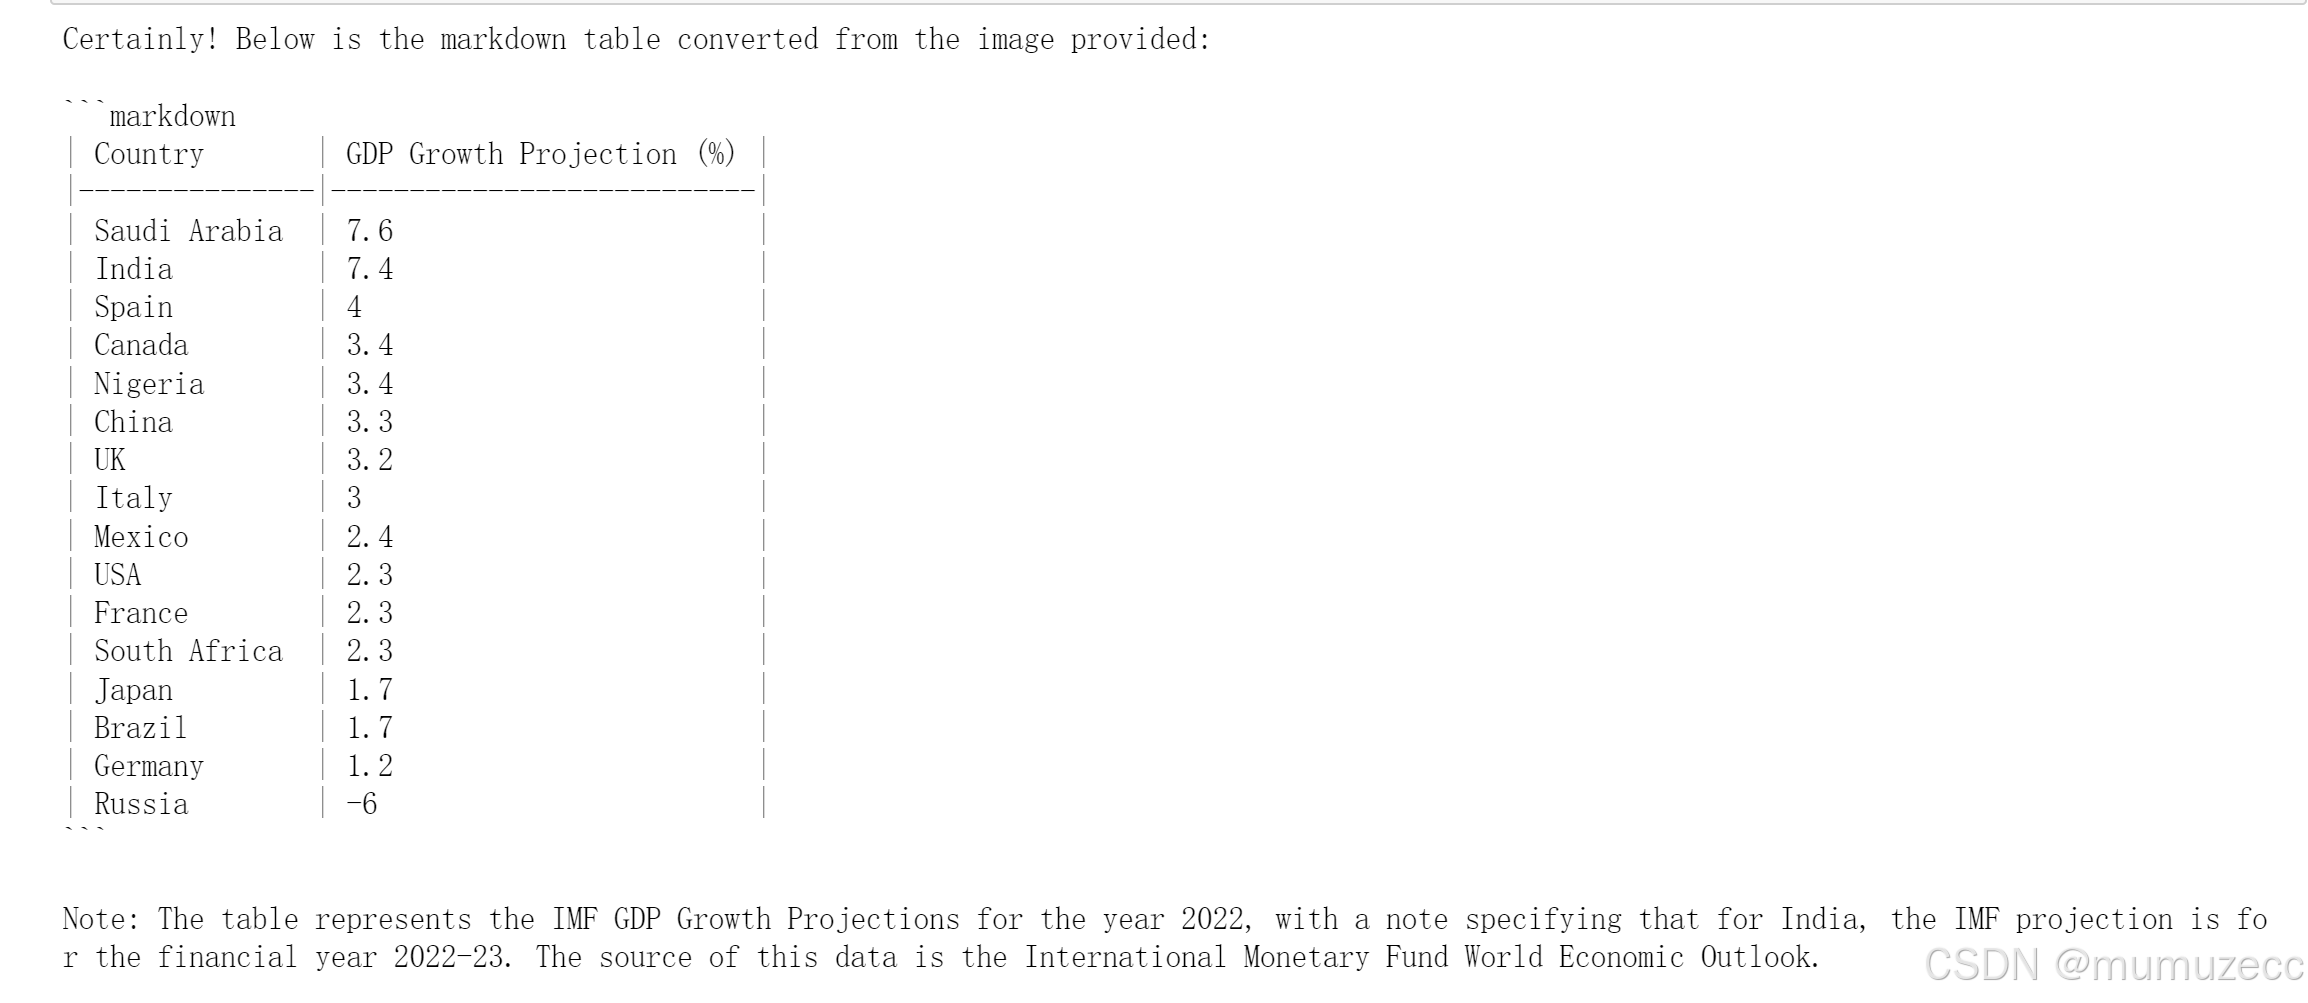
ChatNVIDIA.get_available_models()好了,接下去我们就要把图片给AI了,但是AI无法直接理解AI,我们首先要对AI进行编码和解码。
从网上随便找了张2022年的世界GDP图,用base64编码。
def image2b64(image_file):
    with open(image_file, "rb") as f:
        image_b64 = base64.b64encode(f.read()).decode()
        return image_b64

image_b64 = image2b64("GDP.png")
# image_b64 = image2b64("eco-good-bad-chart.png")
查看图片
from PIL import Image
display(Image.open("GDP.png"))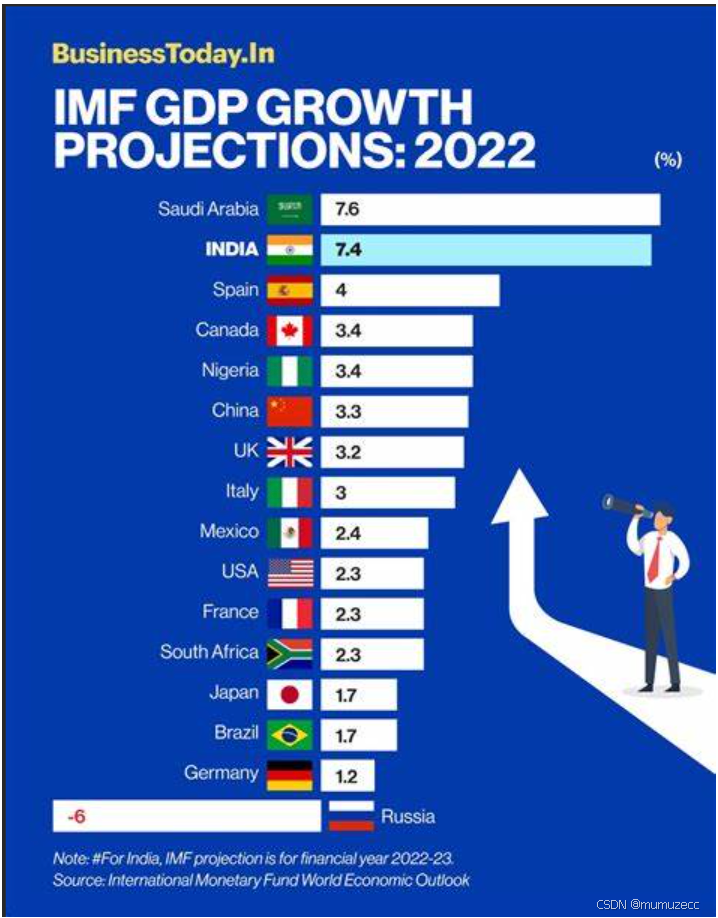
在这里我选择用Microsoft Phi 3去训练,phi3对于英文语境有较好的反应,所以上面建议大家用英文,图片也选取英文(不过听说近期会更新跨语言,之后用中文也没关系了)
将编码后的图像按照格式给到Microsoft Phi 3 vision , 利用其强大能力解析图片中的数据
还是十分精确的。
(这里简单介绍一下phi 3,phi 3是一个“小”语言模型,可以简单理解为通过更好的训练数据使得在模型参数减少的同时,效果保持不变,算力需求更小了。非常适合个人和小型开发者使用。)
3.RAG系统
先试试原本AI 的描述
这里invoke内容,改成第一部分的录音txt就可以实现功能衔接。(这里演示是为了展示rag)
llm = ChatNVIDIA(model="ai-phi-3-small-128k-instruct", nvidia_api_key="nvapi-xxxxxxx", max_tokens=512)
result = llm.invoke("向我描述2022年美国的GDP状况")
print(result.content)
输出结果为:

上述图片美国2022年的GDP增长率是2.3%,我在网上搜到很多资料是2.2%,那么AI的回答就出现了幻觉。
为了解决这一问题,我们要设置一个专门的资料库。
首先,初始化这个向量模型,它可以实现把文字转化成向量
from langchain_nvidia_ai_endpoints import NVIDIAEmbeddings

embedder = NVIDIAEmbeddings(model="ai-embed-qa-4")
!pip install -U langchain-community
!pip install faiss-cpu
获取文本数据集
我这里找了2022年有关数据,放到对应地址中
import os
from tqdm import tqdm
from pathlib import Path

# Here we read in the text data and prepare them into vectorstore
ps = os.listdir("./zh_data/")
data = []
sources = []
for p in ps:
    if p.endswith('GDP.txt'):
        path2file="./zh_data/"+p
        with open(path2file,encoding="utf-8") as f:
            lines=f.readlines()
            for line in lines:
                if len(line)>=1:
                    data.append(line)
                    sources.append(path2file)
进行一些基本的清理并删除空行
documents=[d for d in data if d != '\n']
len(data), len(documents), data[0]
将文档处理到 faiss vectorstore 并将其保存到磁盘
from operator import itemgetter
from langchain.vectorstores import FAISS
from langchain_core.output_parsers import StrOutputParser
from langchain_core.prompts import ChatPromptTemplate
from langchain_core.runnables import RunnablePassthrough
from langchain.text_splitter import CharacterTextSplitter
from langchain_nvidia_ai_endpoints import ChatNVIDIA
import faiss
重读之前处理并保存的 Faiss Vectore 存储
# Load the vectorestore back.
store = FAISS.load_local("./zh_data/nv_embedding", embedder,allow_dangerous_deserialization=True)
retriever = store.as_retriever()
prompt = ChatPromptTemplate.from_messages(
[
(
"system",
"Answer solely based on the following context:\n<Documents>\n{context}\n</Documents>",
),
("user", "{question}"),
]
)
chain = (
{"context": retriever, "question": RunnablePassthrough()}
| prompt
| llm
| StrOutputParser()
)
chain.invoke("2022年美国的GDP增速是多少?")
可以看到内容已经获得了更新。
在有了RAG的经验后,我们就可以对之前的模型也进行这样的修改,同理就是把相关资料地址提取放入到模型里。让我们再次回去完善第二步吧。
使用 LangChain 构建多模态智能体
Agent 应用场景:将图片中的统计图表转换为可以用 python 进行分析的数据
Agent 工作流:
- 接收图片,读取图片数据
- 对数据进行调整、分析
- 生成能够绘制图片的代码,并执行代码
- 根据处理后的数据绘制图表
接收图片 -> 分析数据 -> 修改数据 -> 生成绘制图片的代码 -> 执行代码 -> 展示结果
这里是辅助函数
import re

# 将 langchain 运行状态下的表保存到全局变量中
def save_table_to_global(x):
    global table
    if 'TABLE' in x.content:
        table = x.content.split('TABLE', 1)[1].split('END_TABLE')[0]
    return x

# helper function 用于Debug
def print_and_return(x):
    print(x)
    return x

# 对打模型生成的代码进行处理, 将注释或解释性文字去除掉, 留下pyhon代码
def extract_python_code(text):
    pattern = r'```python\s*(.*?)\s*```'
    matches = re.findall(pattern, text, re.DOTALL)
    return [match.strip() for match in matches]

# 执行由大模型生成的代码
def execute_and_return(x):
    code = extract_python_code(x.content)[0]
    try:
        result = exec(str(code))
        #print("exec result: "+result)
    except ExceptionType:
        print("The code is not executable, don't give up, try again!")
    return x

# 将图片编码成base64格式, 以方便输入给大模型
def image2b64(image_file):
    with open(image_file, "rb") as f:
        image_b64 = base64.b64encode(f.read()).decode()
        return image_b64
定义多模态数据分析 Agent
- 这里首先定义了提示词模板, chart_reading_prompt, 我们输入的图片会边恒base64格式的string传输给它
- 将处理好的提示词输入给char_reading, 也就是microsoft/phi-3-vision大模型来进行数据分析, 得到我们需要的表格或者说table变量
- 将Phi3 vision处理好的table和提示词输入给另一个大模型llama3.1, 修改数据并生成代码
- 将生成的代码通过上面的执行函数来执行python代码, 并得到结果
def chart_agent(image_b64, user_input, table):
    # Chart reading Runnable
    chart_reading = ChatNVIDIA(model="ai-phi-3-vision-128k-instruct")
    chart_reading_prompt = ChatPromptTemplate.from_template(
        'Generate underlying data table of the figure below, : <img src="data:image/png;base64,{image_b64}" />'
    )
    chart_chain = chart_reading_prompt | chart_reading

    # Instruct LLM Runnable
    # instruct_chat = ChatNVIDIA(model="nv-mistralai/mistral-nemo-12b-instruct")
    # instruct_chat = ChatNVIDIA(model="meta/llama-3.1-8b-instruct")
    #instruct_chat = ChatNVIDIA(model="ai-llama3-70b")
    instruct_chat = ChatNVIDIA(model="meta/llama-3.1-405b-instruct")

    instruct_prompt = ChatPromptTemplate.from_template(
        "Do NOT repeat my requirements already stated. Based on this table {table}, {input}" \
        "If has table string, start with 'TABLE', end with 'END_TABLE'." \
        "If has code, start with '```python' and end with '```'." \
        "Do NOT include table inside code, and vice versa."
    )
    instruct_chain = instruct_prompt | instruct_chat

    # 根据“表格”决定是否读取图表
    chart_reading_branch = RunnableBranch(
        (lambda x: x.get('table') is None, RunnableAssign({'table': chart_chain })),
        (lambda x: x.get('table') is not None, lambda x: x),
        lambda x: x
    )
    # 根据需求更新table
    update_table = RunnableBranch(
        (lambda x: 'TABLE' in x.content, save_table_to_global),
        lambda x: x
    )
    # 执行绘制图表的代码
    execute_code = RunnableBranch(
        (lambda x: '```python' in x.content, execute_and_return),
        lambda x: x
    )

    chain = (
        chart_reading_branch
        #| RunnableLambda(print_and_return)
        | instruct_chain
        #| RunnableLambda(print_and_return)
        | update_table
        | execute_code
    )

    return chain.invoke({"image_b64": image_b64, "input": user_input, "table": table}).content
在这里选择你的图片,初始化
# 使用全局变量 table 来存储数据
table = None
# 将要处理的图像转换成base64格式
image_b64 = image2b64("GDP.png")

#展示读取的图片
from PIL import Image

display(Image.open("GDP.png"))
让 Agent 自己尝试修改其中的内容
user_input = "replace table string's 'USA' with 'United States of Ameirca'"
chart_agent(image_b64, user_input, table)
print(table)    # let's see what 'table' looks like now
美国的缩写换成全称,执行
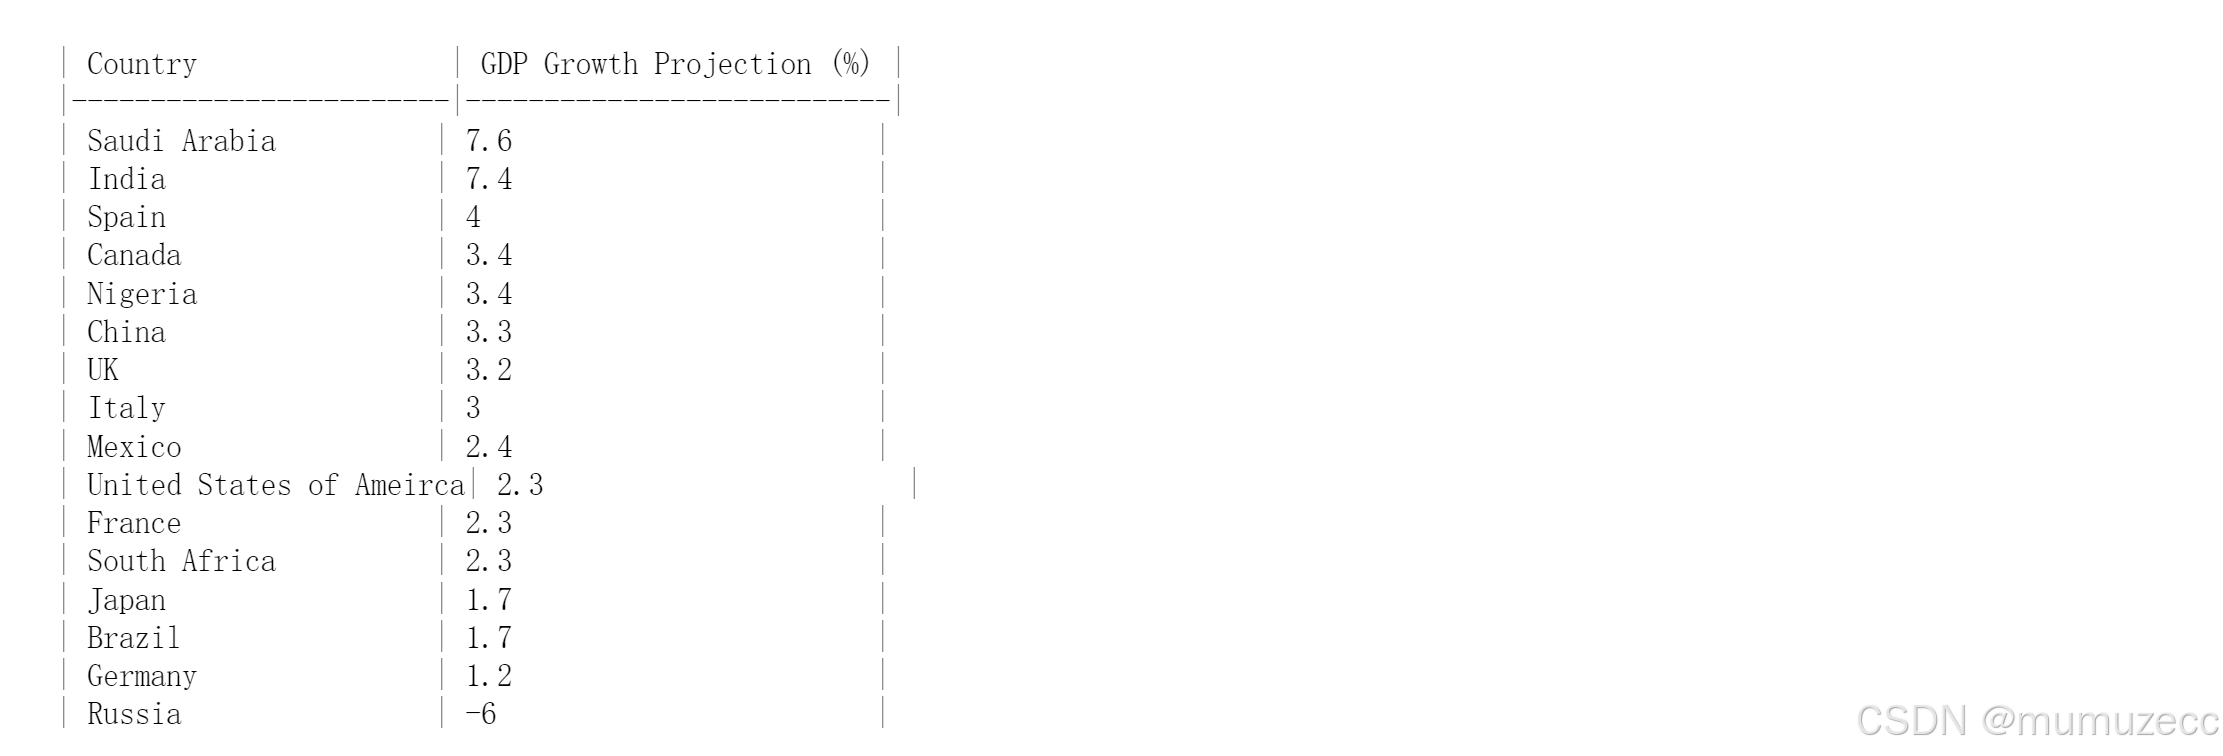
用 python 绘制图表
这里会让大模型生成绘制图像的代码, 并执行生成的代码
user_input = "draw this table as stacked bar chart in python"
result = chart_agent(image_b64, user_input, table)
print("result: "+result)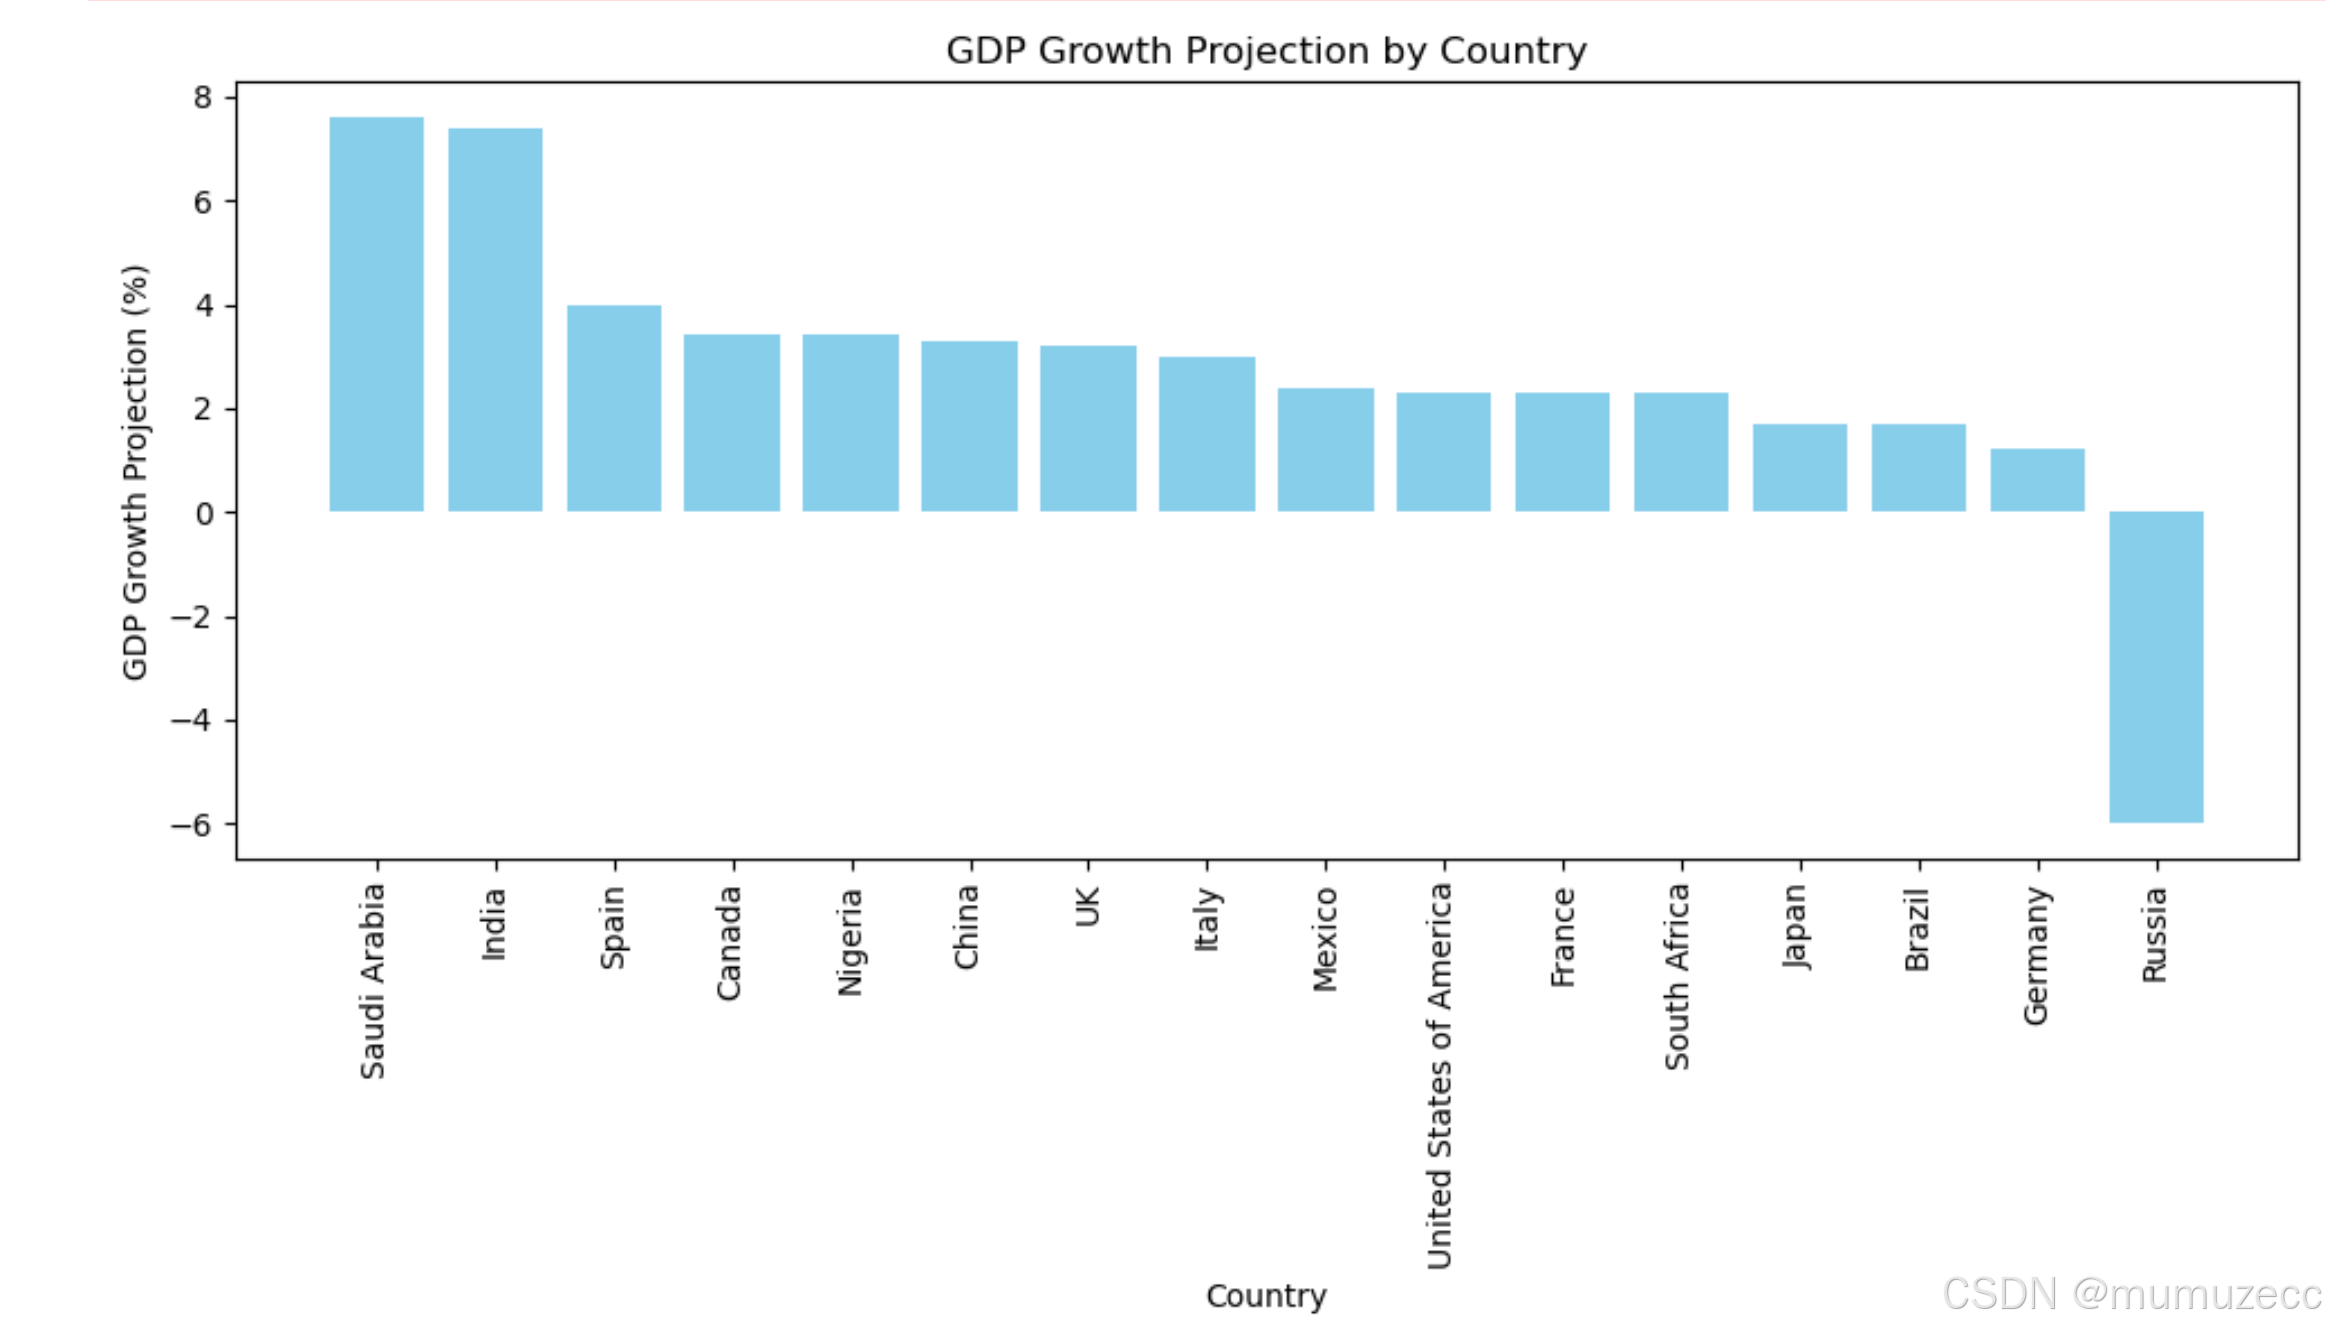
当我们完成上述任务的时候, 就拥有了一个可以分析图片, 生成代码, 修改数据, 执行代码的智能体
还记得上述的结果吗
语音输出系统——AI文本转换成语音输出
如何输出note呢:
!pip install edge-tts playsound
import edge_tts
from IPython.display import HTML, display

def edge_tts(text):
    javascript = f"""
    <script>
    var msg = new SpeechSynthesisUtterance();
    msg.text = "{text}";
    msg.lang = 'en-US';
    window.speechSynthesis.speak(msg);
    </script>
    """
    display(HTML(javascript))

# 使用这个函数来调用 TTS
edge_tts("Hello, how are you?")
同时我们也可以修改语音语调来匹配我们的输出
from IPython.display import HTML, display

def edge_tts(text):
    javascript = f"""
    <script>
    var msg = new SpeechSynthesisUtterance();
    msg.text = "{text}";
    msg.lang = 'zh-CN';
    window.speechSynthesis.speak(msg);
    </script>
    """
    display(HTML(javascript))

# 使用这个函数来调用 TTS
edge_tts("你好,今天感觉如何?")
然后修改文本内容为:result.content即可
最后,让我们封装一下AI
这里使用的是Gradio
!pip install Gradio在这里选择你的路径地址哦
global img_path
img_path = 'F:\output image'+'image.png'
print(img_path)
def execute_and_return_gr(x):
code = extract_python_code(x.content)[0]
try:
result = exec(str(code))
#print("exec result: "+result)
except ExceptionType:
print("加油再试一次")
return img_path这个chart_agent函数的输入原来是base64格式, 但是gradio中上传图片的格式是png或jpg等图片格式
所以我们更新了这个函数, 在最开始的步骤中加入了一个编码的过程
def chart_agent_gr(image_b64, user_input, table):

    image_b64 = image2b64(image_b64)
    # Chart reading Runnable
    chart_reading = ChatNVIDIA(model="microsoft/phi-3-vision-128k-instruct")
    chart_reading_prompt = ChatPromptTemplate.from_template(
        'Generate underlying data table of the figure below, : <img src="data:image/png;base64,{image_b64}" />'
    )
    chart_chain = chart_reading_prompt | chart_reading

    # Instruct LLM Runnable
    # instruct_chat = ChatNVIDIA(model="nv-mistralai/mistral-nemo-12b-instruct")
    # instruct_chat = ChatNVIDIA(model="meta/llama-3.1-8b-instruct")
    #instruct_chat = ChatNVIDIA(model="ai-llama3-70b")
    instruct_chat = ChatNVIDIA(model="meta/llama-3.1-405b-instruct")

    instruct_prompt = ChatPromptTemplate.from_template(
        "Do NOT repeat my requirements already stated. Based on this table {table}, {input}" \
        "If has table string, start with 'TABLE', end with 'END_TABLE'." \
        "If has code, start with '```python' and end with '```'." \
        "Do NOT include table inside code, and vice versa."
    )
    instruct_chain = instruct_prompt | instruct_chat

    # 根据“表格”决定是否读取图表
    chart_reading_branch = RunnableBranch(
        (lambda x: x.get('table') is None, RunnableAssign({'table': chart_chain })),
        (lambda x: x.get('table') is not None, lambda x: x),
        lambda x: x
    )

    # 根据需求更新table
    update_table = RunnableBranch(
        (lambda x: 'TABLE' in x.content, save_table_to_global),
        lambda x: x
    )

    execute_code = RunnableBranch(
        (lambda x: '```python' in x.content, execute_and_return_gr),
        lambda x: x
    )

    # 执行绘制图表的代码
    chain = (
        chart_reading_branch
        | RunnableLambda(print_and_return)
        | instruct_chain
        | RunnableLambda(print_and_return)
        | update_table
        | execute_code
    )

    return chain.invoke({"image_b64": image_b64, "input": user_input, "table": table})
设置好界面
import gradio as gr
multi_modal_chart_agent = gr.Interface(fn=chart_agent_gr,
                    inputs=[gr.Image(label="Upload image", type="filepath"), 'text'],
                    outputs=['image','text'],
                    title="Multi Modal chat agent",
                    description="Multi Modal chat agent",
                    allow_flagging="never")

multi_modal_chart_agent.launch(debug=True, share=False, show_api=False, server_port=7860, server_name="127.0.0.1")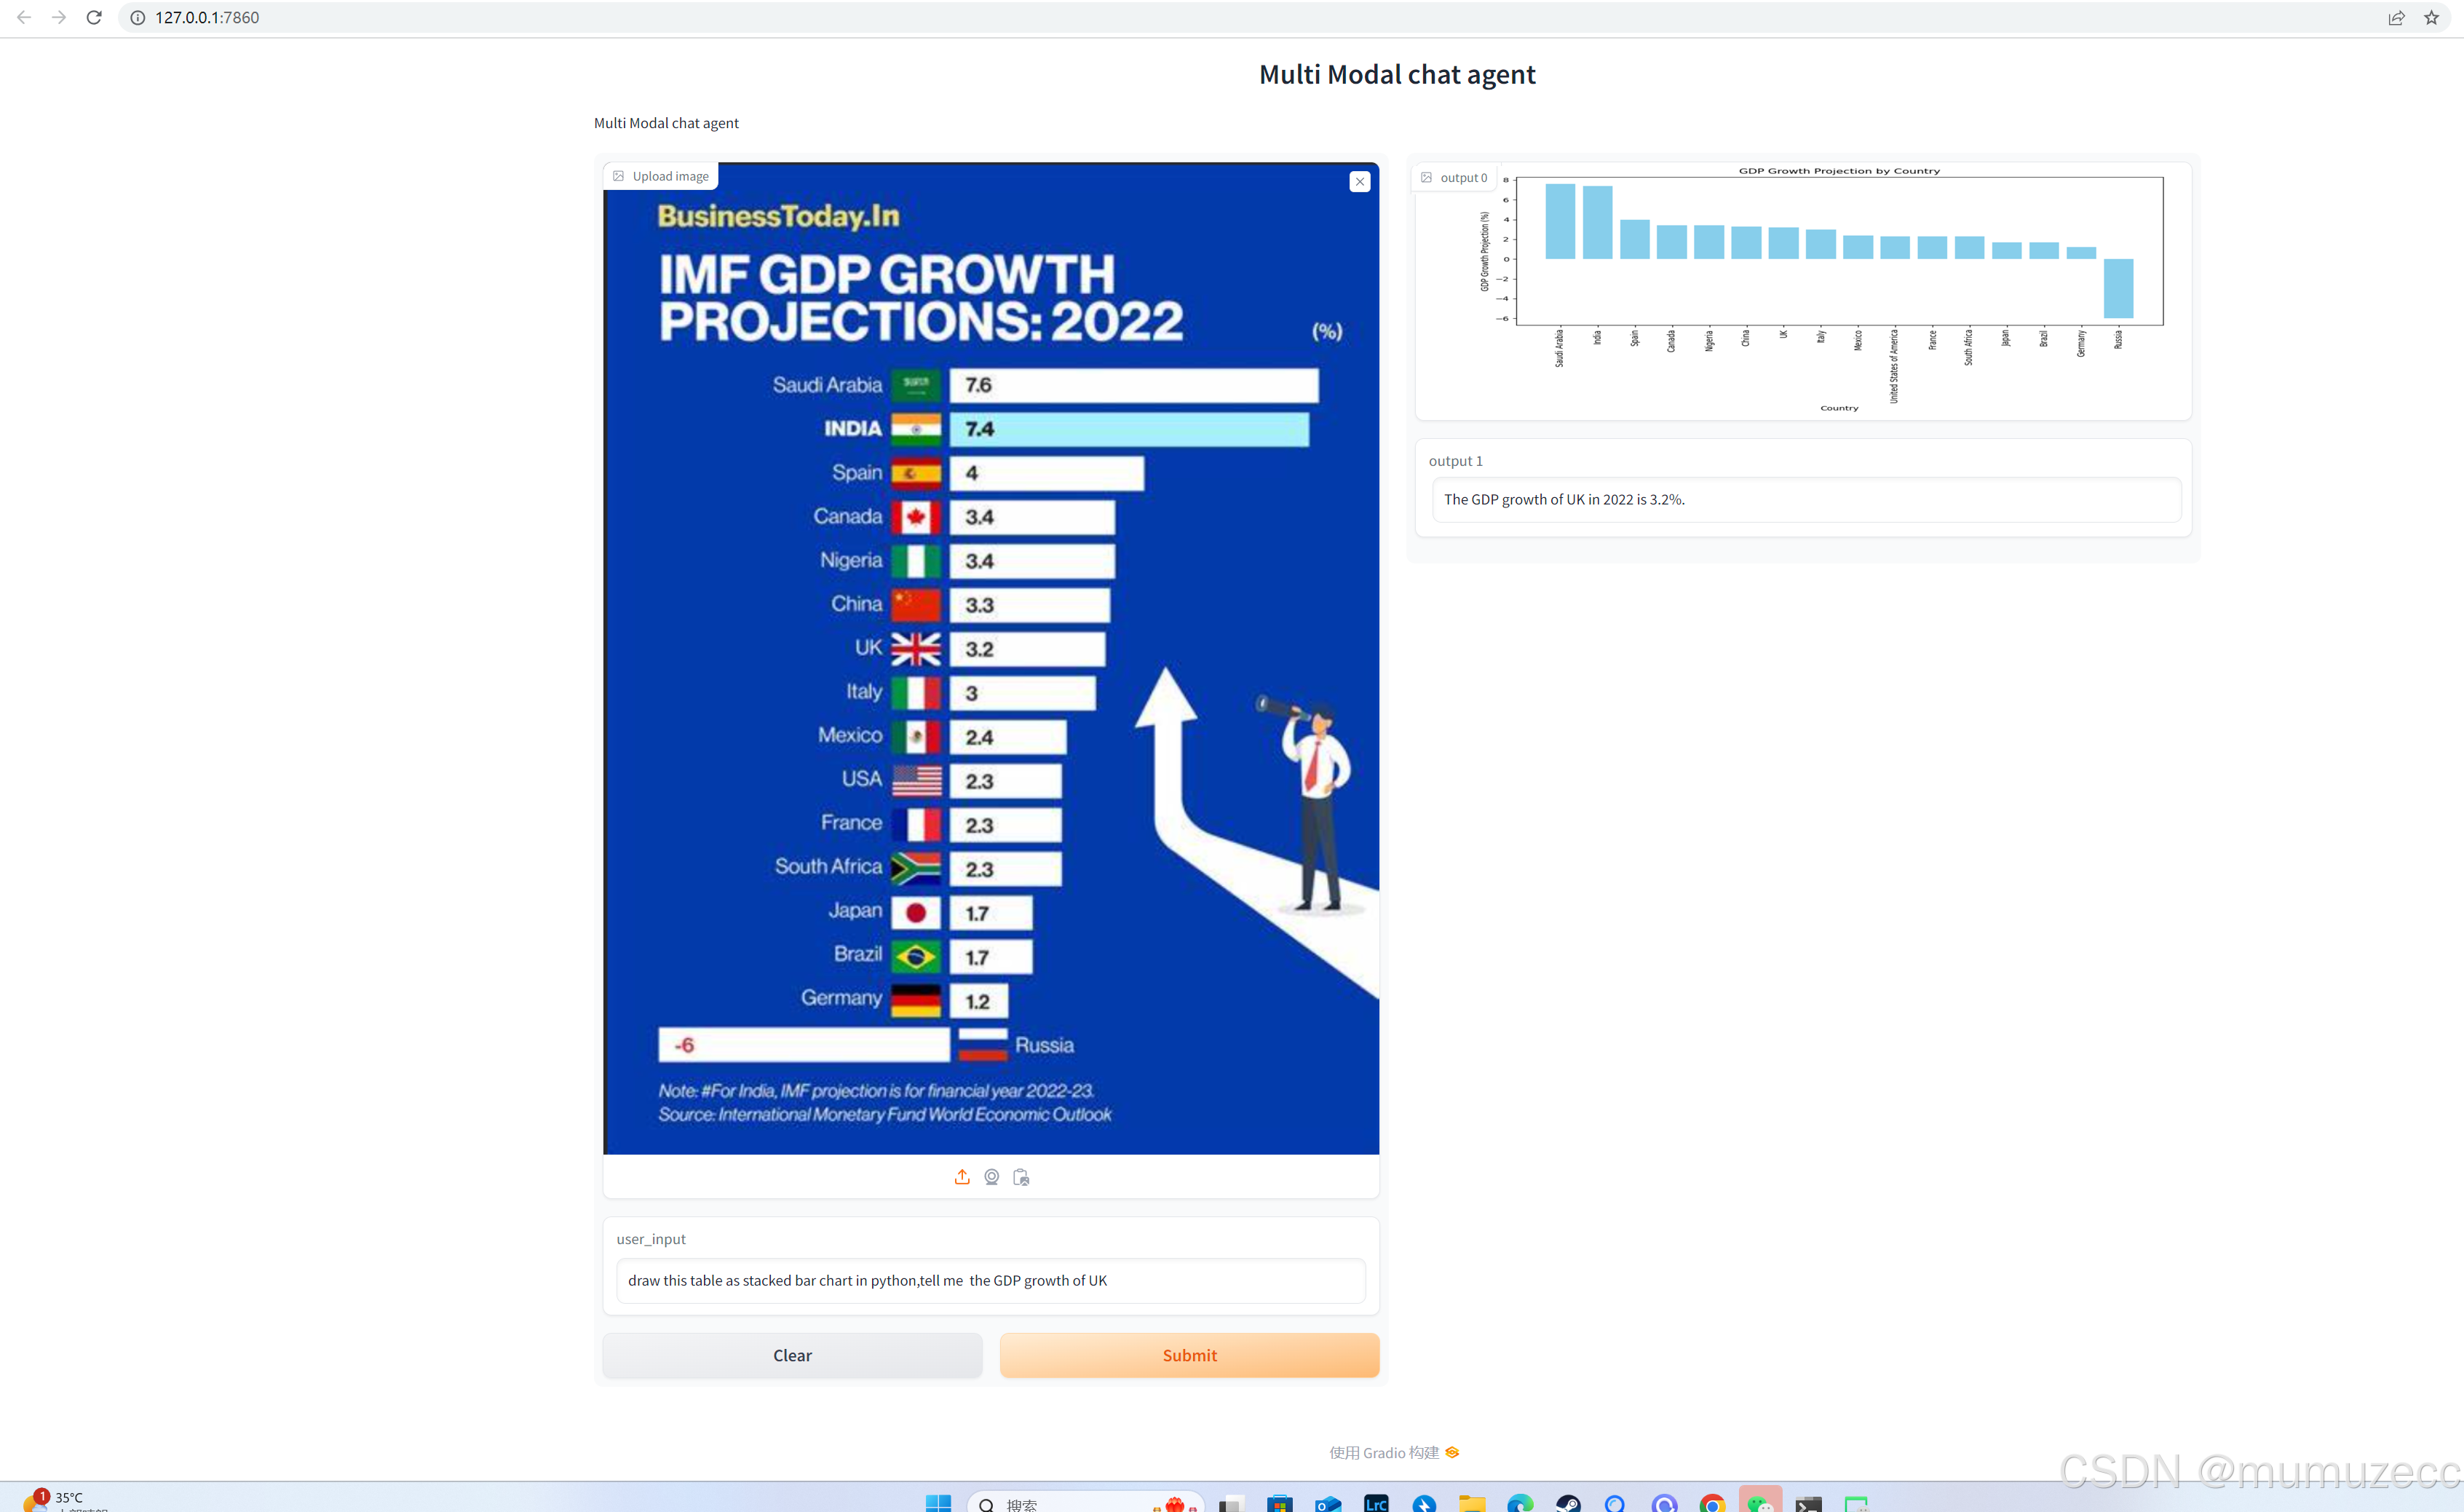
然后就可以在这里问答啦
先写到这,很感谢英伟达社区的老师的指导,还有很多大佬的指点,给了我们很多的参考。我很多材料和代码的编写,都源于这些大佬的分享。


 被折叠的 条评论
为什么被折叠?
被折叠的 条评论
为什么被折叠?
 到【灌水乐园】发言


