


十一、生命周期
<= v16.8.4

注意:
React 是单页面的,即所有组件都是在初始化创建的时候全部被创建的(包括弹框),只是通过属性来显示和隐藏组件,并不会销毁和重建组件。
因此,在子组件中,可以通过更新state时会触发的回调函数来做一些操作,如componentWillUpdate();但是若是在componentWillMount()做了一些操作的话,那么这些操作便只会触发一次,更新state或是显示出该组件(如弹框组件)时都不会触发这些操作,因为它们所在的回调函数在生命周期中只触发一次。
1. 组件的三个生命周期
Mount:插入真实DOM
Update:正在被重新渲染
Unmount:被移除真实DOM
componentWillMount()
componentDidMount()
componentWillUpdate()
componentDidUpdate()
componentWillUnmount()
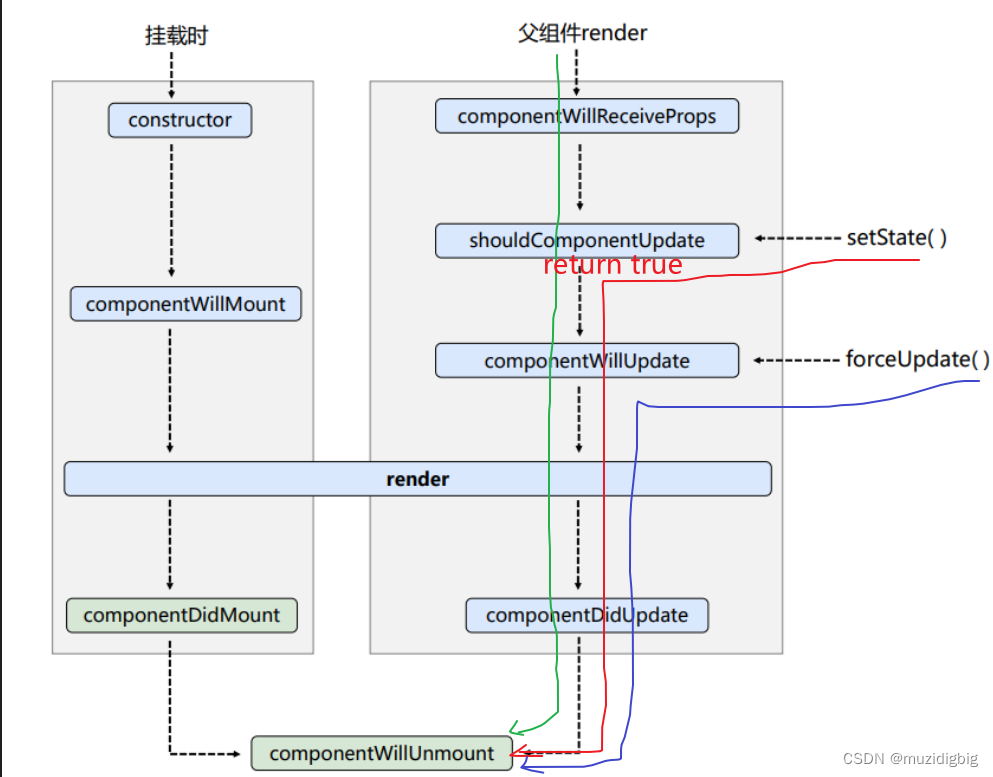
1、初始化阶段: 由ReactDOM.render()触发---初次渲染
- constructor():创建对象初始化 state
- componentWillMount():将要插入回调
render():用于插入虚拟DOM回调–每更新一次状态,调用一次- componentDidMount():已经插入回调 =====> 常用,一般在这个钩子中做一些初始化的事,例如:开启定时器、发送网络请求、订阅消息
2、更新阶段: 由组件内部this.setSate()或父组件render触发
- shouldComponentUpdate():return true; 控制组件更新的“阀门”
-
componentWillUpdate:将要更新回调
- render():更新(重新渲染)=====> 必须使用的一个
- componentDidUpdate():已经更新回调
3、移除/卸载组件:ReactDOM.unmountComponentAtNode(containerDOM) =====> 常用,一般在这个钩子中做一些收尾的事,例如:关闭定时器、取消订阅消息
- componentWillUnmount():组件将要被移除回调
- initial render
- constructor()
- componentWillMount()
- render()
- componentDidMount()
- componentWillUnmount()
- 父组件 render
- componentWillReceiveProps(props):组件将要接收到新属性,第一次接收属性的时候不调用
- shouldComponentUpdate()–this.setState()
- componentWillUpdate()–this.forceUpdate()
- render()
- componentDidUpdate()
- componentWillUnmount()
<div id="example">/<div>
<script type="text/babel">
	class Life extends React.Component {
		constructor(props) {
			super(props)
			this.state = {
				opcity: 1
			}
			this.destroyComponent = this.destroyComponent.bind(this)
		}
		componentDidMount() {
			// 启动循环定时器
			this.intervalID = setInterval(function() {
				let {opcity} = this.state
				opcity -= 0.1
				if(opcity<=0) {
					opcity = 1
				}
				this.setState({opcity})
			}.bind(this),200) // 绑定this为当前react实例
			// 使用箭头函数解决this问题
			// setInterval(()=>{
			// 	this.setState({date: new Date()})
			// }, 1000)
		}
		// 销毁组件前
		componentWillUnmount() {
			clearInterval(this.intervalID) // 清理定时器,参数为定时器id
		}
		// 销毁组件Life
		destroyComponent() {
			ReactDOM.unmountComponentAtNode(document.getElementById('example'))
		}
		render() {
			const { opcity } = this.state
			return(
				<div>
					<h2 style={{opcity: opcity}}>{this.props.msg}</h2>
					<button @click="destroyComponent">销毁组件</button>
				</div>
			)
		}
	}
	ReactDOM.render(<Life msg="React生命周期"/>, document.getElementById('example'))
</script>
重要的钩子
| 钩子 | 作用 |
|---|---|
| render() | 初始化渲染或更新渲染调用 |
| componentDidMount() | 开启监听,可调用setTimeout, setInterval或者送 ajax 请求(初始化的异步操作) |
| componentWillUnmount() | 做一些收尾工作,如:清理定时器 |
| componentWillReceiveProps() | 当组件接收到新的属性时回调 |
>= v17.0.1
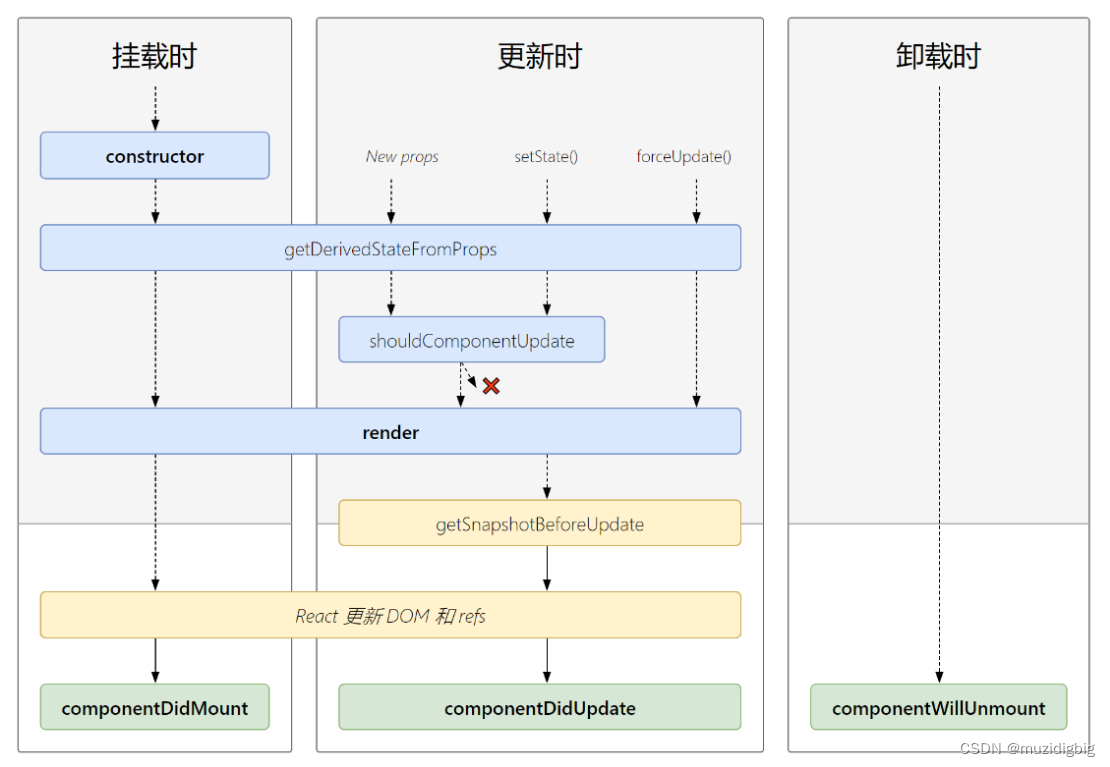 新的与旧的相比:废弃了3个(componentWillMount、componentWillReceiveProps、componentWillUpdate),新增了2个(getDerivedStateFromProps、getSnapshotBeforeUpdate)
/*
	1. 初始化阶段: 由ReactDOM.render()触发---初次渲染
					1.	constructor()
					2.	getDerivedStateFromProps
					3.	render()
					4.	componentDidMount() =====> 常用
								一般在这个钩子中做一些初始化的事,例如:开启定时器、发送网络请求、订阅消息
	2. 更新阶段: 由组件内部this.setSate()或父组件重新render触发
					1.	getDerivedStateFromProps
					2.	shouldComponentUpdate()
					3.	render()
					4.	getSnapshotBeforeUpdate
					5.	componentDidUpdate()
	3. 卸载组件: 由ReactDOM.unmountComponentAtNode()触发
					1.	componentWillUnmount()  =====> 常用
								一般在这个钩子中做一些收尾的事,例如:关闭定时器、取消订阅消息
*/
十二、Axios 的使用
React 组件的数据可以通过 componentDidMount 方法中的 Ajax 来获取,当从服务端获取数据时可以将数据存储在 state 中,再用 this.setState 方法重新渲染 UI。
当使用异步加载数据时,在组件卸载前使用 componentWillUnmount 来取消未完成的请求。

1.安装:
npm isntall axios --save
2.在使用的组件中引入axios
import axios from 'axios';案例:
import React from 'react';
import axios from 'axios';
const url = 'https://5b5e71c98e9f160014b88cc9.mockapi.io/api/v1/lists';

class UserGist extends React.Component {
    constructor(props) {
        super(props);
        this.state = { users: [] };
    }
    componentDidMount() {
        axios.get(url).then(res => {
            const result = res.data;
            this.setState({
                users: result
            })
        }).catch((err) => {
            console.log("请求数据失败!");
        })
    }

    render() {
        return (
            <div>
                <h1>Ajax</h1>
                <table>
                    <tbody>
                        {this.state.users.length > 0 &&
                            this.state.users.slice(0,3).map((item, index) => {
                                return (
                                    <tr key={index}>
                                        <td>{item.name}</td>
                                        <td>{item.sex}</td>
                                        <td>{item.age}</td>
                                    </tr>
                                )
                            })
                        }
                    </tbody>
                </table>
            </div>
        );
    }
}

export default UserGist;


 534
534


 被折叠的 条评论
为什么被折叠?
被折叠的 条评论
为什么被折叠?
 到【灌水乐园】发言


