


1、传统的增删改查
2、Restful风格
3、Restful风格实现的CRUD图书
1、传统的增删改查
1、准备单表的数据库
drop database if exists springmvc;

create database springmvc;

use springmvc;

##创建图书表
create table t_book(
	`id` int(11) primary key auto_increment, 	## 主键
	`name` varchar(50) not null,				## 书名
	`author` varchar(50) not null,				## 作者
	`price` decimal(11,2) not null,				## 价格
	`sales` int(11) not null,					## 销量
	`stock` int(11) not null					## 库存
);


## 插入初始化测试数据
insert into t_book(`id` , `name` , `author` , `price` , `sales` , `stock`)
values(null , 'java从入门到放弃' , '国哥' , 80 , 9999 , 9);

insert into t_book(`id` , `name` , `author` , `price` , `sales` , `stock`)
values(null , '数据结构与算法' , '严敏君' , 78.5 , 6 , 13);

insert into t_book(`id` , `name` , `author` , `price` , `sales` , `stock`)
values(null , '怎样拐跑别人的媳妇' , '龙伍' , 68, 99999 , 52);

insert into t_book(`id` , `name` , `author` , `price` , `sales` , `stock`)
values(null , '木虚肉盖饭' , '小胖' , 16, 1000 , 50);

insert into t_book(`id` , `name` , `author` , `price` , `sales` , `stock`)
values(null , 'C++编程思想' , '刚哥' , 45.5 , 14 , 95);

insert into t_book(`id` , `name` , `author` , `price` , `sales` , `stock`)
values(null , '蛋炒饭' , '周星星' , 9.9, 12 , 53);

insert into t_book(`id` , `name` , `author` , `price` , `sales` , `stock`)
values(null , '赌神' , '龙伍' , 66.5, 125 , 535);

insert into t_book(`id` , `name` , `author` , `price` , `sales` , `stock`)
values(null , 'Java编程思想' , '阳哥' , 99.5 , 47 , 36);

insert into t_book(`id` , `name` , `author` , `price` , `sales` , `stock`)
values(null , 'JavaScript从入门到精通' , '婷姐' , 9.9 , 85 , 95);

insert into t_book(`id` , `name` , `author` , `price` , `sales` , `stock`)
values(null , 'cocos2d-x游戏编程入门' , '国哥' , 49, 52 , 62);

insert into t_book(`id` , `name` , `author` , `price` , `sales` , `stock`)
values(null , 'C语言程序设计' , '谭浩强' , 28 , 52 , 74);

insert into t_book(`id` , `name` , `author` , `price` , `sales` , `stock`)
values(null , 'Lua语言程序设计' , '雷丰阳' , 51.5 , 48 , 82);

insert into t_book(`id` , `name` , `author` , `price` , `sales` , `stock`)
values(null , '西游记' , '罗贯中' , 12, 19 , 9999);

insert into t_book(`id` , `name` , `author` , `price` , `sales` , `stock`)
values(null , '水浒传' , '华仔' , 33.05 , 22 , 88);

insert into t_book(`id` , `name` , `author` , `price` , `sales` , `stock`)
values(null , '操作系统原理' , '刘优' , 133.05 , 122 , 188);

insert into t_book(`id` , `name` , `author` , `price` , `sales` , `stock`)
values(null , '数据结构 java版' , '封大神' , 173.15 , 21 , 81);

insert into t_book(`id` , `name` , `author` , `price` , `sales` , `stock`)
values(null , 'UNIX高级环境编程' , '乐天' , 99.15 , 210 , 810);

insert into t_book(`id` , `name` , `author` , `price` , `sales` , `stock`)
values(null , 'javaScript高级编程' , '国哥' , 69.15 , 210 , 810);

insert into t_book(`id` , `name` , `author` , `price` , `sales` , `stock`)
values(null , '大话设计模式' , '国哥' , 89.15 , 20 , 10);

insert into t_book(`id` , `name` , `author` , `price` , `sales` , `stock`)
values(null , '人月神话' , '刚哥' , 88.15 , 20 , 80);


## 查看表内容
select id,name,author,price,sales,stock from t_book;2、SpringMVC的单表的增,删,改,查
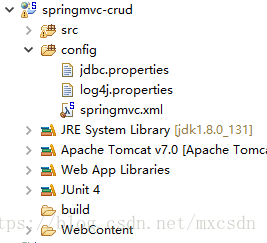
创建一个web工程
导入需要jar包
c3p0-0.9.1.2.jar
commons-logging-1.1.3.jar
log4j-1.2.17.jar
mysql-connector-java-5.1.37-bin.jar
spring-aop-4.0.0.RELEASE.jar
spring-beans-4.0.0.RELEASE.jar
spring-context-4.0.0.RELEASE.jar
spring-core-4.0.0.RELEASE.jar
spring-expression-4.0.0.RELEASE.jar
spring-jdbc-4.0.0.RELEASE.jar
spring-orm-4.0.0.RELEASE.jar
spring-test-4.0.0.RELEASE.jar
spring-tx-4.0.0.RELEASE.jar
spring-web-4.0.0.RELEASE.jar
spring-webmvc-4.0.0.RELEASE.jar
添加jdbc.properties属性配置文件:
jdbc.user=root
jdbc.password=123456
jdbc.driverClass=com.mysql.jdbc.Driver
jdbc.url=jdbc:mysql://localhost:3306/springmvc2.1、添加log4j.properties属性配置文件
# Global logging configuration
log4j.rootLogger=INFO, stdout
# Console output...
log4j.appender.stdout=org.apache.log4j.ConsoleAppender
log4j.appender.stdout.layout=org.apache.log4j.PatternLayout
log4j.appender.stdout.layout.ConversionPattern=%5p [%t] - %m%n配置Spring访问数据库需要的组件:
<!-- 扫描组件 -->
	<context:component-scan base-package="com.atguigu"></context:component-scan>
	<!-- 加载jdbc.properties属性配置文件 -->
	<context:property-placeholder location="classpath:jdbc.properties"/>
	<!-- 配置数据库连接池对象 -->
	<bean id="dataSource" class="com.mchange.v2.c3p0.ComboPooledDataSource">
		<property name="user" value="${jdbc.user}" />
		<property name="password" value="${jdbc.password}" />
		<property name="driverClass" value="${jdbc.driverClass}" />
		<property name="jdbcUrl" value="${jdbc.url}" />
	</bean>
	<!-- 配置jdbcTempate操作数据库用 -->
	<bean id="jdbcTemplate" class="org.springframework.jdbc.core.JdbcTemplate">
		<property name="dataSource" ref="dataSource"></property>
</bean>并分别对DataSource 和JdbcTemplate 进行测试:
@ContextConfiguration(locations="classpath:springmvc.xml")
@RunWith(SpringJUnit4ClassRunner.class)
public class SpringMVCTest {

	@Autowired
	DataSource dataSource;

	@Autowired
	JdbcTemplate jdbcTemplate;
	@Test
	public void testDataSource() {
		try {
			System.out.println(dataSource.getConnection());
		} catch (SQLException e) {
			// TODO Auto-generated catch block
			e.printStackTrace();
		}
	}
	@Test
	public void testJdbcTemplate() {
		System.out.println(jdbcTemplate);
	}

}2.2、创建实体bean对象
public class Book {
	private Integer id;
	private String name;
	private String author;
	private BigDecimal price;
	private Integer sales;
private Integer stock;2.3、创建BookDao以及测试
@Repository
public class BookDao {

	@Autowired
	JdbcTemplate jdbcTemplate;

	public int saveBook(Book book) {
		String sql = "insert into t_book(`name` , `author` , `price` , `sales` , `stock`) values(?,?,?,?,?)";
		return jdbcTemplate.update(sql, book.getName(), book.getAuthor(),
				book.getPrice(), book.getSales(), book.getStock());
	}

	public int deleteBookById(Integer id) {
		String sql = "delete from t_book where id = ?";
		return jdbcTemplate.update(sql, id);
	}

	public int updateBook(Book book) {
		String sql = "update t_book set name=?,author=?,price=?,sales=?,stock=? where id = ?";
		return jdbcTemplate
				.update(sql, book.getName(), book.getAuthor(), book.getPrice(),
						book.getSales(), book.getStock(), book.getId());
	}

	public Book queryBookById(Integer id) {
		String sql = "select `id`,`name` , `author` , `price` , `sales` , `stock` from t_book where id = ?";
		return jdbcTemplate.queryForObject(sql,
				new BeanPropertyRowMapper<Book>(Book.class), id);
	}

	public List<Book> queryList() {
		String sql = "select `id`,`name` , `author` , `price` , `sales` , `stock` from t_book";
		return jdbcTemplate.query(sql, new BeanPropertyRowMapper<Book>(
				Book.class));
	}

}2.4、创建BookService以及测试
@Service
public class BookService {

	@Autowired
	private BookDao bookDao;

	public void saveBook(Book book) {
		bookDao.saveBook(book);
	}

	public void deleteBookById(Integer id) {
		bookDao.deleteBookById(id);
	}

	public void updateBook(Book book) {
		bookDao.updateBook(book);
	}

	public Book queryBookById(Integer id) {
		return bookDao.queryBookById(id);
	}

	public List<Book> queryList() {
		return bookDao.queryList();
	}

}2.5、在web.xml中配置前端控制器和乱码解决Filter
<servlet>
		<servlet-name>springDispatcherServlet</servlet-name>
		<servlet-class>org.springframework.web.servlet.DispatcherServlet</servlet-class>
		<init-param>
			<param-name>contextConfigLocation</param-name>
			<param-value>classpath:springmvc.xml</param-value>
		</init-param>
		<load-on-startup>1</load-on-startup>
	</servlet>

	<servlet-mapping>
		<servlet-name>springDispatcherServlet</servlet-name>
		<url-pattern>/</url-pattern>
</servlet-mapping>POST请求乱码在web.xml中配置Filter解决
<filter>
		<!-- 配置Filter解决post请求乱码 -->
		<filter-name>CharacterEncodingFilter</filter-name>
		<filter-class>org.springframework.web.filter.	</filter-class>
		<init-param>
			<!-- 配置post请求进来的字符集 -->
			<param-name>encoding</param-name>
			<param-value>UTF-8</param-value>
		</init-param>
		<init-param>
			<!-- 配置响应的字符集 -->
			<param-name>forceEncoding</param-name>
			<param-value>true</param-value>
		</init-param>
	</filter>
	<filter-mapping>
		<filter-name>CharacterEncodingFilter</filter-name>
		<url-pattern>/*</url-pattern>
</filter-mapping>GET请求乱码在tomcat的server.xml配置文件中做如下的配置:

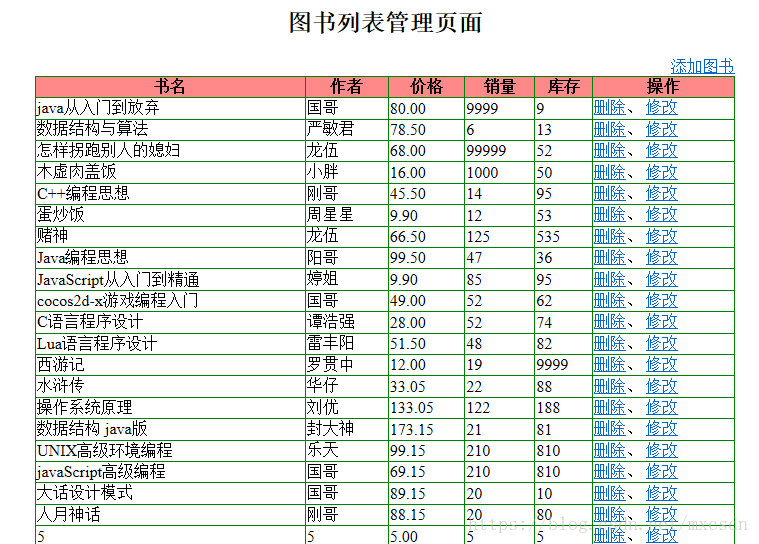
2.6、图书列表功能的实现
@RequestMapping(value = "/book")
@Controller
public class BookController {

	@Autowired
	private BookService bookService;

	@RequestMapping(value = "/list")
	public ModelAndView list() {
		List<Book> bookList = bookService.queryList();
		// 设置跳转去的地址是 /jsp/bookList.jsp页面
		ModelAndView modelAndView = new ModelAndView("bookList");
		//保存到request域中
		modelAndView.addObject("list", bookList);
		return modelAndView;
}
}2.7、图书添加功能的实现
@RequestMapping(value="/addBook")
	public ModelAndView addBook(Book book) {
		bookService.saveBook(book);

		ModelAndView modelAndView = new ModelAndView("redirect:/book/list");

		return modelAndView;
}注:添加成功之后还要跳转到列表页面,所以这里跳到list
2.8、图书删除功能的实现
需要在SpringMVC配置文件中添加如下的配置:
	<!-- 配置Spring支持静态资源请求 -->
	<mvc:default-servlet-handler/>
	<!-- 启用SpringMVC注解驱动 -->
<mvc:annotation-driven></mvc:annotation-driven>Controller中的代码:
@RequestMapping(value = "/deleteBook")
	public ModelAndView deleteBook(Integer id) {
		System.out.println("这是我要删除的图书id:" + id);
		bookService.deleteBookById(id);
		ModelAndView modelAndView = new ModelAndView("redirect:/book/list");
		return modelAndView;
}bookList.jsp页面中的代码:

<head>
<meta http-equiv="Content-Type" content="text/html; charset=UTF-8">
<title>图书列表</title>
<%
	String basePath = request.getScheme() + "://"
			+ request.getServerName() + ":" + request.getServerPort()
			+ request.getContextPath() + "/";
%>
<base href="<%=basePath%>" />
<script type="text/javascript" src="script/jquery-1.7.2.js"></script>
<script type="text/javascript">
	$(function() {
		// 给所有的删除的a标签绑定单击事件
		$("a.deleteA").click(
				function() {
					return confirm("你确定删除【"
							+ $(this).parent().parent().find("td:first").text()
							+ "】吗?");
				});
	});
</script>
</head>2.9、图书更新功能的实现
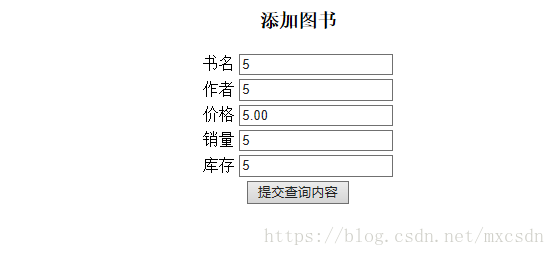
第一步:点击修改连接,把需要修改的图书信息,填充到bookEdit.jsp页面
修改页面中修改连接的跳转地址:
<a href="${ pageContext.request.contextPath }/book/getBook?id=${book.id}">修改</a></td>
BookController中的getBook方法如下:
@RequestMapping(value="/getBook")
	public ModelAndView getBook(Integer id) {
		System.out.println("这是我要修改的图书id:" + id);
		Book book = bookService.queryBookById(id);
		ModelAndView modelAndView = new ModelAndView("bookEdit");
		modelAndView.addObject("book", book);
		return modelAndView;
	}
第二步:提交数据给服务器确认修改
bookEdit.jsp页面需要修改动态的提交地址

Controller中的方法:
@RequestMapping(value = "/updateBook")
	public ModelAndView updateBook(Book book) {
		bookService.updateBook(book);
		ModelAndView modelAndView = new ModelAndView("redirect:/book/list");
		return modelAndView;
	}
效果图:
2、Restful风格
2.1、Restful 风格的介绍
Restful 一种软件架构风格、设计风格,而不是标准,只是提供了一组设计原则和约束条件。它主要用于客户端和服务器交互类的软件。基于这个风格设计的软件可以更简洁,更有层次,更易于实现缓存等机制。
6
REST(英文:Representational State Transfer,简称REST)描述了一个架构样式的网络系统,比如 web 应用程序。它首次出现在 2000 年 Roy Fielding 的博士论文中,他是 HTTP 规范的主要编写者之一。在目前主流的三种Web服务交互方案中,REST相比于SOAP(Simple Object Access protocol,简单对象访问协议)以及XML-RPC更加简单明了,无论是对URL的处理还是对Payload的编码,REST都倾向于用更加简单轻量的方法设计和实现。值得注意的是REST并没有一个明确的标准,而更像是一种设计的风格。
原则条件
REST 指的是一组架构约束条件和原则。满足这些约束条件和原则的应用程序或设计就是 RESTful。
Web 应用程序最重要的 REST 原则是,客户端和服务器之间的交互在请求之间是无状态的。从客户端到服务器的每个请求都必须包含理解请求所必需的信息。如果服务器在请求之间的任何时间点重启,客户端不会得到通知。此外,无状态请求可以由任何可用服务器回答,这十分适合云计算之类的环境。客户端可以缓存数据以改进性能。
在服务器端,应用程序状态和功能可以分为各种资源。资源是一个有趣的概念实体,它向客户端公开。资源的例子有:应用程序对象、数据库记录、算法等等。每个资源都使用 URI (Universal Resource Identifier) 得到一个唯一的地址。所有资源都共享统一的接口,以便在客户端和服务器之间传输状态。使用的是标准的 HTTP 方法,比如 GET、PUT、POST 和 DELETE。Hypermedia 是应用程序状态的引擎,资源表示通过超链接互联。
干货(简单明了):
Restful是一种设计风格。对于我们Web开发人员来说。就是使用一个url地址表示一个唯一的资源。然后把原来的请求参数加入到请求资源地址中。然后原来请求的增,删,改,查操作。改为使用HTTP协议中请求方式GET、POST、PUT、DELETE表示。
1、把请求参数加入到请求的资源地址中
2、原来的增,删,改,查。使用HTTP请求方式,POST、DELETE、PUT、GET分别一一对应。
添加 对应 post请求
删除 对应delete请求
修改 对应put请求
查询 对应get请求
2.2、如何学习restful风格,这里需要明确两点:
2.2.1、就是把传统的请求参数加入到请求地址是什么样子?
传统的方式是:
比如:http://ip:port/工程名/资源名?请求参数
举例:http://127.0.0.1:8080/springmvc/book?action=delete&id=1
restful风格是:
比如:http://ip:port/工程名/资源名/请求参数
举例:http://127.0.0.1:8080/springmvc/book/1
请求的动作删除由请求方式delete决定
2.2.2、restful风格中请求方式GET、POST、PUT、DELETE分别表示查、增、改、删。
GET请求 对应 查询
http://ip:port/工程名/book/1 HTTP请求GET 表示要查询id为1的图书
http://ip:port/工程名/book HTTP请求GET 表示查询全部的图书
POST请求 对应 添加
http://ip:port/工程名/book HTTP请求POST 表示要添加一个图书
PUT请求 对应 修改
http://ip:port/工程名/book/1 HTTP请求PUT 表示要修改id为1的图书信息
DELETE请求 对应 删除
http://ip:port/工程名/book/1 HTTP请求DELETE 表示要删除id为1的图书信息
2.2.3、SpringMVC中如何发送GET请求、POST请求、PUT请求、DELETE请求。
我们知道发起GET请求和POST请求,只需要在表单的form标签中,设置method=”get” 就是GET请求。
设置form标签的method=”post”。就会发起POST请求。而PUT请求和DELETE请求。要如何发起呢。
1、要有post请求的form标签
2、在form表单中,添加一个额外的隐藏域_method=”PUT”或_method=”DELETE”
3、在web.xml中配置一个Filter过滤器org.springframework.web.filter.HiddenHttpMethodFilter(注意,这个Filter一定要在处理乱码的Filter后面)
2.3、Restful风格的Controller如何实现
index.jsp页面中的代码:
<%@ page language="java" contentType="text/html; charset=UTF-8"
    pageEncoding="UTF-8"%>
<!DOCTYPE html PUBLIC "-//W3C//DTD HTML 4.01 Transitional//EN" "http://www.w3.org/TR/html4/loose.dtd">
<html>
	<head>
		<meta http-equiv="Content-Type" content="text/html; charset=UTF-8">
		<title>Insert title here</title>
	</head>
	<body>
		<a href="${pageContext.request.contextPath}/book/1">查询一个图书</a><br/>
		<a href="${pageContext.request.contextPath}/book">查询全部图书</a><br/>
		<form action="${pageContext.request.contextPath}/book" method="post">
			<input type="hidden" name="id" value="1" />
			<input type="hidden" name="name" value="这是需要添加的图书" />
			<input type="submit" value="这是添加操作"/>
		</form>
		<!-- 我们要发送put请求或是delete请求,
				1、有一个post请求的form标签
				2、添加一个隐藏域,<input type="hidden" name="_method" value="delete|put"/>
				3、添加一个restful支持的filter过滤器====HiddenHttpMethodFilter。
		 -->
		<form action="${pageContext.request.contextPath}/book/1" method="post">
			<input type="hidden" name="_method" value="delete"/>
			<input type="submit" value="这是删除操作"/>
		</form>

		<form action="${pageContext.request.contextPath}/book/1" method="post">
			<input type="hidden" name="_method" value="put"/>
			<input type="hidden" name="id" value="1" />
			<input type="hidden" name="name" value="这是需要修改的图书" />
			<input type="submit" value="这是修改操作"/>
		</form>

	</body>
</html>
控制器:
@Controller
public class BookController {

	@RequestMapping(value = "/book", method = RequestMethod.GET)
	public String list() {
		System.out.println("查询全部图书");
		return "redirect:/index.jsp";
	}

	@RequestMapping(value = "/book/1", method = RequestMethod.GET)
	public String queryBookById() {
		System.out.println("查询id为1的图书信息");
		return "redirect:/index.jsp";
	}

	@RequestMapping(value = "/book", method = RequestMethod.POST)
	public String addBook(Book book) {
		System.out.println("把book对象【" + book + "】插入到数据库");
		return "redirect:/index.jsp";
	}

	@RequestMapping(value = "/book/1", method = RequestMethod.DELETE)
	public String deleteBookById() {
		System.out.println("删除id为1的图书信息");
		return "redirect:/index.jsp";
	}

	@RequestMapping(value = "/book/1", method = RequestMethod.PUT)
	public String updateBook(Book book) {
		System.out.println("修改图书-->>" + book);
		return "redirect:/index.jsp";
	}

}2.4、Restful风格在高版本Tomcat中无法转发到jsp页面
在Tomcat8之后的一些高版本,使用restful风格访问然后转发到jsp页面。就会有如下的错误提示:
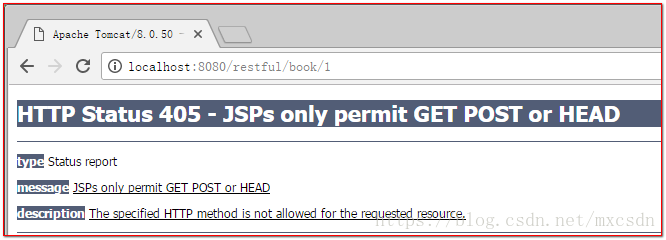
解决办法有两种:
一:在jsp页面中,修改page指定
<%@ page language="java" contentType="text/html; charset=UTF-8"
isErrorPage="true"
pageEncoding="UTF-8"%>
二:在Controller中使用重定向跳转。而不用转发(默认)
2.5、@PathVariable 路径参数获取
前面我们已经知道如何编写和配置restful风格的请求和控制器。
那么 现在的问题是。如何接收restful风格请求的参数。比如前面的id值。
/book/{id} 中 {id} 是占位符
第一种情况,一个path参数:
/**
	 * @PathVariable 路径参数<br/>
	 *               表示把请求地址中{id}占位符所表示的地址参数。注入到 方法参数的id中。
	 */
	@RequestMapping(value = "/book/{id}", method = RequestMethod.GET)
	public String queryBookById(@PathVariable(value = "id") Integer id) {
		System.out.println("查询id为" + id + "的图书信息");
		return "redirect:/index.jsp";
}第二种情况,多个path参数(不怎么推荐多个参数):
/**
	 * @PathVariable 路径参数<br/>
	 *               表示把请求地址中{id}占位符所表示的地址参数。注入到 方法参数的id中。
	 */
	@RequestMapping(value = "/book/{id}/{name}", method = RequestMethod.GET)
	public String queryBookById(@PathVariable(value = "id") Integer id,
			@PathVariable("name") String name) {
		System.out.println("这是参数id的值:" + id + ",参数name的值:" + name);
		System.out.println("查询id为" + id + "的图书信息");
		return "redirect:/index.jsp";
}3、Restful风格实现的CRUD图书
把前面的传统请求方式的图书的CRUD换成刚刚讲的Restful风格的图书模块的CRUD。只需要修改页面端的请求方式和地址,以及服务器端Controller的接收。
3.1、Restful风格的crud工程的搭建
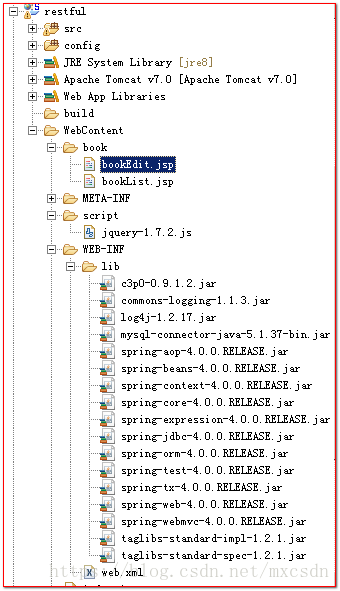
有jdbc.properties属性配置文件:
jdbc.user=root
jdbc.password=123456
jdbc.driverClass=com.mysql.jdbc.Driver
jdbc.url=jdbc:mysql://localhost:3306/springmvcspringmvc.xml配置文件:
<?xml version="1.0" encoding="UTF-8"?>
<beans xmlns="http://www.springframework.org/schema/beans"
	xmlns:xsi="http://www.w3.org/2001/XMLSchema-instance" xmlns:context="http://www.springframework.org/schema/context"
	xmlns:mvc="http://www.springframework.org/schema/mvc"
	xsi:schemaLocation="http://www.springframework.org/schema/mvc http://www.springframework.org/schema/mvc/spring-mvc-4.0.xsd
		http://www.springframework.org/schema/beans http://www.springframework.org/schema/beans/spring-beans.xsd
		http://www.springframework.org/schema/context http://www.springframework.org/schema/context/spring-context-4.0.xsd">
	<!-- 包扫描 -->
	<context:component-scan base-package="com.tcent"></context:component-scan>

	<!-- 配置springMVC的视图解析器 -->
	<bean
		class="org.springframework.web.servlet.view.InternalResourceViewResolver">
		<property name="prefix" value="/book/" />
		<property name="suffix" value=".jsp" />
	</bean>

	<!-- 支持静态资源处理 -->
	<mvc:default-servlet-handler />
	<!-- 支持Springmvc注解驱动 -->
	<mvc:annotation-driven></mvc:annotation-driven>

	<!-- 加载jdbc.properties属性配置文件 -->
	<context:property-placeholder location="classpath:jdbc.properties" />
	<!-- 配置数据库连接池对象 -->
	<bean id="dataSource" class="com.mchange.v2.c3p0.ComboPooledDataSource">
		<property name="user" value="${jdbc.user}" />
		<property name="password" value="${jdbc.password}" />
		<property name="driverClass" value="${jdbc.driverClass}" />
		<property name="jdbcUrl" value="${jdbc.url}" />
	</bean>
	<!-- 配置jdbcTempate操作数据库用 -->
	<bean id="jdbcTemplate" class="org.springframework.jdbc.core.JdbcTemplate">
		<property name="dataSource" ref="dataSource"></property>
	</bean>

</beans>web.xml中的配置:
<?xml version="1.0" encoding="UTF-8"?>
<web-app xmlns:xsi="http://www.w3.org/2001/XMLSchema-instance"
	xmlns="http://java.sun.com/xml/ns/javaee"
	xsi:schemaLocation="http://java.sun.com/xml/ns/javaee http://java.sun.com/xml/ns/javaee/web-app_2_5.xsd"
	id="WebApp_ID" version="2.5">
	<display-name>restful</display-name>

	<filter>
		<filter-name>CharacterEncodingFilter</filter-name>
		<filter-class>org.springframework.web.filter.CharacterEncodingFilter</filter-class>
		<init-param>
			<param-name>encoding</param-name>
			<param-value>UTF-8</param-value>
		</init-param>
		<init-param>
			<param-name>forceEncoding</param-name>
			<param-value>true</param-value>
		</init-param>
	</filter>
	<filter-mapping>
		<filter-name>CharacterEncodingFilter</filter-name>
		<url-pattern>/*</url-pattern>
	</filter-mapping>
	<!-- 支持restful风格的filter。它里面调用了String paramValue = request.getParameter(this.methodParam);
			那么破坏了CharacterEncodingFilter中设置乱码字符集的代码。所以必须放在中文乱码字符集filter的后面
	 -->
	<filter>
		<filter-name>HiddenHttpMethodFilter</filter-name>
		<filter-class>org.springframework.web.filter.HiddenHttpMethodFilter</filter-class>
	</filter>
	<filter-mapping>
		<filter-name>HiddenHttpMethodFilter</filter-name>
		<url-pattern>/*</url-pattern>
	</filter-mapping>
	<!-- The front controller of this Spring Web application, responsible for handling all application requests -->
	<servlet>
		<servlet-name>springDispatcherServlet</servlet-name>
		<servlet-class>org.springframework.web.servlet.DispatcherServlet</servlet-class>
		<init-param>
			<param-name>contextConfigLocation</param-name>
			<param-value>classpath:springmvc.xml</param-value>
		</init-param>
		<load-on-startup>1</load-on-startup>
	</servlet>

	<!-- Map all requests to the DispatcherServlet for handling -->
	<servlet-mapping>
		<servlet-name>springDispatcherServlet</servlet-name>
		<url-pattern>/</url-pattern>
	</servlet-mapping>


	<welcome-file-list>
		<welcome-file>index.html</welcome-file>
		<welcome-file>index.htm</welcome-file>
		<welcome-file>index.jsp</welcome-file>
		<welcome-file>default.html</welcome-file>
		<welcome-file>default.htm</welcome-file>
		<welcome-file>default.jsp</welcome-file>
	</welcome-file-list>
</web-app>3.2、列表功能实现
页面端:
<a href="${pageContext.request.contextPath}/book">跳去图书管理</a>
restful风格的图书列表查询:
@Controller
public class BookController {

	@Autowired
	private BookService bookService;

	@RequestMapping(value = "/book", method = RequestMethod.GET)
	public ModelAndView list() {
		ModelAndView modelAndView = new ModelAndView("bookList");
		modelAndView.addObject("list", bookService.queryList());
		return modelAndView;
	}
}3.3、删除功能实现
bookList页面中的代码:
<form action="${pageContext.request.contextPath}/book/${book.id}" method="post">
						<input type="hidden" name="_method" value="delete"/>
					</form>
					<a class="deleteA" href="">删除</a>、
注:${ pageContext.request.contextPath }/book/deleteBook?id=${book.id}也就不起作用了,可以删除,但不想修改以前的a标签的function,所以这里就不单独为form添加标签id了。还是用class="deleteA"
删除提示操作:
<script type="text/javascript">
	$(function() {
		// 给所有的删除的a标签绑定单击事件
		$("a.deleteA").click(
				function() {
					if( confirm("你确定删除【"
							+ $(this).parent().parent().find("td:first").text()
							+ "】吗?")) {
						// 我们需要查找到当前点击的删除前面的一个form标签
						$(this).prev("form").submit();
					}
					return false;
				});
});BookController中代码:
@RequestMapping(value = "/book/{id}", method = RequestMethod.DELETE)
	public String deleteBookById(@PathVariable("id") Integer id) {
		bookService.deleteBookById(id);
		return "redirect:/book";
	}
路径参数名叫什么都可以,只是要和获取的名字一致
3.4、添加功能实现
原有的bookEdit.jsp页面不需要改动
BookController中的代码:
@RequestMapping(value = "/book/{id}", method = RequestMethod.PUT)
	public String updateBook(Book book) {
//这里book中已经有id值了,会自动注入进去,所以不需要再额外的添加id参数了
		bookService.updateBook(book);
		return "redirect:/book";
}3.5、更新功能实现
更新图书分为两个步骤:
1、查询需要更新的图书,填充到更新页面
2、提交请求,发送数据给服务器更新保存修改。
3.5.1、查询需要更新的图书,填充到更新页面
Controller中的代码:
/**
	 * @PathVariable 路径参数<br/>
	 *               表示把请求地址中{id}占位符所表示的地址参数。注入到 方法参数的id中。
	 */
	@RequestMapping(value = "/book/{id}", method = RequestMethod.GET)
	public ModelAndView queryBookById(@PathVariable(value = "id") Integer id) {
		Book book = bookService.queryBookById(id);
		ModelAndView modelAndView = new ModelAndView("bookEdit");
		modelAndView.addObject("book", book);
		return modelAndView;
	}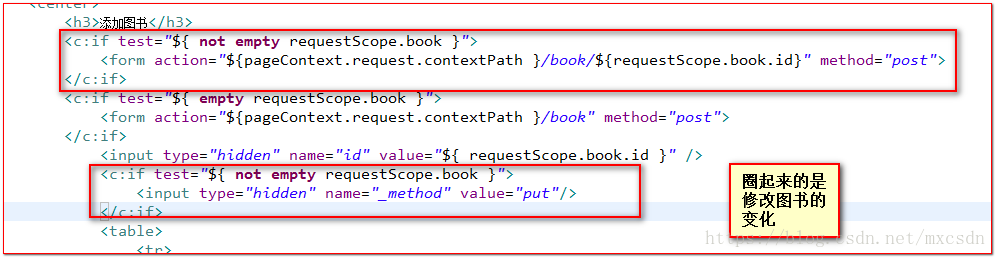
3.5.2、提交请求,发送数据给服务器更新保存修改。


 1513
1513

 被折叠的 条评论
为什么被折叠?
被折叠的 条评论
为什么被折叠?
 到【灌水乐园】发言


