


1.TableLayout 布局
所有的控件都是以表格的形式添加进去的。
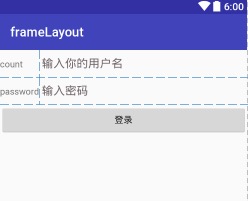
可以看到,就是在每一行里面添加控件,代码如下:
<TableLayout xmlns:android="http://schemas.android.com/apk/res/android"
    android:layout_width="match_parent"
    android:layout_height="match_parent"
    //将 android:stretchColumns 的值指定为 1,表示如果表格不能完全占满屏幕宽度,就将第二列进行拉伸
    //指定成 1 就是拉伸第二列,指定成 0 就是拉伸第一列,以此类推

124
    android:stretchColumns="1">

    <TableRow>
        <TextView
            android:id="@+id/count"
            android:text="count"
            />

        <EditText
            android:id="@+id/input_count"
            android:textColor="@color/red"
            android:hint="输入你的用户名"
            android:textColorHint="@color/huise"
            />
    </TableRow>

    <TableRow>
        <TextView
            android:id="@+id/password"
            android:text="password"
            />
        <EditText
            android:id="@+id/input_password"
            android:textColor="@color/red"
            android:textColorHint="@color/huise"
            android:hint="输入密码"
            />
    </TableRow>

    <TableRow>
        /<Button
        android:id="@+id/button_1"
        android:text="登录"
        //
        android:layout_span="2"
        />
    </TableRow>
</TableLayout>
有一个用于登录的按钮,前两行都有两列,第三行只有一列,这样的表格就会很难看,而且 结构也非常不合理。这时就需要通过对单元格进行合并来解决这个问题,使用 android:layout_span=”2”让登录按钮占据两列的空间,就可以保证表格结构的合理性了。
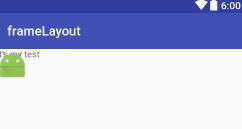
2.FrameLayout
在此框架下面定义的所有控件都是默认排在布局的左上角的,如果有几个控件,还会形成覆盖。比较简单,用处也不多。
<?xml version="1.0" encoding="utf-8"?>
<FrameLayout xmlns:android="http://schemas.android.com/apk/res/android"
    android:layout_width="match_parent"
    android:layout_height="match_parent">

    <TextView
        android:id="@+id/textView_1"
        android:layout_width="wrap_content"
        android:layout_height="wrap_content"
        android:text="it's my test"
        />

    <ImageView
        android:id="@+id/imageView_1"
        android:layout_width="wrap_content"
        android:layout_height="wrap_content"
        android:src="@mipmap/ic_launcher"/>

</FrameLayout>


 1117
1117

 被折叠的 条评论
为什么被折叠?
被折叠的 条评论
为什么被折叠?
 到【灌水乐园】发言


