


TableLayout
简介
表格布局 TableLayout 是 LinearLayout 的子类,允许我们使用表格的方式来排列组件,就是行与列的方式。
Tablelayout 类以行和列的形式对控件进行管理,每一行为一个TableRow对象,或一个View控件。
当为TableRow对象时,可在TableRow下添加子控件,默认情况下,每个子控件占据一列。
当为 View 时,该 View 将独占一行。
行列数的确定
TableLayout 的行数由开发人员直接指定,即有多少个 TableRow 对象(或 View 控件),就有多少行。
TableLayout 的列数等于含有最多子控件的 TableRow 的列数。如第一 TableRow 含2个子控件,第二个 TableRow 含3个,第三个 TableRow 含4个,那么该 TableLayout 的列数为4。
属性
TableLayout 可设置的属性包括全局属性及单元格属性。
1、全局属性也即列属性,有以下3个参数:
①android:stretchColumns 设置可伸展的列。该列可以向行方向伸展,最多可占据一整行。例如:android:stretchColumns="0"表示第0列可伸展。这个字段是为了 让 table 自动铺满屏幕
②android:shrinkColumns 设置可收缩的列。当该列子控件的内容太多,已经挤满所在行,那么该子控件的内容将往列方向显示。例如android:shrinkColumns="1,2"表示第1、2列皆可收缩
③android:collapseColumns 设置要隐藏的列。例如android:collapseColumns="*"表示隐藏所有行
说明:列可以同时具备stretchColumns及shrinkColumns属性,若此,那么当该列的内容N多时,将“多行”显示其内容。(这里不是真正的多行,而是系统根据需要自动调节该行的layout_height)
2、单元格属性,有以下2个参数:
①android:layout_column 指定该单元格在第几列显示,例如android:layout_column="1" 表示该控件显示在第1列
②android:layout_span 指定该单元格占据的列数(未指定时,为1),例如:android:layout_span="2"表示该控件占据2列
说明:一个控件也可以同时具备这两个特性。
表格布局练习
<?xml version="1.0" encoding="utf-8"?>
<LinearLayout xmlns:android="http://schemas.android.com/apk/res/android"
    android:layout_width="fill_parent"
    android:layout_height="fill_parent"
    android:orientation="vertical"
    android:padding="3dip">

    <!-- 第1个TableLayout,用于描述表中的列属性。第0列可伸展,第1列可收缩 ,第2列被隐藏-->
    <TextView
        android:layout_width="wrap_content"
        android:layout_height="wrap_content"
        android:background="#7f00ffff"
        android:text="表1:全局设置:列属性设置"
        android:textSize="15sp" />

    <TableLayout
        android:id="@+id/table1"
        android:layout_width="fill_parent"
        android:layout_height="wrap_content"
        android:collapseColumns="2"
        android:padding="3dip"
        android:shrinkColumns="1"
        android:stretchColumns="0">

        <TableRow>

            <Button android:text="该列可伸展12345678901234567890" />

            <Button android:text="该列可收缩12345678901234567890" />

            <Button android:text="我被隐藏了" />
        </TableRow>

        <TableRow>

            <TextView android:text="我向行方向伸展,我可以很长    " />

            <TextView android:text="我向列方向收缩,我可以很深" />
        </TableRow>

    </TableLayout>

    <!-- 第2个TableLayout,用于描述表中单元格的属性,包括:android:layout_column 及 android:layout_span-->
    <TextView
        android:layout_width="wrap_content"
        android:layout_height="wrap_content"
        android:background="#7f00ffff"
        android:text="表2:单元格设置:指定单元格属性设置"
        android:textSize="15sp" />

    <TableLayout
        android:id="@+id/table2"
        android:layout_width="fill_parent"
        android:layout_height="wrap_content"
        android:padding="3dip">

        <TableRow>

            <Button android:text="第0列" />

            <Button android:text="第1列" />

            <Button android:text="第2列" />
        </TableRow>

        <TableRow>

            <TextView
                android:layout_column="2"
                android:text="我被指定在第2列" />
        </TableRow>

        <TableRow>

            <TextView
                android:layout_column="1"
                android:layout_span="2"
                android:text="我跨1到2列,不信你看!" />
        </TableRow>

    </TableLayout>

    <!-- 第3个TableLayout,使用可伸展特性-->

    <TextView
        android:layout_width="wrap_content"
        android:layout_height="wrap_content"
        android:background="#7f00ffff"
        android:text="表3:均匀布局"
        android:textSize="15sp" />

    <TableLayout
        android:id="@+id/table3"
        android:layout_width="fill_parent"
        android:layout_height="wrap_content"
        android:padding="6dip"
        android:stretchColumns="*">

        <TableRow>

            <Button
                android:layout_width="1dip"
                android:text="一" />

            <Button
                android:layout_width="1dip"
                android:text="两字" />

            <Button
                android:layout_width="1dip"
                android:text="三个字" />

            <Button
                android:layout_width="1dip"
                android:text="四个个字" />

            <Button
                android:id="@+id/button"
                style="?android:attr/buttonStyleSmall"
                android:layout_width="1dip"
                android:layout_height="wrap_content"
                android:text="New Button" />

        </TableRow>
    </TableLayout>
</LinearLayout>
运行程序:

FrameLayout
简介
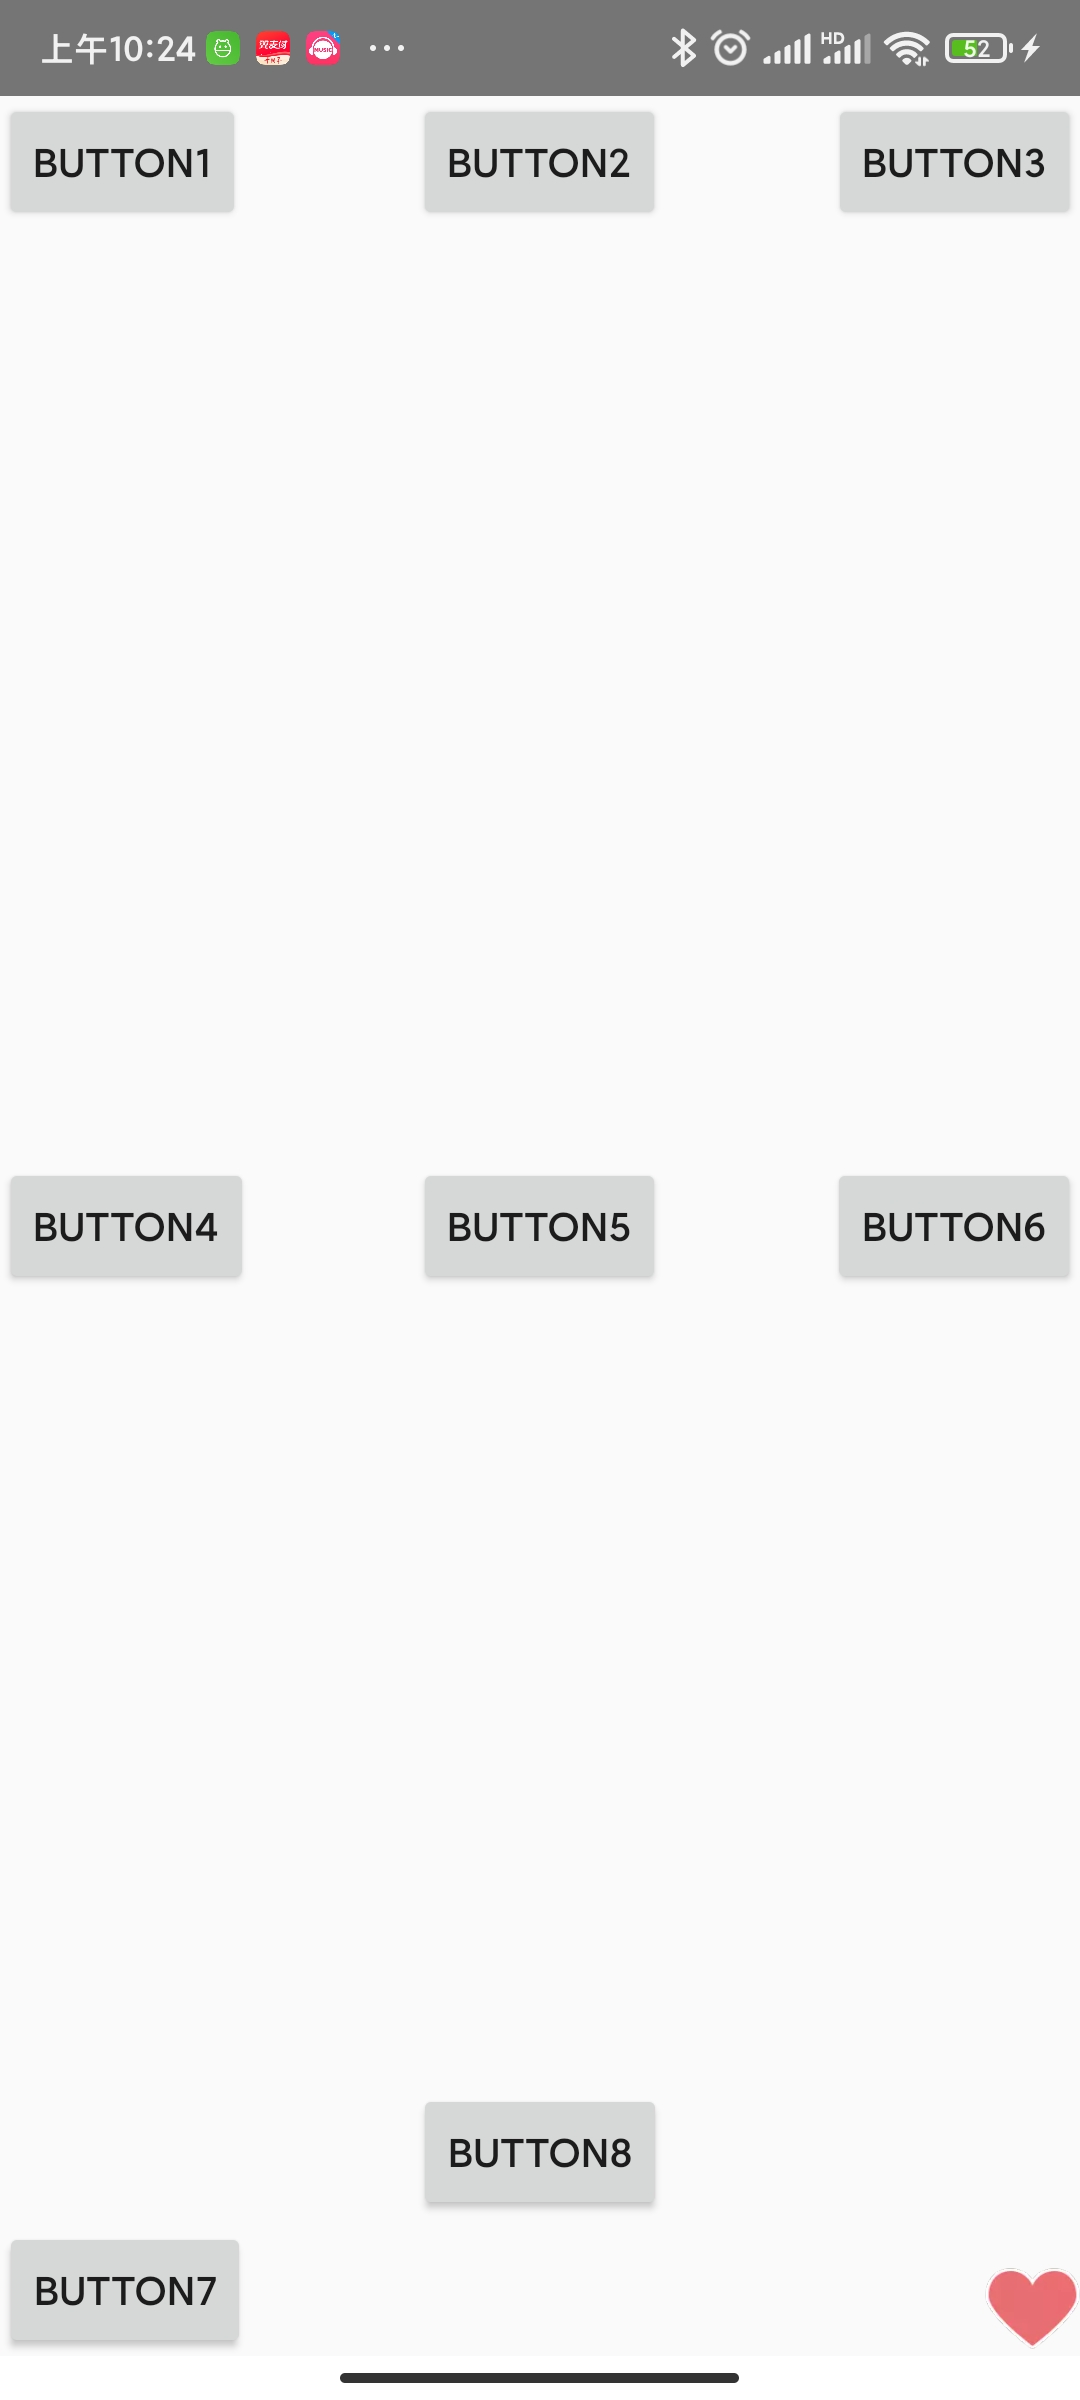
帧布局 FrameLayout 可以说是六大布局中最为简单的一个布局,这个布局直接在屏幕上开辟出一块空白的区域,当我们往里面添加控件的时候,会默认把他们放到这块区域的左上角,而这种布局方式却没有任何的定位方式,所以它应用的场景并不多。
帧布局的大小由控件中最大的子控件决定,如果控件的大小一样大的话,那么同一时刻就只能看到最上面的那个组件。后续添加的控件会覆盖前一个。虽然默认会将控件放置在左上角,但是我们也可以通过layout_gravity属性,指定到其他的位置。
一般用来实现层叠布局
属性
android:foreground设置改帧布局容器的前景图像
android:foregroundGravity设置前景图像显示的位置
前景图像即永远处于帧布局最上面,直接面对用户的图像,就是不会被覆盖的图片。
帧布局练习
xml
<?xml version="1.0" encoding="utf-8"?>
<FrameLayout xmlns:android="http://schemas.android.com/apk/res/android"
    android:layout_width="match_parent"
    android:layout_height="match_parent"
    android:foreground="@mipmap/heart"
    android:foregroundGravity="right|bottom">

    <Button
        android:layout_width="wrap_content"
        android:layout_height="wrap_content"
        android:text="button1" />

    <Button
        android:layout_width="wrap_content"
        android:layout_height="wrap_content"
        android:layout_gravity="center_horizontal"
        android:text="button2" />

    <Button
        android:layout_width="wrap_content"
        android:layout_height="wrap_content"
        android:layout_gravity="right"
        android:text="button3" />

    <Button
        android:layout_width="wrap_content"
        android:layout_height="wrap_content"
        android:layout_gravity="center_vertical"
        android:text="button4" />

    <Button
        android:layout_width="wrap_content"
        android:layout_height="wrap_content"
        android:layout_gravity="center"
        android:text="button5" />

    <Button
        android:layout_width="wrap_content"
        android:layout_height="wrap_content"
        android:layout_gravity="right|center_vertical"
        android:text="button6" />

    <Button
        android:layout_width="wrap_content"
        android:layout_height="wrap_content"
        android:layout_gravity="bottom"
        android:text="button7" />

    <Button
        android:layout_width="wrap_content"
        android:layout_height="wrap_content"
        android:layout_gravity="center_horizontal|bottom"
        android:layout_marginBottom="50dp"
        android:text="button8" />

</FrameLayout>
运行程序:


 1361
1361

 被折叠的 条评论
为什么被折叠?
被折叠的 条评论
为什么被折叠?
 到【灌水乐园】发言


