


目录
nginx简介
nginx(发音同engine x)是一款轻量级的Web服务器/反向代理服务器及电子邮件(IMAP/POP3)代理服务器,并在一个BSD-like协议下发行。
nginx由俄罗斯的程序设计师Igor Sysoev所开发,最初供俄国大型的入口网站及搜寻引擎Rambler使用。
第一个公开版本0.1.0发布于2004年10月4日。其将源代码以类BSD许可证的形式发布,因它的稳定性、丰富的功能集、示例配置文件和低系统资源的消耗而闻名。2011年6月1日,nginx 1.0.4发布。
nginx的特点是占有内存少,并发能力强,事实上nginx的并发能力确实在同类型的网页服务器中表现较好,中国大陆使用nginx网站用户有:百度、京东、新浪、网易、腾讯、淘宝等。
nginx特性与优点
nginx特性
nginx是一个很牛的高性能Web和反向代理服务器,它具有很多非常优越的特性:
- 在高连接并发的情况下,nginx是Apache服务器不错的替代品,能够支持高达50000个并发连接数的响应
使用epoll and kqueue作为开发模型 - nginx作为负载均衡服务器:nginx既可在内部直接支持和PHP程序对外进行服务,也可支持作为HTTP代理服务器对外进行服务
- nginx采用C进行编写,不论系统资源开销还是CPU使用效率都比Perlbal要好很多
nginx优点
- 高并发连接:官方测试能够支撑5万并发连接,在实际生产环境中跑到2-3万并发连接数
- 内存消耗少:在3万并发连接下,开启的10个nginx进程才消耗150M内存(15M*10=150M)
- 配置文件非常简单:风格跟程序一样通俗易懂
- 成本低廉:nginx为开源软件,可以免费使用。而购买F5 BIG-IP、NetScaler等硬件负载均衡交换机则需要十多万至几十万人民币
- 支持Rewrite重写规则:能够根据域名、URL的不同,将HTTP请求分到不同的后端服务器群组
- 内置的健康检查功能:如果Nginx Proxy后端的某台Web服务器宕机了,不会影响前端访问
- 节省带宽:支持GZIP压缩,可以添加浏览器本地缓存的Header头
- 稳定性高:用于反向代理,宕机的概率微乎其微
- 模块化设计:模块可以动态编译
- 外围支持好:文档全,二次开发和模块较多
- 支持热部署:可以不停机重载配置文件
-支持事件驱动、AIO(AsyncIO,异步IO)、mmap(Memory Map,内存映射)等性能优化
nginx功能
nginx基本功能
- 静态资源的web服务器,能缓存打开的文件描述符
- http、smtp、pop3协议的反向代理服务器
- 缓存加速、负载均衡
- 支持FastCGI(fpm,LNMP),uWSGI(Python)等
- 模块化(非DSO机制),过滤器zip、SSI及图像的大小调整
- 支持SSL
nginx 工作原理
Nginx由内核和模块组成。
Nginx本身做的工作实际很少,当它接到一个HTTP请求时,它仅仅是通过查找配置文件将此次请求映射到一个location block,而此location中所配置的各个指令则会启动不同的模块去完成工作,因此模块可以看做Nginx真正的劳动工作者。通常一个location中的指令会涉及一个handler模块和多个filter模块(当然,多个location可以复用同一个模块)。handler模块负责处理请求,完成响应内容的生成,而filter模块对响应内容进行处理。
用户根据自己的需要开发的模块都属于第三方模块。正是有了这么多模块的支撑,Nginx的功能才会如此强大。
Nginx的模块从结构上分为核心模块、基础模块和第三方模块:
- 核心模块:HTTP模块、EVENT模块和MAIL模块
- 基础模块:HTTP Access模块、HTTP FastCGI模块、HTTP Proxy模块和HTTP Rewrite模块,
- 第三方模块:HTTP Upstream Request Hash模块、Notice模块和HTTP Access Key模块。
Nginx的模块从功能上分为如下三类:
-
Handlers(处理器模块)。此类模块直接处理请求,并进行输出内容和修改headers信息等操作。Handlers处理器模块一般只能有一个。
-
Filters (过滤器模块)。此类模块主要对其他处理器模块输出的内容进行修改操作,最后由Nginx输出。
-
Proxies (代理类模块)。此类模块是Nginx的HTTP Upstream之类的模块,这些模块主要与后端一些服务比如FastCGI等进行交互,实现服务代理和负载均衡等功能。

web服务请求资源

一次完整的web访问流程简析: -
client:输入网址–>发起http request–>等待web server响应.
-
server:收到client请求–>加载资源–>构建响应报文,发给client.
client发起http请求:
-
client将键入的域名解析为server端的IP地址(DNS解析).
-
client与server进行TCP连接(三次握手).
-
client与web server数据传输.
-
client与web server断开TCP连接(四次挥手).
-
client解释HTML文档,浏览器渲染,将在屏幕上显示渲染后的图形结果。
server收到client请求时:
-
http request请求首先到达server端的公网ip上(公网ip一般配置在硬件防火墙上).
-
经过防火墙过滤之后,到达负载均衡层(可能涉及四层负载均衡和七层负载均衡),负载均衡将请求报文往后端Real Server调度.
-
经过lvs调度至后端RS上,此时后端提供web服务的一般是Nginx(Apache也可能),Nginx判断请求报文是动态资源还是静态资源(动静分离).
-
静态资源:由Nginx发起系统调用,请求内核从磁盘加载相应的资源文件,可能涉及存储服务器(资源的保存的服务器).
动态资源:由Nginx代理给能处理动态资源的服务器(Tomcat、PHP等),还可能涉及访问数据库服务器. -
web server将请求的资源加载完成之后,构建响应报文发送给client.
nginx脚本安装
nginx官网
[root@localhost nginx]# tree
.
├── nginx.sh
└── soft
    └── nginx-1.21.3.tar.gz

1 directory, 2 files

[root@localhost nginx]# vim nginx.sh
#!/bin/bash

log_dir=/var/log
install_dir=/usr/src
config_dir=/usr/local


useradd -r -M -s /sbin/nologin nginx

#安装依赖包
yum -y install pcre-devel openssl openssl-devel gd-devel gcc gcc-c++
yum -y groups mark install 'Development Tools'


#创建日志存放目录
if [ ! -d $log_dir/nginx ];then
    mkdir -p $log_dir/nginx
    chown -R nginx.nginx $log_dir/nginx
fi

tar xf soft/nginx-1.21.3.tar.gz -C $install_dir

#install
if [ ! -d $config_dir/nginx ];then
    cd $install_dir/nginx-1.21.3
    ./configure \
        --prefix=/usr/local/nginx \
        --user=nginx \
        --group=nginx \
        --with-debug \
        --with-http_ssl_module \
        --with-http_realip_module \
        --with-http_image_filter_module \
        --with-http_gunzip_module \
        --with-http_gzip_static_module \
        --with-http_stub_status_module \
        --http-log-path=/var/log/nginx/access.log \
        --error-log-path=/var/log/nginx/error.log  && make && make install
fi

echo "export PATH=$config_dir/nginx/sbin:\$PATH" > /etc/profile.d/nginx.sh

cat > /usr/lib/systemd/system/nginx.service <<EOF
[Unit]
Description=nginx
After=network.target

[Service]
Type=forking
ExecStart=/usr/local/nginx/sbin/nginx
ExecReload=/usr/local/nginx/sbin/nginx -s reload
ExecStop=/usr/local/nginx/sbin/nginx -s quit
PrivateTmp=true

[Install]
WantedBy=multi-user.target
EOF

systemctl daemon-reload
systemctl enable --now  nginx
nginx配置文件详解
主配置文件: /usr/local/nginx/conf/nginx.conf
- 默认启动nginx时,使用的配置文件是:安装路径/conf/nginx.conf文件
- 可以在启动nginx时通过-c选项来指定要读取的配置文件
nginx.conf的内容分为以下几段:
- main配置段:全局配置段。其中main配置段中可能包含event配置段
- event {}:定义event模型工作特性
- http {}:定义http协议相关的配置
配置指令:要以分号结尾,语法格式:derective value1 [value2 ...];
支持使用变量:
- 内置变量:模块会提供内建变量定义
- 自定义变量:
set var_name value
#修改进程
[root@localhost ~]# ps -ef |grep nginx
root        1009       1  0 10月25 ?      00:00:00 nginx: master process /usr/local/nginx/sbin/nginx
nginx       1011    1009  0 10月25 ?      00:00:00 nginx: worker process
root        1828    1710  0 00:22 pts/0    00:00:00 grep --color=auto nginx
[root@localhost ~]# vim /usr/local/nginx/conf/nginx.conf
#user  nobody;
worker_processes  3;	#修改进程数,默认为1

#检查语法
[root@localhost ~]# nginx -t
nginx: the configuration file /usr/local/nginx/conf/nginx.conf syntax is ok
nginx: configuration file /usr/local/nginx/conf/nginx.conf test is successful


[root@localhost ~]# systemctl restart nginx
[root@localhost ~]# ps -ef |grep nginx
root        1838       1  0 00:22 ?        00:00:00 nginx: master process /usr/local/nginx/sbin/nginx
nginx       1839    1838  0 00:22 ?        00:00:00 nginx: worker process
nginx       1840    1838  0 00:22 ?        00:00:00 nginx: worker process
nginx       1841    1838  0 00:22 ?        00:00:00 nginx: worker process
root        1845    1710  0 00:22 pts/0    00:00:00 grep --color=auto nginx


#使用nginx服务控制命令重启并指定配置文件路径
[root@localhost ~]# nginx -s stop;nginx -c /opt/nginx.conf
[root@localhost ~]# ss -antl
State         Recv-Q        Send-Q               Local Address:Port               Peer Address:Port
LISTEN        0             128                      127.0.0.1:9000                    0.0.0.0:*
LISTEN        0             128                        0.0.0.0:80                      0.0.0.0:*
用于调试,定位问题的配置参数
是否以守护进程方式运行Nginx
守护进程(daemon)是脱离终端并且在后台运行的进程。它脱离终端是为了避免进程执行过程中的信息在任何终端上显示,这样一来,进程也不会被任何终端所产生的信息所打断。Nginx毫无疑问是一个需要以守护进程方式运行的服务,因此,默认都是以这种方式运行的。
不过Nginx还是提供了关闭守护进程的模式,之所以提供这种模式,是为了方便跟踪调试Nginx,毕竟用gdb调试进程时最烦琐的就是如何继续跟进fork出的子进程了。
daemon {on|off};    //是否以守护进程方式运行nginx,调试时应设置为off
master_process {on|off};    //是否以master/worker模型来运行nginx,调试时可以设置为off
error_log 位置 级别;    //配置错误日志
[root@localhost ~]# vim /usr/local/nginx/conf/nginx.conf
#user  nobody;
worker_processes  1;
daemon off;

[root@localhost ~]# nginx -s stop;nginx
正常运行必备的配置参数
# user USERNAME [GROUPNAME]		//指定允许worker进程的用户和组
[root@localhost ~]# vim /usr/local/nginx/conf/nginx.conf
user  nginx nginx;

# pid /path/to/pid_file			//指定nginx守护进程的pid文件
[root@localhost ~]# vim /usr/local/nginx/conf/nginx.conf
pid        logs/nginx.pid;
[root@localhost ~]# ls /usr/local/nginx/logs/
nginx.pid
[root@localhost ~]# systemctl stop nginx.service
[root@localhost ~]# ls /usr/local/nginx/logs/

# worker_rlimit_nofile number	//设置所有woker进程最大可以打开的文件数,默认1024

# worker_rlimit_core size	    //指明所有worker进程所能够使用的总体的最大核心文件大小,保持默认即可
优化性能的配置参数
worker_processes n;    //启动n个worker进程,这里的n为了避免上下文切换,通常设置为cpu总核心数-1或等于总核心数
worker_cpu_affinity cpumask ...;    //将进程绑定到某cpu中,避免频繁刷新缓存
//cpumask:使用8位二进制表示cpu核心,如:
    0000 0001   //第一颗cpu核心
    0000 0010   //第二颗cpu核心
    0000 0100   //第三颗cpu核心
    0000 1000   //第四颗cpu核心
    0001 0000   //第五颗cpu核心
    0010 0000   //第六颗cpu核心
    0100 0000   //第七颗cpu核心
    1000 0000   //第八颗cpu核心

#查看cpu
[root@localhost ~]# vim /usr/local/nginx/conf/nginx.conf
worker_processes  3;
worker_cpu_affinity 0001 0010 0100;
[root@localhost ~]# systemctl restart nginx.service
[root@localhost ~]# ps -ef | grep nginx
root        1571       1  0 23:13 ?        00:00:00 nginx: master process /usr/local/nginx/sbin/nginx
nginx       1572    1571  0 23:13 ?        00:00:00 nginx: worker process
nginx       1573    1571  0 23:13 ?        00:00:00 nginx: worker process
nginx       1574    1571  0 23:13 ?        00:00:00 nginx: worker process
root        1576    1485  0 23:13 pts/0    00:00:00 grep --color=auto nginx

[root@localhost ~]# top
top - 23:31:29 up 22 min,  1 user,  load average: 0.00, 0.00, 0.00
Tasks: 223 total,   1 running, 222 sleeping,   0 stopped,   0 zombie
%Cpu(s):  0.0 us,  0.0 sy,  0.0 ni,100.0 id,  0.0 wa,  0.0 hi,  0.0 si,  0.0 st
MiB Mem :   3752.0 total,   3300.8 free,    216.8 used,    234.4 buff/cache
MiB Swap:   4044.0 total,   4044.0 free,      0.0 used.   3305.5 avail Mem

    PID USER      PR  NI    VIRT    RES    SHR S  %CPU  %MEM     TIME+ COMMAND
      1 root      20   0  242256  10628   8180 S   0.0   0.3   0:00.92 systemd
      2 root      20   0       0      0      0 S   0.0   0.0   0:00.00 kthreadd
      3 root       0 -20       0      0      0 I   0.0   0.0   0:00.00 rcu_gp

#按shift+f ,输入nginx,回车

Locate string nginx

    PID USER      PR  NI    VIRT    RES    SHR S  %CPU  %MEM     TIME+ COMMAND
   1485 root      20   0   26516   4928   3452 S   0.0   0.1   0:00.03 bash
   1571 root      20   0   80256   1092     56 S   0.0   0.0   0:00.00 nginx
   1572 nginx     20   0  111708   6276   4700 S   0.0   0.2   0:00.00 nginx
   1573 nginx     20   0  111708   6276   4700 S   0.0   0.2   0:00.00 nginx
   1574 nginx     20   0  111708   6276   4700 S   0.0   0.2   0:00.00 nginx

# 按f, 将光标移到  P       = Last Used Cpu (SMP)
Fields Management for window 1:Def, whose current sort field is %CPU
   Navigate with Up/Dn, Right selects for move then <Enter> or Left commits,
   'd' or <Space> toggles display, 's' sets sort.  Use 'q' or <Esc> to end!

* PID     = Process Id             WCHAN   = Sleeping in Function
* USER    = Effective User Name    Flags   = Task Flags <sched.h>
* PR      = Priority               CGROUPS = Control Groups
* NI      = Nice Value             SUPGIDS = Supp Groups IDs
* VIRT    = Virtual Image (KiB)    SUPGRPS = Supp Groups Names
* RES     = Resident Size (KiB)    TGID    = Thread Group Id
* SHR     = Shared Memory (KiB)    OOMa    = OOMEM Adjustment
* S       = Process Status         OOMs    = OOMEM Score current
* %CPU    = CPU Usage              ENVIRON = Environment vars
* %MEM    = Memory Usage (RES)     vMj     = Major Faults delta
* TIME+   = CPU Time, hundredths   vMn     = Minor Faults delta
* COMMAND = Command Name/Line      USED    = Res+Swap Size (KiB)
  PPID    = Parent Process pid     nsIPC   = IPC namespace Inode
  UID     = Effective User Id      nsMNT   = MNT namespace Inode
  RUID    = Real User Id           nsNET   = NET namespace Inode
  RUSER   = Real User Name         nsPID   = PID namespace Inode
  SUID    = Saved User Id          nsUSER  = USER namespace Inode
  SUSER   = Saved User Name        nsUTS   = UTS namespace Inode
  GID     = Group Id               LXC     = LXC container name
  GROUP   = Group Name             RSan    = RES Anonymous (KiB)
  PGRP    = Process Group Id       RSfd    = RES File-based (KiB)
  TTY     = Controlling Tty        RSlk    = RES Locked (KiB)
  TPGID   = Tty Process Grp Id     RSsh    = RES Shared (KiB)
  SID     = Session Id             CGNAME  = Control Group name
  nTH     = Number of Threads      NU      = Last Used NUMA node
  P       = Last Used Cpu (SMP)
  TIME    = CPU Time
  SWAP    = Swapped Size (KiB)
  CODE    = Code Size (KiB)
  DATA    = Data+Stack (KiB)
  nMaj    = Major Page Faults
  nMin    = Minor Page Faults
  nDRT    = Dirty Pages Count

# 空格选择,按q

    PID USER      PR  NI    VIRT    RES    SHR S  %CPU  %MEM     TIME+ COMMAND                                                      P
   1571 root      20   0   80256   1092     56 S   0.0   0.0   0:00.00 nginx                                                        2
   1572 nginx     20   0  111708   6276   4700 S   0.0   0.2   0:00.00 nginx                                                        0
   1573 nginx     20   0  111708   6276   4700 S   0.0   0.2   0:00.00 nginx                                                        1
   1574 nginx     20   0  111708   6276   4700 S   0.0   0.2   0:00.00 nginx                                                        2


timer_resolution interval;    //计时器解析度。降低此值,可减少gettimeofday()系统调用的次数
worker_priority number;    //指明worker进程的nice值 number取19~-20,数值越低优先级越高


[root@localhost ~]# vim /usr/local/nginx/conf/nginx.conf
worker_priority -20;
[root@localhost ~]# systemctl restart nginx.service
[root@localhost ~]# ps -elf |grep nginx
1 S root        1750       1  0  80   0 - 20064 -      00:21 ?        00:00:00 nginx: master process /usr/local/nginx/sbin/nginx
5 S nginx       1751    1750  0  60 -20 - 27927 do_epo 00:21 ?        00:00:00 nginx: worker process
5 S nginx       1752    1750  0  60 -20 - 27927 do_epo 00:21 ?        00:00:00 nginx: worker process
5 S nginx       1753    1750  0  60 -20 - 27927 do_epo 00:21 ?        00:00:00 nginx: worker process
0 S root        1756    1485  0  80   0 -  3086 -      00:22 pts/0    00:00:00 grep --color=auto nginx
事件相关的配置:event{}段中的配置参数**
accept_mutex {off|on};    //master调度用户请求至各worker进程时使用的负载均衡锁;on表示能让多个worker轮流地、序列化地去响应新请求
lock_file file;    //accept_mutex用到的互斥锁锁文件路径
use [epoll | rtsig | select | poll];    //指明使用的事件模型,建议让nginx自行选择
worker_connections #;    //每个进程能够接受的最大连接数
[root@localhost ~]# vim /usr/local/nginx/conf/nginx.conf
events {
    worker_connections  10240;
}

[root@localhost ~]# dnf -y install httpd-tools
[root@localhost ~]# ab  -n 3000 http://192.168.8.132/index.html
This is ApacheBench, Version 2.3 <$Revision: 1843412 $>
Copyright 1996 Adam Twiss, Zeus Technology Ltd, http://www.zeustech.net/
Licensed to The Apache Software Foundation, http://www.apache.org/

Benchmarking 192.168.8.132 (be patient)
Completed 300 requests
Completed 600 requests
Completed 900 requests
Completed 1200 requests
Completed 1500 requests
Completed 1800 requests
Completed 2100 requests
Completed 2400 requests
Completed 2700 requests
Completed 3000 requests
Finished 3000 requests


Server Software:        nginx/1.20.1
Server Hostname:        192.168.8.132
Server Port:            80

Document Path:          /index.html
Document Length:        612 bytes

Concurrency Level:      1
Time taken for tests:   0.376 seconds
Complete requests:      3000
Failed requests:        0
Total transferred:      2535000 bytes
HTML transferred:       1836000 bytes
Requests per second:    7974.21 [#/sec] (mean)
Time per request:       0.125 [ms] (mean)
Time per request:       0.125 [ms] (mean, across all concurrent requests)
Transfer rate:          6580.28 [Kbytes/sec] received

Connection Times (ms)
              min  mean[+/-sd] median   max
Connect:        0    0   0.0      0       0
Processing:     0    0   0.0      0       1
Waiting:        0    0   0.0      0       1
Total:          0    0   0.0      0       1

Percentage of the requests served within a certain time (ms)
  50%      0
  66%      0
  75%      0
  80%      0
  90%      0
  95%      0
  98%      0
  99%      0
 100%      1 (longest request)
网络连接相关的配置参数
keepalive_timeout number;    //长连接的超时时长,默认为65s
keepalive_requests number;    //在一个长连接上所能够允许请求的最大资源数
keepalive_disable [msie6|safari|none];    //为指定类型的UserAgent禁用长连接
tcp_nodelay on|off;    //是否对长连接使用TCP_NODELAY选项,为了提升用户体验,通常设为on
client_header_timeout number;    //读取http请求报文首部的超时时长
client_body_timeout number;    //读取http请求报文body部分的超时时长
send_timeout number;    //发送响应报文的超时时长
fastcgi的相关配置参数
LNMP: php需启用fpm模型
location ~ \.php$ {
  root html;
  fastcgi_pass 127.0.0.1:9000;      //定义反向代理
  fastcgi_index index.php;
  fastcgi_param SCRIPT_FILENAME /scripts$fastcgi_script_name;		//.php文件路径
  include fastcgi_params;
}
nginx作为web服务器时使用的配置:http{}段的配置参数
http{…}:配置http相关,由ngx_http_core_module模块引入。nginx的HTTP配置主要包括四个区块,结构如下:
http {//协议级别
  include mime.types;
  default_type application/octet-stream;
  keepalive_timeout 65;
  gzip on;
  upstream {//负载均衡配置
    ...
  }
  server {//服务器级别,每个server类似于httpd中的一个<VirtualHost>
    listen 80;
    server_name localhost;
    location / {//请求级别,类似于httpd中的<Location>,用于定义URL与本地文件系统的映射关系
      root html;
      index index.html index.htm;
    }
  }
}
当有多个server时,匹配顺序如下:
- 先做精确匹配检查
- 左侧通配符匹配检查,如*.idfsoft.com
- 右侧通配符匹配检查,如mail.*
- 正则表达式匹配检查,如~ ^.*.idfsoft.com$
- default_server
root path 设置资源路径映射,用于指明请求的URL所对应的资源所在的文件系统上的起始路径
alias path用于location配置段,定义路径别名
index file默认主页面
error_page code [...] [=code] URI | @name 根据http响应状态码来指明特用的错误页面,例如 :error_page 404 /404_customed.html
log_format 定义日志格式:

log_format  main  '$remote_addr - $remote_user [$time_local] "$request" '
                    '$status $body_bytes_sent "$http_referer" '
                    '"$http_user_agent" "$http_x_forwarded_for"';
access_log  logs/access.log  main;

//注意:此处可用变量为nginx各模块内建变量
错误页面配置
[root@localhost ~]# vim /usr/local/nginx/conf/nginx.conf
        error_page  404              /404.html;		#取消注释
[root@localhost html]# vim 404.html
<html>
<head>
<title>ERROR</title>
<body>
<h1>ACCESS ERROR</h1>
</body>
</head>
</html>

[root@localhost html]# systemctl restart nginx
访问不存在的文件

平滑升级添加echo功能
- 获取现有的程序编译的参数 -V
- 获取新版本的软件包或功能包
- 将新功能或新版本进行编译
- 备份原程序
- 替换原程序
#功能包下载
https://github.com/openresty/echo-nginx-module.git

[root@localhost src]# unzip echo-nginx-module-master.zip
[root@localhost src]# ls
debug  echo-nginx-module-master  kernels  nginx-1.20.1  nginx-1.20.1.tar.gz echo-nginx-module-master.zip

#解压nginx
[root@localhost src]# ls
debug  kernels  nginx-1.20.1  nginx-1.20.1.tar.gz
[root@localhost src]# rm -rf nginx-1.20.1
[root@localhost src]# tar xf nginx-1.20.1.tar.gz

[root@localhost nginx-1.20.1]# ./configure --prefix=/usr/local/nginx --user=nginx --group=nginx --with-debug --with-http_ssl_module --with-http_realip_module --with-http_image_filter_module --with-http_gunzip_module --with-http_gzip_static_module --with-http_stub_status_module --http-log-path=/var/log/nginx/access.log --error-log-path=/var/log/nginx/error.log --add-module=../echo-nginx-module-master

[root@localhost nginx-1.20.1]# make

[root@localhost nginx-1.20.1]# ls objs/
addon         Makefile  nginx.8            ngx_auto_headers.h  ngx_modules.o
autoconf.err  nginx     ngx_auto_config.h  ngx_modules.c       src

#备份nginx
[root@localhost nginx-1.20.1]# cp /usr/local/nginx/sbin/nginx /opt/

[root@localhost nginx-1.20.1]# nginx -s stop;objs/nginx -c /usr/local/nginx/conf/nginx.conf
[root@localhost nginx-1.20.1]# ps -ef |grep nginx
root        5652       1  0 22:24 ?        00:00:00 nginx: master process objs/nginx -c /usr/local/nginx/conf/nginx.conf
nginx       5653    5652  0 22:24 ?        00:00:00 nginx: worker process
nginx       5654    5652  0 22:24 ?        00:00:00 nginx: worker process
nginx       5655    5652  0 22:24 ?        00:00:00 nginx: worker process
root        5657    1623  0 22:24 pts/1    00:00:00 grep --color=auto nginx

[root@localhost conf]# vim nginx.conf
        location /test {
            echo "test";
        }
[root@localhost nginx-1.20.1]# objs/nginx -t
nginx: the configuration file /usr/local/nginx/conf/nginx.conf syntax is ok
nginx: configuration file /usr/local/nginx/conf/nginx.conf test is successful
[root@localhost nginx-1.20.1]# objs/nginx -s reload
#重启后在命令行查看


[root@localhost src]# cp nginx-1.20.1/objs/nginx /usr/local/nginx/sbin/
cp:是否覆盖'/usr/local/nginx/sbin/nginx'? y

location配置
通过指定模式来与客户端请求的URI相匹配
//功能:允许根据用户请求的URI来匹配定义的各location,匹配到时,此请求将被相应的location配置块中的配置所处理,例如做访问控制等功能

//语法:location [ 修饰符 ] pattern {......}
常用修饰符:
| 修饰符 | 功能 |
|---|---|
| = | 精确匹配 |
| ~ | 正则表达式模式匹配,区分大小写 |
| ~* | 正则表达式模式匹配,不区分大小写 |
| ^~ | 前缀匹配,类似于无修饰符的行为,也是以指定模块开始,不同的是,如果模式匹配,那么就停止搜索其他模式了,不支持正则表达式 |
| @ | 定义命名location区段,这些区段客户端不能访问,只可以由内部产生的请求来访问,如try_files或error_page等 |
没有修饰符表示需以指定模式开始:
        location /test {
            echo "test";
        }
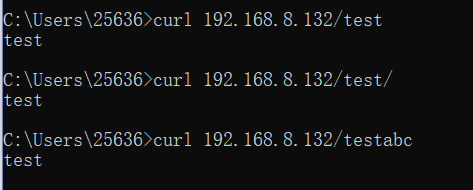
= : 表示必须与指定模式精确匹配
        location = /test2 {
            echo "test2";
        }
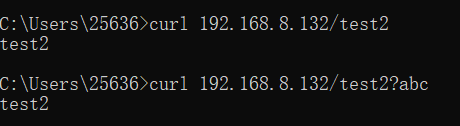
~ :表示指定的正则表达式要区分大小写
        location ~ ^/abc$ {
            echo "abc";
        }
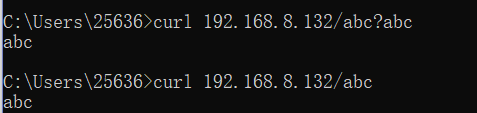
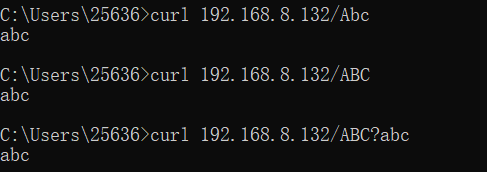
~*:表示指定的正则表达式不区分大小写
        location ~* ^/abc$ {
            echo "abc";
        }
查找顺序和优先级:
- 带有=的精确匹配优先
- 正则表达式按照他们在配置文件中定义的顺序
- 带有^~修饰符的,开头匹配
- 带有或*修饰符的,如果正则表达式与URI匹配
- 没有修饰符的精确匹配
访问控制
用于location段
allow:设定允许哪台或哪些主机访问,多个参数间用多个allow
deny:设定禁止哪台或哪些主机访问,多个参数间用多个deny
#拒绝本机访问
[root@localhost ~]# vim /usr/local/nginx/conf/nginx.conf
        location / {
            deny   192.168.8.1;
            root   html;
            index  index.html index.htm;
        }

#允许本机访问,其他全部拒绝
[root@localhost ~]# vim /usr/local/nginx/conf/nginx.conf
        location / {
            allow   192.168.8.1;
            deny all;
            root   html;
            index  index.html index.htm;
        }
[root@localhost ~]# curl 192.168.8.132
<html>
<head><title>403 Forbidden</title></head>
<body>
<center><h1>403 Forbidden</h1></center>
<hr><center>nginx/1.20.1</center>
</body>
</html>
基于用户认证
auth_basic "欢迎信息";
auth_basic_user_file "/path/to/user_auth_file"
user_auth_file内容格式为:
username:password
这里的密码为加密后的密码串,建议用htpasswd来创建此文件:
[root@localhost ~]# htpasswd -c -m /usr/local/nginx/conf/.pass admin
New password:
Re-type new password:
Adding password for user admin

[root@localhost ~]# vim /usr/local/nginx/conf/nginx.conf
        location / {
            auth_basic "Welcome";
            auth_basic_user_file "conf/.pass";
            root   html;
            index  index.html index.htm;
        }


https配置
生成证书
#生成一对密钥
[root@localhost ~]# mkdir -p /etc/pki/CA
[root@localhost ~]# cd /etc/pki/CA/
[root@localhost CA]# mkdir private
[root@localhost CA]# (umask 077;openssl genrsa -out private/cakey.pem 2048)
Generating RSA private key, 2048 bit long modulus (2 primes)
........................+++++
........................................................................+++++
e is 65537 (0x010001)

#生成自签署证书
[root@localhost CA]# openssl req -new -x509 -key private/cakey.pem -out cacert.pem -days 365
You are about to be asked to enter information that will be incorporated
into your certificate request.
What you are about to enter is what is called a Distinguished Name or a DN.
There are quite a few fields but you can leave some blank
For some fields there will be a default value,
If you enter '.', the field will be left blank.
-----
Country Name (2 letter code) [XX]:CN
State or Province Name (full name) []:HB
Locality Name (eg, city) [Default City]:WH
Organization Name (eg, company) [Default Company Ltd]:runtime
Organizational Unit Name (eg, section) []:runtime
Common Name (eg, your name or your server's hostname) []:test.neawalke.com
Email Address []:1@2.com

[root@localhost CA]# mkdir certs newcerts crl
[root@localhost CA]# touch index.txt && echo 01 > serial

#创建证书存放位置
[root@localhost CA]# mkdir /usr/local/nginx/conf/ssl

#生成密钥
[root@localhost ~]# cd /usr/local/nginx/conf/ssl/
[root@localhost ssl]# (umask 077;openssl genrsa -out nginx.key 2048)
Generating RSA private key, 2048 bit long modulus (2 primes)
......+++++
..............+++++
e is 65537 (0x010001)

#生成证书签署请求
[root@localhost ssl]# openssl req -new -key nginx.key -days 365 -out nginx.csr
Ignoring -days; not generating a certificate
You are about to be asked to enter information that will be incorporated
into your certificate request.
What you are about to enter is what is called a Distinguished Name or a DN.
There are quite a few fields but you can leave some blank
For some fields there will be a default value,
If you enter '.', the field will be left blank.
-----
Country Name (2 letter code) [XX]:CN
State or Province Name (full name) []:HB
Locality Name (eg, city) [Default City]:WH
Organization Name (eg, company) [Default Company Ltd]:runtime
Organizational Unit Name (eg, section) []:runtime
Common Name (eg, your name or your server's hostname) []:test.neawalke.com
Email Address []:1@2.com

Please enter the following 'extra' attributes
to be sent with your certificate request
A challenge password []:
An optional company name []:

#修改nginx配置文件
[root@localhost ~]# vim /usr/local/nginx/conf/nginx.conf
   server {
        listen       443 ssl;
        server_name  test.neawalke.com;

        ssl_certificate      ssl/nginx.crt;
        ssl_certificate_key  ssl/nginx.key;

        ssl_session_cache    shared:SSL:1m;
        ssl_session_timeout  5m;

        ssl_ciphers  HIGH:!aNULL:!MD5;
        ssl_prefer_server_ciphers  on;

        location / {
            root   html;
            index  index.html index.htm;
        }
    }

#CA签署客户端提交上来的证书
[root@localhost ssl]# openssl ca -in nginx.csr -out nginx.crt -days 365
Using configuration from /etc/pki/tls/openssl.cnf
Check that the request matches the signature
Signature ok
Certificate Details:
        Serial Number: 1 (0x1)
        Validity
            Not Before: Oct 27 15:46:45 2021 GMT
            Not After : Oct 27 15:46:45 2022 GMT
        Subject:
            countryName               = CN
            stateOrProvinceName       = HB
            organizationName          = runtime
            organizationalUnitName    = runtime
            commonName                = test.neawalke.com
            emailAddress              = 1@2.com
        X509v3 extensions:
            X509v3 Basic Constraints:
                CA:FALSE
            Netscape Comment:
                OpenSSL Generated Certificate
            X509v3 Subject Key Identifier:
                DB:C0:67:A9:96:4F:D8:67:60:8D:C0:6E:E7:B9:96:A9:70:7A:0E:62
            X509v3 Authority Key Identifier:
                keyid:E6:F5:AE:F8:57:F4:37:2F:EE:29:36:75:E9:CB:0E:45:FE:80:8A:72

Certificate is to be certified until Oct 27 15:46:45 2022 GMT (365 days)
Sign the certificate? [y/n]:y


1 out of 1 certificate requests certified, commit? [y/n]y
Write out database with 1 new entries
Data Base Updated

#当需两台服务器实现https,需做如下操作
//客户端把证书签署请求文件发送给CA
scp httpd.csr root@CA端IP:/root

//CA把签署好的证书httpd.crt发给客户端
scp httpd.crt root@客户端IP:/etc/httpd/ssl/

开启状态界面
#开启status
[root@localhost ~]# vim /usr/local/nginx/conf/nginx.conf
        location /status {
            stub_status;
        }

状态页面:
| 状态码 | 表示的意义 |
|---|---|
| Active connections 2 | 当前所有处于打开状态的连接数 |
| accepts | 总共处理了多少个连接 |
| handled | 成功创建多少握手 |
| requests | 总共处理了多少个请求 |
| Reading | nginx读取到客户端的Header信息数,表示正处于接收请求状态的连接数 |
| Writing | nginx返回给客户端的Header信息数,表示请求已经接收完成且正处于处理请求或发送响应的过程中的连接数 |
| Waiting | 开启keep-alive的情况下,这个值等于active - (reading + writing),意思就是Nginx已处理完正在等候下一次请求指令的驻留连接 |
状态页面监控
环境:
| 主机 | IP | 服务 |
|---|---|---|
| zabbix | 192.168.8.129 | zabbix_server |
| server | 192.168.8.132 | zabbix_agent、nginx |
#监控脚本
[root@localhost scripts]# cat nginx_status.sh
#!/bin/bash

status=$(curl -s 192.168.8.132/status |awk 'NR==4{print $6}')
if [ $status -eq 0 ];then
	echo "0"
else
	echo "1"
fi

[root@localhost etc]# vim zabbix_agentd.conf
UnsafeUserParameters=1 #默认为0。修改为1,打开自定义监控功能
······
UserParameter=check_status,/scripts/nginx_status.sh


rewrite
URL重定向
#语法:rewrite regex replacement flag;

rewrite ^/images/(.*\.jpg)$ /imgs/$1 break;

此处的$1用于引用(.*.jpg)匹配到的内容,又如:
rewrite ^/bbs/(.*)$ http://www.idfsoft.com/index.html redirect;

[root@localhost html]# mv images  img
[root@localhost html]# ls
404.html  50x.html  img  index.html

[root@localhost ~]# vim /usr/local/nginx/conf/nginx.conf
        location /images {
            rewrite ^/images/(.*\.jpg)$ /img/$1 break;
        }

常见flag
| flag | 作用 |
|---|---|
| last | 基本上都用这个flag,表示当前的匹配结束,继续下一个匹配,最多匹配10个到20个一旦此rewrite规则重写完成后,就不再被后面其它的rewrite规则进行处理而是由UserAgent重新对重写后的URL再一次发起请求,并从头开始执行类似的过程 |
| break | 中止Rewrite,不再继续匹配一旦此rewrite规则重写完成后,由UserAgent对新的URL重新发起请求,且不再会被当前location内的任何rewrite规则所检查 |
| redirect | 以临时重定向的HTTP状态302返回新的URL |
| permanent | 以永久重定向的HTTP状态301返回新的URL |
rewrite模块的作用是用来执行URL重定向。这个机制有利于去掉恶意访问的url,也有利于搜索引擎优化(SEO)
#使用last,当前匹配结束时,继续下一个匹配
[root@localhost ~]# vim /usr/local/nginx/conf/nginx.conf
        location /images {
            rewrite ^/images/(.*\.jpg)$ /img/$1 last;
        }
        location /img {
            rewrite ^/img/(.*)$ https://www.baidu.com/ last;
        }

if
语法:if (condition) {…}
应用场景:
- server段
- location段
常见的condition
- 变量名(变量值为空串,或者以“0”开始,则为false,其它的均为true)
- 以变量为操作数构成的比较表达式(可使用=,!=类似的比较操作符进行测试)
- 正则表达式的模式匹配操作
~:区分大小写的模式匹配检查
~:不区分大小写的模式匹配检查
!和!:对上面两种测试取反 - 测试指定路径为文件的可能性(-f,!-f)
- 测试指定路径为目录的可能性(-d,!-d)
- 测试文件的存在性(-e,!-e)
- 检查文件是否有执行权限(-x,!-x)
Examples:
if ($http_user_agent ~ MSIE) {
    rewrite ^(.*)$ /msie/$1 break;
}

if ($http_cookie ~* "id=([^;]+)(?:;|$)") {
    set $id $1;
}

if ($request_method = POST) {
    return 405;
}

if ($slow) {
    limit_rate 10k;
}

if ($invalid_referer) {
    return 403;
}
反向代理与负载均衡
nginx通常被用作后端服务器的反向代理,这样就可以很方便的实现动静分离以及负载均衡,从而大大提高服务器的处理能力。
nginx实现动静分离,其实就是在反向代理的时候,如果是静态资源,就直接从nginx发布的路径去读取,而不需要从后台服务器获取了。
但是要注意,这种情况下需要保证后端跟前端的程序保持一致,可以使用Rsync做服务端自动同步或者使用NFS、MFS分布式共享存储。
Http Proxy模块,功能很多,最常用的是proxy_pass和proxy_cache
如果要使用proxy_cache,需要集成第三方的ngx_cache_purge模块,用来清除指定的URL缓存。这个集成需要在安装nginx的时候去做,如:
./configure --add-module=…/ngx_cache_purge-1.0 …
nginx通过upstream模块来实现简单的负载均衡,upstream需要定义在http段内
在upstream段内,定义一个服务器列表,默认的方式是轮询,如果要确定同一个访问者发出的请求总是由同一个后端服务器来处理,可以设置ip_hash,如:
upstream idfsoft.com {
  ip_hash;
  server 127.0.0.1:9080 weight=5;
  server 127.0.0.1:8080 weight=5;
  server 127.0.0.1:1111;
}
环境:
| 主机 | IP | 服务 |
|---|---|---|
| local | 192.168.8.131 | nginx |
| RS-1 | 192.168.8.130 | nginx |
| RS-2 | 192.168.8.132 | nginx,mysql,php |
修改RS-1的默认端口
[root@RS-1 ~]# vim /usr/local/nginx/conf/nginx.conf
 server {
        listen       8080;
        server_name  localhost;

#修改默认web页面
[root@RS-1 ~]# echo "RS-1" > /usr/local/nginx/html/index.html
负载均衡操作
[root@local ~]# vim /usr/local/nginx/conf/nginx.conf
#添加下面四行
    upstream web {
        server 192.168.8.130:8080;
        server 192.168.8.132;
    }

···
    server {
        listen       80;
        server_name  localhost;

        #access_log  logs/host.access.log  main;

        location / {
            proxy_pass http://web;	#修改此内容
        }


动静分离配置
#调度器配置
[root@local ~]# vim /usr/local/nginx/conf/nginx.conf
···
    upstream static {
        server 192.168.8.130;
    }

    upstream dynamic {
        server 192.168.8.132;
    }

        location / {
            proxy_pass http://static;
        }

        location ~ \.php$ {
            proxy_pass   http://dynamic;
        }
···
编写php页面
[root@RS-2 ~]# vim /usr/local/nginx/html/index.php
<?php
        phpinfo();
?>
配置RS-2上的nginx
[root@RS-2 ~]# vim /usr/local/nginx/conf/nginx.conf
        location / {
            root   html;
            index  index.html index.html index.htm;
        }

        location ~ \.php$ {
            root           html;
            fastcgi_pass   127.0.0.1:9000;
            fastcgi_index  index.php;
            fastcgi_param  SCRIPT_FILENAME  $document_root$fastcgi_script_name;
            include        fastcgi_params;
        }
访问动态页面

访问静态页面


 114
114


 被折叠的 条评论
为什么被折叠?
被折叠的 条评论
为什么被折叠?
 到【灌水乐园】发言


