


代码所在位置:WPFSamples/Intro/QuickStart2
MyApp.xaml
<Application
xmlns="http://schemas.microsoft.com/winfx/2006/xaml/presentation"
xmlns:x="http://schemas.microsoft.com/winfx/2006/xaml"
StartupUri="Page1.xaml">
</Application>
QuickStart2中的MyApp.xaml文件和QuickStart1一样,没有变化
Page1.xaml
<!--<SnippetSimpleLayout>-->
<StackPanel
xmlns="http://schemas.microsoft.com/winfx/2006/xaml/presentation"
xmlns:x="http://schemas.microsoft.com/winfx/2006/xaml">
<Button HorizontalAlignment="Left"
Width="100"
Margin="10,10,10,10">Button 1</Button>
<Button HorizontalAlignment="Left"
Width="100"
Margin="10,10,10,10">Button 2</Button>
<Button HorizontalAlignment="Left"
Width="100"
Margin="10,10,10,10">Button 3</Button>
</StackPanel>
<!--</SnippetSimpleLayout>-->
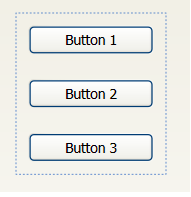
下面介绍一下[StackPanel]布局,[StackPanel]可以把内部的元素水平或者垂直的放置。
默认情况下是垂直放置的,如图所示:
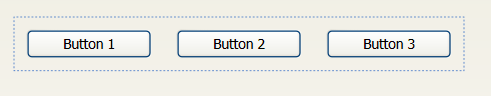
通过调整[StackPanel]的Orientation属性为Horizontal,可以使内部的控件水平放置
<StackPanel Orientation="Horizontal">
显示效果如下图所示:
这个例子中,在[StackPanel]中添加了三个[Button],HorizontalAlignment 标签定义了对齐位置为Left,这个例子在一定程度上说明了[StackPanel]的布局方式,从下图的显示结果可以看到


 2万+
2万+

 被折叠的 条评论
为什么被折叠?
被折叠的 条评论
为什么被折叠?
 到【灌水乐园】发言


