


openstack搭建笔记-train版
环境准备
备注:openstack 安装部署建议查看官方文档,很全面,细致。
本文仅提供对整体架构的了解和整体思路
系统:Centos7.9,
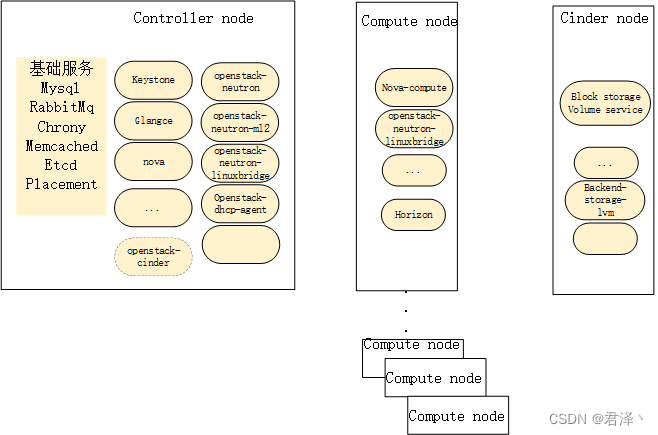
架构:1个controller,2个compute,dashboard和cinder在其中一个计算节点上
1.修改主机名,配置host
hostnamectl set-hostname controller
hostnamectl set-hostname compute01
hostnamectl set-hostname compute03
控制节点,安装配置基础服务
1.时间同步:
yum install chrony
vi /etc/chrony.conf
	server NTP_SERVER iburst
	allow 192.168.0.0/16
systemctl enable chronyd.service
systemctl start chronyd.service
systemctl status chronyd.service

其他节点:
yum install chrony -y
vi /etc/chrony.conf
	server controller iburst
	allow 192.168.0.0/16
systemctl enable chronyd.service
systemctl start chronyd.service
systemctl status chronyd.service

2.启用 OpenStack 存储库
yum install centos-release-openstack-train -y
yum install https://rdoproject.org/repos/rdo-release.rpm -y
yum upgrade -y
yum install python-openstackclient openstack-selinux -y

3.安装数据库
yum install mariadb mariadb-server python2-PyMySQL -y
vi /etc/my.cnf.d/openstack.cnf

[mysqld]
bind-address = 192.168.5.36
default-storage-engine = innodb
innodb_file_per_table = on
max_connections = 4096
collation-server = utf8_general_ci
character-set-server = utf8

systemctl enable mariadb.service
systemctl start mariadb.service
systemctl status mariadb.service
mysql_secure_installation

4.安装消息队列,Rabbitmq
yum install rabbitmq-server -y
systemctl enable rabbitmq-server.service
systemctl start rabbitmq-server.service
systemctl status rabbitmq-server.service

rabbitmqctl add_user openstack RABBIT_PASS
rabbitmqctl set_permissions openstack ".*" ".*" ".*"
rabbitmqctl set_user_tags openstack administrator

5.安装memcached
yum install memcached python-memcached
vi /etc/sysconfig/memcached
OPTIONS="-l 0.0.0.0,::1"

systemctl enable memcached.service
systemctl start memcached.service
systemctl status memcached.service

6.安装etcd
yum install etcd -y
vi /etc/etcd/etcd.conf

#[Member]
ETCD_DATA_DIR="/var/lib/etcd/default.etcd"
ETCD_LISTEN_PEER_URLS="http://192.168.5.36:2380"
ETCD_LISTEN_CLIENT_URLS="http://192.168.5.36:2379"
ETCD_NAME="controller"
#[Clustering]
ETCD_INITIAL_ADVERTISE_PEER_URLS="http://192.168.5.36:2380"
ETCD_ADVERTISE_CLIENT_URLS="http://192.168.5.36:2379"
ETCD_INITIAL_CLUSTER="controller=http://192.168.5.36:2380"
ETCD_INITIAL_CLUSTER_TOKEN="etcd-cluster-01"
ETCD_INITIAL_CLUSTER_STATE="new"

systemctl enable etcd
systemctl start etcd
systemctl status etcd
控制节点,安装配置主要服务
1.keystone
mysql -u root -p
CREATE DATABASE keystone;
GRANT ALL PRIVILEGES ON keystone.* TO 'keystone'@'localhost' IDENTIFIED BY 'KEYSTONE_DBPASS';
GRANT ALL PRIVILEGES ON keystone.* TO 'keystone'@'%' IDENTIFIED BY 'KEYSTONE_DBPASS';

yum install openstack-keystone httpd mod_wsgi -y
vi /etc/keystone/keystone.conf

[database]
# ...
connection = mysql+pymysql://keystone:KEYSTONE_DBPASS@controller/keystone
[token]
# ...
provider = fernet

su -s /bin/sh -c "keystone-manage db_sync" keystone

keystone-manage fernet_setup --keystone-user keystone --keystone-group keystone
keystone-manage credential_setup --keystone-user keystone --keystone-group keystone

keystone-manage bootstrap --bootstrap-password ADMIN_PASS \
  --bootstrap-admin-url http://controller:5000/v3/ \
  --bootstrap-internal-url http://controller:5000/v3/ \
  --bootstrap-public-url http://controller:5000/v3/ \
  --bootstrap-region-id RegionOne

vi /etc/httpd/conf/httpd.conf
ServerName controller

ln -s /usr/share/keystone/wsgi-keystone.conf /etc/httpd/conf.d/

systemctl enable httpd.service
systemctl restart httpd.service
systemctl status httpd.service

#### 新建admin-openrc.sh
vi admin-openrc.sh
export OS_PROJECT_DOMAIN_NAME=Default
export OS_USER_DOMAIN_NAME=Default
export OS_PROJECT_NAME=admin
export OS_USERNAME=admin
export OS_PASSWORD=ADMIN_PASS
export OS_AUTH_URL=http://controller:5000/v3
export OS_IDENTITY_API_VERSION=3
export OS_IMAGE_API_VERSION=2

bash admin-openrc.sh
####初始化环境变量
####创建域,项目,用户,角色

openstack domain create --description "An Example Domain" example (存在缺省域,可不创建)
openstack project create --domain default --description "Service Project" service

openstack project create --domain default --description "Demo Project" myproject
openstack user create --domain default --password-prompt myuser

openstack role create myrole
openstack role add --project myproject --user myuser myrole

检查:请求身份验证令牌:
openstack --os-auth-url http://controller:5000/v3 \
  --os-project-domain-name Default --os-user-domain-name Default \
  --os-project-name admin --os-username admin token issue

openstack token issue
2.glance
mysql -u root -p
CREATE DATABASE glance;
GRANT ALL PRIVILEGES ON glance.* TO 'glance'@'localhost' IDENTIFIED BY 'GLANCE_DBPASS';
GRANT ALL PRIVILEGES ON glance.* TO 'glance'@'%' IDENTIFIED BY 'GLANCE_DBPASS';

. admin-openrc.sh
openstack user create --domain default --password-prompt glance
openstack service create --name glance \
  --description "OpenStack Image" image

openstack endpoint create --region RegionOne \
  image public http://controller:9292
openstack endpoint create --region RegionOne \
  image internal http://controller:9292
openstack endpoint create --region RegionOne \
  image admin http://controller:9292

yum install openstack-glance -y
vi /etc/glance/glance-api.conf

[database]
# ...
connection = mysql+pymysql://glance:GLANCE_DBPASS@controller/glance
[keystone_authtoken]
# ...
www_authenticate_uri  = http://controller:5000
auth_url = http://controller:5000
memcached_servers = controller:11211
auth_type = password
project_domain_name = Default
user_domain_name = Default
project_name = service
username = glance
password = glance

[paste_deploy]
# ...
flavor = keystone

[glance_store]
# ...
stores = file,http
default_store = file
filesystem_store_datadir = /var/lib/glance/images/

su -s /bin/sh -c "glance-manage db_sync" glance

systemctl enable openstack-glance-api.service
systemctl start openstack-glance-api.service
systemctl status openstack-glance-api.service

#### cirros-0.4.0-x86_64-disk.img,下载
#### wget http://download.cirros-cloud.net/0.4.0/cirros-0.4.0-x86_64-disk.img

检查:上传下载的镜像,查看
glance image-create --name "cirros" \
  --file cirros-0.4.0-x86_64-disk.img \
  --disk-format qcow2 --container-format bare \
  --visibility public

glance image-list
3.placement
mysql -uroot -p
CREATE DATABASE placement;
GRANT ALL PRIVILEGES ON placement.* TO 'placement'@'localhost' IDENTIFIED BY 'PLACEMENT_DBPASS';
GRANT ALL PRIVILEGES ON placement.* TO 'placement'@'%' IDENTIFIED BY 'PLACEMENT_DBPASS';

. admin-openrc
openstack user create --domain default --password-prompt placement
openstack role add --project service --user placement admin
openstack service create --name placement \
  --description "Placement API" placement

openstack endpoint create --region RegionOne \
  placement public http://controller:8778
openstack endpoint create --region RegionOne \
  placement internal http://controller:8778
openstack endpoint create --region RegionOne \
  placement admin http://controller:8778

yum install openstack-placement-api -y
vi /etc/placement/placement.conf
[placement_database]
# ...
connection = mysql+pymysql://placement:PLACEMENT_DBPASS@controller/placement

[api]
# ...
auth_strategy = keystone

[keystone_authtoken]
# ...
auth_url = http://controller:5000/v3
memcached_servers = controller:11211
auth_type = password
project_domain_name = Default
user_domain_name = Default
project_name = service
username = placement
password = placement

su -s /bin/sh -c "placement-manage db sync" placement

vi /etc/httpd/conf.d/00-placement-api.conf
#SSLCertificateKeyFile ...(添加到这一行后)
<Directory /usr/bin>
   <IfVersion >= 2.4>
     Require all granted
  </IfVersion>
  <IfVersion < 2.4>
     Order allow,deny
     Allow from all
  </IfVersion>
 </Directory>

#检查健康状态
placement-status upgrade check(显示success即正常)
curl http://controller:8778 (能够获取到json即正常)

systemctl restart httpd
systemctl status httpd
4.nova
mysql -u root -p
CREATE DATABASE nova_api;
CREATE DATABASE nova;
CREATE DATABASE nova_cell0;

GRANT ALL PRIVILEGES ON nova_api.* TO 'nova'@'localhost' \
  IDENTIFIED BY 'NOVA_DBPASS';
GRANT ALL PRIVILEGES ON nova_api.* TO 'nova'@'%' \
  IDENTIFIED BY 'NOVA_DBPASS';

GRANT ALL PRIVILEGES ON nova.* TO 'nova'@'localhost' \
  IDENTIFIED BY 'NOVA_DBPASS';
GRANT ALL PRIVILEGES ON nova.* TO 'nova'@'%' \
  IDENTIFIED BY 'NOVA_DBPASS';

GRANT ALL PRIVILEGES ON nova_cell0.* TO 'nova'@'localhost' \
  IDENTIFIED BY 'NOVA_DBPASS';
GRANT ALL PRIVILEGES ON nova_cell0.* TO 'nova'@'%' \
  IDENTIFIED BY 'NOVA_DBPASS';

openstack user create --domain default --password-prompt nova
openstack role add --project service --user nova admin
openstack service create --name nova \
  --description "OpenStack Compute" compute

openstack endpoint create --region RegionOne \
  compute public http://controller:8774/v2.1
openstack endpoint create --region RegionOne \
  compute internal http://controller:8774/v2.1
openstack endpoint create --region RegionOne \
  compute admin http://controller:8774/v2.1

yum install -y openstack-nova-api openstack-nova-conductor \
  openstack-nova-novncproxy openstack-nova-scheduler

vi /etc/nova/nova.conf
[DEFAULT]
# ...
enabled_apis = osapi_compute,metadata
transport_url = rabbit://openstack:RABBIT_PASS@controller:5672/
my_ip = 192.168.5.36
[api_database]
# ...
connection = mysql+pymysql://nova:NOVA_DBPASS@controller/nova_api

[database]
# ...
connection = mysql+pymysql://nova:NOVA_DBPASS@controller/nova
[api]
# ...
auth_strategy = keystone

[keystone_authtoken]
# ...
www_authenticate_uri = http://controller:5000/
auth_url = http://controller:5000/
memcached_servers = controller:11211
auth_type = password
project_domain_name = Default
user_domain_name = Default
project_name = service
username = nova
password = nova

[vnc]
enabled = true
# ...
server_listen = $my_ip
server_proxyclient_address = $my_ip
[glance]
# ...
api_servers = http://controller:9292

[oslo_concurrency]
# ...
lock_path = /var/lib/nova/tmp

[placement]
# ...
region_name = RegionOne
project_domain_name = Default
project_name = service
auth_type = password
user_domain_name = Default
auth_url = http://controller:5000/v3
username = placement
password = placement


su -s /bin/sh -c "nova-manage api_db sync" nova
su -s /bin/sh -c "nova-manage cell_v2 map_cell0" nova
su -s /bin/sh -c "nova-manage cell_v2 create_cell --name=cell1 --verbose" nova
su -s /bin/sh -c "nova-manage db sync" nova

#### 验证:nova cell0 和 cell1 是否正确注册
su -s /bin/sh -c "nova-manage cell_v2 list_cells" nova

systemctl enable \
    openstack-nova-api.service \
    openstack-nova-scheduler.service \
    openstack-nova-conductor.service \
    openstack-nova-novncproxy.service

systemctl start \
    openstack-nova-api.service \
    openstack-nova-scheduler.service \
    openstack-nova-conductor.service \
    openstack-nova-novncproxy.service
systemctl status \
    openstack-nova-api.service \
    openstack-nova-scheduler.service \
    openstack-nova-conductor.service \
    openstack-nova-novncproxy.service

#### 计算节点配置好后可通过以下方式检查,查看
. admin-openrc
openstack compute service list --service nova-compute
su -s /bin/sh -c "nova-manage cell_v2 discover_hosts --verbose" nova
vi /etc/nova/nova.conf
[scheduler]
discover_hosts_in_cells_interval = 300

#验证:nova
openstack compute service list
openstack catalog list
openstack image list
nova-status upgrade check
5.neutron(可独立安装,此处安装在控制节点,选择提供者网络,flat和vlan模式)
mysql -u root -p
CREATE DATABASE neutron;
GRANT ALL PRIVILEGES ON neutron.* TO 'neutron'@'localhost' \
  IDENTIFIED BY 'NEUTRON_DBPASS';
GRANT ALL PRIVILEGES ON neutron.* TO 'neutron'@'%' \
  IDENTIFIED BY 'NEUTRON_DBPASS';

openstack user create --domain default --password-prompt neutron
openstack role add --project service --user neutron admin
openstack service create --name neutron \
  --description "OpenStack Networking" network

openstack endpoint create --region RegionOne \
  network public http://controller:9696
openstack endpoint create --region RegionOne \
  network internal http://controller:9696
openstack endpoint create --region RegionOne \
  network admin http://controller:9696

yum install -y openstack-neutron openstack-neutron-ml2 \
  openstack-neutron-linuxbridge ebtables

vi /etc/neutron/neutron.conf

[database]
# ...
connection = mysql+pymysql://neutron:NEUTRON_DBPASS@controller/neutron
[DEFAULT]
# ...
core_plugin = ml2
service_plugins =
transport_url = rabbit://openstack:RABBIT_PASS@controller
auth_strategy = keystone
notify_nova_on_port_status_changes = true
notify_nova_on_port_data_changes = true

[keystone_authtoken]
# ...
www_authenticate_uri = http://controller:5000
auth_url = http://controller:5000
memcached_servers = controller:11211
auth_type = password
project_domain_name = default
user_domain_name = default
project_name = service
username = neutron
password = neutron

[nova]
# ...
auth_url = http://controller:5000
auth_type = password
project_domain_name = default
user_domain_name = default
region_name = RegionOne
project_name = service
username = nova
password = nova

[oslo_concurrency]
# ...
lock_path = /var/lib/neutron/tmp

vi /etc/neutron/plugins/ml2/ml2_conf.ini
[ml2]
# ...
type_drivers = flat,vlan
tenant_network_types =
mechanism_drivers = linuxbridge
extension_drivers = port_security

[ml2_type_flat]
# ...
flat_networks = provider

[securitygroup]
# ...
enable_ipset = true

vi /etc/neutron/plugins/ml2/linuxbridge_agent.ini

[linux_bridge]
physical_interface_mappings = provider:eth0
[vxlan]
enable_vxlan = false
[securitygroup]
# ...
enable_security_group = true
firewall_driver = neutron.agent.linux.iptables_firewall.IptablesFirewallDriver

echo 'net.bridge.bridge-nf-call-iptables=1
net.bridge.bridge-nf-call-ip6tables=1' >> /etc/sysctl.conf
modprobe br_netfilter
sysctl -p

vi /etc/neutron/dhcp_agent.ini

[DEFAULT]
# ...
interface_driver = linuxbridge
dhcp_driver = neutron.agent.linux.dhcp.Dnsmasq
enable_isolated_metadata = true

vi /etc/neutron/metadata_agent.ini
[DEFAULT]
# ...
nova_metadata_host = controller
metadata_proxy_shared_secret = METADATA_SECRET

vi /etc/nova/nova.conf

[neutron]
# ...
auth_url = http://controller:5000
auth_type = password
project_domain_name = default
user_domain_name = default
region_name = RegionOne
project_name = service
username = neutron
password = neutron
service_metadata_proxy = true
metadata_proxy_shared_secret = METADATA_SECRET

ln -s /etc/neutron/plugins/ml2/ml2_conf.ini /etc/neutron/plugin.ini

su -s /bin/sh -c "neutron-db-manage --config-file /etc/neutron/neutron.conf \
  --config-file /etc/neutron/plugins/ml2/ml2_conf.ini upgrade head" neutron

systemctl restart openstack-nova-api.service
systemctl status openstack-nova-api.service

systemctl enable neutron-server.service \
  neutron-linuxbridge-agent.service neutron-dhcp-agent.service \
  neutron-metadata-agent.service
systemctl restart neutron-server.service \
  neutron-linuxbridge-agent.service neutron-dhcp-agent.service \
  neutron-metadata-agent.service
systemctl status neutron-server.service \
  neutron-linuxbridge-agent.service neutron-dhcp-agent.service \
  neutron-metadata-agent.service
计算节点
1.基础服务安装
修改主机名,配置host
hostnamectl set-hostname controller
hostnamectl set-hostname compute01
hostnamectl set-hostname compute02

vi /etc/hosts
192.168.5.36    controller
192.168.5.35    compute01
192.168.5.37	compute02

yum install chrony -y
vi /etc/chrony.conf
	server controller iburst
	allow 192.168.0.0/16
systemctl enable chronyd.service
systemctl start chronyd.service
systemctl status chronyd.service

启用 OpenStack 存储库
yum install centos-release-openstack-train -y
yum install https://rdoproject.org/repos/rdo-release.rpm -y
yum upgrade -y
yum install python-openstackclient openstack-selinux -y
2.nova
yum install openstack-nova-compute -y
vi /etc/nova/nova.conf

[DEFAULT]
# ...
enabled_apis = osapi_compute,metadata
transport_url = rabbit://openstack:RABBIT_PASS@controller
my_ip = 192.168.5.35
use_neutron = true
firewall_driver = nova.virt.firewall.NoopFirewallDriver

[api]
# ...
auth_strategy = keystone

[keystone_authtoken]
# ...
www_authenticate_uri = http://controller:5000/
auth_url = http://controller:5000/
memcached_servers = controller:11211
auth_type = password
project_domain_name = Default
user_domain_name = Default
project_name = service
username = nova
password = nova

[vnc]
# ...
enabled = true
server_listen = 0.0.0.0
server_proxyclient_address = $my_ip
novncproxy_base_url = http://controller:6080/vnc_auto.html

[glance]
# ...
api_servers = http://controller:9292

[oslo_concurrency]
# ...
lock_path = /var/lib/nova/tmp

[placement]
# ...
region_name = RegionOne
project_domain_name = Default
project_name = service
auth_type = password
user_domain_name = Default
auth_url = http://controller:5000/v3
username = placement
password = placement

egrep -c '(vmx|svm)' /proc/cpuinfo
####如果此命令返回值zero,则您的计算节点不支持硬件加速,您必须配置libvirt为使用 QEMU 而不是 KVM。
vi /etc/nova/nova.conf
[libvirt]
# ...
virt_type = qemu

systemctl enable libvirtd.service openstack-nova-compute.service
systemctl start libvirtd.service openstack-nova-compute.service
systemctl status libvirtd.service openstack-nova-compute.service

####在控制器节点上运行以下命令
. admin-openrc
openstack compute service list --service nova-compute
su -s /bin/sh -c "nova-manage cell_v2 discover_hosts --verbose" nova
vi /etc/nova/nova.conf
[scheduler]
discover_hosts_in_cells_interval = 300

#验证:nova
openstack compute service list
openstack catalog list
openstack image list
nova-status upgrade check
3.neutron
yum install openstack-neutron-linuxbridge ebtables ipset -y

vi /etc/neutron/neutron.conf

[DEFAULT]
# ...
transport_url = rabbit://openstack:RABBIT_PASS@controller
auth_strategy = keystone

[keystone_authtoken]
# ...
www_authenticate_uri = http://controller:5000
auth_url = http://controller:5000
memcached_servers = controller:11211
auth_type = password
project_domain_name = default
user_domain_name = default
project_name = service
username = neutron
password = neutron

[oslo_concurrency]
# ...
lock_path = /var/lib/neutron/tmp

vi /etc/neutron/plugins/ml2/linuxbridge_agent.ini

[linux_bridge]
physical_interface_mappings = provider:eth0
[vxlan]
enable_vxlan = false
[securitygroup]
# ...
enable_security_group = true
firewall_driver = neutron.agent.linux.iptables_firewall.IptablesFirewallDriver

echo 'net.bridge.bridge-nf-call-iptables=1
net.bridge.bridge-nf-call-ip6tables=1' >> /etc/sysctl.conf
modprobe br_netfilter
sysctl -p


vi /etc/nova/nova.conf

[neutron]
# ...
auth_url = http://controller:5000
auth_type = password
project_domain_name = default
user_domain_name = default
region_name = RegionOne
project_name = service
username = neutron
password = neutron

systemctl restart openstack-nova-compute.service
systemctl status openstack-nova-compute.service

systemctl enable neutron-linuxbridge-agent.service
systemctl restart neutron-linuxbridge-agent.service
systemctl status neutron-linuxbridge-agent.service

systemctl stop openstack-nova-compute.service
systemctl stop neutron-linuxbridge-agent.service

systemctl start openstack-nova-compute.service
systemctl start neutron-linuxbridge-agent.service

systemctl status NetworkManager
systemctl stop NetworkManager
yum remove NetworkManager -y
reboot
配置虚拟机在计算节点间冷迁移
启用nova用户登录(每个计算节点):
usermod -s /bin/bash nova

在其中一个节点:
su - nova
生成密钥对:配置ssh
ssh-keygen -t rsa

将获取的私钥放入该文件夹中,并将 pub 密钥添加到 authorized_keys 文件中
mkdir -p /var/lib/nova/.ssh
cp <private key>  /var/lib/nova/.ssh/id_rsa
echo 'StrictHostKeyChecking no' >> /var/lib/nova/.ssh/config
touch /var/lib/nova/.ssh/authorized_keys
chmod 600 /var/lib/nova/.ssh/id_rsa /var/lib/nova/.ssh/authorized_keys
echo <pub key> >> /var/lib/nova/.ssh/authorized_keys

copy文件夹到所计算节点:
scp -r /var/lib/nova/.ssh remote-host:/var/lib/nova/
所有节点:
systemctl restart libvirtd.service
systemctl restart openstack-nova-compute.service


 2640
2640


 被折叠的 条评论
为什么被折叠?
被折叠的 条评论
为什么被折叠?
 到【灌水乐园】发言


