


Imagine this: you design your charming form
You send it to your product manager, he looks at it and says: “So I have to type in the whole country name? Can’t you show me suggestions as I type?” and you think to yourself: “Well, he’s right!” So you decide to implement a “typeahead”, an “autocomplete” or whatever you want to call it: A text field that shows suggestions as the user types. You start working.. you know how to get the suggestions, you know how to do the logic, you know everything.. except how to make the suggestions float on top of other widgets.
You think about it; to achieve this you have to redesign your whole screen into a Stack, and then calculate exactly where each widget has to show. Very intrusive, extremely rigorous, incredibly error-prone, and just simply feels wrong. But there is another way..
You could use Flutter’s pre-provided Stack, the Overlay.
In this article I will explain how to use the Overlay widget to create widgets that float on top of everything else, without having to restructure your whole view.
You could use this to create autocomplete suggestions, tooltips, or basically anything that floats
What is the Overlay widget?
The official docs define the Overlay widget as:
A Stack of entries that can be managed independently.
Overlays let independent child widgets “float” visual elements on top of other widgets by inserting them into the overlay’s Stack.
This is exactly what we’re looking for. When we create our MaterialApp, it automatically creates a Navigator, which in turn creates an Overlay; a Stack widget that the navigator uses to manage the display of the views.
So let’s see how to use the Overlay to solve our problem.
Note: This article is concerned with displaying floating widgets, and thus won’t go much into the details of implementing a typeahead (autocomplete) field. If you’re interested in a well-coded, highly customizable typeahead widget, make sure to check out my package, flutter_typeahead
Initial program
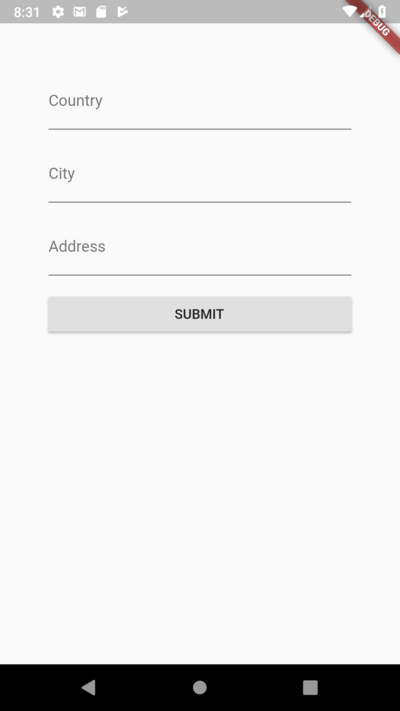
Let’s start with the simple form:
Scaffold(
  body: Padding(
    padding: const EdgeInsets.all(50.0),
    child: Form(
      child: ListView(
        children: <Widget>[
          TextFormField(
            decoration: InputDecoration(
                labelText: 'Address'
            ),
          ),
          SizedBox(height: 16.0,),
          TextFormField(
            decoration: InputDecoration(
                labelText: 'City'
            ),
          ),
          SizedBox(height: 16.0,),
          TextFormField(
            decoration: InputDecoration(
                labelText: 'Address'
            ),
          ),
          SizedBox(height: 16.0,),
          RaisedButton(
            child: Text('SUBMIT'),
            onPressed: () {
              // submit the form
            },
          )
        ],
      ),
    ),
  ),
)
- It is a simple view that contains three text fields: country, city and address.
We, then, take the countries field, and abstract it into its own stateful widget that we call CountriesField:
class CountriesField extends StatefulWidget {
  @override
  _CountriesFieldState createState() => _CountriesFieldState();
}

class _CountriesFieldState extends State<CountriesField> {


  @override
  Widget build(BuildContext context) {
    return TextFormField(
      decoration: InputDecoration(
        labelText: 'Country'
      ),
    );
  }
}
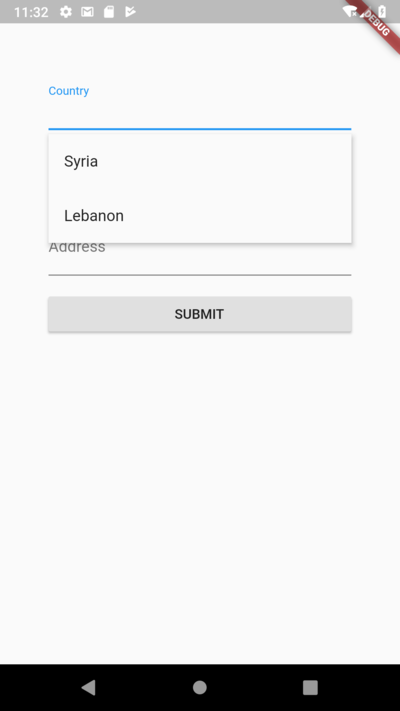
What we will do next is to display a floating list every time the field receives focus, and hide that list whenever focus is lost. You could change that logic depending on your use case. You might want to only display it when the user types some characters, and remove it when the user hits Enter. In all cases, let’s take a look at how to display this floating widget:
class CountriesField extends StatefulWidget {
  @override
  _CountriesFieldState createState() => _CountriesFieldState();
}

class _CountriesFieldState extends State<CountriesField> {

  final FocusNode _focusNode = FocusNode();

  OverlayEntry _overlayEntry;

  @override
  void initState() {
    _focusNode.addListener(() {
      if (_focusNode.hasFocus) {

        this._overlayEntry = this._createOverlayEntry();
        Overlay.of(context).insert(this._overlayEntry);

      } else {
        this._overlayEntry.remove();
      }
    });
  }

  OverlayEntry _createOverlayEntry() {

    RenderBox renderBox = context.findRenderObject();
    var size = renderBox.size;
    var offset = renderBox.localToGlobal(Offset.zero);

    return OverlayEntry(
      builder: (context) => Positioned(
        left: offset.dx,
        top: offset.dy + size.height + 5.0,
        width: size.width,
        child: Material(
          elevation: 4.0,
          child: ListView(
            padding: EdgeInsets.zero,
            shrinkWrap: true,
            children: <Widget>[
              ListTile(
                title: Text('Syria'),
              ),
              ListTile(
                title: Text('Lebanon'),
              )
            ],
          ),
        ),
      )
    );
  }

  @override
  Widget build(BuildContext context) {
    return TextFormField(
        focusNode: this._focusNode,
      decoration: InputDecoration(
        labelText: 'Country'
      ),
    );
  }
}
- We assign a
FocusNodeto theTextFormField, and add a listener to it ininitState. We will use this listener to detect when the field gains/loses focus. - Every time we receive focus (
_focusNode.hasFocus == true), we create anOverlayEntryusing_createOverlayEntry, and we insert it into the closestOverlaywidget, usingOverlay.of(context).insert - Every time we lose focus (
_focusNode.hasFocus == false), we remove the overlay entry that we have added, using_overlayEntry.remove. _createOverlayEntryinquires for the render box of our widget, usingcontext.findRenderObjectfunction. This render box enables us to know the position, size, and other rendering information of our widget. This will help us later know where to place our floating list._createOverlayEntryuses the render box to obtain thesizeof the widget, it also usesrenderBox.localToGlobalto get the coordinates of the widget in the screen. We provide thelocalToGlobalmethod withOffset.zero, this means that we are taking the (0, 0) coordinates inside this render box, and converting them to their corresponding coordinates on the screen.- We then create an
OverlayEntry, which is a widget used to display widgets in theOverlay. - The content of the
OverlayEntryis aPositionedwidget. Remember thatPositionedwidgets can only be inserted in aStack, but also remember that theOverlayis indeed aStack. - We set the coordinates of the
Positionedwidget, we give it the same xcoordinate as theTextField, the same width, and the same y coordinate but shifted a bit to the bottom in order not to cover theTextField. - Inside the
Positioned, we display aListViewwith the suggestions that we want (I hardcoded a few entries in the example). Notice that I placed everything inside aMaterialwidget. That is for two reasons: because theOverlaydoes not contain aMaterialwidget by default, and many widgets cannot be displayed without aMaterialancestor, and because theMaterialwidget provides theelevationproperty which allows us to give the widget a shadow to make it look as if it is really floating.
And that’s it! Our suggestions box now floats on top of everything else!
Bonus: Follow the scroll!
Before we leave, let’s try and learn one more thing! If our view is scrollable, then we might notice something:

The suggestions box scrolls with us!
The suggestions box sticks to its place on the screen! Now this might be desired in some cases, but in this case, we don’t want that, we want it to followour TextField!
The key here is the word follow. Flutter provides us with two widgets: the CompositedTransformFollower and the CompositedTransformTarget. Simply put, if we link a follower and a target, then the follower will follow the target wherever it goes! To link a follower and a target we have to provide both of them with the same LayerLink.
Thus, we will wrap our suggestions box with a CompositedTransformFollower, and our TextField with a CompositedTransformTarget. Then, we will link them by providing them with the same LayerLink. This will make the suggestions box follow the TextField wherever it goes:
class CountriesField extends StatefulWidget {
  @override
  _CountriesFieldState createState() => _CountriesFieldState();
}

class _CountriesFieldState extends State<CountriesField> {

  final FocusNode _focusNode = FocusNode();

  OverlayEntry _overlayEntry;

  final LayerLink _layerLink = LayerLink();

  @override
  void initState() {
    _focusNode.addListener(() {
      if (_focusNode.hasFocus) {

        this._overlayEntry = this._createOverlayEntry();
        Overlay.of(context).insert(this._overlayEntry);

      } else {
        this._overlayEntry.remove();
      }
    });
  }

  OverlayEntry _createOverlayEntry() {

    RenderBox renderBox = context.findRenderObject();
    var size = renderBox.size;

    return OverlayEntry(
      builder: (context) => Positioned(
        width: size.width,
        child: CompositedTransformFollower(
          link: this._layerLink,
          showWhenUnlinked: false,
          offset: Offset(0.0, size.height + 5.0),
          child: Material(
            elevation: 4.0,
            child: ListView(
              padding: EdgeInsets.zero,
              shrinkWrap: true,
              children: <Widget>[
                ListTile(
                  title: Text('Syria'),
                  onTap: () {
                    print('Syria Tapped');
                  },
                ),
                ListTile(
                  title: Text('Lebanon'),
                  onTap: () {
                    print('Lebanon Tapped');
                  },
                )
              ],
            ),
          ),
        ),
      )
    );
  }

  @override
  Widget build(BuildContext context) {
    return CompositedTransformTarget(
      link: this._layerLink,
      child: TextFormField(
          focusNode: this._focusNode,
        decoration: InputDecoration(
          labelText: 'Country'
        ),
      ),
    );
  }
}
- We wrapped our
Materialwidget in theOverlayEntrywith aCompositedTransformFollower, and wrapped ourTextFormFieldwith aCompositedTransformTarget. - We provided both the
followerand thetargetwith the sameLayerLinkinstance. This will cause thefollowerto have the same coordinate space as thetarget, making it effectively follow it around. - We removed the
topandleftproperties from thePositionedwidget. These are not needed anymore, since thefollowerwill have the same coordinates as thetargetby default. We kept thewidthproperty of thePositioned, however, because thefollowertends to extend infinitely if not bounded. - We provided the
CompositedTransformFollowerwith an offset, to disallow it from covering theTextField(same as before) - Finally, we set
showWhenUnlinkedtofalse, to hide theOverlayEntrywhen theTextFieldis not visible on the screen (like if we scroll too far to the bottom)
And with that, our OverlayEntry now follows our TextField!

Important Note: The CompositedTransformFollower is still a little buggy; even though the follower is hidden from the screen when the target is no more visible, the follower still responds to tap events. I have opened an issue with the Flutter Team:
And will update the post when the issue is resolved
The Overlay is a powerful widget that provides us with a handy Stack to place our floating widgets. I have successfully used it to create flutter_typeahead, and I’m sure you too can use it for a variety of use cases.
I hope this has been useful. Let me know what you think!


 6262
6262

 被折叠的 条评论
为什么被折叠?
被折叠的 条评论
为什么被折叠?
 到【灌水乐园】发言


