Download it – Struts2-Spring-Integration-Example.zip
In this tutorial, it shows the integration between Struts 2 and Spring.
1. Project Structure
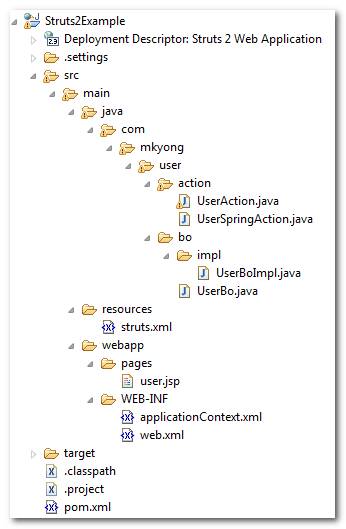
Here’s the project folder structure of this tutorials.
2. Struts 2 + Spring Plugin
To integrate Struts 2 and Spring, get and include the “struts2-spring-plugin-xxx.jar” library into your project classpath.
pom.xml
        <!-- Struts 2 -->
        <dependency>
                <groupId>org.apache.struts</groupId>
	        <artifactId>struts2-core</artifactId>
	        <version>2.1.8</version>
        </dependency>

	<!-- Spring framework -->
	<dependency>
		<groupId>org.springframework</groupId>
		<artifactId>spring</artifactId>
		<version>2.5.6</version>
	</dependency>

	<dependency>
		<groupId>org.springframework</groupId>
		<artifactId>spring-web</artifactId>
		<version>2.5.6</version>
	</dependency>

	<!-- Struts 2 + Spring plugins -->
	<dependency>
                 <groupId>org.apache.struts</groupId>
	         <artifactId>struts2-spring-plugin</artifactId>
	         <version>2.1.8</version>
         </dependency>
3. Spring Listener
Configure the Spring listener “org.springframework.web.context.ContextLoaderListener” in web.xml file.
web.xml
<!DOCTYPE web-app PUBLIC
 "-//Sun Microsystems, Inc.//DTD Web Application 2.3//EN"
 "http://java.sun.com/dtd/web-app_2_3.dtd" >

<web-app>
  <display-name>Struts 2 Web Application</display-name>

  <filter>
	<filter-name>struts2</filter-name>
	<filter-class>
         org.apache.struts2.dispatcher.ng.filter.StrutsPrepareAndExecuteFilter
        </filter-class>
  </filter>

  <filter-mapping>
	<filter-name>struts2</filter-name>
	<url-pattern>/*</url-pattern>
  </filter-mapping>

  <listener>
    <listener-class>
      org.springframework.web.context.ContextLoaderListener
    </listener-class>
  </listener>

</web-app>
3. Register Spring Bean
Register all the Spring’s Beans in the applicationContext.xml file, the Spring listener will locate this xml file automatically.
applicationContext.xml
<beans xmlns="http://www.springframework.org/schema/beans"
xmlns:xsi="http://www.w3.org/2001/XMLSchema-instance"
xsi:schemaLocation="http://www.springframework.org/schema/beans
http://www.springframework.org/schema/beans/spring-beans-2.5.xsd">

	<bean id="userBo" class="com.mkyong.user.bo.impl.UserBoImpl" />

	<bean id="userSpringAction" class="com.mkyong.user.action.UserSpringAction">
		<property name="userBo" ref="userBo" />
	</bean>

</beans>
UserBo.java
package com.mkyong.user.bo;

public interface UserBo{

	public void printUser();

}
UserBoImpl.java
package com.mkyong.user.bo.impl;

import com.mkyong.user.bo.UserBo;

public class UserBoImpl implements UserBo{

	public void printUser(){
		System.out.println("printUser() is executed...");
	}

}
UserSpringAction.java
package com.mkyong.user.action;

import com.mkyong.user.bo.UserBo;

public class UserSpringAction{

	//DI via Spring
	UserBo userBo;

	public UserBo getUserBo() {
		return userBo;
	}

	public void setUserBo(UserBo userBo) {
		this.userBo = userBo;
	}

	public String execute() throws Exception {

		userBo.printUser();
		return "success";

	}
}
5. Struts.xml
Declared all the relationship here.
<?xml version="1.0" encoding="UTF-8" ?>
<!DOCTYPE struts PUBLIC
"-//Apache Software Foundation//DTD Struts Configuration 2.0//EN"
"http://struts.apache.org/dtds/struts-2.0.dtd">

<struts>
 	<constant name="struts.devMode" value="true" />

	<package name="default" namespace="/" extends="struts-default">

		<action name="userAction"
			class="com.mkyong.user.action.UserAction" >
			<result name="success">pages/user.jsp</result>
		</action>

		<action name="userSpringAction"
			class="userSpringAction" >
			<result name="success">pages/user.jsp</result>
		</action>

	</package>

</struts>
6. Demo
Now, all the Struts 2 and Spring integration work is done, now see the following use case to access the Spring’s “userBo” bean.
- Case 1 : Make Spring act as the Struts 2 Action class, and access the Spring’s bean.
- Case 2 : Access the Spring’s bean in Struts 2 Action class.
Case 1
In this example, the userSpringAction is act as the Struts 2 Action class, and you can DI the Spring’s userBo bean with normal Spring’s way.
//struts.xml
<action name="userSpringAction"
	class="userSpringAction" >
	<result name="success">pages/user.jsp</result>
</action>

//applicationContext.xml
<bean id="userSpringAction" class="com.mkyong.user.action.UserSpringAction">
	<property name="userBo" ref="userBo" />
</bean>
To access this action, use the URL : http://localhost:8080/Struts2Example/userSpringAction
Case 2
By default, Spring listener enables “autowiring by matching the bean name“. So, it will pass the Spring’s “userBo” bean into the UserAction via setUserBo() automatically. See below Struts 2 Action :
UserAction.java
package com.mkyong.user.action;

import com.mkyong.user.bo.UserBo;
import com.opensymphony.xwork2.ActionSupport;

public class UserAction extends ActionSupport{

	//DI via Spring
	UserBo userBo;

	public UserBo getUserBo() {
		return userBo;
	}

	public void setUserBo(UserBo userBo) {
		this.userBo = userBo;
	}

	public String execute() throws Exception {

		userBo.printUser();
		return SUCCESS;

	}
}
To access this action, use the URL : http://localhost:8080/Struts2Example/userAction
WebApplicationContextUtils
Alternatively, you can use the Spring’s generic
WebApplicationContextUtils class to get the Spring’s bean directly.
package com.mkyong.user.action;

import org.apache.struts2.ServletActionContext;
import org.springframework.web.context.WebApplicationContext;
import org.springframework.web.context.support.WebApplicationContextUtils;

import com.mkyong.user.bo.UserBo;
import com.opensymphony.xwork2.ActionSupport;

public class UserAction extends ActionSupport{

	public String execute() throws Exception {

		WebApplicationContext context =
			WebApplicationContextUtils.getRequiredWebApplicationContext(
                                    ServletActionContext.getServletContext()
                        );

		UserBo userBo1 = (UserBo)context.getBean("userBo");
		userBo1.printUser();

		return SUCCESS;

	}
}
A really long and tedious article, make sure you download the full project source code for practice.


 284
284


 被折叠的 条评论
为什么被折叠?


