


 文章详细介绍了EF中的实体关系,包括一对一、一对多和多对多关系的示例及代码实现。同时,讨论了如何构建模型,包括排除类型和属性、设置主键、生成值、必需和可选属性、最大长度、并发标记、时间戳以及索引的配置。最后,文章提到了异步查询和保存操作的重要性及其实现方式。
一、EF中的实体关系
通过A 和 B表示能更好了解数据中表与表之间的关系:
1.一对一
一对一,表A中每一条记录在表 B 仅有一条数据与其对应;而表B中每一个记录,在表A中只有一条数据与之相对应。
下面用实体框架设计器的概念模型显示学生表 Student 和 学生明细DetailInfo 两个实体一对一的关系:
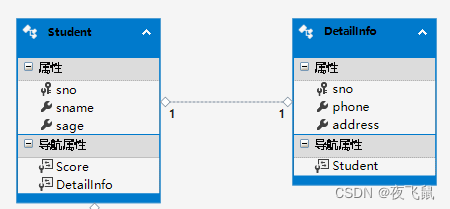
对应的代码实现:
    public partial class Student
    {
        public int sno { get; set; }

        public string sname { get; set; }

        public int sage { get; set; }

        public virtual DetailInfo DetailInfo { get; set; }
    }
public partial class DetailInfo
{
public int sno { get; set; }
public int phone { get; set; }
public string address { get; set; }
public virtual Student Student { get; set; }
}2.一对多
一对多,表A中每一条记录在表 B 中,至少有两条数据与之对应;而表B中每一个记录,在表A中只有一条数据与之相对应。
下面用实体框架设计器的概念模型显示学生表 Student 和成绩表 Score 两个实体一对多的关系:
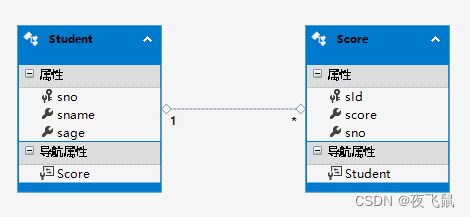
对应的代码实现:
    public partial class Student
    {
        public Student()
        {
            this.Score = new HashSet<Score>();
        }

        public int sno { get; set; }

        public string sname { get; set; }

        public int sage { get; set; }

        public virtual ICollection<Score> Score { get; set; }
    }
public partial class Score
{
public int sId { get; set; }
public int score { get; set; }
public int sno { get; set; }
public virtual Student Student { get; set; }
}3.多对多
多对多,表A中每一条记录在表有B中,有多个数据相对应;而表B中每一个记录,在表A中有多条数据与之相对应。
下面用实体框架设计器的概念模型显示学生表 Student 和课程表 Cource 两个实体多对多的关系,通过成绩表 Score 作为两个表的中间桥梁:
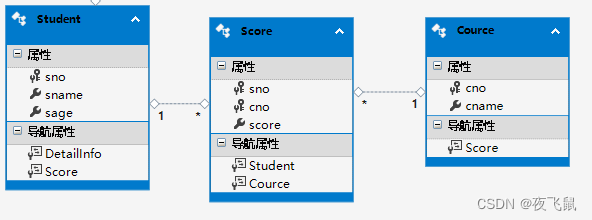
对应的代码实现:
    public partial class Student
    {
        public Student()
        {
            this.Score = new HashSet<Score>();
        }

        public int sno { get; set; }
        public string sname { get; set; }
        public int sage { get; set; }
        public virtual ICollection<Score> Score { get; set; }
    }
public partial class Score
{
public int sno { get; set; }
public int cno { get; set; }
public int score { get; set; }
public virtual Student Student { get; set; }
public virtual Cource Cource { get; set; }
} public partial class Cource
{
public Cource()
{
this.Score = new HashSet<Score>();
}
public int cno { get; set; }
public string cname { get; set; }
public virtual ICollection<Score> Score { get; set; }
}二、构建模型的约定
1.从模型中排除类型
使用数据注释来从模型中排除类型:
    public class Student
    {
        public int Id { get; set; }
        public string Name { get; set; }
        public Course course { get; set; }
    }

    [NotMapped]
    public class Course
    {
        public int Id { get; set; }
        public string Name { get; set; }
    }
使用Fluent API来从模型中排除类型:
    public class MyContext : DbContext
    {
        public DbSet<Student> Students { get; set; }
        protected override void OnModelCreating(DbModelBuilder modelBuilder)
        {
            modelBuilder.Ignore<Course>(); // 排除课程属性
        }
    }

    public class Student
    {
        public int Id { get; set; }
        public string Name { get; set; }
        public Course course { get; set; }
    }

    public class Course
    {
        public int Id { get; set; }
        public string Name { get; set; }
    }
2.从模型中排除属性
注意:模型所含的那些公共属性都拥有一个 getter 和一个 setter。
使用数据注释来从模型中排除属性:
    public class Student
    {
        public int Id { get; set; }
        [NotMapped]
        public string Name { get; set; }
        public Course course { get; set; }
    }
使用Fluent API来从模型中排除属性:
    public class MyContext : DbContext
    {
        public DbSet<Student> Students { get; set; }
        protected override void OnModelCreating(DbModelBuilder modelBuilder)
        {
            modelBuilder.Entity<Student>().Ignore(x => x.Name); // 排除名称属性
        }
    }

    public class Student
    {
        public int Id { get; set; }
        [NotMapped]
        public string Name { get; set; }
    }
3.为模型设置主键
约定
按照约定,会将名为 Id 或 <type name>Id 的属性配置为一个实体的键。
使用数据注释将单个属性配置为主键:
    public class Student
    {
        [Key]
        public int StudentId { get; set; }
        public string Name { get; set; }
    }
使用Fluent API将单个属性配置为主键:
    public class MyContext : DbContext
    {
        public DbSet<Student> Students { get; set; }
        protected override void OnModelCreating(DbModelBuilder modelBuilder)
        {
            modelBuilder.Entity<Student>().HasKey(x => x.StudentId); // 设置主键
        }
    }

    public class Student
    {
        public int StudentId { get; set; }
        public string Name { get; set; }
    }
使用Fluent API设置复合主键:
    public class MyContext : DbContext
    {
        public DbSet<Student> Students { get; set; }
        protected override void OnModelCreating(DbModelBuilder modelBuilder)
        {
            // 设置复合主键
            modelBuilder.Entity<Student>().HasKey(x =>
                                          new { x.CardId, x.StudentId });
        }
    }

    public class Student
    {
        public int CardId { get; set; }
        public int StudentId { get; set; }
        public string Name { get; set; }
    }
4. 生成值
类型为 short、int、long、或 Guid 的非复合主键会被设置在添加时生成值。其他属性会被设置为不生成值。
(1)使用数据注释设置生成值
在添加时不设置生成值:
    public class Student
    {
        public int CardId { get; set; }
        [DatabaseGenerated(DatabaseGeneratedOption.None)]
        public int StudentId { get; set; }
        public string Name { get; set; }
    }
在添加时设置生成值:
    public class Student
    {
        public int CardId { get; set; }
        [DatabaseGenerated(DatabaseGeneratedOption.Identity)]
        public int StudentId { get; set; }
        public string Name { get; set; }

        // 在添加或更新 在 时生成生 值
        [DatabaseGenerated(DatabaseGeneratedOption.Computed)]
        public DateTime LastUpdated { get; set; }
    }
5.必需和可选属性
属性类型包含 null 的数值才能配置为可选。
使用数据批注设置属性是必需:
    public class Student
    {
        public int CardId { get; set; }
        public int StudentId { get; set; }
        [Required]
        public string Name { get; set; }
        public DateTime LastUpdated { get; set; }
    }
使用 Fluent API 设置属性是必需:
    public class MyContext : DbContext
    {
        public DbSet<Student> Students { get; set; }
        protected override void OnModelCreating(DbModelBuilder modelBuilder)
        {
            modelBuilder.Entity<Student>()
                        .Property(b => b.Name)
                        .IsRequired();
        }
    }

    public class Student
    {
        public int CardId { get; set; }
        public int StudentId { get; set; }
        public string Name { get; set; }
        public DateTime LastUpdated { get; set; }
    }
6.最大长度
使用数据注释来配置属性的最大长度:
    public class Student
    {
        public int CardId { get; set; }
        public int StudentId { get; set; }
        [MaxLength(250)]
        public string Name { get; set; }
        public DateTime LastUpdated { get; set; }
    }
使用Fluent API来配置属性的最大长度:
        protected override void OnModelCreating(DbModelBuilder modelBuilder)
        {
            modelBuilder.Entity<Student>()
                        .Property(b => b.Name)
                        .HasMaxLength(500);
        }
7.并发标记
属性配置为并发标记用于实现乐观并发控制。
使用数据注释属性配置为并发标记:
    public class Student
    {
        public int CardId { get; set; }
        public int StudentId { get; set; }
        [ConcurrencyCheck]
        public string Name { get; set; }
        public DateTime LastUpdated { get; set; }
    }
使用 Fluent API 属性配置为并发标记:
        protected override void OnModelCreating(DbModelBuilder modelBuilder)
        {
            modelBuilder.Entity<Student>()
                        .Property(p => p.Name)
                        .IsConcurrencyToken();
        }
8.时间戳
时间戳是每次插入或更新行时,由数据库生成一个新的值。 这可确保其他人已修改的行,你将收到异常。
使用数据注释属性配置为时间戳:
    public class Student
    {
        public int CardId { get; set; }
        public int StudentId { get; set; }
        [ConcurrencyCheck]
        public string Name { get; set; }
        public DateTime LastUpdated { get; set; }
        [Timestamp]
        public byte[] Timestamp { get; set; }
    }
使用 Fluent API 属性配置为时间戳:
        protected override void OnModelCreating(DbModelBuilder modelBuilder)
        {
            modelBuilder.Entity<Student>()
                        .Property(x => x.Timestamp)
                        .IsRowVersion();
        }
9.索引
数据注释指定索引:
    public class Student
    {
        [Index("MultipleIndexColumn", 1)]
        public int CardId { get; set; }
        [Index("MultipleIndexColumn", 2)]
        public int StudentId { get; set; }
        public string Name { get; set; }
        public DateTime LastUpdated { get; set; }
        public byte[] Timestamp { get; set; }
    }
Fluent API 指定索引:
        protected override void OnModelCreating(DbModelBuilder modelBuilder)
        {
            modelBuilder.Entity<Student>().HasIndex(x => x.CardId);
        }
protected override void OnModelCreating(DbModelBuilder modelBuilder)
{
modelBuilder.Entity<Student>().HasIndex(x => new {
x.CardId, x.StudentId
});
}定索引是唯一:
        protected override void OnModelCreating(DbModelBuilder modelBuilder)
        {
            modelBuilder.Entity<Student>().HasIndex( x => x.CardId).IsUnique();
        }
三、异步查询和保存
为了在执行长时间操作或绑定任务时提高对客户端响应能力和服务器可伸缩性,Entity Framework 6.0 可以使用async 和 await 关键字 实现异步查询和保存。
1.同步查询和保存
默认情况下,查询和保存是同步(可以参考文章《Entity Framework 6.0 Code First》的“四、读取和写入数据”章节 。),如下面所示:
        public static void PerformDatabaseOperations()
        {
            using (var db = new BloggingContext())
            {
                // 创建并且保存一条Blog记录
                db.Blogs.Add(new Blog
                {
                    Name = "C# " + (db.Blogs.Count() + 1)
                });
                db.SaveChanges();

                // 根据name排序,查询所有
                var blogs = (from b in db.Blogs
                             orderby b.Name
                             select b).ToList();

                // 遍历输出所有blogs
                Console.WriteLine();
                Console.WriteLine("所有blogs:");
                foreach (var blog in blogs)
                {
                    Console.WriteLine(" " + blog.Name);
                }
            }
        }
2.异步查询和保存
把 PerformDatabaseOperations 方法的返回类型改为 System.Threading.Tasks,加入async关键字,使用await 标记异步并返回任务。
        public static async Task PerformDatabaseOperations()
        {
            using (var db = new BloggingContext())
            {
                // 创建并且保存一条Blog记录
                db.Blogs.Add(new Blog
                {
                    Name = "C# " + (db.Blogs.Count() + 1)
                });

                await db.SaveChangesAsync();

                // 根据name排序,查询所有
                Console.WriteLine("Executing query.");
                var blogs = await (from b in db.Blogs
                                   orderby b.Name
                                   select b).ToListAsync();

                // 遍历输出所有blogs
                Console.WriteLine("所有blogs:");
                foreach (var blog in blogs)
                {
                    Console.WriteLine(" - " + blog.Name);
                }
            }
        }
四、配置
1.实体框架配置
在配置文件app.config的configSections节点可以设置上下文使用的数据库初始值,安装 EntityFramework NuGet 包,自动添加到项目的配置文件。如下代码:
<?xml version="1.0" encoding="utf-8"?>
<configuration>
  <configSections>
    <!-- For more information on Entity Framework configuration, visit http://go.microsoft.com/fwlink/?LinkID=237468 -->
    <section name="entityFramework" type="System.Data.Entity.Internal.ConfigFile.EntityFrameworkSection, EntityFramework, Version=6.0.0.0, Culture=neutral, PublicKeyToken=b77a5c561934e089" requirePermission="false" />
  </configSections>
</configuration>
2.连接字符串
连接字符串转connectionStrings元素,并且不需要entityFramework部分:
    <connectionStrings>
        <add name="BloggingContext"
             providerName="System.Data.SqlClient"
             connectionString="Server=服务器地址;Initial Catalog=数据库;User ID=用户名;Password=密码;MultipleActiveResultSets=True;"/>
    </connectionStrings>
3.基于模型使用 EF 连接字符串
<connectionStrings>
<add name="BlogContext"
connectionString=
"metadata=
res://*/BloggingModel.csdl|
res://*/BloggingModel.ssdl|
res://*/BloggingModel.msl;
provider=System.Data.SqlClient
provider connection string=
"data source=(localdb)\mssqllocaldb;
initial catalog=Blogging;
integrated security=True;
multipleactiveresultsets=True;""
providerName="System.Data.EntityClient" />
</connectionStrings>四、连接字符串和模型
1.默认数据库连接
如果 BloggingContext 继承 DbContext 类,没有做任何配置,程序会调用无参数构造函数将导致 DbContext 在 Code First 模式下运行与创建的约定的数据库连接。
namespace EFDemo
{
    public class BloggingContext : DbContext
    {
        public BloggingContext()
        {
        }
    }
}
上述代码会默认将命名空间名称和类的名称作为数据库名称(即:EFDemo.BloggingContext),然后创建使用SQL Express 或 LocalDB 此数据库的连接字符串。
如果没安装 SQL Express ,则会使用LocalDB 。
2.指定的数据库名称
如果 BloggingContext 继承 DbContext 类,没有做任何配置,然后调用 DbContext 有参构造函数。
程序会调用 DbContext 在 Code First 模式下创建以构造函数字符串作为数据库名称的数据库连接。
下面代码,BloggingDatabase 作为数据库名称。
public class BloggingContext : DbContext
{
    public BloggingContext()
    : base("BloggingDatabase")
    {
    }
}
3.Code First 配置文件中的连接字符串
你可以在 app.config 或 web.config 文件中配置数据库连接字符串,例如:
<configuration>
   <connectionStrings>
        <add name="BloggingContext"
             providerName="System.Data.SqlClient"
             connectionString="Server=服务器地址;Initial Catalog=数据库;User ID=用户名;Password=密码;MultipleActiveResultSets=True;"/>
    </connectionStrings>
</configuration>
public class BloggingContext : DbContext
{
public BloggingContext()
: base("BloggingCompactDatabase")
{
}
}或者,"name =<连接字符串名称>"字符串传递给 DbContext 构造函数。
public class BloggingContext : DbContext
{
public BloggingContext()
: base("name=BloggingCompactDatabase")
{
}
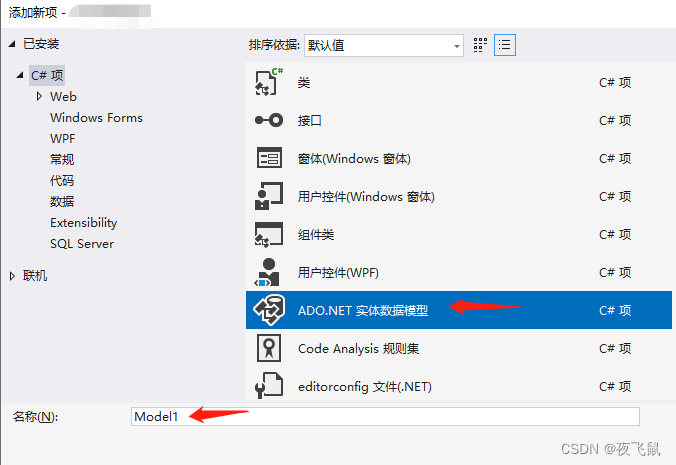
}4.Databasefirst 或 Model First 配置文件中的连接字符串
添加ADO.NET 实体数据模型,如下图所示:
设计器会将 EF 连接字符串添加到 app.config 或 web.config 文件。
<connectionStrings>
<add name="TestDBEntities" connectionString="metadata=res://*/Model1.csdl|res://*/Model1.ssdl|res://*/Model1.msl;provider=System.Data.SqlClient;provider connection string="data source=.;initial catalog=TestDB;integrated security=True;MultipleActiveResultSets=True;App=EntityFramework"" providerName="System.Data.EntityClient" />
</connectionStrings>


 2909
2909

 被折叠的 条评论
为什么被折叠?
被折叠的 条评论
为什么被折叠?
 到【灌水乐园】发言


