


文章目录
概述
通过阅读博文:APP 访问硬件的 4 种方式,可以知道这 4 种方法并不仅仅用于 GPIO 按键,在所有的APP 调用驱动程序过程中,都是使用这些方法。
所以:
-
APP 开发的基本技能:阻塞 、非阻塞、休眠、poll、异步通知
-
相应的驱动的基本技能:中断、休眠、唤醒、poll 等机制【这些基本技能是驱动开发的基础,其他大型驱动复杂的地方是它的框架及设计思想】
APP 读取按键的 4 种方法
四种方法:
- ① 查询方式
- ② 休眠-唤醒方式
- ③ poll 方式
- ④ 异步通知方式
第 2、3、4 种方法,都涉及中断服务程序。中断时,它会做某些事情:唤醒 APP、向 APP 发信号。所以,在按键驱动程序中,中断是核心。实际上,中断无论是在单片机还是在 Linux 中都很重要。在 Linux 中,中断的知识还涉及进程、线程等(中断上下文,保存资源等)
查询方式
驱动程序中构造、注册一个 file_operations 结构体,里面提供有对应的open,read 函数。APP 调用 open 时,导致驱动中对应的 open 函数被调用,在里面配置 GPIO 为输入引脚。APP 调用 read 时,导致驱动中对应的 read 函数被调用,它读取寄存器,把引脚状态直接返回给 APP。
休眠-唤醒方式
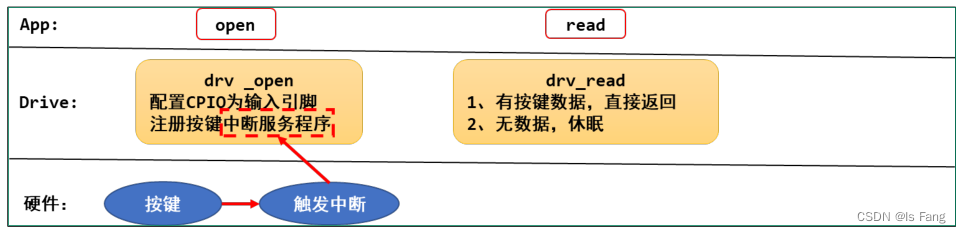
驱动程序中构造、注册一个 file_operations 结构体,里面提供有对应的open,read 函数。APP 调用 open 时,导致驱动中对应的 open 函数被调用,在里面配置 GPIO 为输入引脚;并且注册 GPIO 的中断处理函数。
APP 调用 read 时,导致驱动中对应的 read 函数被调用,如果有按键数据则直接返回给 APP;否则 APP 在内核态休眠。
当用户按下按键时,GPIO 中断被触发,导致驱动程序之前注册的中断服务程序被执行。它会记录按键数据,并唤醒休眠中的 APP。APP 被唤醒后继续在内核态运行,即继续执行驱动代码,把按键数据返回给 APP(的用户空间)。
poll 方式
poll 方式就相当于定个闹钟
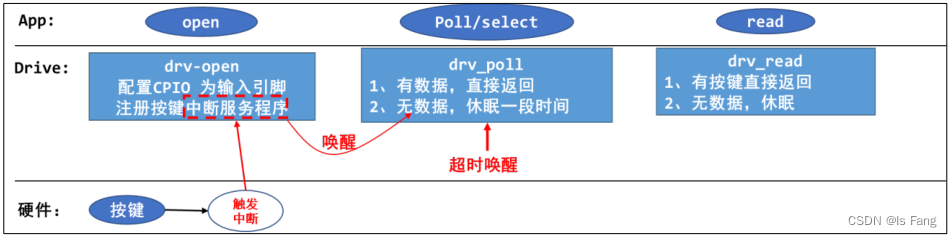
驱动程序中构造、注册一个 file_operations 结构体,里面提供有对应的open,read,poll 函数。APP 调用 open 时,导致驱动中对应的 open 函数被调用,在里面配置 GPIO为输入引脚;并且注册 GPIO 的中断处理函数。
APP 调用 poll 或 select 函数,意图是“查询”是否有数据,这 2 个函数都可以指定一个超时时间,即在这段时间内没有数据的话就返回错误,这会导致驱动中对应的 poll 函数被调用。如果有按键数据则直接返回给 APP;否则APP 在内核态休眠一段时间。
当用户按下按键时,GPIO 中断被触发,导致驱动程序之前注册的中断服务程序被执行。它会记录按键数据,并唤醒休眠中的 APP。如果用户没按下按键,但是超时时间到了,内核也会唤醒 APP。
所以 APP 被唤醒有 2 种原因:用户操作了按键,超时。被唤醒的 APP 在内核态继续运行,即继续执行驱动代码,把“状态”返回给 APP(的用户空间)。APP 得到 poll/select 函数的返回结果后,如果确认是有数据的,则再调用 read 函数,这会导致驱动中的 read 函数被调用,这时驱动程序中含有数据,会直接返回数据。
休眠-唤醒和poll方式的区别在于唤醒的方式,以及唤醒后App首先收到的是立即调用read指令还是根据 poll/select 函数的返回结果决定是否调用read指令
异步通知方式
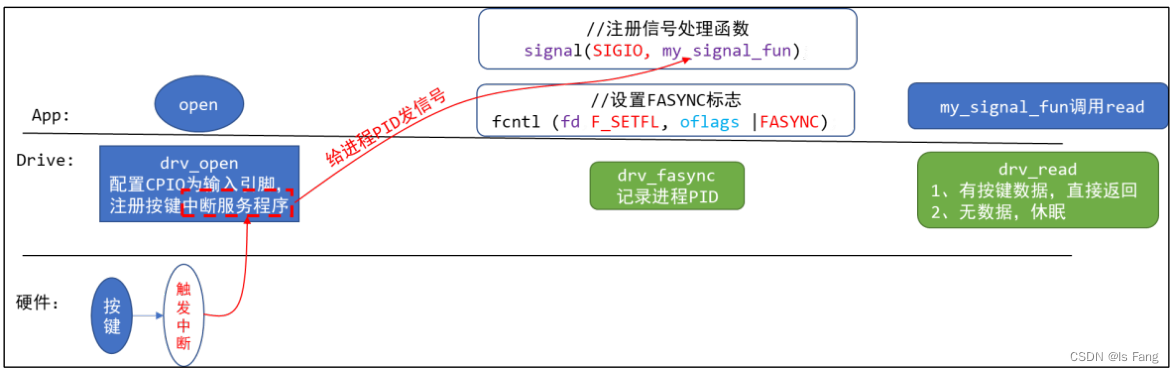
异步通知的实现原理是:内核给 APP 发信号。信号有很多种,这里发的是SIGIO。
驱动程序中构造、注册一个 file_operations 结构体,里面提供有对应的open,read,fasync 函数。APP 调用 open 时,导致驱动中对应的 open 函数被调用,在里面配置 GPIO为输入引脚;并且注册 GPIO 的中断处理函数。
APP 给信号 SIGIO 注册自己的处理函数:my_signal_fun。
APP 调用 fcntl 函数,把驱动程序的 flag 改为 FASYNC,这会导致驱动程序的 drv_fasync 函数被调用,它只是简单记录进程 PID。
当用户按下按键时,GPIO 中断被触发,导致驱动程序之前注册的中断服务程序被执行。它会记录按键数据,然后给进程 PID 发送 SIGIO 信号(利用kill_fasync函数)。 APP 收到信号后会被打断,先执行注册的信号处理函数my_signal_fun:在信号处理函数中可以去调用 read 函数读取按键值。信号处理函数返回后,APP 会继续执行原先被打断的代码。
查询方式的按键驱动程序(框架)
按键驱动编写思路
GPIO 按键的原理图一般有如下 2 种:
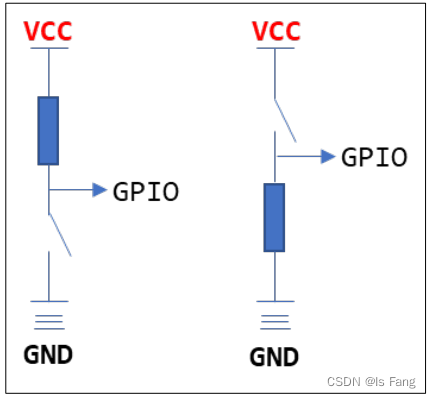
- 按键没被按下时,上图中左边的 GPIO 电平为高,右边的 GPIO 电平为低。
- 按键被按下后,上图中左边的 GPIO 电平为低,右边的 GPIO 电平为高。
按键驱动框架:
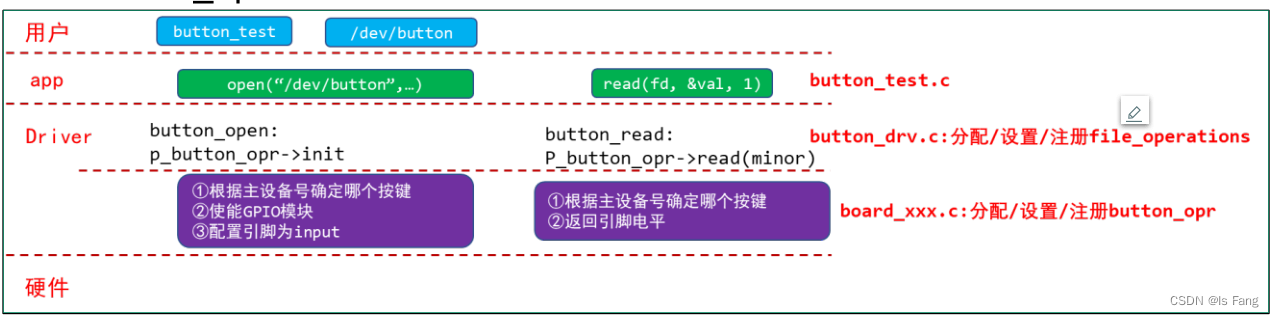
采用分层的思想编写按键驱动:写出一个容易扩展到各种芯片、各种板子的按键驱动程序,所以驱动程序分为上下两层。参考LED驱动:STM32MP157驱动开发——LED驱动(原始架构优化:分层/分离)
-
button_drv.c :分配/设置/注册 file_operations 结构体
起承上启下的作用,向上提供 button_open,button_read 供 APP 调用。而这 2 个函数又会调用底层硬件提供的 p_button_opr 中的 init、read函数操作硬件。 -
board_xxx.c 分配/设置/注册 button_operations 结构体
里面定义单板 xxx 的按键操作函数。这样的结构易于扩展,对于不同的单板,只需要替换 board_xxx.c 提供自己的 button_operations 结构体即可。
board_xxx.c
注意 :凡是有分配、设置、注册结构体的源文件,都有入口函数的定义,出口函数的定义,入口函数注册该结构体,出口函数销毁该结构体
#include <linux/module.h>
#include <linux/errno.h>
#include <linux/kernel.h>
#include <linux/major.h>
#include <linux/sched.h>
#include <linux/slab.h>
#include <linux/fcntl.h>
#include <linux/fs.h>
#include <linux/signal.h>
#include <linux/mutex.h>
#include <linux/mm.h>
#include <linux/timer.h>
#include <linux/wait.h>
#include <linux/skbuff.h>
#include <linux/proc_fs.h>
#include <linux/poll.h>
#include <linux/capi.h>
#include <linux/kernelcapi.h>
#include <linux/init.h>
#include <linux/device.h>
#include <linux/moduleparam.h>

#include "button_drv.h"


static void board_xxx_button_init_gpio (int which)
{
    printk("%s %s %d, init gpio for button %d\n", __FILE__, __FUNCTION__, __LINE__, which);
}

static int board_xxx_button_read_gpio (int which)
{
    printk("%s %s %d, read gpio for button %d\n", __FILE__, __FUNCTION__, __LINE__, which);
    //固定写1返回
    return 1;
}

static struct button_operations my_buttons_ops ={
    .count = 2,
    .init  = board_xxx_button_init_gpio,
    .read  = board_xxx_button_read_gpio,
};

int board_xxx_button_init(void)
{
    register_button_operations(&my_buttons_ops);
    return 0;
}

void board_xxx_button_exit(void)
{
    unregister_button_operations();
}

module_init(board_xxx_button_init);
module_exit(board_xxx_button_exit);

MODULE_LICENSE("GPL");
button_drv.c
#include <linux/module.h>
#include <linux/errno.h>
#include <linux/kernel.h>
#include <linux/major.h>
#include <linux/sched.h>
#include <linux/slab.h>
#include <linux/fcntl.h>
#include <linux/fs.h>
#include <linux/signal.h>
#include <linux/mutex.h>
#include <linux/mm.h>
#include <linux/timer.h>
#include <linux/wait.h>
#include <linux/skbuff.h>
#include <linux/proc_fs.h>
#include <linux/poll.h>
#include <linux/capi.h>
#include <linux/kernelcapi.h>
#include <linux/init.h>
#include <linux/device.h>
#include <linux/moduleparam.h>

#include "button_drv.h"


static int major = 0;

static struct button_operations *p_button_opr;
static struct class *button_class;

static int button_open (struct inode *inode, struct file *file)
{
    int minor = iminor(inode);
    p_button_opr->init(minor);//根据次设备号去区分不同的按键设备
    return 0;
}

static ssize_t button_read (struct file *file, char __user *buf, size_t size, loff_t *off)
{
    unsigned int minor = iminor(file_inode(file));
    char level;
    int err;

    level = p_button_opr->read(minor);//根据次设备号去区分不同的按键设备
    err = copy_to_user(buf, &level, 1);
    return 1;
}


static struct file_operations button_fops = {
    .open = button_open,
    .read = button_read,
};

void register_button_operations(struct button_operations *opr)
{
    int i;

    p_button_opr = opr;
    for (i = 0; i < opr->count; i++)
    {
        device_create(button_class, NULL, MKDEV(major, i), NULL, "my_button%d", i);
    }
}

void unregister_button_operations(void)
{
    int i;

    for (i = 0; i < p_button_opr->count; i++)
    {
        device_destroy(button_class, MKDEV(major, i));
    }
}

//在其他文件中调用,需要将函数暴露出去
EXPORT_SYMBOL(register_button_operations);
EXPORT_SYMBOL(unregister_button_operations);


int button_init(void)
{
    major = register_chrdev(0, "my_button", &button_fops);

    button_class = class_create(THIS_MODULE, "my_button");
    //注册
    if (IS_ERR(button_class))
        return -1;

    return 0;
}

void button_exit(void)
{
    class_destroy(button_class);
    unregister_chrdev(major, "my_button");
}

module_init(button_init);
module_exit(button_exit);
MODULE_LICENSE("GPL");
button_drv.h
#ifndef _BUTTON_DRV_H
#define _BUTTON_DRV_H

struct button_operations {
    int count;
    void (*init) (int which);
    int (*read) (int which);
};

void register_button_operations(struct button_operations *opr);
void unregister_button_operations(void);

#endif
button_test.c
#include <sys/types.h>
#include <sys/stat.h>
#include <fcntl.h>
#include <unistd.h>
#include <stdio.h>
#include <string.h>

/*
 * ./button_test /dev/my_button0
 *
 */
int main(int argc, char **argv)
{
	int fd;
	char val;

	/* 1. 判断参数 */
	if (argc != 2)
	{
		printf("Usage: %s <dev>\n", argv[0]);
		return -1;
	}

	/* 2. 打开文件 */
	fd = open(argv[1], O_RDWR);
	if (fd == -1)
	{
		printf("can not open file %s\n", argv[1]);
		return -1;
	}

	/* 3. 读文件 */
	read(fd, &val, 1);
	printf("get button : %d\n", val);

	close(fd);

	return 0;
}
Makefile
# 1. 使用不同的开发板内核时, 一定要修改KERN_DIR
# 2. KERN_DIR中的内核要事先配置、编译, 为了能编译内核, 要先设置下列环境变量:
# 2.1 ARCH,          比如: export ARCH=arm64
# 2.2 CROSS_COMPILE, 比如: export CROSS_COMPILE=aarch64-linux-gnu-
# 2.3 PATH,          比如: export PATH=$PATH:/home/book/100ask_roc-rk3399-pc/ToolChain-6.3.1/gcc-linaro-6.3.1-2017.05-x86_64_aarch64-linux-gnu/bin
# 注意: 不同的开发板不同的编译器上述3个环境变量不一定相同,
#       请参考各开发板的高级用户使用手册

KERN_DIR = /home/book/100ask_stm32mp157_pro-sdk/Linux-5.4

all:
	make -C $(KERN_DIR) M=`pwd` modules
	$(CROSS_COMPILE)gcc -o button_test button_test.c

clean:
	make -C $(KERN_DIR) M=`pwd` modules clean
	rm -rf modules.order
	rm -f button_test

# 参考内核源码drivers/char/ipmi/Makefile
# 要想把a.c, b.c编译成ab.ko, 可以这样指定:
# ab-y := a.o b.o
# obj-m += ab.o


obj-m	+= button_drv.o
obj-m	+= board_xxx.o
编译测试
在Makefile文件目录下执行make指令,此时,目录下有编译好的内核模块my_led.ko和可执行程序ledtest ,移植到开发板上
insmod button_drv.ko // 装载驱动程序
insmod board_xxx.ko
ls /dev/my_button* -l // 查看设备节点
echo none > /sys/class/leds/heartbeat/trigger // 关闭心跳灯
./button_test /dev/my_button0 // 读按键
查询方式的按键驱动程序(stm32mp157)
阅读博客:STM32MP157驱动开发——LED驱动(原始架构),可知GPIO 引脚操作方法,以及STM32MP157的GPIO操作方法
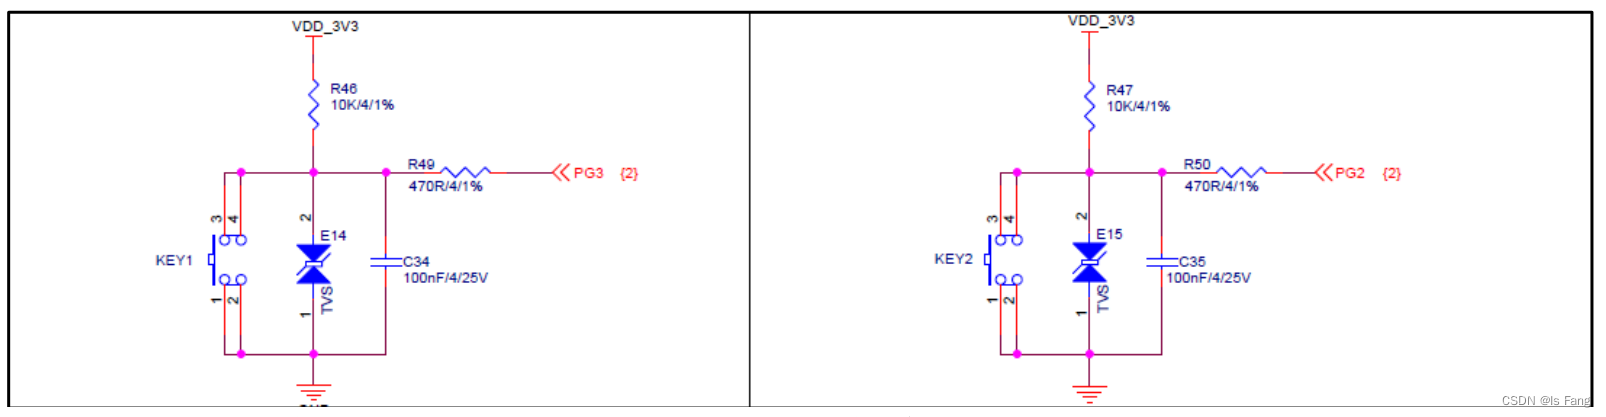
在 STM32MP157 开发板上有 2 个按键,原理图如下,由原理图可知平时按键电平为高电平,按下按键后电平为低电平。按键引脚为 GPIOG_IO03、GPIOG_IO02。
再看芯片手册确定寄存器及操作方法,主要查看以下四个寄存器
① 使能电源/时钟控制器;
② 配置引脚模式;
③ 配置引脚方向——输入/输出;
④ 输出电平/读取电平;
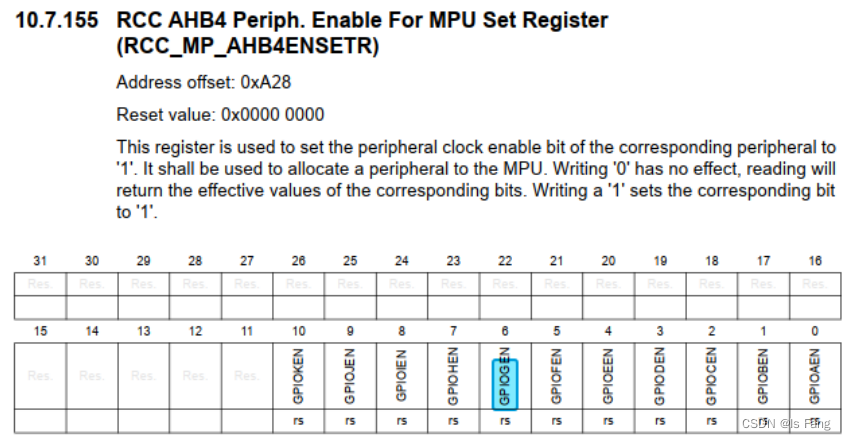
使能 GPIOG
- 下图为针对 APU 的 GPIOA 至 K 的时钟使能寄存器,低 11 位有效。为了使用 GPIOG,我们需要将对应的 b[6]位设置为 1
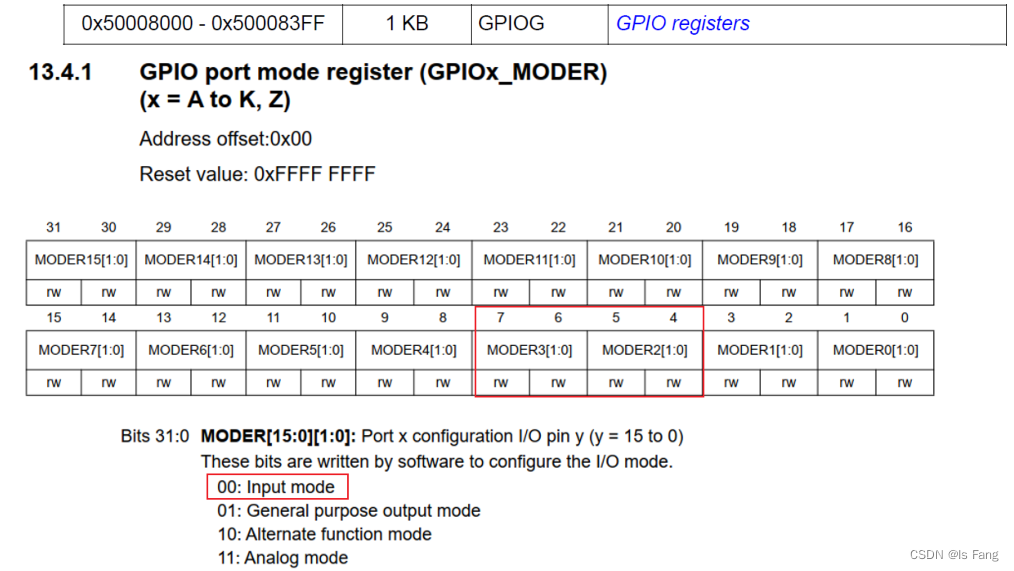
设置 GPIOG_IO03、GPIOG_IO02 为 GPIO 输入模式 - 设置 b[7:6]为 0 就可以配置 GPIOG_IO03 为输入模式,配置 b[5:4]为 0 就可以配置 GPIOG_IO02 为输入模式。
读取 GPIOG_IO02 GPIOG_IO03 引脚电平
- 读取 IDR 寄存器获取引脚状态寄存器,得到引脚电平
- 寄存器地址为:


board_stm32mp157.c
由于GPIO涉及的寄存器挺多,一个一个去执行 ioremap 效率太低。可以先定义结构体,然后对结构体指针进行 ioremap。
#include <linux/module.h>

#include <linux/fs.h>
#include <linux/io.h>
#include <linux/errno.h>
#include <linux/miscdevice.h>
#include <linux/kernel.h>
#include <linux/major.h>
#include <linux/mutex.h>
#include <linux/proc_fs.h>
#include <linux/seq_file.h>
#include <linux/stat.h>
#include <linux/init.h>
#include <linux/device.h>
#include <linux/tty.h>
#include <linux/kmod.h>
#include <linux/gfp.h>
#include <asm/io.h>

#include "button_drv.h"

//定义一个GPIO结构体,目前只需要用到MODER和IDR
struct stm32mp157_gpio {
  volatile unsigned int MODER;    /*!< GPIO port mode register,               Address offset: 0x00      */
  volatile unsigned int OTYPER;   /*!< GPIO port output type register,        Address offset: 0x04      */
  volatile unsigned int OSPEEDR;  /*!< GPIO port output speed register,       Address offset: 0x08      */
  volatile unsigned int PUPDR;    /*!< GPIO port pull-up/pull-down register,  Address offset: 0x0C      */
  volatile unsigned int IDR;      /*!< GPIO port input data register,         Address offset: 0x10      */
  volatile unsigned int ODR;      /*!< GPIO port output data register,        Address offset: 0x14      */
  volatile unsigned int BSRR;     /*!< GPIO port bit set/reset,               Address offset: 0x18      */
  volatile unsigned int LCKR;     /*!< GPIO port configuration lock register, Address offset: 0x1C      */
  volatile unsigned int AFR[2];   /*!< GPIO alternate function registers,     Address offset: 0x20-0x24 */
} ;


/* RCC_PLL4CR */
static volatile unsigned int *RCC_PLL4CR;

/* RCC_MP_AHB4ENSETR */
static volatile unsigned int *RCC_MP_AHB4ENSETR;

static struct stm32mp157_gpio *gpiog; /* KEY1: PG3, KEY2: PG2 */

static void board_stm32mp157_button_init (int which) /* 初始化button, which-哪个button */
{
    if (!RCC_PLL4CR)
    {
        RCC_PLL4CR = ioremap(0x50000000 + 0x894, 4);
        RCC_MP_AHB4ENSETR = ioremap(0x50000000 + 0xA28, 4);

        gpiog = ioremap(0x50008000, sizeof(struct stm32mp157_gpio));//利用结构体指针,映射所有的寄存器
    }

    if (which == 0)
    {
        /* 1. enable PLL4
         * CG15, b[31:30] = 0b11
         */
		*RCC_PLL4CR |= (1<<0);
		while((*RCC_PLL4CR & (1<<1)) == 0);

		/* 2. enable GPIOG */
		*RCC_MP_AHB4ENSETR |= (1<<6);

		/* 3. 设置PG3为GPIO模式, 输入模式
		 */
		gpiog->MODER &= ~(3<<6);

    }
    else if(which == 1)
    {
        /* 1. enable PLL4
         * CG15, b[31:30] = 0b11
         */
		*RCC_PLL4CR |= (1<<0);
		while((*RCC_PLL4CR & (1<<1)) == 0);

		/* 2. enable GPIOG */
		*RCC_MP_AHB4ENSETR |= (1<<6);

		/* 3. 设置PG2为GPIO模式, 输入模式
		 */
		gpiog->MODER &= ~(3<<4);
    }

}

static int board_stm32mp157_button_read (int which) /* 读button, which-哪个 */
{
    //printk("%s %s line %d, button %d, 0x%x\n", __FILE__, __FUNCTION__, __LINE__, which, *GPIO1_DATAIN);
    if (which == 0)
        return (gpiog->IDR & (1<<3)) ? 1 : 0;
    else
        return (gpiog->IDR & (1<<2)) ? 1 : 0;
}

static struct button_operations my_buttons_ops = {
    .count = 2,
    .init = board_stm32mp157_button_init,
    .read = board_stm32mp157_button_read,
};

int board_stm32mp157_button_drv_init(void)
{
    register_button_operations(&my_buttons_ops);
    return 0;
}

void board_stm32mp157_button_drv_exit(void)
{
    unregister_button_operations();
}

module_init(board_stm32mp157_button_drv_init);
module_exit(board_stm32mp157_button_drv_exit);

MODULE_LICENSE("GPL");
Makefile
# 1. 使用不同的开发板内核时, 一定要修改KERN_DIR
# 2. KERN_DIR中的内核要事先配置、编译, 为了能编译内核, 要先设置下列环境变量:
# 2.1 ARCH,          比如: export ARCH=arm64
# 2.2 CROSS_COMPILE, 比如: export CROSS_COMPILE=aarch64-linux-gnu-
# 2.3 PATH,          比如: export PATH=$PATH:/home/book/100ask_roc-rk3399-pc/ToolChain-6.3.1/gcc-linaro-6.3.1-2017.05-x86_64_aarch64-linux-gnu/bin
# 注意: 不同的开发板不同的编译器上述3个环境变量不一定相同,
#       请参考各开发板的高级用户使用手册

KERN_DIR = /home/book/100ask_stm32mp157_pro-sdk/Linux-5.4

all:
	make -C $(KERN_DIR) M=`pwd` modules
	$(CROSS_COMPILE)gcc -o button_test button_test.c

clean:
	make -C $(KERN_DIR) M=`pwd` modules clean
	rm -rf modules.order
	rm -f button_test

# 参考内核源码drivers/char/ipmi/Makefile
# 要想把a.c, b.c编译成ab.ko, 可以这样指定:
# ab-y := a.o b.o
# obj-m += ab.o


obj-m	+= button_drv.o
obj-m	+= board_stm32mp157.o
编译测试
其他文件利用上面的框架,只需要替换上述两个文件
insmod button_drv.ko
insmod board_stm32mp157-pro.ko
./button_test /dev/my_button0
./button_test /dev/my_button1


 952
952


 被折叠的 条评论
为什么被折叠?
被折叠的 条评论
为什么被折叠?
 到【灌水乐园】发言


