


kvm虚拟化
虚拟化介绍
虚拟化:在一台计算机上虚拟出多个逻辑的计算机,而且每个逻辑计算机
它可以是不同操作系统
虚拟化技术:可以扩大硬件容量,单个cpu模拟出多个cpu并行,
允许一个平台上同时运行多个操作系统,应用程序都可以在相互独立
的空间内运行,而且互不影响。
为什么企业使用虚拟化技术
1、节约成本
2、提高效率,物理机我们一般称为宿主机(Host),宿主机上面的虚拟机称为客户机(Guest)。
那么 Host 是如何将自己的硬件资源虚拟化,并提供给 Guest 使用的呢?
这个主要是通过一个叫做 Hypervisor 的程序实现的。
Hypervisor:一种运行在物理服务器硬件与操作系统之间的中间软件层
可允许多个操作系统和应用来共享硬件资源
根据 Hypervisor 的实现方式和所处的位置,虚拟化又分为两种:
完全虚拟化:直接在物理机上部署虚拟化,且不需要修改操作系统内核
半虚拟化:需要修改操作系统内核,使其支持虚拟化驱动来实现虚拟化技术
1、完全虚拟化
Hypervisor 直接安装在物理机上,多个虚拟机在 Hypervisor 上运行。Hypervisor 实现方式一般是一个特殊定制的 Linux 系统。Xen 和 VMWare 的 ESXi 都属于这个类型

2、半虚拟化
理论上讲:
完全虚拟化一般对硬件虚拟化功能进行了特别优化,性能上比半虚拟化要高;
半虚拟化因为基于普通的操作系统,会比较灵活,比如支持虚拟机嵌套。嵌套意味着可以在KVM虚拟机中再运行KVM。
kvm介绍
kVM 全称是 Kernel-Based Virtual Machine。也就是说 KVM 是基于 Linux 内核实现的。
KVM有一个内核模块叫 kvm.ko,只用于管理虚拟 CPU 和内存。
那 IO 的虚拟化,比如存储和网络设备则是由 Linux 内核与Qemu来实现。
Qemu 是纯软件实现的虚拟化模拟器,几乎可以模拟任何硬件设备,我们最熟悉的就是能够模拟一台能够独立运行操作系统的虚拟机,虚拟机认为自己和硬件打交道,但其实是和 Qemu 模拟出来的硬件打交道,Qemu 将这些指令转译给真正的硬件。
正因为 Qemu 是纯软件实现的,所有的指令都要经 Qemu 过一手,性能非常低,所以,在生产环境中,大多数的做法都是配合 KVM 来完成虚拟化工作,因为 KVM 是硬件辅助的虚拟化技术,主要负责 比较繁琐的 CPU 和内存虚拟化,而 Qemu 则负责 I/O 虚拟化,两者合作各自发挥自身的优势,相得益彰.
作为一个 Hypervisor,KVM 本身只关注虚拟机调度和内存管理这两个方面。IO 外设的任务交给 Linux 内核和 Qemu。
Libvirt 就是 KVM 的管理工具。管理虚拟机和虚拟化功能的软件
其实,Libvirt 除了能管理 KVM 这种 Hypervisor,还能管理 Xen,VirtualBox 等。
Libvirt 包含 3 个东西:后台 daemon 程序 libvirtd、API 库和命令行工具 virsh
1、libvirtd是服务程序,接收和处理 API 请求;
2、API 库使得其他人可以开发基于 Libvirt 的高级工具,比如 virt-manager,这是个图形化的 KVM 管理工具;
3、virsh 是我们经常要用的 KVM 命令行工具
KVM部署(基于CentOS8)
环境说明:
系统:CentOS8
IP:192.168.171.13
CPU虚拟化功能
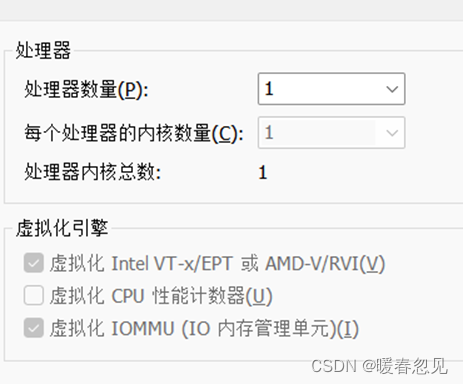
部署前请确保你的CPU虚拟化功能已开启,分为两种情况:
(1)虚拟机要关机设置CPU虚拟化
(2)物理机要在BIOS里开启CPU虚拟化
2、虚拟机设置(内存:8G 磁盘:200G 虚拟化功能:开启)
//设置虚拟机内存,添加一块200G的硬盘
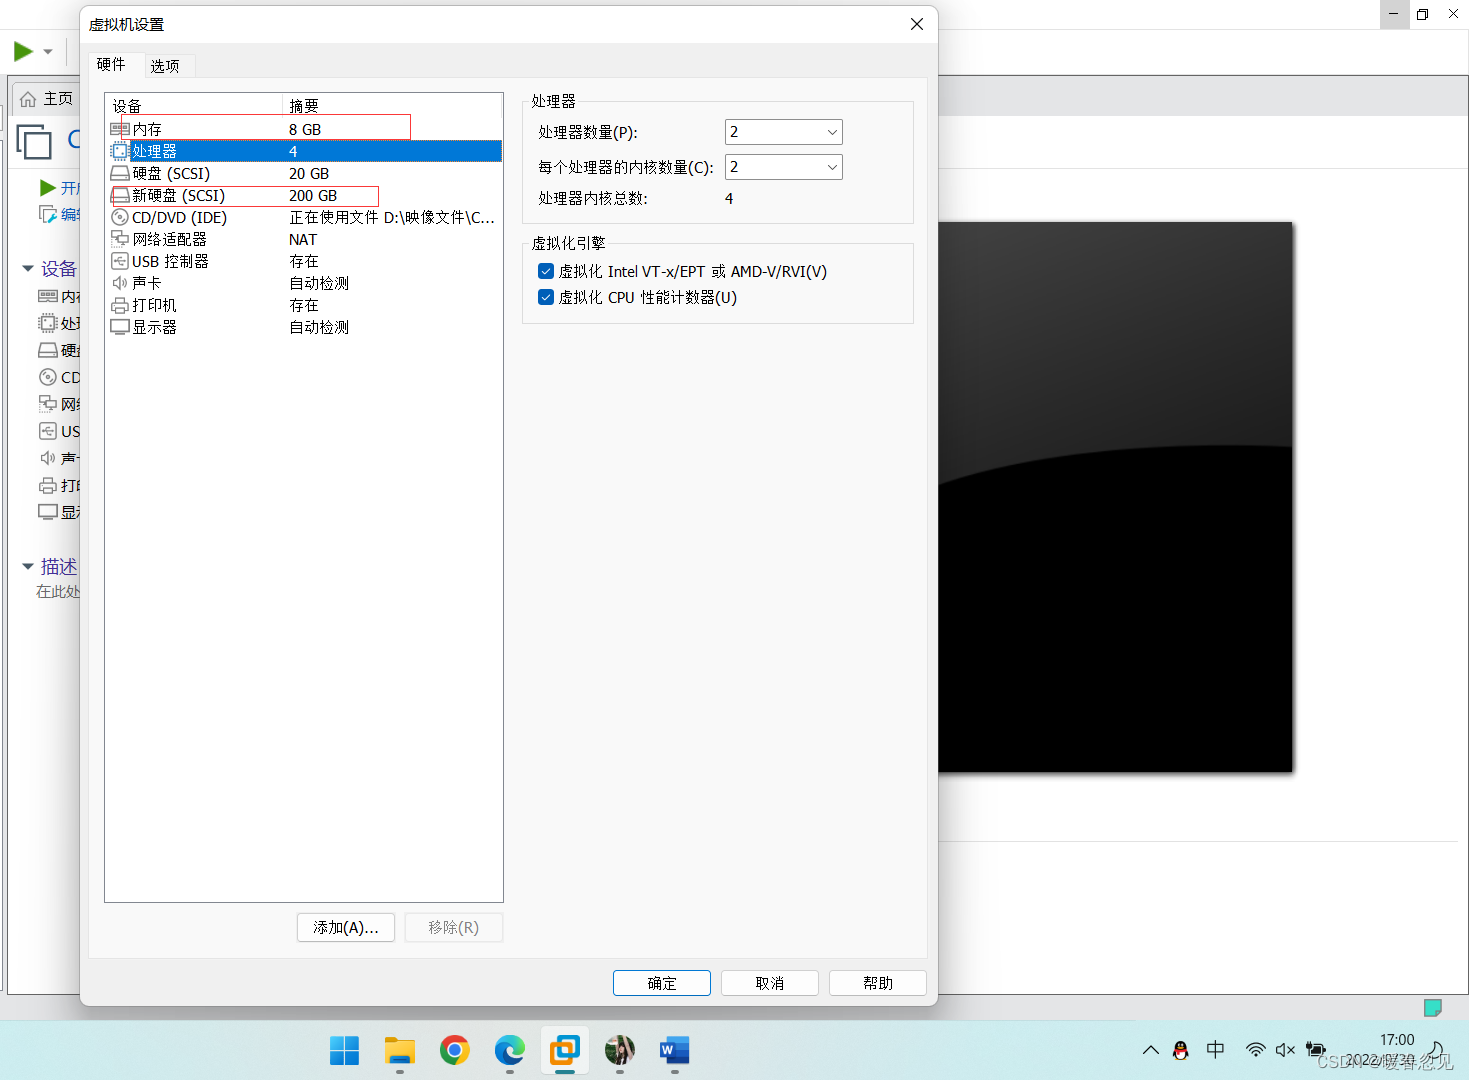
//新建分区,将硬盘所有大小都给这个分区
//看一下刚刚添加的硬盘
[root@localhost ~]# lsblk
NAME        MAJ:MIN RM  SIZE RO TYPE MOUNTPOINT
sda           8:0    0   20G  0 disk
|-sda1        8:1    0    1G  0 part /boot
`-sda2        8:2    0   19G  0 part
  |-cs-root 253:0    0   17G  0 lvm  /
  `-cs-swap 253:1    0    2G  0 lvm  [SWAP]
sdb           8:16   0  200G  0 disk
sr0          11:0    1 10.3G  0 rom
[root@localhost ~]#
//新建分区,将硬盘所有大小都给这个分区
[root@localhost ~]# fdisk /dev/sdb

Welcome to fdisk (util-linux 2.32.1).
Changes will remain in memory only, until you decide to write them.
Be careful before using the write command.

Device does not contain a recognized partition table.
Created a new DOS disklabel with disk identifier 0x742fcb67.

Command (m for help): n
Partition type
   p   primary (0 primary, 0 extended, 4 free)
   e   extended (container for logical partitions)
Select (default p): p
Partition number (1-4, default 1):
First sector (2048-419430399, default 2048):
Last sector, +sectors or +size{K,M,G,T,P} (2048-419430399, default 419430399):

Created a new partition 1 of type 'Linux' and of size 200 GiB.

Command (m for help): p
Disk /dev/sdb: 200 GiB, 214748364800 bytes, 419430400 sectors
Units: sectors of 1 * 512 = 512 bytes
Sector size (logical/physical): 512 bytes / 512 bytes
I/O size (minimum/optimal): 512 bytes / 512 bytes
Disklabel type: dos
Disk identifier: 0x742fcb67

Device     Boot Start       End   Sectors  Size Id Type
/dev/sdb1        2048 419430399 419428352  200G 83 Linux

Command (m for help):
[root@localhost ~]# lsblk
NAME        MAJ:MIN RM  SIZE RO TYPE MOUNTPOINT
sda           8:0    0   20G  0 disk
|-sda1        8:1    0    1G  0 part /boot
`-sda2        8:2    0   19G  0 part
  |-cs-root 253:0    0   17G  0 lvm  /
  `-cs-swap 253:1    0    2G  0 lvm  [SWAP]
sdb           8:16   0  200G  0 disk
`-sdb1        8:17   0  200G  0 part
sr0          11:0    1 10.3G  0 rom
//给刚分的区用xfs格式化
[root@localhost ~]# mkfs.xfs /dev/sdb1
[root@localhost ~]# blkid /dev/sdb1
/dev/sdb1: UUID="dde40f97-3d67-4cbc-b04c-497127134c72" BLOCK_SIZE="512" TYPE="xfs" PARTUUID="742fcb67-01"
//然后在永久挂载上去
[root@localhost ~]# mkdir /kvmdata
[root@localhost ~]# vim /etc/fstab
UUID="dde40f97-3d67-4cbc-b04c-497127134c72" /kvmdata xfs defaults 0 0
[root@localhost ~]# mount -a
[root@localhost ~]# df -hT
Filesystem          Type      Size  Used Avail Use% Mounted on
devtmpfs            devtmpfs  3.8G     0  3.8G   0% /dev
tmpfs               tmpfs     3.8G     0  3.8G   0% /dev/shm
tmpfs               tmpfs     3.8G  9.0M  3.8G   1% /run
tmpfs               tmpfs     3.8G     0  3.8G   0% /sys/fs/cgroup
/dev/mapper/cs-root xfs        17G   13G  4.9G  72% /
/dev/sda1           xfs      1014M  209M  806M  21% /boot
tmpfs               tmpfs     774M     0  774M   0% /run/user/0
/dev/sdb1           xfs       200G  1.5G  199G   1% /kvmdata
[root@localhost ~]#
//KVM安装
//关闭防火墙和selinux
[root@cy ~]# systemctl stop firewalld
[root@cy ~]# systemctl disable firewalld
[root@cy ~]# cat /etc/sysconfig/selinux
SELINUX=disabled
[root@cy ~]# reboot
//替换源,安装需要的依赖包和安装包
[root@localhost ~]# curl -o /etc/yum.repos.d/CentOS-Base.repo https://mirrors.aliyun.com/repo/Centos-vault-8.5.2111.repo
[root@localhost ~]# sed -i -e '/mirrors.cloud.aliyuncs.com/d' -e '/mirrors.aliyuncs.com/d' /etc/yum.repos.d/CentOS-Base.repo
[root@localhost ~]# yum -y install epel-release
[root@localhost ~]# yum -y install vim wget net-tools unzip zip gcc gcc-c++ qemu-kvm  qemu-img virt-manager libvirt libvirt-client virt-install virt-viewer  libguestfs-tools
[root@localhost ~]# wget http://mirror.centos.org/centos/7/os/x86_64/Packages/qemu-kvm-tools-1.5.3-175.el7.x86_64.rpm
[root@localhost ~]# wget http://mirror.centos.org/centos/7/os/x86_64/Packages/libvirt-python-4.5.0-1.el7.x86_64.rpm
[root@localhost ~]# wget http://mirror.centos.org/centos/7/os/x86_64/Packages/bridge-utils-1.5-9.el7.x86_64.rpm
[root@localhost ~]# rpm -ivh --nodeps libvirt-python-4.5.0-1.el7.x86_64.rpm
[root@localhost ~]# rpm -ivh --nodeps qemu-kvm-tools-1.5.3-175.el7.x86_64.rpm
...
//查看电脑是否支持kvm
[root@localhost ~]#  egrep -o 'vmx|svm' /proc/cpuinfo
svm
//安装kvm
[root@localhost ~]# yum -y install qemu-kvm \
  qemu-kvm \
  qemu-img \
  virt-manager \
  libvirt \
  libvirt-python3 \
  libvirt-client \
  virt-install \
  virt-viewer \
  bridge-utils \
  libguestfs-tools
//配置网络,因为虚拟机中的网络,我们一般是都和公司服务器处在同一网段的,所以我们需要把kvm的网卡配置成桥接模式
[root@localhost network-scripts]# cp ifcfg-ens33 ifcfg-br0
[root@localhost network-scripts]# cat ifcfg-br0
TYPE=Bridge
BOOTPROTO=none
NAME=br0
DEVICE=br0
ONBOOT=yes
IPADDR=192.168.171.13
PREFIX=24
GATEWAY=192.168.171.2
DNS1=8.8.8.8
[root@localhost network-scripts]#
[root@localhost network-scripts]# cat ifcfg-ens33
TYPE=Ethernet
BOOTPROTO=none
NAME=ens33
DEVICE=ens33
ONBOOT=yes
BRIDGE=br0
//重启网卡服务
[root@localhost network-scripts]# systemctl restart NetworkManager
[root@localhost network-scripts]# nmcli con up ens33
[root@localhost ~]# ip a
1: lo: <LOOPBACK,UP,LOWER_UP> mtu 65536 qdisc noqueue state UNKNOWN group default qlen 1000
    link/loopback 00:00:00:00:00:00 brd 00:00:00:00:00:00
    inet 127.0.0.1/8 scope host lo
       valid_lft forever preferred_lft forever
    inet6 ::1/128 scope host
       valid_lft forever preferred_lft forever
2: ens33: <BROADCAST,MULTICAST,UP,LOWER_UP> mtu 1500 qdisc fq_codel master br0 state UP group default qlen 1000
    link/ether 00:0c:29:84:ee:47 brd ff:ff:ff:ff:ff:ff
3: br0: <BROADCAST,MULTICAST,UP,LOWER_UP> mtu 1500 qdisc noqueue state UP group default qlen 1000
    link/ether 00:0c:29:84:ee:47 brd ff:ff:ff:ff:ff:ff
    inet 192.168.171.13/24 brd 192.168.171.255 scope global noprefixroute br0
       valid_lft forever preferred_lft forever
[root@localhost ~]#
//重启libvirtd服务,并设置下次启动生效
[root@localhost ~]# systemctl enable --now libvirtd
[root@localhost ~]# lsmod | grep kvm
kvm_amd               135168  0
ccp                    98304  1 kvm_amd
kvm                   905216  1 kvm_amd
irqbypass              16384  1 kvm
//验证安装结果
[root@localhost ~]# virsh -c qemu:///system list
setlocale: No such file or directory
 Id   Name   State
--------------------

[root@localhost ~]# virsh --version
setlocale: No such file or directory
8.0.0
[root@localhost ~]# virt-install --version
3.2.0
//将qemu-kvm这个命令做一个软链接到/usr/bin/qemu-kvm
[root@localhost ~]# ln -s /usr/libexec/qemu-kvm /usr/bin/qemu-kvm
[root@localhost ~]# ll /usr/bin/qemu-kvm
lrwxrwxrwx 1 root root 21 Oct  2 02:29 /usr/bin/qemu-kvm -> /usr/libexec/qemu-kvm
[root@localhost ~]#
//查看网桥信息
[root@localhost ~]# brctl show
bridge name     bridge id               STP enabled     interfaces
br0             8000.000c2984ee47       no              ens33
virbr0          8000.52540092bb78       yes
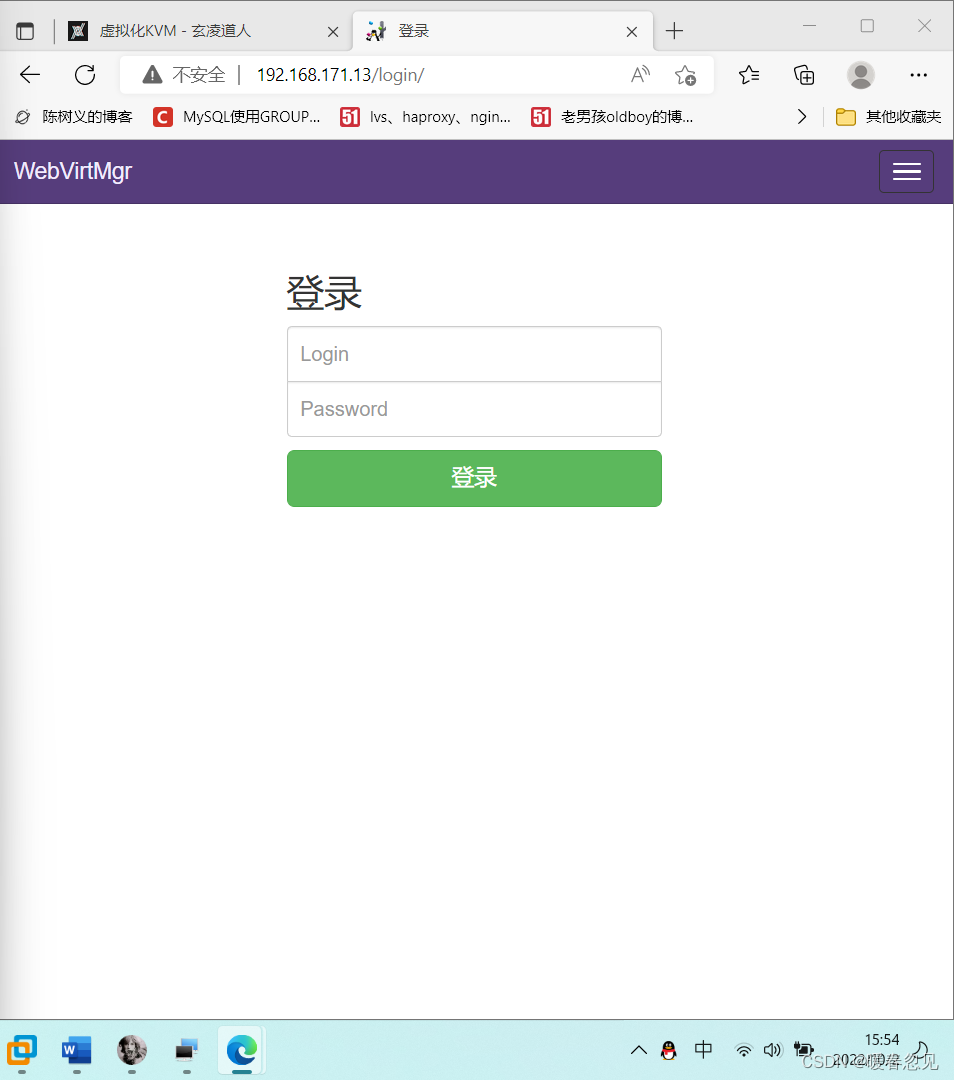
KVM管理界面安装
Kvm的web界面是由webvirtmgr程序提供的
//安装依赖包
[root@localhost ~]# yum -y install git python2-pip supervisor nginx python2-devel
//安装rpm包
[root@localhost ~]# wget http://mirror.centos.org/centos/7/os/x86_64/Packages/libxml2-python-2.9.1-6.el7.5.x86_64.rpm
[root@localhost ~]# wget https://download-ib01.fedoraproject.org/pub/epel/7/x86_64/Packages/p/python-websockify-0.6.0-2.el7.noarch.rpm
[root@localhost ~]# rpm -ivh --nodeps libxml2-python-2.9.1-6.el7.5.x86_64.rpm
[root@localhost ~]# rpm -ivh --nodeps python-websockify-0.6.0-2.el7.noarch.rpm
//升级pip
[root@localhost ~]# pip2 install --upgrade pip
WARNING: Running pip install with root privileges is generally not a good idea. Try `pip2 install --user` instead.
Collecting pip
  Downloading https://files.pythonhosted.org/packages/27/79/8a850fe3496446ff0d584327ae44e7500daf6764ca1a382d2d02789accf7/pip-20.3.4-py2.py3-none-any.whl (1.5MB)
    100% |################################| 1.5MB 27kB/s
Installing collected packages: pip
  Found existing installation: pip 9.0.3
    Uninstalling pip-9.0.3:
      Successfully uninstalled pip-9.0.3
Successfully installed pip-20.3.4
You are using pip version 20.3.4, however version 22.2.2 is available.
You should consider upgrading via the 'pip install --upgrade pip' command.
[root@localhost ~]# pip -V
pip 20.3.4 from /usr/lib/python2.7/site-packages/pip (python 2.7)
//github拉取webvirtmgr
[root@localhost ~]# cd /usr/local/src/
[root@localhost src]# ls
[root@localhost src]#  git clone http://github.com/retspen/webvirtmgr.git
[root@localhost src]# ls
webvirtmgr
[root@localhost src]# cd webvirtmgr/
[root@localhost webvirtmgr]# ls
MANIFEST.in  Vagrantfile  console  deploy                hostdetail  instance    locale     networks          secrets    servers   storages   vrtManager
README.rst   conf         create   dev-requirements.txt  images      interfaces  manage.py  requirements.txt  serverlog  setup.py  templates  webvirtmgr
[root@localhost webvirtmgr]#
//安装webvirtmgr
[root@localhost webvirtmgr]# pip install -r requirements.txt
//检查sqlite3是否安装
[root@localhost webvirtmgr]# python3
Python 3.6.8 (default, Jan 19 2022, 23:28:49)
[GCC 8.5.0 20210514 (Red Hat 8.5.0-7)] on linux
Type "help", "copyright", "credits" or "license" for more information.
>>> import sqlite3
>>> exit()
[root@localhost webvirtmgr]#

//初始化账号信息
[root@localhost webvirtmgr]# python2 manage.py syncdb
WARNING:root:No local_settings file found.
Creating tables ...
Creating table auth_permission
Creating table auth_group_permissions
Creating table auth_group
Creating table auth_user_groups
Creating table auth_user_user_permissions
Creating table auth_user
Creating table django_content_type
Creating table django_session
Creating table django_site
Creating table servers_compute
Creating table instance_instance
Creating table create_flavor

You just installed Django's auth system, which means you don't have any superusers defined.
Would you like to create one now? (yes/no): yes
Username (leave blank to use 'root'): root
Email address: wtk@qq.com
Password:
Password (again):
Superuser created successfully.
Installing custom SQL ...
Installing indexes ...
Installed 6 object(s) from 1 fixture(s)

//拷贝web网页到指定目录
[root@localhost webvirtmgr]# mkdir /var/www/
[root@localhost webvirtmgr]# cp -r /usr/local/src/webvirtmgr/ /var/www/
[root@localhost webvirtmgr]# chown -R nginx.nginx /var/www/webvirtmgr/

//配置密钥认证
由于这里webvirtmgr和kvm服务部署在同一台机器,所以这里是本地信任;如果kvm部署在其他机器上的时候,那么就需要把公钥发送到kvm主机中
[root@localhost webvirtmgr]# ssh-keygen
Generating public/private rsa key pair.
Enter file in which to save the key (/root/.ssh/id_rsa):      //直接回车,下面的也是。
Created directory '/root/.ssh'.
Enter passphrase (empty for no passphrase):
Enter same passphrase again:
Your identification has been saved in /root/.ssh/id_rsa.
Your public key has been saved in /root/.ssh/id_rsa.pub.
The key fingerprint is:
SHA256:BWvbZLJHAC551APEoVKp++4e4+i+vjnoBS04LwZEmAM root@localhost.localdomain
The key's randomart image is:
+---[RSA 3072]----+
|Eo  .+*=o        |
|=  ..=. o+       |
| o..+ o +.=      |
|o o. o . X       |
|+o o    S o      |
|.o+      .       |
|.o.oo            |
|o.o+.o           |
|.=OB=            |
+----[SHA256]-----+

[root@localhost webvirtmgr]# ssh-copy-id -i ~/.ssh/id_rsa.pub root@192.168.171.13
/usr/bin/ssh-copy-id: INFO: Source of key(s) to be installed: "/root/.ssh/id_rsa.pub"
The authenticity of host '192.168.171.13 (192.168.171.13)' can't be established.
ECDSA key fingerprint is SHA256:vhEAEKvc9QvjXaFvfS/FJ17juXp7BA38wPghfiFRRMI.
Are you sure you want to continue connecting (yes/no/[fingerprint])? yes
/usr/bin/ssh-copy-id: INFO: attempting to log in with the new key(s), to filter out any that are already installed
/usr/bin/ssh-copy-id: INFO: 1 key(s) remain to be installed -- if you are prompted now it is to install the new keys
root@192.168.171.13's password:

Number of key(s) added: 1

Now try logging into the machine, with:   "ssh 'root@192.168.171.13'"
and check to make sure that only the key(s) you wanted were added.

//配置端口转发
[root@localhost ~]# ssh 192.168.171.13 -L localhost:8000:localhost:8000 -L localhost:6080:localhost:60

//查看端口
[root@localhost ~]# ss -antl
State   Recv-Q  Send-Q   Local Address:Port   Peer Address:Port Process
LISTEN  0       128            0.0.0.0:111         0.0.0.0:*
LISTEN  0       32       192.168.122.1:53          0.0.0.0:*
LISTEN  0       128            0.0.0.0:22          0.0.0.0:*
LISTEN  0       128          127.0.0.1:6080        0.0.0.0:*
LISTEN  0       128          127.0.0.1:8000        0.0.0.0:*
LISTEN  0       128               [::]:111            [::]:*
LISTEN  0       128               [::]:22             [::]:*
LISTEN  0       128              [::1]:6080           [::]:*
LISTEN  0       128              [::1]:8000           [::]:*

//配置nginx
[root@localhost ~]# cp /etc/nginx/nginx.conf /etc/nginx/nginx.conf.bak
[root@localhost ~]# vim /etc/nginx/nginx.conf
删除listen       [::]:80;行
参数server_name行改成server_name  localhost;
删除root         /usr/share/nginx/html;行
server {
        listen       80 ;
        server_name  localhost;

在include /etc/nginx/default.d/*.conf;行下添加
        location / {
                root    html;
                index   index.html index.htm;
        }

//配置nginx虚拟主机
[root@localhost ~]# vi /etc/nginx/conf.d/webvirtmgr.conf
server {
    listen 80 default_server;

    server_name $hostname;
    #access_log /var/log/nginx/webvirtmgr_access_log;

    location /static/ {
        root /var/www/webvirtmgr/webvirtmgr;
        expires max;
    }

    location / {
        proxy_pass http://127.0.0.1:8000;
        proxy_set_header X-Real-IP $remote_addr;
        proxy_set_header X-Forwarded-for $proxy_add_x_forwarded_for;
        proxy_set_header Host $host:$server_port;
        proxy_set_header X-Forwarded-Proto $remote_addr;
        proxy_connect_timeout 600;
        proxy_read_timeout 600;
        proxy_send_timeout 600;
        client_max_body_size 1024M;
    }
}


//确保bind绑定本机的8000端口
[root@localhost ~]#  grep "bind"  /var/www/webvirtmgr/conf/gunicorn.conf.py
# bind - The socket to bind.
bind = '127.0.0.1:8000'

//重启nginx服务,并查看端口
[root@localhost ~]# systemctl restart nginx.service
[root@localhost ~]# ss -antl
State   Recv-Q  Send-Q   Local Address:Port   Peer Address:Port Process
LISTEN  0       128            0.0.0.0:111         0.0.0.0:*
LISTEN  0       128            0.0.0.0:80          0.0.0.0:*
LISTEN  0       32       192.168.122.1:53          0.0.0.0:*
LISTEN  0       128            0.0.0.0:22          0.0.0.0:*
LISTEN  0       128          127.0.0.1:6080        0.0.0.0:*
LISTEN  0       128          127.0.0.1:8000        0.0.0.0:*
LISTEN  0       128               [::]:111            [::]:*
LISTEN  0       128               [::]:22             [::]:*
LISTEN  0       128              [::1]:6080           [::]:*
LISTEN  0       128              [::1]:8000           [::]:*
[root@localhost ~]#

//设置supervisor
[root@localhost ~]# vim /etc/supervisord.conf
在最后面添加
[program:webvirtmgr]
command=/usr/bin/python2 /var/www/webvirtmgr/manage.py run_gunicorn -c /var/www/webvirtmgr/conf/gunicorn.conf.py
directory=/var/www/webvirtmgr
autostart=true
autorestart=true
logfile=/var/log/supervisor/webvirtmgr.log
log_stderr=true
user=nginx

[program:webvirtmgr-console]
command=/usr/bin/python2 /var/www/webvirtmgr/console/webvirtmgr-console
directory=/var/www/webvirtmgr
autostart=true
autorestart=true
stdout_logfile=/var/log/supervisor/webvirtmgr-console.log
redirect_stderr=true
user=nginx

//启动并设置开机自启
[root@localhost ~]# systemctl enable --now supervisord.service

//配置nginx用户
[root@localhost ~]# su - nginx -s /bin/bash
[nginx@localhost ~]$ ssh-keygen -t rsa
Generating public/private rsa key pair.
Enter file in which to save the key (/var/lib/nginx/.ssh/id_rsa):
Created directory '/var/lib/nginx/.ssh'.
Enter passphrase (empty for no passphrase):
Enter same passphrase again:
Your identification has been saved in /var/lib/nginx/.ssh/id_rsa.
Your public key has been saved in /var/lib/nginx/.ssh/id_rsa.pub.
The key fingerprint is:
SHA256:ViltQranNV3T3BBEz4cVEY9MVcdmUDakt2aVqO6SxgU nginx@localhost.localdomain
The key's randomart image is:
+---[RSA 3072]----+
|        o    o@/&|
|       o o o +oO%|
|        + O .o+=*|
|         E .. . +|
|        S ..   + |
|       .  ..  o  |
|        . o.     |
|         =.      |
|        . ..     |
+----[SHA256]-----+

[nginx@localhost ~]$ echo -e "StrictHostKeyChecking=no\nUserKnownHostsFile=/dev/null" > ~/.ssh/config
[nginx@localhost ~]$ cat .ssh/config
StrictHostKeyChecking=no
UserKnownHostsFile=/dev/null
[nginx@localhost ~]$

[nginx@localhost ~]$ chmod 600 .ssh/config
[nginx@localhost ~]$ ssh-copy-id  root@192.168.171.13
/usr/bin/ssh-copy-id: INFO: Source of key(s) to be installed: "/var/lib/nginx/.ssh/id_rsa.pub"
/usr/bin/ssh-copy-id: INFO: attempting to log in with the new key(s), to filter out any that are already installed
/usr/bin/ssh-copy-id: INFO: 1 key(s) remain to be installed -- if you are prompted now it is to install the new keys
Warning: Permanently added '192.168.171.13' (ECDSA) to the list of known hosts.
root@192.168.171.13's password:

Number of key(s) added: 1

Now try logging into the machine, with:   "ssh 'root@192.168.171.13'"
and check to make sure that only the key(s) you wanted were added.

[nginx@localhost ~]$ exit
logout
[root@localhost ~]#
[root@localhost ~]# vim /etc/polkit-1/localauthority/50-local.d/50-libvirt-remote-access.pkla
[Remote libvirt SSH access]
Identity=unix-user:root
Action=org.libvirt.unix.manage
ResultAny=yes
ResultInactive=yes
ResultActive=yes

//这里要看53端口有没有起来没起来就寄
[root@localhost ~]# systemctl restart nginx.service
[root@localhost ~]# systemctl restart libvirtd
[root@localhost ~]# ss -antl
State   Recv-Q  Send-Q   Local Address:Port   Peer Address:Port Process
LISTEN  0       128            0.0.0.0:111         0.0.0.0:*
LISTEN  0       128            0.0.0.0:80          0.0.0.0:*
LISTEN  0       32       192.168.122.1:53          0.0.0.0:*
LISTEN  0       128            0.0.0.0:22          0.0.0.0:*
LISTEN  0       128          127.0.0.1:6080        0.0.0.0:*
LISTEN  0       128          127.0.0.1:8000        0.0.0.0:*
LISTEN  0       128               [::]:111            [::]:*
LISTEN  0       128               [::]:22             [::]:*
LISTEN  0       128              [::1]:6080           [::]:*
LISTEN  0       128              [::1]:8000           [::]:*
[root@localhost ~]#
//记得端口起来了重启一下然后访问ip
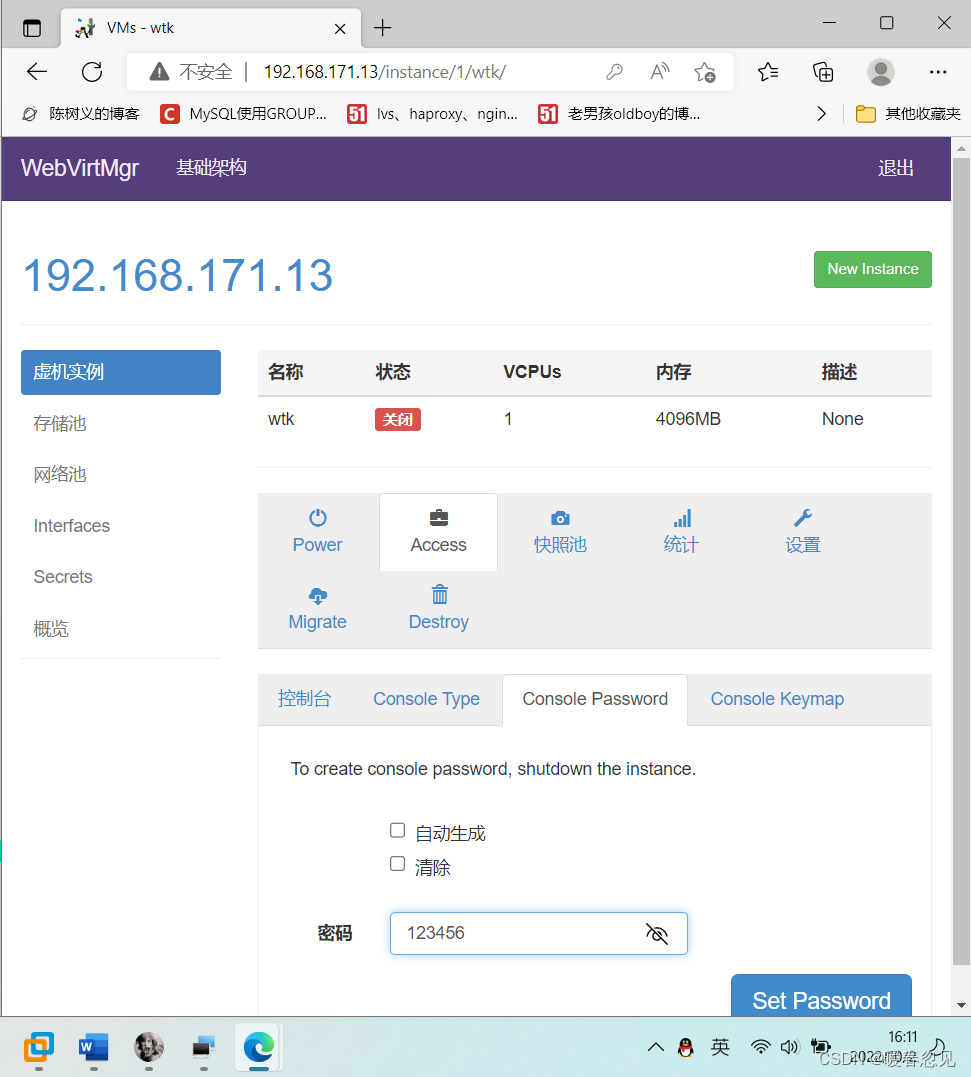
访问web界面

新建连接

新建存储池

通过上传镜像文件
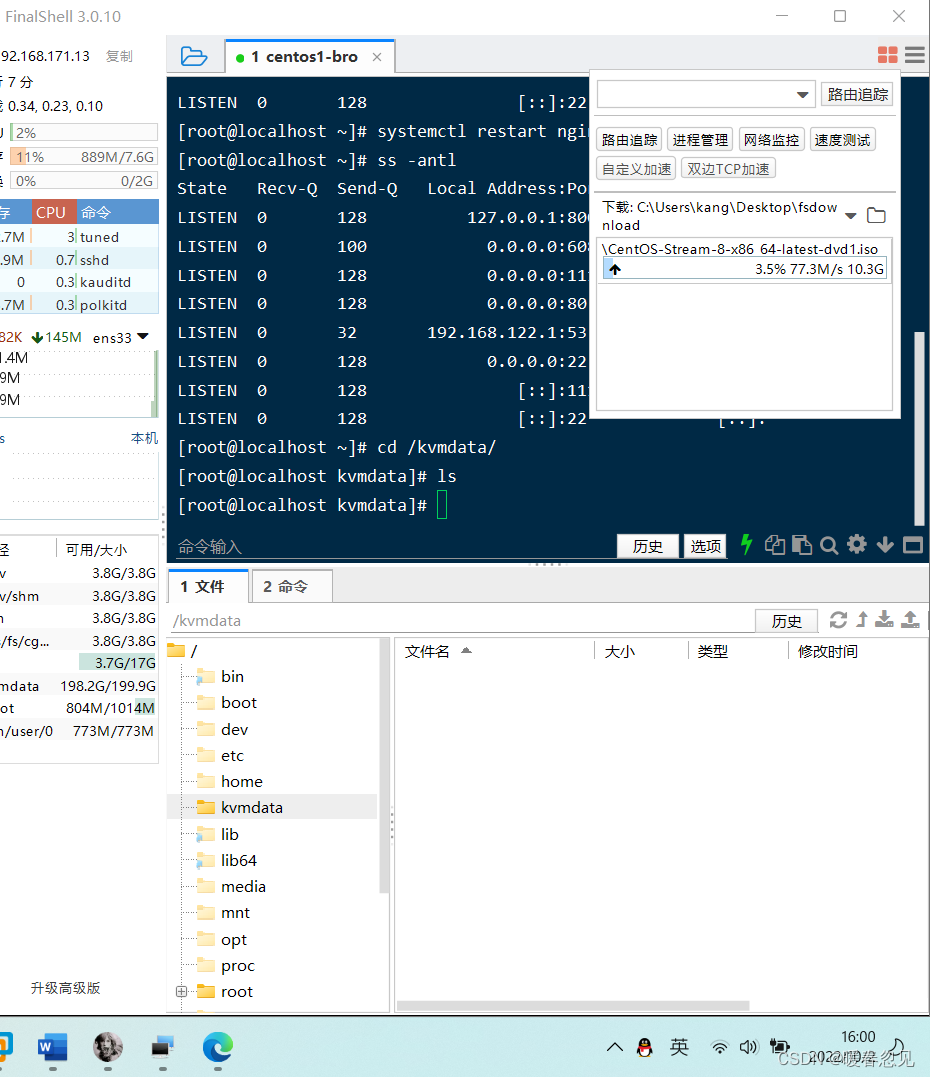
[root@localhost kvmdata]# ls
CentOS-Stream-8-x86_64-latest-dvd1.iso
[root@localhost kvmdata]#
[root@localhost ~]# yum -y install novnc
[root@localhost ~]# chmod +x /etc/rc.d/rc.local
[root@localhost ~]# echo "nohup novnc_server 192.168.100.100:5920 &" >> /etc/rc.d/rc.local
[root@localhost ~]# . /etc/rc.d/rc.local
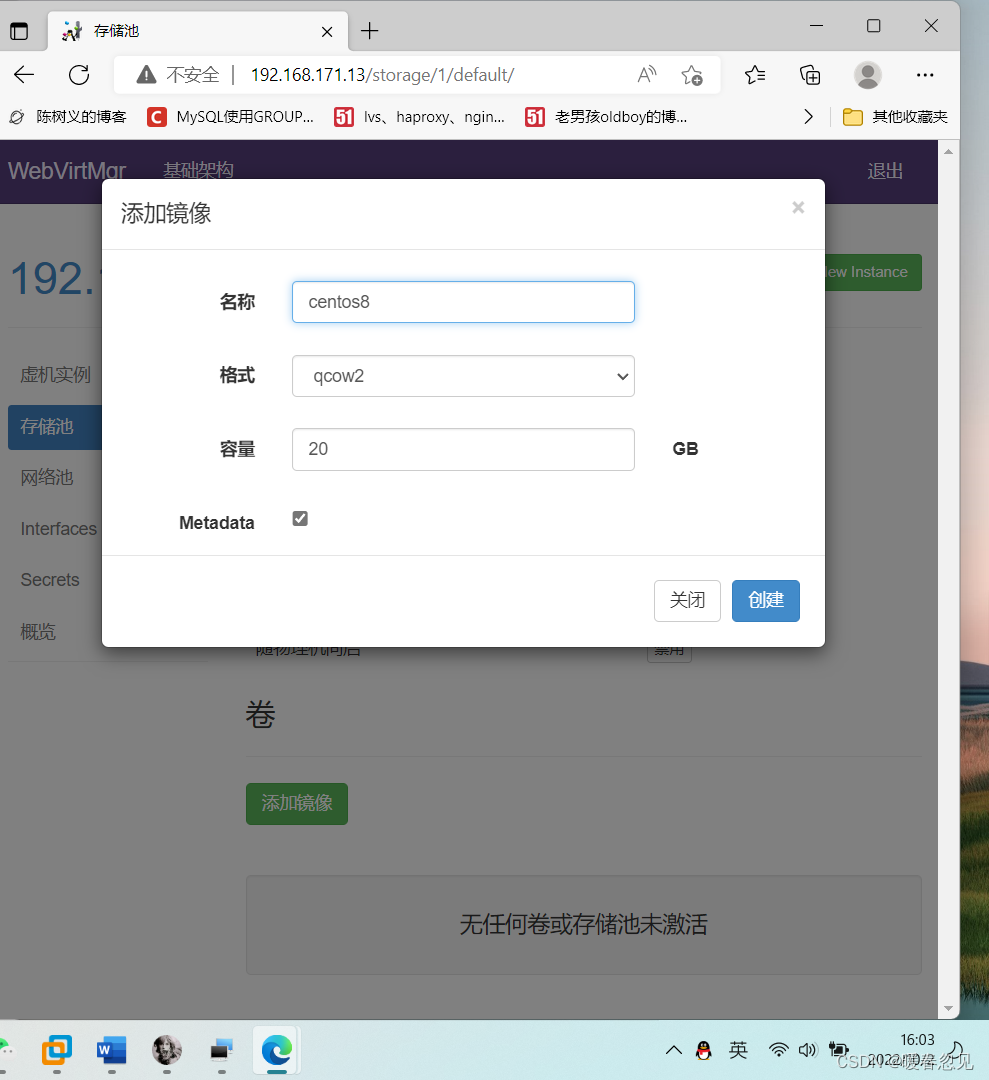
添加镜像
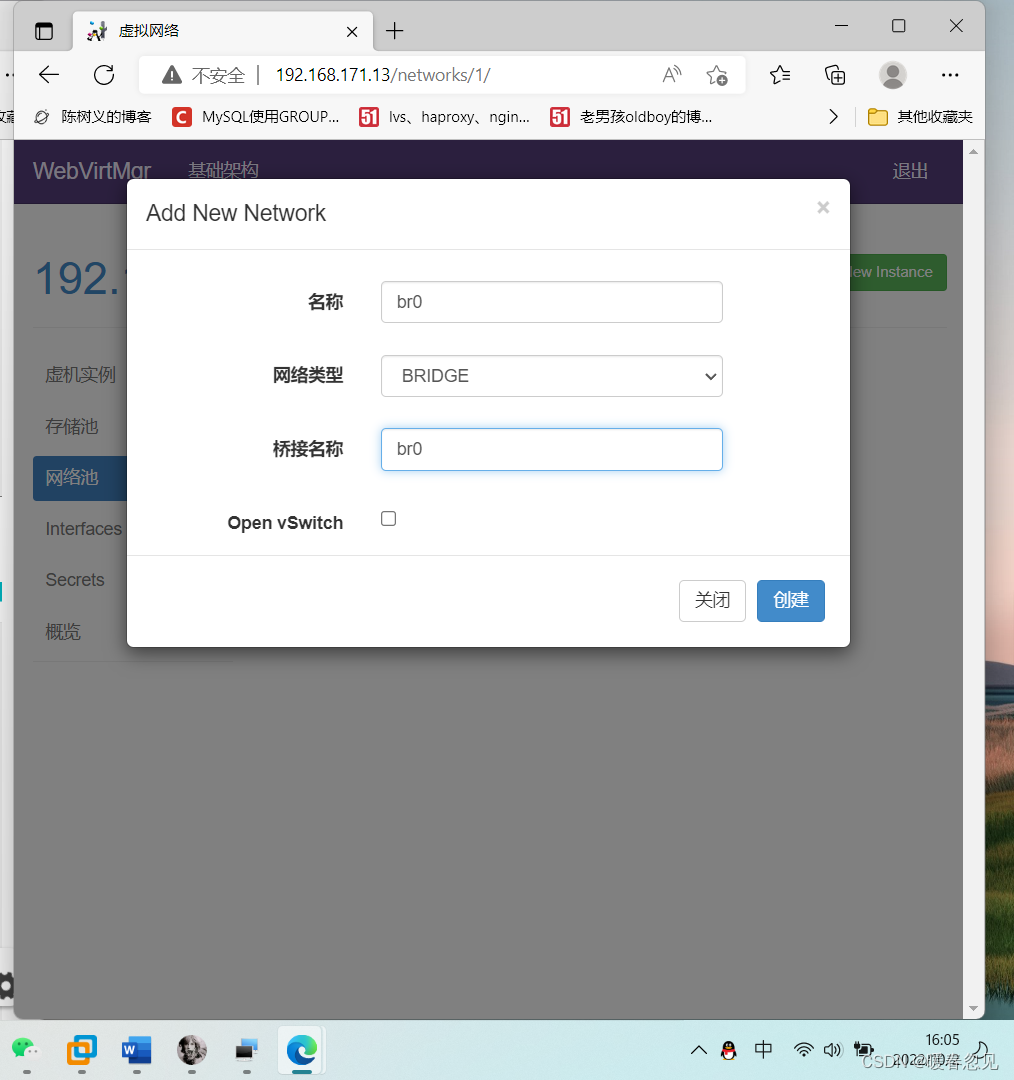
网络池,新建网络
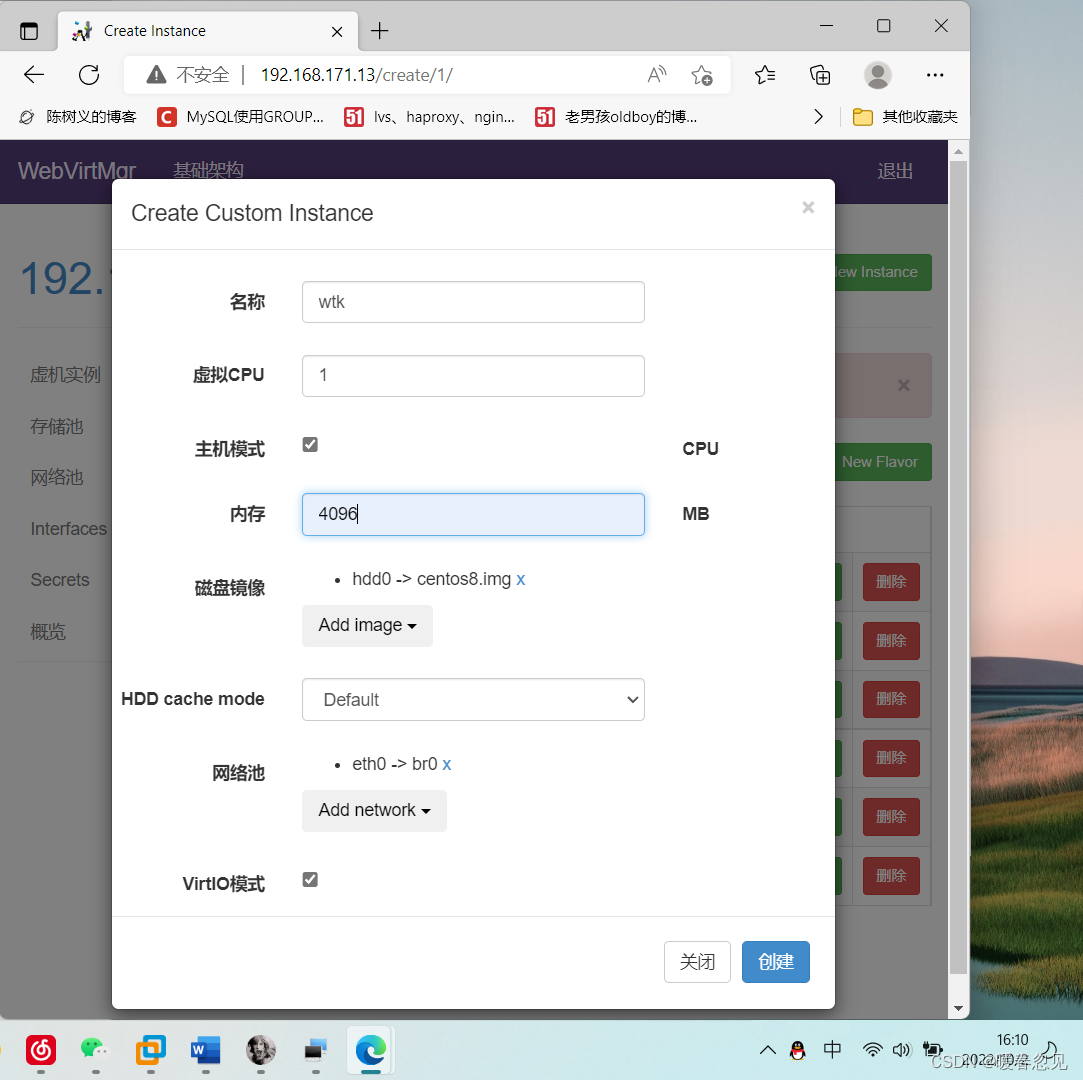
自定义创建虚拟机
把镜像也链接一下


 1391
1391


 被折叠的 条评论
为什么被折叠?
被折叠的 条评论
为什么被折叠?
 到【灌水乐园】发言


