


nginx的配置文件
自定义的配置文件:
自定义的配置文件:
Nginx默认的配置文件是:

/usr/local/nginx/conf/nginx.conf

如果需要使用自定义的配置文件,则需要在运行前指定所用配置文件的路径:

./sbin/nginx -c my_conf/my_conf.conf

关于Nginx命令行支持的参数,可使用 ./sbin/nginx -h 查看:

./nginx -h 			 	# this help
./nginx -c filename  	# set configuration file (default: conf/nginx.conf)
./nginx -s signal 		# send signal to a master process: stop, quit, reopen, reload

./nginx -v				# show version and exit
./nginx -V				# show version and configure options then exit

./nginx -q				# suppres non-error messages during configuration testing
./nginx -p prefix		# set prefix path (default: /usr/local/nginx)
./nginx -g directives	# set global directives out of configuration file
Nginx配置文件的结构:
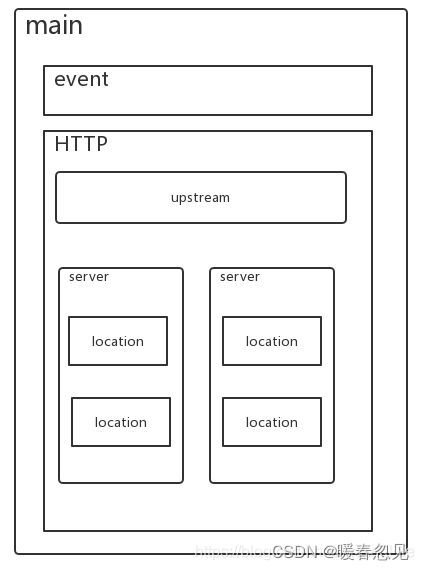
配置文件由若干个指令组成,指令分为简单指令和块指令。
最基本的配置项语法格式:
Nginx配置文件主要分为四部分:
(1)main:
全局配置,用于配置与具体业务无关的参数,例如 worker_processes用来配置要起几个线程;
(2)events:
用于配置影响Nginx服务与用户之间连接的属性,例如 worker_connections 配置每个线程的最大连接数;
(3)http:
用于配置Nginx的业务功能,除http外,还有email;
(4)server:
server必须位于http内部,用于配置Nginx的一个主机;其中listen指定监听的端口号;server_name指定主机名;location用于指定主机上的资源位置。
TIPS:
“worker_processes”, “events”, “http”, “server”, “worker_connections” 这些配置项的名称,在Nginx源码中都是写死的字符串,在Nginx运行时会根据配置文件中的配置项去源码中查找与之匹配的字符串,并按照给出的配置项值进行服务器配置,所以我们需要做的是熟悉这些常用的配置项的名称及功能、用法
Nginx服务的基本配置
Nginx的基本配置可按照 用户使用时的预期功能 分为以下 4 类:
(这些是Nginx的基本配置项,不论是要配置HTTP还是EMAIL服务,是静态Web服务器还是反向代理,都要先配置这些基本项,它们是通用项。)
使Nginx以守护进程的方式在后台运行,默认on
daemon on;
daemon off;

(2) 以master/worker的方式工作,默认on
master_process on;
master_process off;

(3) 设置error日志的路径
error_log logs/error.log error;

(4) 是否处理几个特殊的调试点:
debug_points stop
debug_points abort;

通常不会使用这个配置项。Nginx在一些关键的错误逻辑中设置了调试点,如果设置为stop,代码执行到这些预设的调试点就会发出SIGSTOP信号以用于调试;如果设置为abort,则会产生一个coredump,用于gdb查看当时的Nginx各种信息。

(5) 仅对某个IP的客户端输出debug级别的日志,其他客户端仍使用error_log中配置的日志界别:

debug_connection IP;
debug_connection CIDR;
1
2
这一配置项对定位高并发场景下发送的问题非常有用!仅跟踪某个IP的客户端的debug级别日志

例如:
events {
    debug_connection 10.224.66.14;
    debug_connection 10.224.57.0/24;
}

(6) 限制coredump核心转储文件的大小:
worker_rlimit_core [size];

(7) 指定coredump文件生成目录:
working_directory [path];
Tips:
守护进程(daemon)是什么:
守护进程(daemon)是脱离终端并且在后台运行的进程。它脱离终端是为了避免进程执行过程中的信息在任何终端上显示,这样一来,进程也不会被任何终端所产生的信息所打断(比如Ctrl+C不会终止Nginx的运行)。Nginx毫无疑问是一个需要以守护进程方式运行的服务,因此默认都是以这种方式运行的(默认配置项值为on)。
不过Nginx还是提供了关闭守护进程的模式,之所以提供这种模式,是为了方便跟踪调试Nginx,毕竟用gdb调试进程时最烦琐的就是如何继续跟进fork出的子进程了。
coredump怎么用:
coredump,就是核心转储。
在Linux系统中,当进程发生错误或者收到信号而终止时,系统会将进程执行时的内存内容(核心映像)写入一个文件(core文件),以作为调试之用,这就是所谓的核心转储(core dumps)。
当Nginx进程出现一些非法操作(如内存越界)导致进程直接被操作系统强制结束时,会生成核心转储core文件,可以从core文件获取当时的堆栈、寄存器等信息,从而帮助我们定位问题。但是这种core文件中的许多信息不一定是用户需要的,如果不加以限制,那么可能一个core文件就会达到几个GB,这样随便coredumps几次就会把磁盘占满,引发严重问题。
通过worker_rlimit_core配置可以限制core文件的大小,从而有效帮助用户定位问题。
正常运行的配置项
(1) 定义环境变量:
允许用户直接设置操作系统上的环境变量。
env VAR | VAR = value;
eg:
env TESTPATH = /tmp/;

(2) 嵌入其他配置文件:
类似于与C源文件中包含其他的头文件,Nginx配置文件中也可以使用include将其他配置文件嵌入到当前的nginx.conf中。
http {
	include mime/types;
}

mime/types也是一个配置文件。
(3) pid文件的路径:
pid [path/file];

(4) Nginx worker进程运行的用户及用户组:
user [username][groupname];

(5) 指定Nginx worker进程可以打开的最大文件句柄数:
worker_rlimit_nofile [limit];

(6) 限制信号队列:
worker_rlimit_sigpending [limit];
优化性能的配置项
(1) 【常用】配置worker进程数:
worker_processes 1;

这些进程都是单线程,一般配置成与CPU数量相同。
(2) 绑定Nginx worker进程到指定的CPU内核:
worker_puc_affinity [cpumask][cpumask];

(3) SSL硬件加速:
ssl_engine device;

(4) 系统调用gettimeofday的执行频率:
timer_resolution t;

(5) Nginx worker进程优先级设置:
worker_priority 0;

4. 事件类配置项:
(1) 是否打开accept锁:
accept_mutex on;		# 默认on
accept_mutex off;

accept_mutex是Nginx的负载均衡锁,这把锁可以让多个worker进程轮流的、序列化的与新的客户端建立连接。
当某一个worker进程建立的连接数量达到worker_connections配置的最大连接数的7/8时,会大大的减少该worker进程试图建立新的TCP连接的机会,以此实现所有worker进程智商处理的客户端的请求数尽量相近。
accept锁是默认打开的,如果关闭它,那么TCP建立的耗时会更短,但worker进程之间的负载会非常不平衡。
(2) lock文件的路径:
lock_file logs/nginx.lock;

(3) 两次尝试获得accept锁之间的间隔时间:
accept_mutex_delay 500ms;

使用accept锁后同一时间只能有一个worker进程获得锁,accept锁是非阻塞的,获取失败会立即返回,此进程需要间隔accept_mutex_delay时间后才能再次尝试获得锁。
(4) 批量建立新连接:
multi_accept off;

(5) 选择事件类型:
use epoll;
use select;
use poll;
use kqueue;

Nginx会自动选择最合适的实现模型,默认为epoll
(6) 【常用】每个worker进程可以同时处理的最大连接数:
平滑升级
将原先版本的nginx1.20.0升级至1.22.0,并且添加一个新的功能
//平滑升级需要一个更高版本的nginx这里选择在网上下在
[root@localhost ~]# wget http://nginx.org/download/nginx-1.22.0.tar.gz
[root@localhost ~]# ls
anaconda-ks.cfg  nginx-1.20.2  nginx-1.20.2.tar.gz  nginx-1.22.0.tar.gz

//在网上git下来一个扩展模块,这就是要添加的功能
[root@localhost ~]# yum -y install git
[root@localhost ~]# git clone https://gitee.com/wujunze/nginx_module_echo.git
[root@localhost ~]# ls
anaconda-ks.cfg  nginx-1.20.2  nginx-1.20.2.tar.gz  nginx-1.22.0.tar.gz  nginx_module_echo

//然后在解压新版本的nginx
[root@localhost ~]# tar xf nginx-1.22.0.tar.gz
[root@localhost ~]# cd nginx-1.22.0/
[root@localhost nginx-1.22.0]# ls
CHANGES  CHANGES.ru  LICENSE  README  auto  conf  configure  contrib  html  man  src

//然后在进行编译,注意编译的时候不要make install 因为会把原先的配置文件覆盖,这就不叫平滑升级了,然后添加echo模块的新功能
[root@localhost nginx-1.22.0]# ./configure \
 --prefix=/usr/local/nginx \
 --user=nginx \
 --group=nginx \
 --with-debug \
 --with-http_ssl_module \
 --with-http_realip_module \
 --with-http_image_filter_module \
 --with-http_gunzip_module \
 --with-http_gzip_static_module \
 --with-http_stub_status_module \
 --add-module=cd ../nginx_module_echo
[root@localhost nginx-1.22.0]# make -j 2
...
make[1]: Leaving directory '/root/nginx-1.22.0'

//make好后会发现里面有一个objs目录我们的nginx的主程序就在里面
[root@localhost nginx-1.22.0]# ls
CHANGES  CHANGES.ru  LICENSE  Makefile  README  auto  conf  configure  contrib  html  man  objs  src
[root@localhost nginx-1.22.0]# ls objs/
Makefile  addon  autoconf.err  nginx  nginx.8  ngx_auto_config.h  ngx_auto_headers.h  ngx_modules.c  ngx_modules.o  src
[root@localhost nginx-1.22.0]#

//没有更新添加echo模块功能之前是用不了的,可以看到配置文件出错了,测试完记得加上注释.
[root@localhost ~]# vim /usr/local/nginx/conf/nginx.conf
...
location /abc {
            echo "hello";
        }
[root@localhost ~]# nginx -t
nginx: [emerg] unknown directive "echo" in /usr/local/nginx/conf/nginx.conf:58
nginx: configuration file /usr/local/nginx/conf/nginx.conf test failed

//接下来就直接替换掉nginx老版本的主程序,这里要想模拟生产环境让使用产品的用户察觉不到产品的变化就需要把命令写成一条。
[root@localhost nginx-1.22.0]# \cp /usr/local/nginx/sbin/nginx{,-bek};pkill nginx;\cp /root/nginx-1.22.0/objs/nginx /usr/local/nginx/sbin/nginx;systemctl start nginx
[root@localhost nginx-1.22.0]# ss -antl
State               Recv-Q              Send-Q                           Local Address:Port                           Peer Address:Port             Process
LISTEN              0                   128                                    0.0.0.0:80                                  0.0.0.0:*
LISTEN              0                   128                                    0.0.0.0:22                                  0.0.0.0:*
LISTEN              0                   128                                       [::]:22                                     [::]:*
//可以看到此时的版本变成了nginx1-22.0
[root@localhost nginx-1.22.0]# nginx -v
nginx version: nginx/1.22.0
[root@localhost nginx-1.22.0]#

//再进去主配置文件把注释取消,再次检查配置文件可以看到此时已经可以使用echo了
[root@localhost nginx-1.22.0]# vim /usr/local/nginx/conf/nginx.conf
location /abc {
            echo "hello";
        }
[root@localhost nginx-1.22.0]# nginx -t
nginx: the configuration file /usr/local/nginx/conf/nginx.conf syntax is ok
nginx: configuration file /usr/local/nginx/conf/nginx.conf test is successful
[root@localhost nginx-1.22.0]#
访问测试

location区段
通过指定模式来与客户端请求的URI相匹配
//功能:允许根据用户请求的URI来匹配定义的各location,匹配到时,此请求将被相应的location配置块中的配置所处理,例如做访问控制等功能
//语法:location [ 修饰符 ] pattern {…}
常用修饰符说明:
修饰符 功能
= 精确匹配
~ 正则表达式模式匹配,区分大小写
~* 正则表达式模式匹配,不区分大小写
^~ 前缀匹配,类似于无修饰符的行为,也是以指定模块开始,不同的是,如果模式匹配,那么就停止搜索其他模式了,不支持正则表达式
@ 定义命名location区段,这些区段客户端不能访问,只可以由内部产生的请求来访问,如try_files或error_page等
没有修饰符表示必须以指定模式开始,如:
[root@localhost ~]# vim /usr/local/nginx/conf/nginx.conf
        location /abc {      #默认匹配的URL优先级最低的
            echo "hello"
  }

[root@localhost ~]# systemctl restart nginx.service
[root@localhost ~]# curl http://127.0.0.1/abc
hello
[root@localhost ~]#
那么如下内容就可正确匹配:
http://192.168.171.142/abc
http://192.168.171.142/abc?p1=11&p2=22
http://192.168.171.142/abc/
=:
[root@localhost ~]# vim /usr/local/nginx/conf/nginx.conf
        location /abc {     #他的优先级是最低的,当访问的URL都查找不到是就会默认访问它
            echo "hello";
        }

        location = /abc {   #localtion = 的配置优先级最高他是精确配置
            echo "hello 1";
        }
[root@localhost ~]# systemctl restart nginx.service
测试

~:
[root@localhost ~]# vim /usr/local/nginx/conf/nginx.conf
        location /abc {
            echo "hello";
        }

        location ~ ^/abc$ {       #这个是匹配正则表达式以^/a开头平且区分大小写匹配
            echo "hello 1";
        }
[root@localhost ~]# systemctl restart nginx.service
访问

也可以这样访问

~*:
[root@localhost ~]# vim /usr/local/nginx/conf/nginx.conf
        location /abc {
            echo "hello";
        }

        location ~* ^/abc$ {       #表示匹配正则表达式以^/a开头的,并且不区分大小写
            echo "hello 1";
        }
[root@localhost ~]# systemctl restart nginx.service

//访问,可以看到这里是不区分大小写的。
[root@localhost ~]# curl http://192.168.171.142/ABC
hello 1
[root@localhost ~]# curl http://192.168.171.142/abc
hello 1
[root@localhost ~]#
~^:
[root@localhost ~]# vim /usr/local/nginx/conf/nginx.conf
        location = /50x.html {
            root   html;
        }

        location ~ /abc {
            echo "hello";
        }

        location ^~ /abc {       #这个是类似于无修饰符的匹配方式,从开头匹配,优先级只比= 低比其他的都要高
            echo "hello 10";
[root@localhost ~]# systemctl restart nginx.service
[root@localhost ~]# curl http://127.0.0.1/abc
hello 10
[root@localhost ~]#
查找顺序和优先级:由高到底依次为
1.带有=的精确匹配优先
2.正则表达式按照他们在配置文件中定义的顺序
3.带有^~修饰符的,开头匹配
4.带有或*修饰符的,如果正则表达式与URI匹配
5.没有修饰符的精确匹配
6.优先级次序如下:
( location = 路径 ) --> ( location ^~ 路径 ) --> ( location ~ 正则 ) --> ( location ~ 正则 ) --> ( location 路径 )*


 4367
4367


 被折叠的 条评论
为什么被折叠?
被折叠的 条评论
为什么被折叠?
 到【灌水乐园】发言


