


nginx进阶
访问控制
权限控制指令
Nginx中提供了两个用于配置访问权限控制的指令,分别为allow和deny。从其名称就可以看出,allow用于设置允许访问的权限、deny用于设置禁止访问的权限。在使用时,权限指令后只需要跟上允许或禁止的ip、ip段或all即可。其中,all表示所有的。
单个ip指定的范围最小,all指定的范围最大
同一块下,若同时存在多个权限指令(deny、allow),则先出现的访问权限设置生效,并且会对后出现的设置进行覆盖,未覆盖的范围以然生效,否则以先出现的设置为准
当多个块(如http、server、location)中都出现了权限设置指令,则内层块中的权限级别要比外层块中设置的权限级别高
用于location段
allow:设定允许哪台或哪些主机访问,多个参数间用空格隔开
deny:设定禁止哪台或哪些主机访问,多个参数间用空格隔开
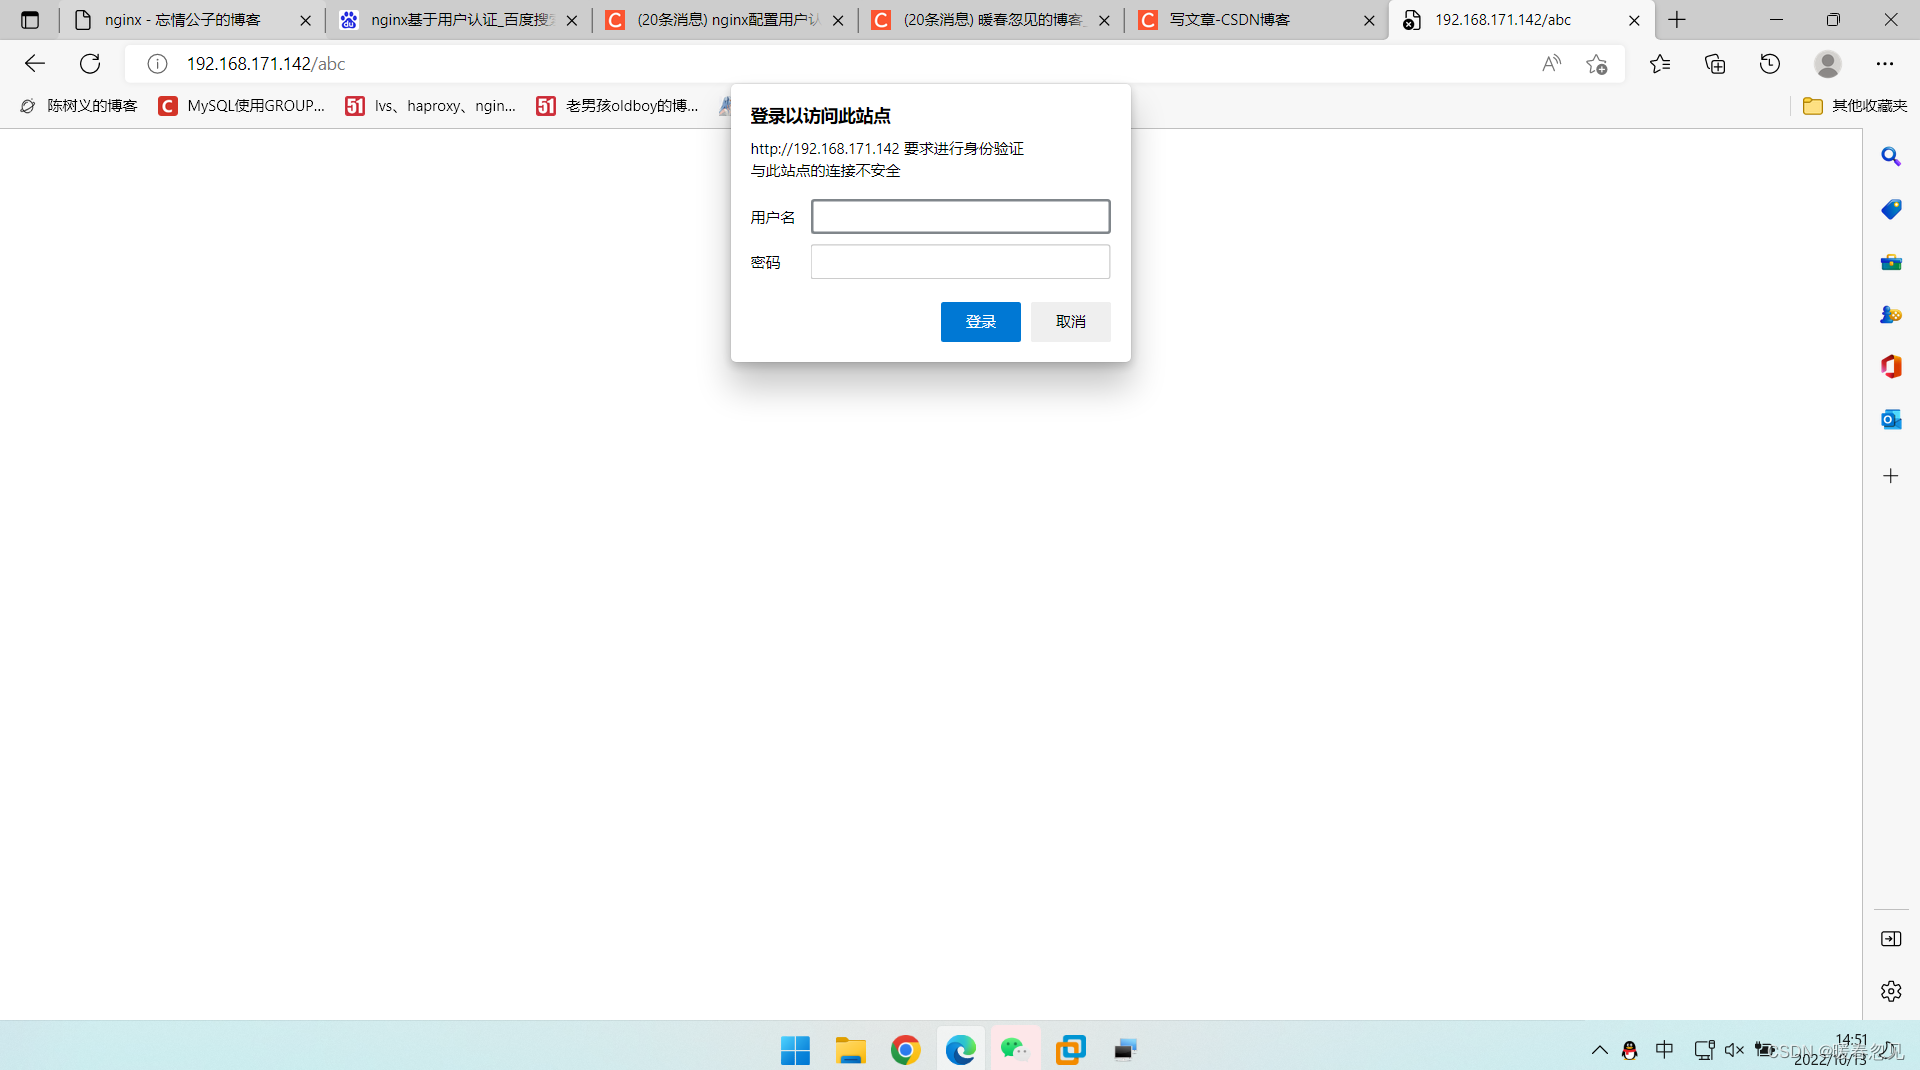
//当我们在nginx配置文件上的location段加上deny 加本机ip的时候,自己就访问不到网页了。
[root@localhost ~]# cd /usr/local/nginx/conf/
[root@localhost conf]# vim nginx.conf
        location = /abc {
            deny 192.168.171.142;
            echo "hello nuanchun";
        }
[root@localhost conf]# systemctl restart nginx.service
//这里访问不到这个URL,是因为权限被拒绝了。
[root@localhost conf]# curl http://192.168.171.142/abc
<html>
<head><title>403 Forbidden</title></head>
<body>
<center><h1>403 Forbidden</h1></center>
<hr><center>nginx/1.22.0</center>
</body>
</html>

//这里我添加了拒绝所有ip访问,但是后面我又添加了只允许自己主机访问,所以这个使用我自己的本机IP是能访问到的。
[root@localhost conf]# vim nginx.conf
        location = /abc {
            allow 192.168.171.142;
            deny all;
            echo "hello nuanchun";
        }
[root@localhost conf]# systemctl restart nginx.service
//这个时候就可以访问到。
[root@localhost conf]# curl http://192.168.171.142/abc
hello nuanchun
[root@localhost conf]#
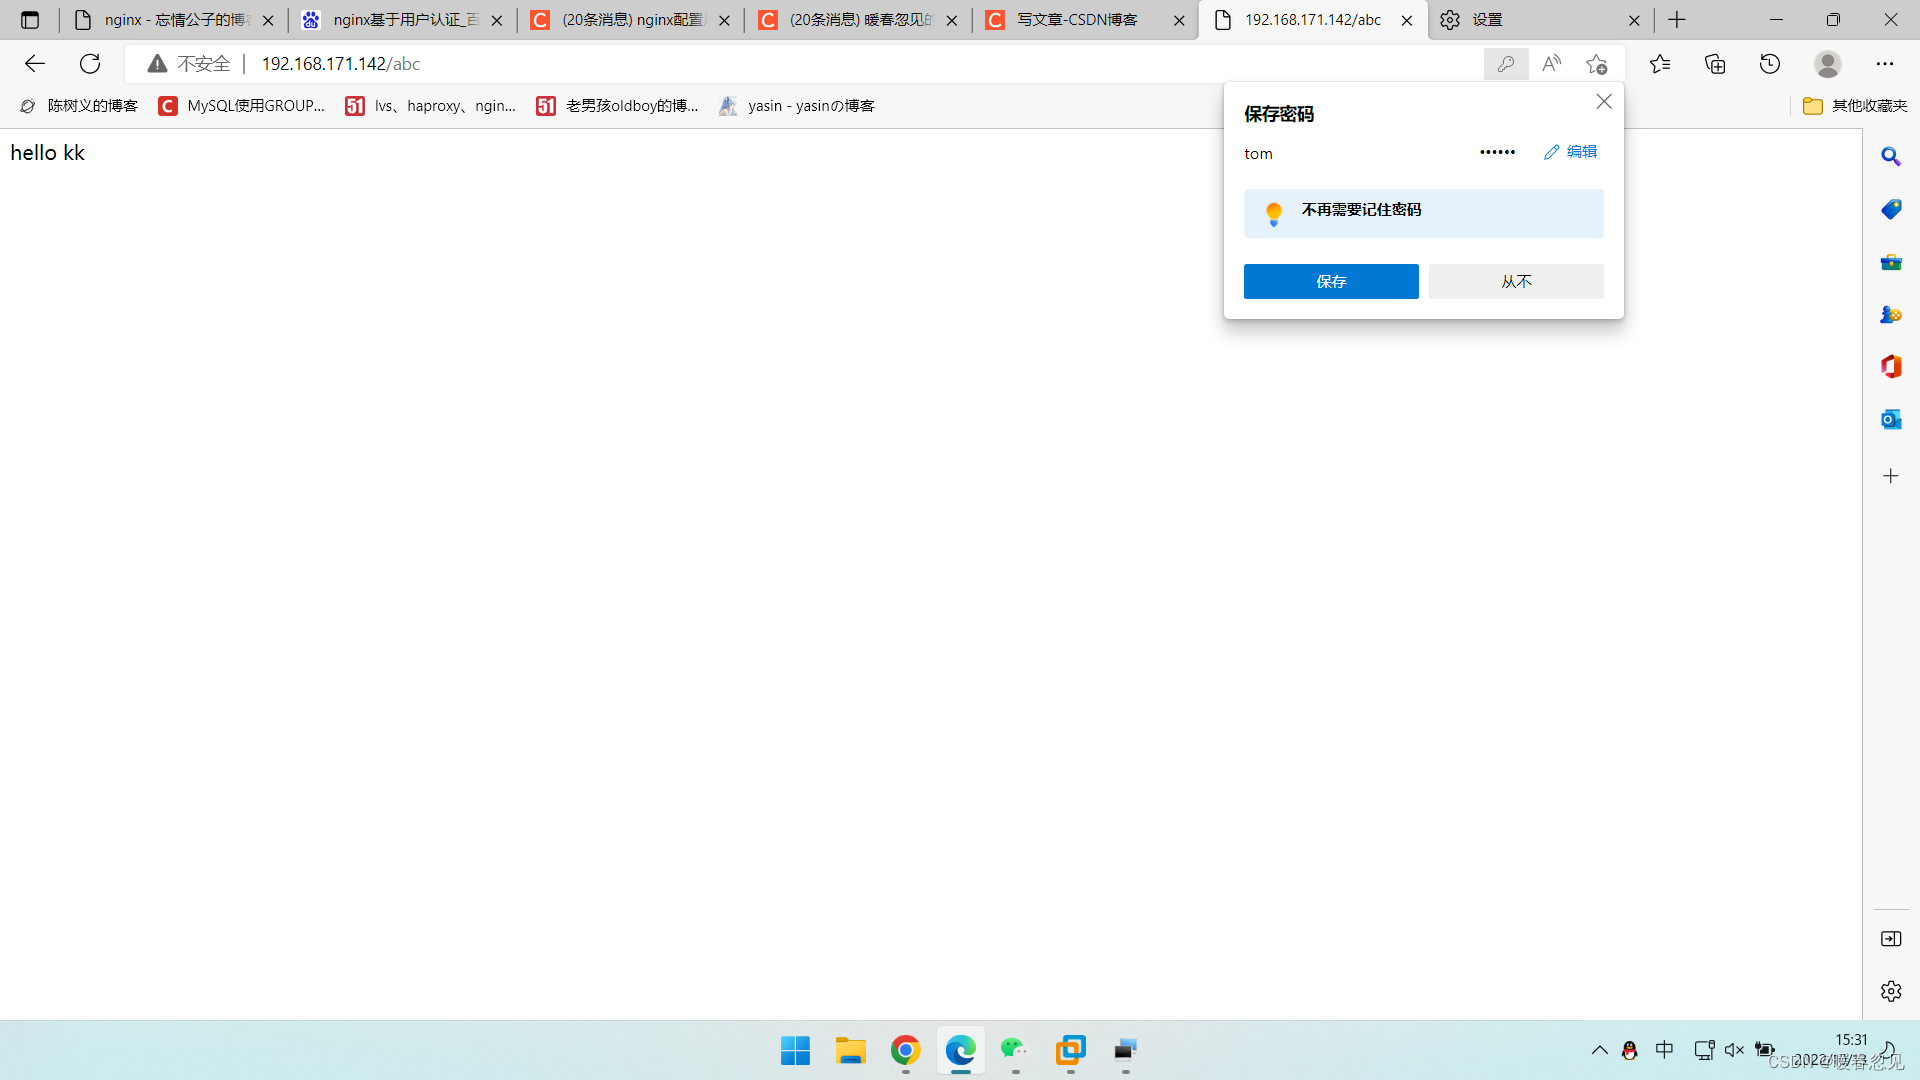
基于用户认证
//用户认证需要下载一个httpd-tools的一个工具
[root@localhost conf]# yum -y install httpd_tools

//然后利用htpasswd创建用户密码
[root@localhost conf]# htpasswd -c -m /usr/local/nginx/conf/usr_auth_file tom
New password:
Re-type new password:
Adding password for user tom
[root@localhost conf]#
[root@localhost conf]# cat usr_auth_file
tom:$apr1$17WRQgTY$fwgSznerUbvvuSffp1ysm.
[root@localhost conf]#

//修改配置文件
[root@localhost conf]# vim nginx.conf

       location = /abc {
           auth_basic "jjyy";
           auth_basic_user_file usr_auth_file;
           echo "hello kk";
       }
[root@localhost conf]# systemctl restart  nginx.service
访问测试
https配置
首先,确保安装了OpenSSL库
//首先创建工作目录
[root@localhost ~]# mkdir app
[root@localhost app]# pwd
/root/app
[root@localhost app]#

//使用openssl创建创建服务器私钥,再次重复输入确认密码。记住此密码,后面会用到,里面的server自己随意设置。
[root@localhost app]# openssl genrsa -des3 -out nginx.key 2048
Generating RSA private key, 1024 bit long modulus (2 primes)
.............+++++
.+++++
e is 65537 (0x010001)
Enter pass phrase for nginx.key:
Verifying - Enter pass phrase for nginx.key:
[root@localhost app]#

//创建证书签名请求
[root@localhost app]# openssl req -new -key nginx.key -out nginx.csr
Enter pass phrase for nginx.key:                 //这里输入上面记住的密码
You are about to be asked to enter information that will be incorporated
into your certificate request.
What you are about to enter is what is called a Distinguished Name or a DN.
There are quite a few fields but you can leave some blank
For some fields there will be a default value,
If you enter '.', the field will be left blank.
-----
Country Name (2 letter code) [XX]:CN
State or Province Name (full name) []:HB
Locality Name (eg, city) [Default City]:WH
Organization Name (eg, company) [Default Company Ltd]:RT
Organizational Unit Name (eg, section) []:KK
Common Name (eg, your name or your server's hostname) []:192.168.171.142
Email Address []:123@qq.com

Please enter the following 'extra' attributes
to be sent with your certificate request
A challenge password []:123456              //这里设置密码
An optional company name []:KK            //设置用户名
[root@localhost app]# ls
nginx.csr  nginx.key
[root@localhost app]#

//使用刚生成的私钥和CSR进行证书签名
[root@localhost app]# openssl x509 -req -days 365 -in nginx.csr -signkey nginx.key -out nginx.crt
Signature ok
subject=C = CN, ST = HB, L = WH, O = RT, OU = KK, CN = 192.168.171.142, emailAddress = 123@qq.com
Getting Private key
Enter pass phrase for nginx.key:     //这里输入之前的密码123456

//会生成三个文件
[root@localhost app]# ls
nginx.crt  nginx.csr  nginx.key
[root@localhost app]#

//然后将证书配置到nginx中即可,把这些配置文件取消注释,然后改一下证书路径。
[root@localhost conf]# vim nginx.conf
    server {
        listen       443 ssl;
        server_name  192.168.171.142;

        ssl_certificate     /root/app/nginx.crt;           //这里路径写绝对路径
        ssl_certificate_key /root/app/nginx.key;

        ssl_session_cache    shared:SSL:1m;
        ssl_session_timeout  5m;

        ssl_ciphers  HIGH:!aNULL:!MD5;
        ssl_prefer_server_ciphers  on;
        location / {
        root   html;
        index  index.html index.htm;
     }
}
[root@localhost app]# systemctl restart nginx.service
访问测试

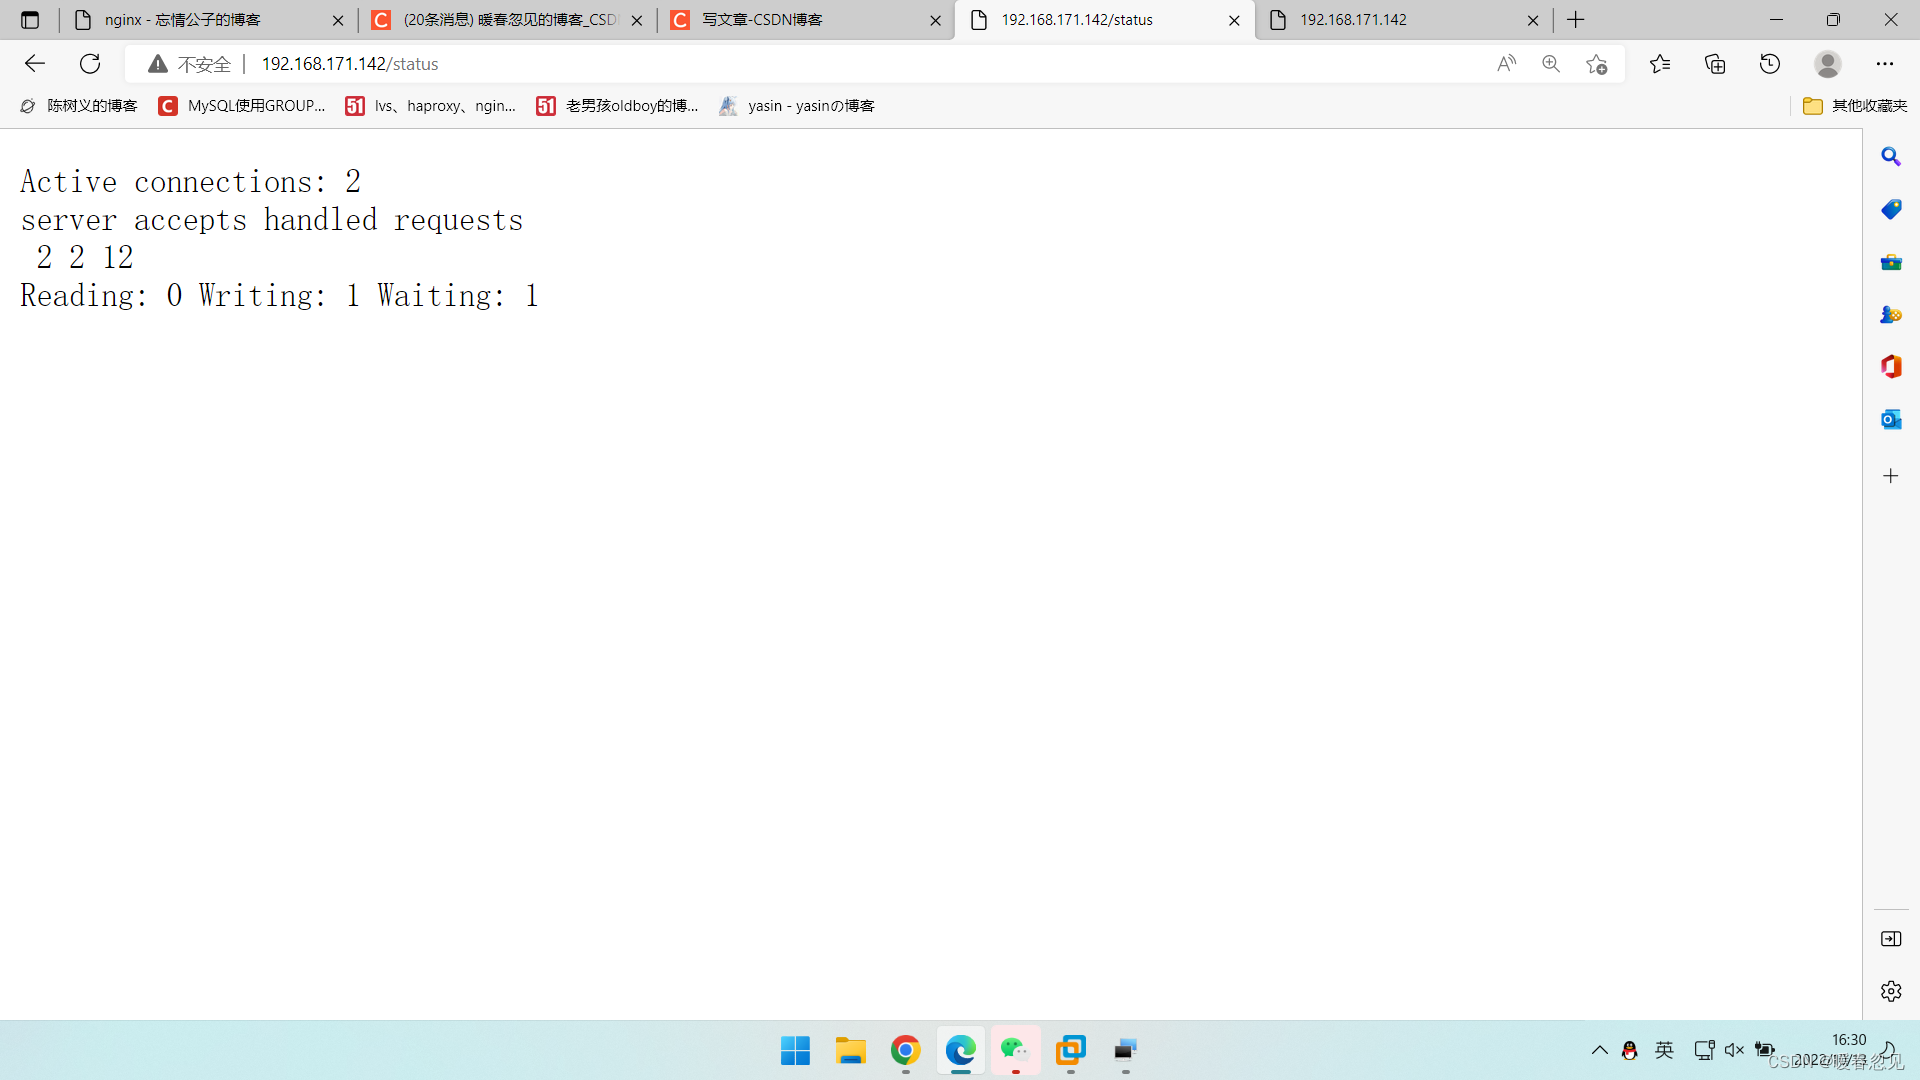
开启状态界面
状态页面信息详解:
| 状态码 | 表示的意义 |
|---|---|
| Active connections 2 | 当前所有处于打开状态的连接数 |
| accepts | 总共处理了多少个连接 |
| handled | 成功创建多少握手 |
| Reading nginx | 读取到客户端的Header信息数,表示正处于接收请求状态的连接数 |
| requests | 总共处理了多少个请求 |
| Writing | nginx返回给客户端的Header信息数,表示请求已经接收完成,且正处于处理请求或发送响应的过程中的连接数 |
| Waiting | 开启keep-alive的情况下,这个值等于active - (reading + writing),意思就是Nginx已处理完正在等候下一次请求指令的驻留连接 |
//改配置文件
[root@localhost conf]# pwd
/usr/local/nginx/conf
[root@localhost conf]# vim nginx.conf
        location /status {
            stub_status on;
            allow 192.168.171.0/24;    //允许这个网段的主机访问
            deny all;                             //拒绝其他主机访问
        }
[root@localhost conf]# systemctl restart nginx.service
测试访问
访问server-ip加/status
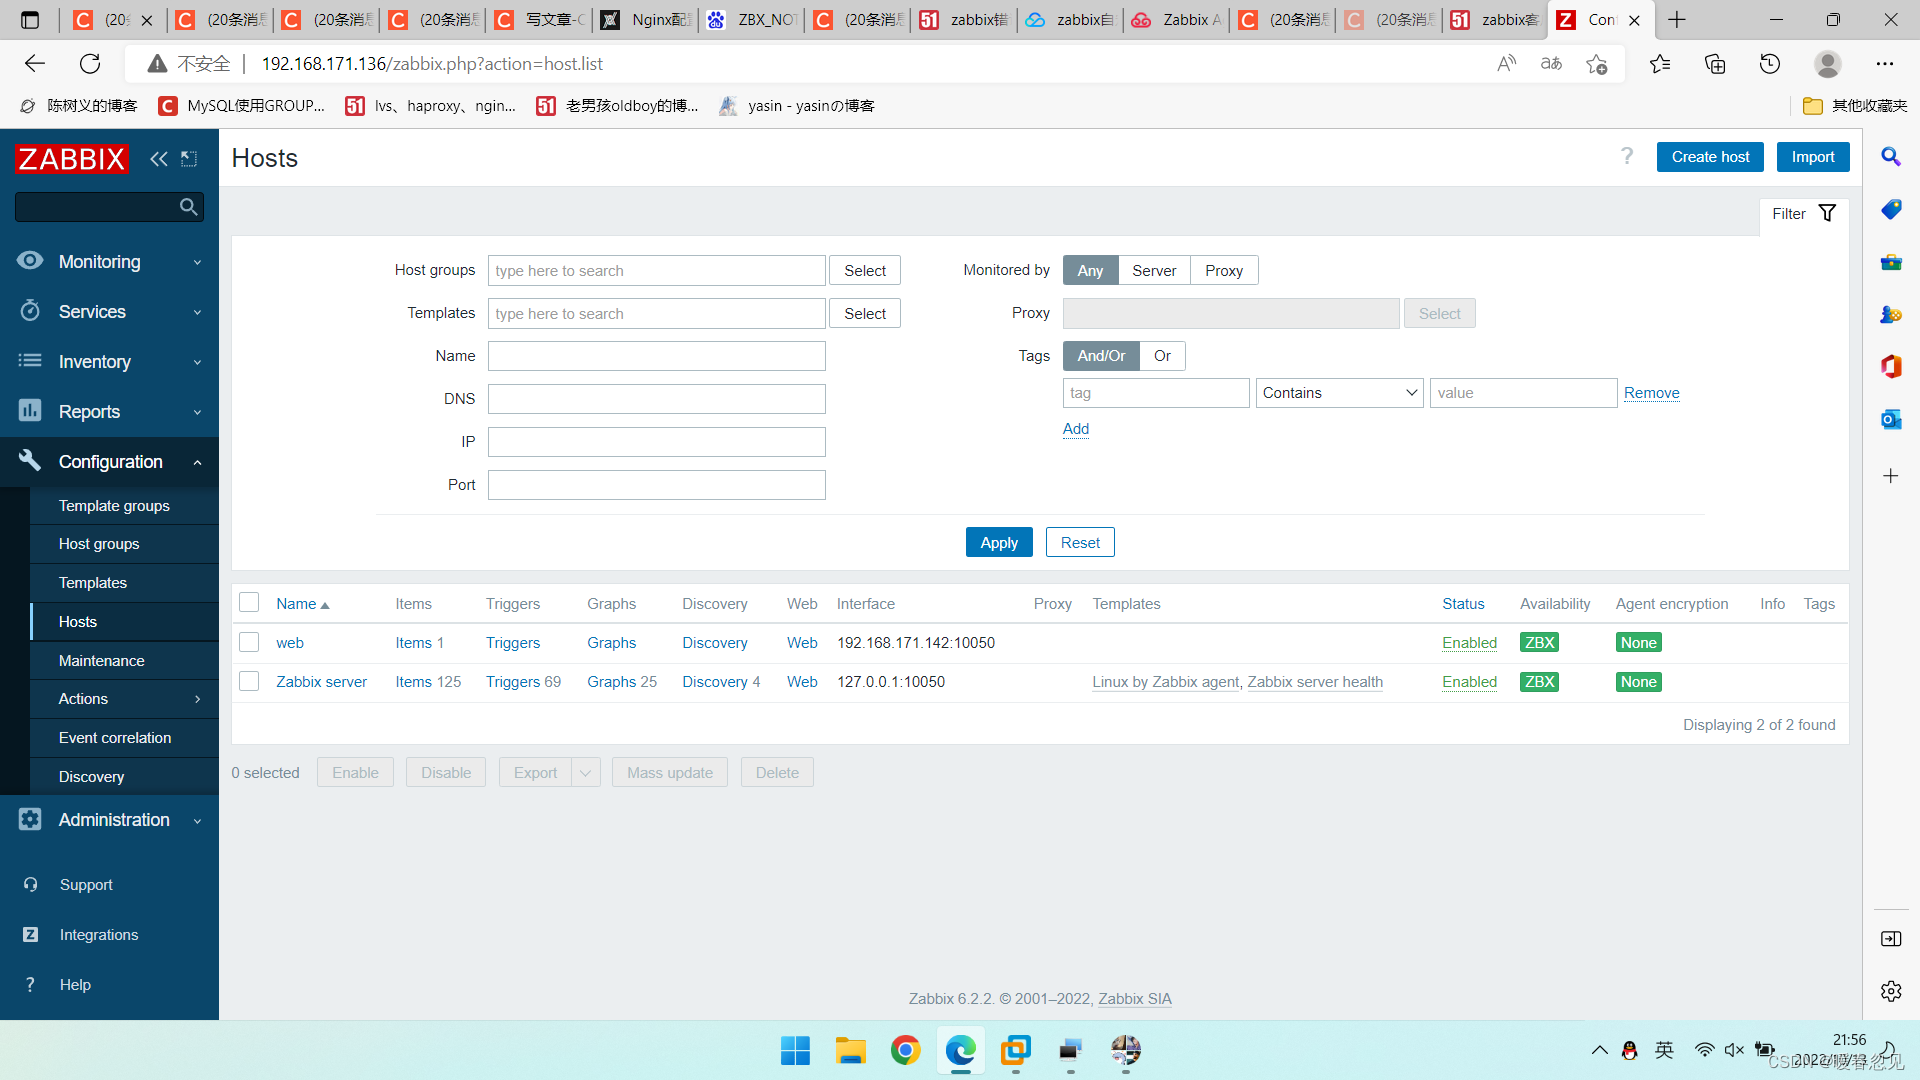
zabbix监控nginx的状态页面
环境说明:
| 使用的系统平台 | IP 需要安装的服务 |
|---|---|
| CentOS8 监控端 | 192.168.171.136 zabbix-server zabbix-agentd |
| CentOS8 被监控端 | 192.168.171.142 nginx zabbix-agentd |
安装zabbix-server需要lamp架构支持,zabbix_agentd的安装之前的文章也写有,这里就不再赘述。
//安装好zabbix_agentd后进入配置文件修改配置指向zabbix_server端
[root@localhost zabbix-6.2.2]# vim /usr/local/etc/zabbix_agentd.conf
Server=192.168.171.136 //服务端主机ip
…………
ServerActive=192.168.171.136 //agent主动模式
…………
Hostname=nginx //zabbix监控的主机名
//启动agentd服务
[root@localhost zabbix-6.2.2]# zabbix_agentd
[root@localhost zabbix-6.2.2]# ss -antl
State Recv-Q Send-Q Local Address:Port Peer Address:Port Process
LISTEN 0 128 0.0.0.0:80 0.0.0.0:*
LISTEN 0 128 0.0.0.0:22 0.0.0.0:*
LISTEN 0 128 0.0.0.0:443 0.0.0.0:*
LISTEN 0 128 0.0.0.0:10050 0.0.0.0:*
LISTEN 0 128 [::]:22 [::]:*
[root@localhost zabbix-6.2.2]#
//配置被监控端的nginx的配置文件
[root@localhost conf]# vim nginx.conf
location /status {
stub_status on;
allow 192.168.171.142;
allow 192.168.171.136; //允许这个网段的主机访问
deny all; //拒绝其他主机访问
}
[root@localhost conf]# systemctl restart nginx.service
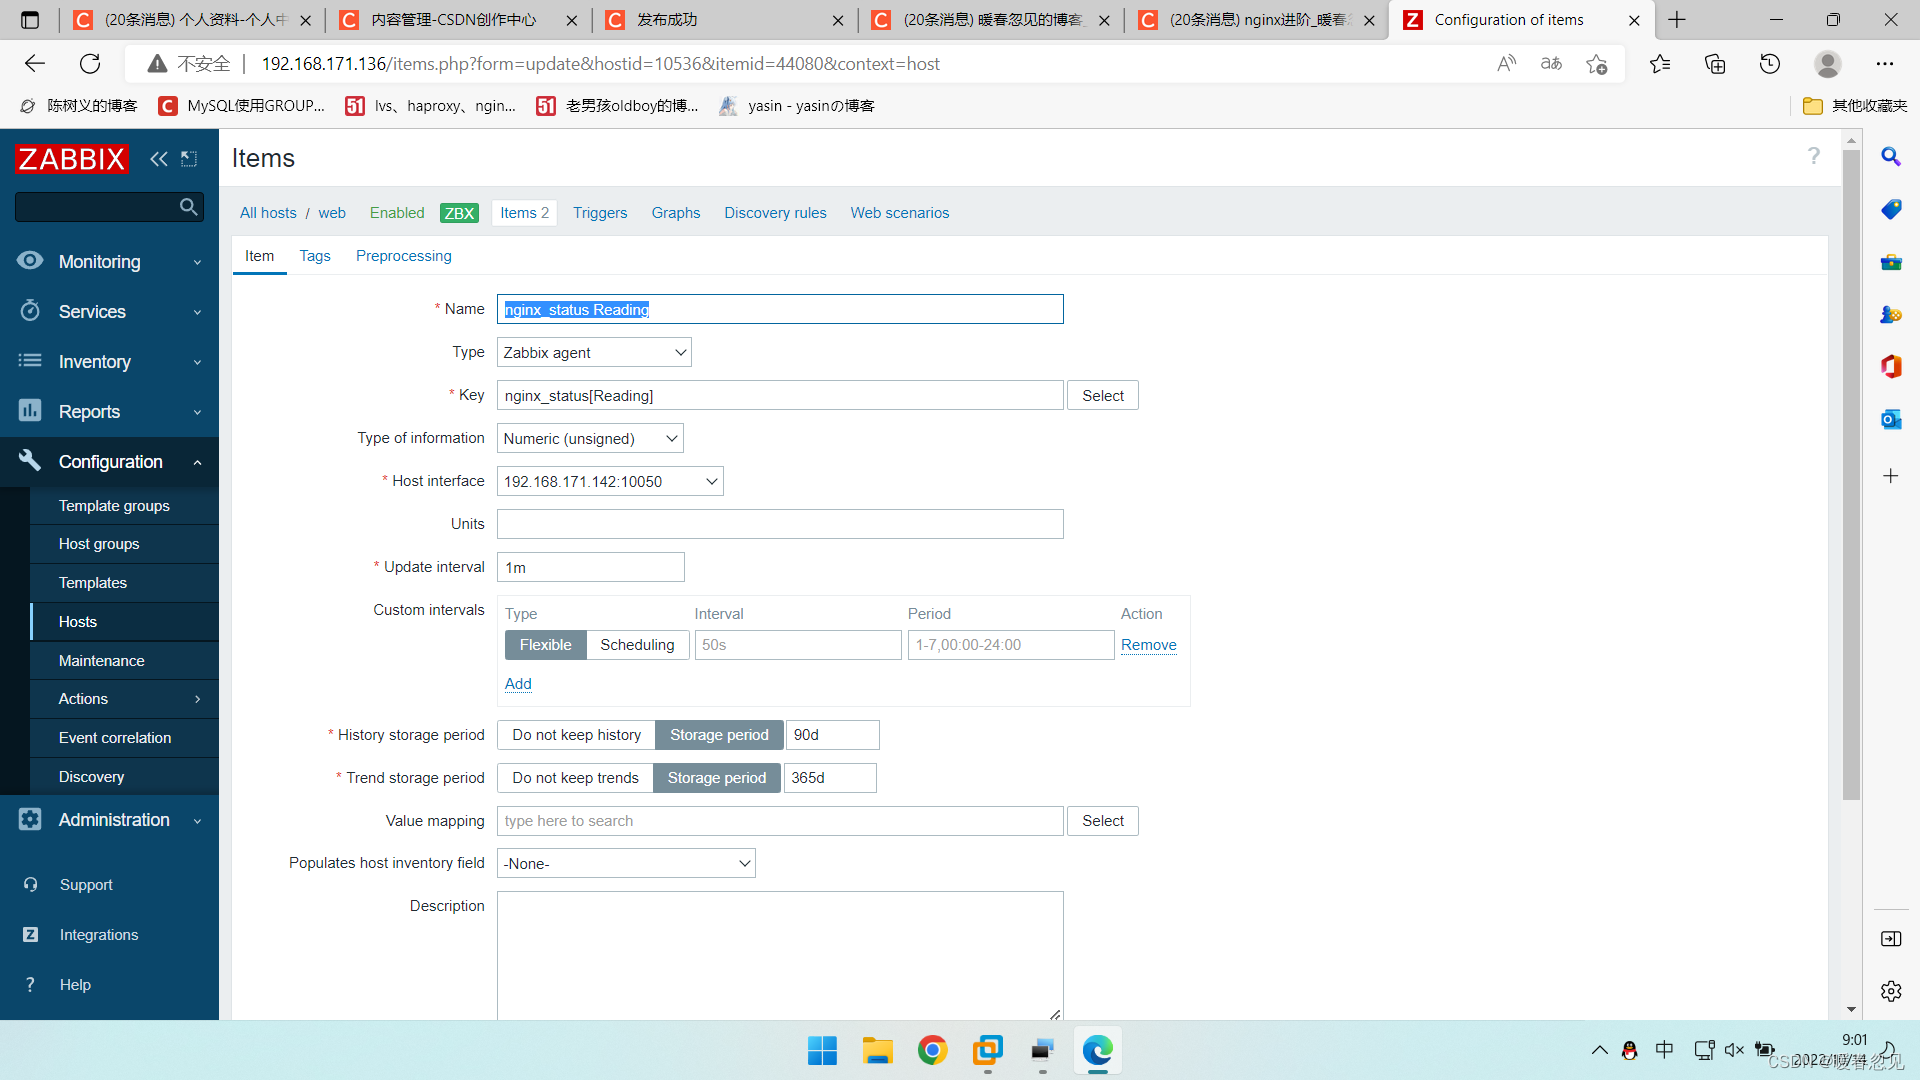
//写监控脚本
[root@localhost ~]# mkdir /scripts/
[root@localhost ~]# cd /scripts/
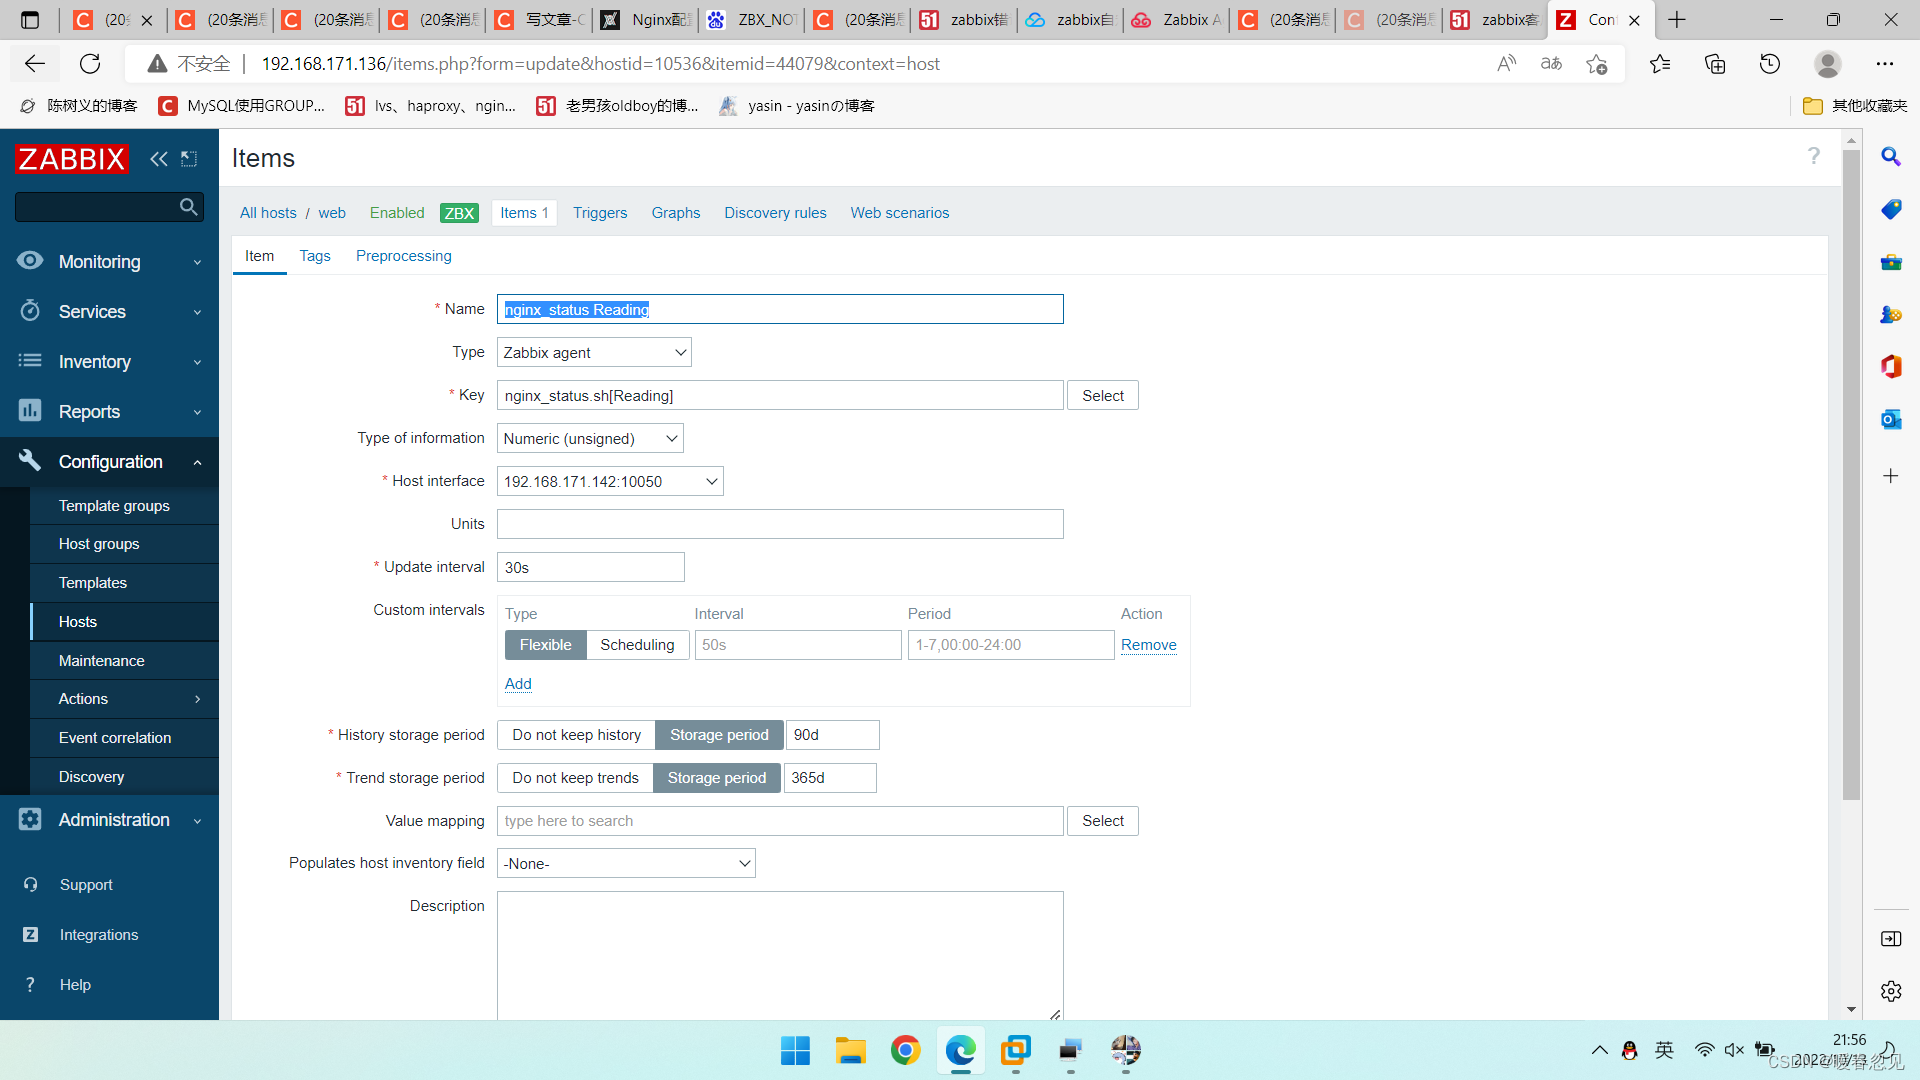
[root@localhost scripts]# vim nginx_status.sh
#!/bin/bash
case $1 in
Reading)
curl -s 192.168.171.142/status | awk "NR==4 {print\$2}"
;;
Writing)
curl -s 192.168.171.142/status | awk "NR==4 {print\$4}"
;;
Waiting)
curl -s 192.168.171.142/status | awk "NR==4 {print\$4}"
;;
*)
exit
;;
esac
[root@localhost scripts]# chmod +x nginx_status.sh
//修改agentd的配置文件
[root@localhost ~]# vim /usr/local/etc/zabbix_agentd.conf
...
UnsafeUserParameters=1
UserParameter=nginx_status[*],/bin/bash /scripts/nginx_status.sh $1
...
//重启agentd服务
[root@localhost ~]# pkill zabbix_agentd
[root@localhost ~]# zabbix_agentd
[root@localhost ~]# ss -antl | grep 10050
LISTEN 0 128 0.0.0.0:10050 0.0.0.0:*
//在zabbix服务端上测试一下脚本是否能够执行
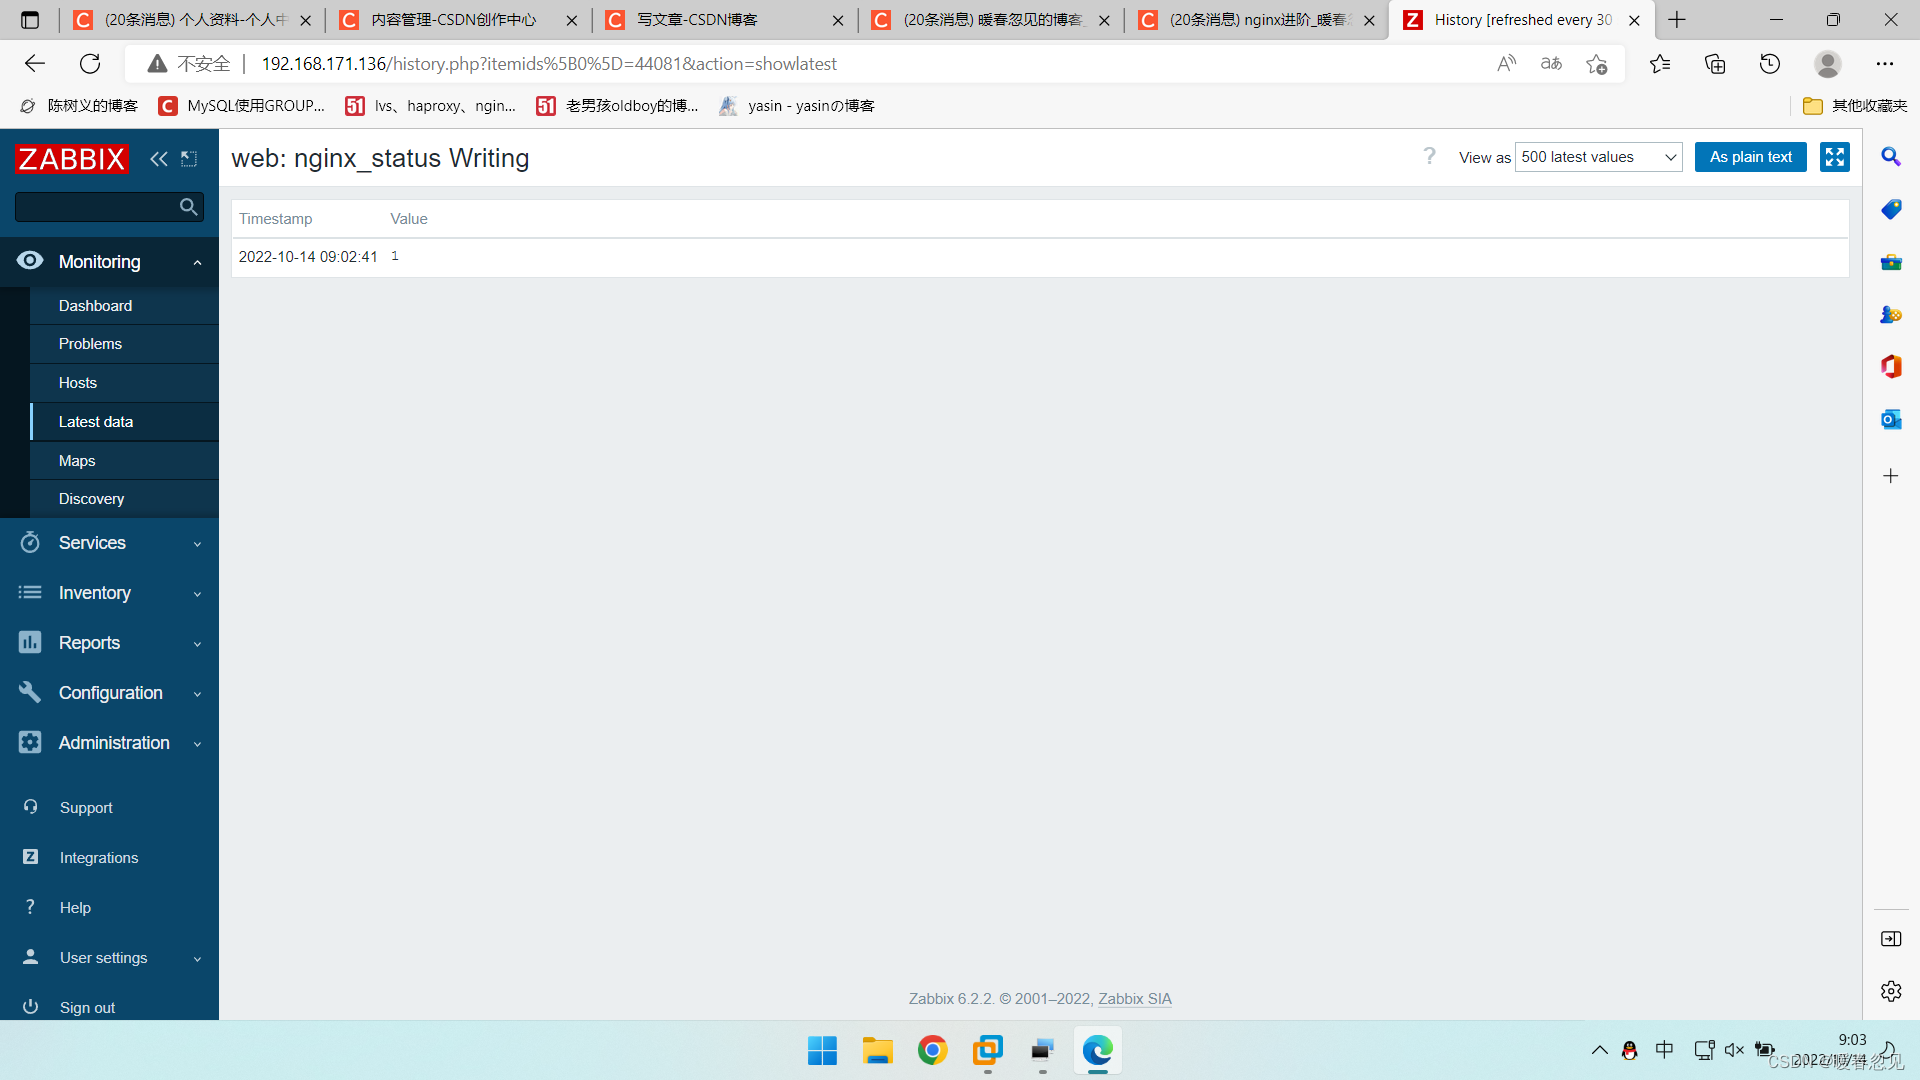
[root@localhost ~]# zabbix_get -s 192.168.171.142 -k nginx_status[Writing]
1


 5445
5445


 被折叠的 条评论
为什么被折叠?
被折叠的 条评论
为什么被折叠?
 到【灌水乐园】发言


