自编码:Autoencoder
压缩与解压
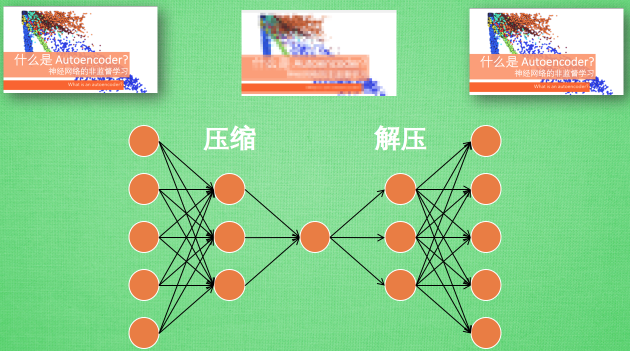
有一个神经网络, 它在做的事情是 接收一张图片, 然后 给它打码, 最后 再从打码后的图片中还原. 太抽象啦? 行, 我们再具体点.
假设刚刚那个神经网络是这样, 对应上刚刚的图片, 可以看出图片其实是经过了压缩,再解压的这一道工序. 当压缩的时候, 原有的图片质量被缩减, 解压时用信息量小却包含了所有关键信息的文件恢复出原本的图片. 为什么要这样做呢?
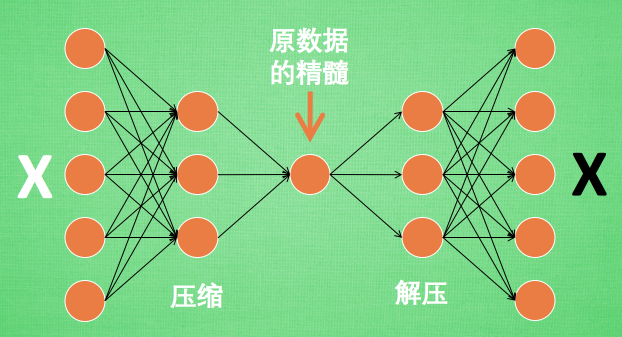
原来有时神经网络要接受大量的输入信息, 比如输入信息是高清图片时, 输入信息量可能达到上千万, 让神经网络直接从上千万个信息源中学习是一件很吃力的工作. 所以, 何不压缩一下, 提取出原图片中的最具代表性的信息, 缩减输入信息量, 再把缩减过后的信息放进神经网络学习. 这样学习起来就简单轻松了. 所以, 自编码就能在这时发挥作用. 通过将原数据白色的X 压缩, 解压 成黑色的X, 然后通过对比黑白 X ,求出预测误差, 进行反向传递, 逐步提升自编码的准确性. 训练好的自编码中间这一部分就是能总结原数据的精髓. 可以看出, 从头到尾, 我们只用到了输入数据 X, 并没有用到 X 对应的数据标签, 所以也可以说自编码是一种非监督学习. 到了真正使用自编码的时候. 通常只会用到自编码前半部分.
实验结果:
Epoch: 0001 cost= 0.085280575
Epoch: 0002 cost= 0.076449201
Epoch: 0003 cost= 0.072712988
Epoch: 0004 cost= 0.067961387
Epoch: 0005 cost= 0.069423236
Optimization Finished!

实验代码:
老规矩,先上链接:
https://download.csdn.net/download/o0haidee0o/10465900
import tensorflow as tf
from tensorflow.examples.tutorials.mnist import input_data
import matplotlib.pyplot as plt
from mpl_toolkits.mplot3d import Axes3D
from matplotlib import cm
import numpy as np


###read the mnist data

from tensorflow.examples.tutorials.mnist import input_data
mnist = input_data.read_data_sets('MNIST_data', one_hot=True)


# Parameter
learning_rate = 0.01
training_epochs = 5 # 五组训练
batch_size = 256
display_step = 1
examples_to_show = 10

# Network Parameters
n_input = 784  # MNIST data input (img shape: 28*28)

###Placeholders
X = tf.placeholder(tf.float32, [None, 784])


#hidden layer settings
n_hidden_1=256 #1st hidden layer output num
n_hidden_2=128 #2st hidden layer output num
weights = {
    'encoder_h1':tf.Variable(tf.random_normal([n_input,n_hidden_1])),
    'encoder_h2':tf.Variable(tf.random_normal([n_hidden_1,n_hidden_2])),
    'decoder_h1':tf.Variable(tf.random_normal([n_hidden_2,n_hidden_1])),
    'decoder_h2':tf.Variable(tf.random_normal([n_hidden_1,n_input])),
    }
biases = {
    'encoder_b1':tf.Variable(tf.random_normal([n_hidden_1])),
    'encoder_b2':tf.Variable(tf.random_normal([n_hidden_2])),
    'decoder_b1':tf.Variable(tf.random_normal([n_hidden_1])),
    'decoder_b2':tf.Variable(tf.random_normal([n_input])),
    }
#下面来定义 Encoder 和 Decoder ,使用的 Activation function 是 sigmoid,
#压缩之后的值应该在 [0,1] 这个范围内。
#在 decoder 过程中,通常使用对应于 encoder 的 Activation function
def encoder(x):
    layer_1 = tf.nn.sigmoid(tf.add(tf.matmul(x,weights['encoder_h1']),biases['encoder_b1']))
    layer_2 = tf.nn.sigmoid(tf.add(tf.matmul(layer_1,weights['encoder_h2']),
                                   biases['encoder_b2']))
    return layer_2
def decoder(x):
    layer_1 = tf.nn.sigmoid(tf.add(tf.matmul(x,weights['decoder_h1']),biases['decoder_b1']))
    layer_2 = tf.nn.sigmoid(tf.add(tf.matmul(layer_1,weights['decoder_h2']),
                                   biases['decoder_b2']))
    return layer_2


#实现 Encoder 和 Decoder 输出的结果:
encoder_op = encoder(X)
decoder_op = decoder(encoder_op)
#Verification
y_ver = decoder_op #copy 'decoder_op' to 'y_ver' for verification
y = X #'y' is the expected output, actrually is 'X' cause unsupervised learning.

#calculate the COST of 'y_ver'&'y'.
cost = tf.losses.mean_squared_error(y,y_ver)
##cost = tf.reduce_mean(tf.pow(y,y_ver,2))#tf.pow幂次方,后面是2代表平方和 Wrong!!
optimizer = tf.train.AdamOptimizer(learning_rate).minimize(cost)

#最后,通过 Matplotlib 的 pyplot 模块将结果显示出来,
#注意在输出时MNIST数据集经过压缩之后 x 的最大值是1,而非255:

# Launch the graph
with tf.Session() as sess:
    sess.run(tf.global_variables_initializer())#########The newest initial centence!!!!!!!!!
    total_batch = int(mnist.train.num_examples/batch_size)#get the 'total_batch'from mnist
    # Training cycle
    for epoch in range(training_epochs):
        #Loop over all batches
        for i in range(total_batch):
            batch_xs,batch_ys = mnist.train.next_batch(batch_size) #get data from mnist
            #sess.run(cost)+sess.run(optimizer)  may work as well
            _,c = sess.run([optimizer,cost],feed_dict={X:batch_xs})#'c'is cost return-value
        #Display logs per epoch step
        if epoch % display_step == 0:
            print("Epoch:",'%04d'%(epoch+1),"cost=","{:.9f}".format(c))

    print("Optimization Finished!")

    ## Applying encode and decode over test set
    encode_decode = sess.run(y_ver,feed_dict={X:mnist.test.images[:examples_to_show]})
    ##Compare original images with their reconstructions
    f,a = plt.subplots(2,10,figsize=(10,2))#'figsize':the size of images???
    for i in range(examples_to_show):
        a[0][i].imshow(np.reshape(mnist.test.images[i],(28,28)))
        a[1][i].imshow(np.reshape(encode_decode[i],(28,28)))
    plt.show()
程序学习自莫烦Python,其程序有错误,已经用???标明并改正。
2018.06.08 改了一下显示
先上效果:

中间行是压缩后的图像,原谅我笑了,我好像发现了如何把图像压缩成二维码。
压缩后的图像是长度为128的向量,我分成了8*16放在二位平面里显示,就是图中的样子了。这是训练100个epochs的结果。但是效果和5个epochs相差不多的感觉。
输出:
Epoch: 0010 cost= 0.062764212
Epoch: 0050 cost= 0.053296197
Epoch: 0100 cost= 0.051029056
(事实上,60次之后cost就不怎么下降了)
程序:
程序链接:
https://download.csdn.net/download/o0haidee0o/10468149
import tensorflow as tf
from tensorflow.examples.tutorials.mnist import input_data
import matplotlib.pyplot as plt
from mpl_toolkits.mplot3d import Axes3D
from matplotlib import cm
import numpy as np


###read the mnist data

from tensorflow.examples.tutorials.mnist import input_data
mnist = input_data.read_data_sets('MNIST_data', one_hot=True)


# Parameter
learning_rate = 0.01
training_epochs = 100 # 100组训练
batch_size = 256
display_step = 1
examples_to_show = 10

# Network Parameters
n_input = 784  # MNIST data input (img shape: 28*28)

###Placeholders
X = tf.placeholder(tf.float32, [None, 784])


#hidden layer settings
n_hidden_1=256 #1st hidden layer output num
n_hidden_2=128 #2st hidden layer output num
weights = {
    'encoder_h1':tf.Variable(tf.random_normal([n_input,n_hidden_1])),
    'encoder_h2':tf.Variable(tf.random_normal([n_hidden_1,n_hidden_2])),
    'decoder_h1':tf.Variable(tf.random_normal([n_hidden_2,n_hidden_1])),
    'decoder_h2':tf.Variable(tf.random_normal([n_hidden_1,n_input])),
    }
biases = {
    'encoder_b1':tf.Variable(tf.random_normal([n_hidden_1])),
    'encoder_b2':tf.Variable(tf.random_normal([n_hidden_2])),
    'decoder_b1':tf.Variable(tf.random_normal([n_hidden_1])),
    'decoder_b2':tf.Variable(tf.random_normal([n_input])),
    }
#下面来定义 Encoder 和 Decoder ,使用的 Activation function 是 sigmoid,
#压缩之后的值应该在 [0,1] 这个范围内。
#在 decoder 过程中,通常使用对应于 encoder 的 Activation function
def encoder(x):
    layer_1 = tf.nn.sigmoid(tf.add(tf.matmul(x,weights['encoder_h1']),biases['encoder_b1']))
    layer_2 = tf.nn.sigmoid(tf.add(tf.matmul(layer_1,weights['encoder_h2']),
                                   biases['encoder_b2']))
    return layer_2
def decoder(x):
    layer_1 = tf.nn.sigmoid(tf.add(tf.matmul(x,weights['decoder_h1']),biases['decoder_b1']))
    layer_2 = tf.nn.sigmoid(tf.add(tf.matmul(layer_1,weights['decoder_h2']),
                                   biases['decoder_b2']))
    return layer_2


#实现 Encoder 和 Decoder 输出的结果:
encoder_op = encoder(X)
decoder_op = decoder(encoder_op)
#Verification
y_ver = decoder_op #copy 'decoder_op' to 'y_ver' for verification
y = X #'y' is the expected output, actrually is 'X' cause unsupervised learning.

#calculate the COST of 'y_ver'&'y'.
cost = tf.losses.mean_squared_error(y,y_ver)
##cost = tf.reduce_mean(tf.pow(y,y_ver,2))#tf.pow幂次方,后面是2代表平方和 Wrong!!
optimizer = tf.train.AdamOptimizer(learning_rate).minimize(cost)

#最后,通过 Matplotlib 的 pyplot 模块将结果显示出来,
#注意在输出时MNIST数据集经过压缩之后 x 的最大值是1,而非255:

# Launch the graph
with tf.Session() as sess:
    sess.run(tf.global_variables_initializer())#########The newest initial centence!!!!!!!!!
    total_batch = int(mnist.train.num_examples/batch_size)#get the 'total_batch'from mnist
    # Training cycle
    for epoch in range(training_epochs):
        #Loop over all batches
        for i in range(total_batch):
            batch_xs,batch_ys = mnist.train.next_batch(batch_size) #get data from mnist
            #sess.run(cost)+sess.run(optimizer)  may work as well
            _,c = sess.run([optimizer,cost],feed_dict={X:batch_xs})#'c'is cost return-value
        #Display logs per epoch step
        if epoch % display_step == 0:
            print("Epoch:",'%04d'%(epoch+1),"cost=","{:.9f}".format(c))

    print("Optimization Finished!")

        ## Applying encode and decode over test set
    encode_decode = sess.run(y_ver,feed_dict={X:mnist.test.images[:examples_to_show]})
    y_m = sess.run(encoder_op,feed_dict={X:mnist.test.images[:examples_to_show]})#y_m <= encoder_op

    ##Compare original images with their reconstructions
    f,a = plt.subplots(3,10,figsize=(10,2))#'figsize':the size of images???
    for i in range(examples_to_show):
        a[0][i].imshow(np.reshape(mnist.test.images[i],(28,28)))
        a[1][i].imshow(np.reshape(y_m[i],(8,16)))#display encoder val
        a[2][i].imshow(np.reshape(encode_decode[i],(28,28)))
    plt.show()


 664
664

 被折叠的 条评论
为什么被折叠?


