


 内容提供者是Android实现跨程序数据共享的标准方式,主要用于在不同应用间安全地分享数据。通过ContentResolver进行CRUD操作,如读取系统联系人。创建自己的内容提供者需要继承ContentProvider并重写相关方法,使用UriMatcher处理内容URI。记得添加权限声明以允许其他应用访问。
内容提供者简介
使用场景:
比如:电话薄,短信,媒体库简介
主要用于在不同的应用程序之间实现数据共享的功能,它提供了一套完整的机制,允许一个程序访问另一个程序中的数据,同时还能保证被访数据的安全性。目前,使用内容提供器是 Android实现跨程序共享数据的标准方式。不同于文件存储和 SharedPreferences 存储中的两种全局可读写操作模式,内容提供器可以选择只对哪一部分数据进行共享,从而保证我们程序中的隐私数据不会有泄漏的风险。
用法
一种是使用现有的内容提供器来读取和操作相应程序中的数据。
另一种是创建自己的内容提供器给我们程序的数据提供外部访问接口。
访问其他应用中的数据
ContentResolver 的基本用法
1、获取
通过 Context 中的 getContentResolver()方法获取到该类的实例。2、函数
ContentResolver 中提供了一系列的方法用于对数据进行 CRUD 操作,其中 insert()方法用于
添加数据,update()方法用于更新数据,delete()方法用于删除数据,query()方法用于查询数
据。
3、内容URL
内容 URI给内容提供器中的数据建立了唯一标识符,它主要由两部分组成,权限(authority)和路径(path)。权限是用于对不同的应用程序做区分的,一般为了避免冲突,都会采用程序包名的方式来进行命名。
比如某个
程序的包名是 com.example.app,那么该程序对应的权限就可以命名为 com.example.app.
provider。路径则是用于对同一应用程序中不同的表做区分的,通常都会添加到权限的后面。
比如某个程序的数据库里存在两张表,table1和 table2,这时就可以将路径分别命名为/table1
和/table2,然后把权限和路径进行组合,内容 URI 就变成了 com.example.app.provider/table1
和 com.example.app.provider/table2。不过,目前还很难辨认出这两个字符串就是两个内容
URI,我们还需要在字符串的头部加上协议声明。因此,内容 URI最标准的格式写法如下:
content://com.example.app.provider/table1
content://com.example.app.provider/table2
4、解析内容URL,解析成Uri对象。
Uri uri = Uri.parse("content://com.example.app.provider/table1")5、查询query()
5.1参数
Cursor cursor = getContentResolver().query(
    uri,
        projection,
        selection,
        selectionArgs,
        sortOrder);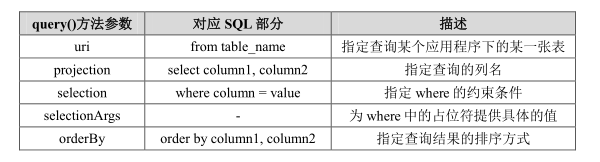
5.2 返回值
一个 Cursor 对象,通过移动游标的位置来遍历 Cursor 的所有行,然后再取出
每一行中相应列的数据。
!!!注意,用完cursor要关闭。
if (cursor != null) {
while (cursor.moveToNext()) {
    String column1 = cursor.getString(cursor.getColumnIndex("column1"));
    int column2 = cursor.getInt(cursor.getColumnIndex("column2"));
    }
    cursor.close();
}
6、增加 insert()
ContentValues values = new ContentValues();
values.put("column1", "text");
values.put("column2", 1);
getContentResolver().insert(uri, values);
7、修改 update()
ContentValues values = new ContentValues();
values.put("column1", "");
getContentResolver().update(uri, values, "column1 = ? and column2 = ?", new
String[] {
  "text", "1"});
8、删除delete()
getContentResolver().delete(uri, "column2 = ?", new String[] { "1" });实例——读取系统联系人
ContactsContract.CommonDataKinds.Phone类已经帮我们做好了封装,提供了一个CONTENT_URI
常量,而这个常量就是使用 Uri.parse()方法解析出来的结果。
public class MainActivity extends Activity {


    private ListView contactListView;
    private ArrayAdapter<String> adapter;
    private List<String> contactList;

    @Override
    protected void onCreate(Bundle savedInstanceState) {
        super.onCreate(savedInstanceState);
        setContentView(R.layout.activity_main);

        initList();
        readContact();
    }

    private void initList(){
        contactList = new ArrayList<String>();
        contactListView = (ListView)findViewById(R.id.contacts_view);
        adapter =  new ArrayAdapter<String>(MainActivity.this, android.R.layout.simple_list_item_1, contactList);
        contactListView.setAdapter(adapter);
    }

    private void readContact(){
        Cursor cursor = null;
        try{
            cursor = getContentResolver().query(ContactsContract.CommonDataKinds.Phone.CONTENT_URI, null, null, null, null);
            while(cursor.moveToNext()){
                String displayName = cursor.getString(cursor.getColumnIndex(ContactsContract.CommonDataKinds.Phone.DISPLAY_NAME));

                String number = cursor.getString(cursor.getColumnIndex(ContactsContract.CommonDataKinds.Phone.NUMBER));
                contactList.add(displayName + "\n" + number);
            }
        }catch (Exception e){
            e.printStackTrace();
        }finally {
            if(cursor != null){
                cursor.close();
            }
        }

    }
}
布局文件
<ListView
        android:id="@+id/contacts_view"
        android:layout_width="match_parent"
        android:layout_height="match_parent" >
    </ListView>
最后,千万别忘记加权限
<uses-permission  最低0.47元/天 解锁文章


 195
195

 被折叠的 条评论
为什么被折叠?
被折叠的 条评论
为什么被折叠?
 到【灌水乐园】发言


