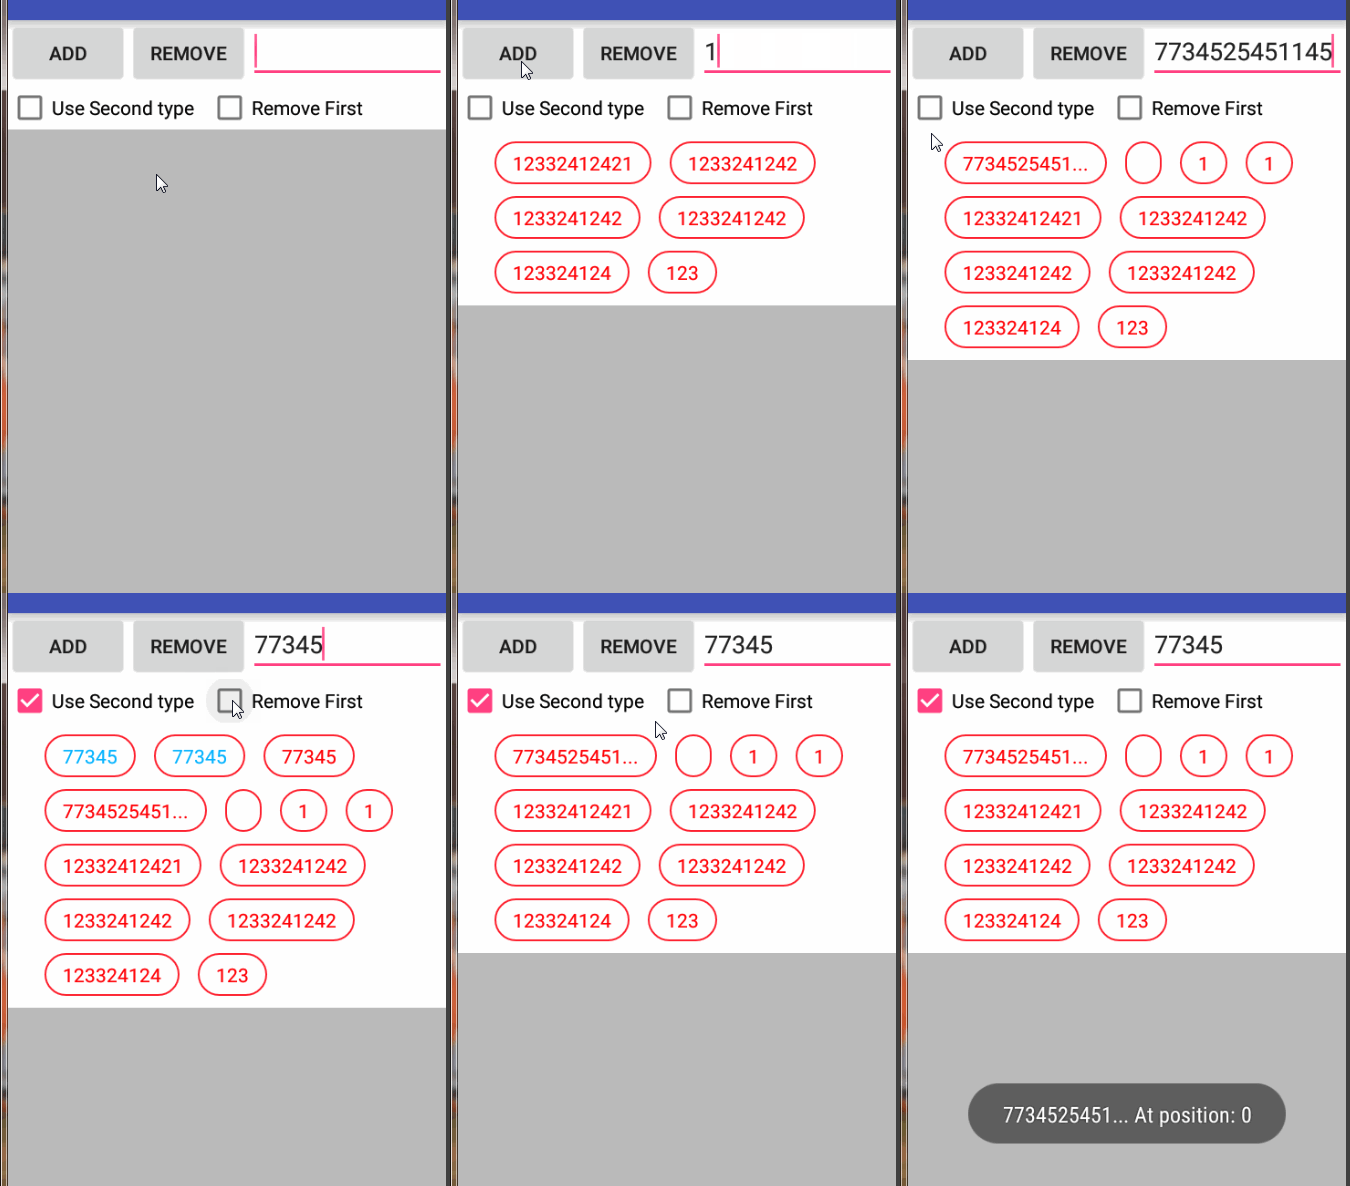
这个标签的布局唯一的难点也就是布局和测量而已。
我们只需要重写ViewGroup里面两个方法即可!
protected void onMeasure(int widthMeasureSpec, int heightMeasureSpec)
@Override
    protected void onMeasure(int widthMeasureSpec, int heightMeasureSpec) {
        super.onMeasure(widthMeasureSpec, heightMeasureSpec);
        measureChildren(widthMeasureSpec, heightMeasureSpec);
        int hMode = MeasureSpec.getMode(heightMeasureSpec);
        int height = 0;
        if (hMode == MeasureSpec.EXACTLY){
            height = MeasureSpec.getSize(heightMeasureSpec);
        }else {
            int width = MeasureSpec.getSize(widthMeasureSpec);
            int count = getChildCount();
            int lineWidth = width;
            int maxHeight = 0;
            for (int i = 0; i < count ; i++) {
                View childView = getChildAt(i);
                int childWidth = childView.getMeasuredWidth();
                int childHeight = childView.getMeasuredHeight();
                if (childHeight > maxHeight){
                    maxHeight = childHeight;
                }
                if (height < maxHeight ){
                    height = maxHeight + 2*linePadding;
                }
                if (lineWidth > childWidth + eachPadding){
                    lineWidth -= (childWidth + eachPadding);
                }else {
                    lineWidth = (width - childWidth + eachPadding);
                    height += maxHeight+linePadding;
                }
            }
        }
        setMeasuredDimension(MeasureSpec.getSize(widthMeasureSpec),height);
}关于控件的长宽属性match、wrap啥的,在这篇里面有过介绍了(http://blog.csdn.net/ocwvar/article/details/50682213)这里就不重复说了。
控件的宽度默认为父容器的宽度。咱们这里要确定的就是ViewGroup的高度,依次计算 每一行所能容下多少个Item+每个Item的间隔,不够的时候就将高度区域增加 累积高度+每行间隔+上一行最高Item的高度 。直到所有Item计算完毕。
protected void onLayout(boolean changed, int l, int t, int r, int b)
@Override
protected void onLayout(boolean changed, int l, int t, int r, int b) {
        int count = getChildCount();
        int lastLeft = getPaddingLeft() + eachPadding;
        int lastTop = linePadding;
        int restWidth = getMeasuredWidth();
        int maxHeight = 0;

        for (int i = 0; i < count; i++) {
            View childView = getChildAt(i);
            int width = childView.getMeasuredWidth();
            int height = childView.getMeasuredHeight();
            if (restWidth > width + eachPadding){
                childView.layout( lastLeft+=eachPadding , lastTop , lastLeft+=width , lastTop+height);
            }else {
                restWidth = r;
                lastLeft = l + eachPadding;
                lastTop += (linePadding + maxHeight);
                childView.layout( lastLeft+=eachPadding , lastTop ,lastLeft+=width, lastTop+height);
            }
            if (height > maxHeight){
                maxHeight = height;
            }
            restWidth -= width + eachPadding;
        }

    }
在绘制的时候和测量高度也是差不多的,咱们要首先记下刚开始时的X,Y。然后依次绘制 间隔+Item+间隔+Item+间隔 直到剩余长度(restWidth)不够,咱们就移到下一行的位置(上一行的Y+上一行最高Item的高度+每行的间隔)。
剩下的就是Tag的添加与移除的处理,咱们的Tag有两种风格,对应着的也就是两种布局而已。
public void addTag(String tag, int position,boolean isSecondStyle)
public void addTag(String tag, int position,boolean isSecondStyle){
        final View tagView;
        TextView textView;
        int count = getChildCount();
        if (position > count){
            position = count;
        }else if (position < 0 ){
            position = 0;
        }
        if (isSecondStyle){
            tagView = LayoutInflater.from(getContext()).inflate(secondViewLayout,this,false);
            textView = (TextView)tagView.findViewById(secondTVID);
        }
        else{
            tagView = LayoutInflater.from(getContext()).inflate(tagViewLayout,this,false);
            textView = (TextView)tagView.findViewById(firstTVID);
        }
        tagView.setOnClickListener(new OnClickListener() {
            @Override
            public void onClick(View v) {
                if (onTagClick != null){
                    onTagClick.onTagClick(v.getTag().toString(),indexOfChild(tagView));
                }
            }
        });
        if (tag.length() > 12){
            tag = String.valueOf(tag.toCharArray(),0,TAG_MAX_LENGTH)+"...";
        }
        tagView.setTag(tag);
        textView.setSingleLine(true);
        textView.setText(tag);
        addView(tagView, position);
        requestLayout();
        measureChildren(getMeasuredWidth(), getMeasuredHeight());
    }
唯一要注意的一个地方就是
String.valueOf(tag.toCharArray(),0,TAG_MAX_LENGTH)+”…”;
当Tag的文本太长的时候非常有碍观瞻,我们可以将其缩减,就像示例图里面那样,比如将:asdfghjkl 缩减成 asdfgh… 这样的固定长度即可。
移除Tag的方法:
public void removeTag(String tagText,boolean onlyRemoveFirstFind)
public void removeTag(String tagText,boolean onlyRemoveFirstFind){
        List<Integer> tags = null;
        if (!onlyRemoveFirstFind){
            tags = new ArrayList<>();
        }
        if (tagText.length() > TAG_MAX_LENGTH){
            tagText = String.valueOf(tagText.toCharArray(),0,TAG_MAX_LENGTH)+"...";
        }
        int count = getChildCount();
        for (int i = 0; i < count; i++) {
            View childView = getChildAt(i);
            if (childView != null && childView.getTag() != null && childView.getTag().equals(tagText)){
                if (!onlyRemoveFirstFind){
                    tags.add(0,i);
                }else {
                    removeViewAt(i);
                    break;
                }
            }
        }
        if (!onlyRemoveFirstFind){
            for (int i = 0; i < tags.size(); i++) {
                removeViewAt(tags.get(i));
            }
        }
        requestLayout();
    }
这也没啥好讲的。。


 371
371


 被折叠的 条评论
为什么被折叠?


