


传统方式操作数据库
传统方式使用JDBC操作数据库主要有以下几步:
- 加载数据库驱动,并注册
- 从DriverManager获取数据库连接
- 从连接创建Statement对象
- 给Statement对象传入SQL语句及参数
- 调用Statement对应的执行方法,操作数据库
- 对于查询语句,返回ResultSet,遍历即可得到所要查询的数据
- 关闭资源
举一个简单的例子:假设在本地部署好了MySQL数据库,并有个名为test的数据库,库中有个简单的user表。表内容如下:
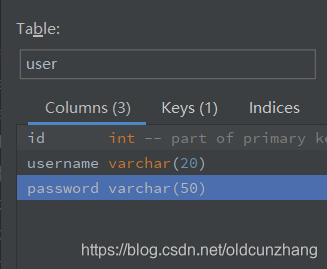
仅包含id、username、password三个字段。现在通过JDBC查询这个数据库表:
首先新建一个User类与数据库表对应(使用了Lombok):
@Data
public class User {
	private int id;
	private String username;
	private String password;
}
通过JDBC操作数据库,需要先把MySQL驱动jar包:mysql-connector-java 放置在classpath下,或者通过maven等导入:
        <dependency>
            <groupId>mysql</groupId>
            <artifactId>mysql-connector-java</artifactId>
            <version>8.0.16</version>
        </dependency>
然后就可以查询数据库了:
public class JDBCExample{

    private static Connection getConnection() {
        Connection connection = null;
        try {
        	// 反射加载数据库驱动
            Driver driver = (Driver) Class.forName("com.mysql.cj.jdbc.Driver").newInstance();
            // 注册数据库驱动
            DriverManager.registerDriver(driver);

			// 数据库连接信息
            String url = "jdbc:mysql://localhost:3306/test";
            String user = "root";
            String password = "root";
            // 获得一个数据库连接
            connection = DriverManager.getConnection(url, user, password);
        } catch (ClassNotFoundException e) {
            System.out.println("找不到数据库驱动类!");
        } catch (SQLException e) {
            System.out.println("连接失败!");
        } catch (IllegalAccessException | InstantiationException e) {
            System.out.println("创建驱动实例失败");
        }
        return connection;
    }

    public User getById(int id) {
    	// 获得数据库连接
        Connection connection = getConnection();
        // 声明一个Statement
        PreparedStatement ps = null;
        // 结果集
        ResultSet rs = null;
        try {
        	// 预编译SQL语句,?为占位符
            ps = connection.prepareStatement("select * from user where id = ?");
            // 填充占位符
            ps.setInt(1, id);
            // 执行查询语句,把结果返回到ResultSet结果集中
            rs = ps.executeQuery();
            // 遍历结果集
            while (rs.next()) {
            	// 以int型取出数据库字段名为id的数据
                int id = rs.getInt("id");
                // 以String型取出数据库字段名为username的数据
                String username = rs.getString("username");
                String password = rs.getString("password");
				// 属性赋给User对象
                User user = new User();
                user.setId(id);
                user.setUsername(username);
                user.setPassword(password);
                return user;
            }
        } catch (SQLException e) {
            e.printStackTrace();
        } finally {
        	// 释放资源
            close(rs, ps, connection);
        }
        return null;
    }

    private void close(ResultSet rs, Statement stmt, Connection conn) {
        try {
            if (rs != null) {
                rs.close();
            }
            if (stmt != null) {
                stmt.close();
            }
            if (conn != null) {
                conn.close();
            }
        } catch (SQLException e) {
            System.out.println("释放资源失败!");
        }
    }

    public static void main(String[] args) {
        User user = new JdbcExample().getById(1);
        System.out.println(user);
    }
}
当然较新版本的驱动在加载、注册时做了小简化,即简化了:
	// 反射加载数据库驱动
    Driver driver = (Driver) Class.forName("com.mysql.cj.jdbc.Driver").newInstance();
    // 注册数据库驱动
    DriverManager.registerDriver(driver);
定位到com.mysql.cj.jdbc.Driver类可以看到类似如下代码:
public class Driver extends NonRegisteringDriver implements java.sql.Driver {
    public Driver() throws SQLException {
    }

    static {
        try {
            DriverManager.registerDriver(new Driver());
        } catch (SQLException var1) {
            throw new RuntimeException("Can't register driver!");
        }
    }
}
驱动程序内置了一个static代码块,将自己注册到DriverManager中。所以上边两步可以简化为:
Class.forName("com.mysql.cj.jdbc.Driver")
无需创建实例(newInstance()),也无需手动注册,只要加载了这个类,就会触发该static代码块。
虽然这种方式非常远古、繁琐,但这是数据库操作的基本流程,现代的数据库操作框架,例如MyBatis等,底层无非也是这一套,理解这个流程还是很有用的。比如其中的Statement,是用来具体执行SQL的,从 Connection 中可以调用 createStatement() 返回 Statement 类型,也可以通过prepareStatement(String sql) 返回Statement的子类型PreparedStatement。PreparedStatement可以执行预编译操作,并且使用占位符?,等后续再填充对应的参数,这种预编译+占位符可以优化同一语句的多次执行,并且防止传统的SQL注入攻击。MyBatis里的#{}占位其实就是基于PreparedStatement。
传统方式操作数据库过于硬核,每一步都需要用户自己操作,繁琐且容易出错。以后的进步、优化都是在基于原有的基础上发展而来的。
DriverManger与DataSource
首先在数据库连接的获取上,DriverManager是直接调用驱动获取一个连接,然后使用完再关闭释放,耦合性太强,此外比如对于Web这种数据库访问很频繁的应用,常常需要数据库连接池来减少建立、释放连接的开销。DataSource就是为了解决这些问题的。查看DataSource源码:
/**
* <p>A factory for connections to the physical data source that this
* {@code DataSource} object represents. An alternative to the
* {@code DriverManager} facility, a {@code DataSource} object
* is the preferred means of getting a connection. An object that implements
* the {@code DataSource} interface will typically be
* registered with a naming service based on the
* Java™ Naming and Directory (JNDI) API.
* <P>
* The {@code DataSource} interface is implemented by a driver vendor.
* There are three types of implementations:
* <OL>
* <LI>Basic implementation -- produces a standard {@code Connection}
* object
* <LI>Connection pooling implementation -- produces a {@code Connection}
* object that will automatically participate in connection pooling. This
* implementation works with a middle-tier connection pooling manager.
* <LI>Distributed transaction implementation -- produces a
* {@code Connection} object that may be used for distributed
* transactions and almost always participates in connection pooling.
* This implementation works with a middle-tier
* transaction manager and almost always with a connection
* pooling manager.
* </OL>
* <P>
* A {@code DataSource} object has properties that can be modified
* when necessary. For example, if the data source is moved to a different
* server, the property for the server can be changed. The benefit is that
* because the data source's properties can be changed, any code accessing
* that data source does not need to be changed.
* <P>
* A driver that is accessed via a {@code DataSource} object does not
* register itself with the {@code DriverManager}. Rather, a
* {@code DataSource} object is retrieved though a lookup operation
* and then used to create a {@code Connection} object. With a basic
* implementation, the connection obtained through a {@code DataSource}
* object is identical to a connection obtained through the
* {@code DriverManager} facility.
* <p>
* An implementation of {@code DataSource} must include a public no-arg
* constructor.
*
* @since 1.4
*/
public interface DataSource extends CommonDataSource, Wrapper {
Connection getConnection() throws SQLException;
Connection getConnection(String username, String password)
throws SQLException;
}
注释的大概内容有以下几点:
- 这是连接到物理数据源的工厂。 是DriverManager的替代方法,是获得连接的首选方法。实现此接口的对象通常会基于(JNDI)API向命名服务注册。
- 有三种典型的实现:
- 基本实现,提供一个Connection连接,这种实现和DriverManager提供一个连接相同。
- 池化实现
- 分布式事务实现
- 可以在必要时候修改数据源属性,所以不需要改变访问数据库的代码
- 不会主动向DriverManager注册自己
关于第4点,涉及Java SPI的相关内容,见(Java SPI机制及在数据库连接中的实现)
总之可以得出结论,推荐使用DataSource来获取连接。查看MyBatis关于此接口的实现:

就是对应的池化和非池化版本。先简单看下非池化版本中的对应方法。
// 缓存驱动
private static Map<String, Driver> registeredDrivers = new ConcurrentHashMap<>();

private String driver;
private String url;
private String username;
private String password;
// 静态代码块获取数据库驱动并缓存
static {
  Enumeration<Driver> drivers = DriverManager.getDrivers();
  while (drivers.hasMoreElements()) {
    Driver driver = drivers.nextElement();
    registeredDrivers.put(driver.getClass().getName(), driver);
  }
}

// DataSource接口中的两个方法实现
@Override
public Connection getConnection() throws SQLException
{
    return doGetConnection(username, password);
}
@Override
public Connection getConnection(String username, String password) throws SQLException {
    return doGetConnection(username, password);
}

private Connection doGetConnection(String username, String password) throws SQLException
{
    //封装username和password成properties
    Properties props = new Properties();
    if (driverProperties != null) {
        props.putAll(driverProperties);
    }
    if (username != null) {
        props.setProperty("user", username);
    }
    if (password != null) {
        props.setProperty("password", password);
    }
    return doGetConnection(props);
}

/*
 *  获取数据连接
 */
private Connection doGetConnection(Properties properties) throws SQLException
{
    // 1.初始化驱动
    initializeDriver();
    // 2.从DriverManager中获取新的Connection对象
    Connection connection = DriverManager.getConnection(url, properties);
    // 3.包装connection
    configureConnection(connection);
    return connection;
}
// 包装连接,设置超时时间、是否自动提交、默认事务隔离级别。
private void configureConnection(Connection conn) throws SQLException {
    if (defaultNetworkTimeout != null) {
      conn.setNetworkTimeout(Executors.newSingleThreadExecutor(), defaultNetworkTimeout);
    }
    if (autoCommit != null && autoCommit != conn.getAutoCommit()) {
      conn.setAutoCommit(autoCommit);
    }
    if (defaultTransactionIsolationLevel != null) {
      conn.setTransactionIsolation(defaultTransactionIsolationLevel);
    }
}
操作时序图如下(来源《深入理解mybatis原理》 Mybatis数据源与连接池):
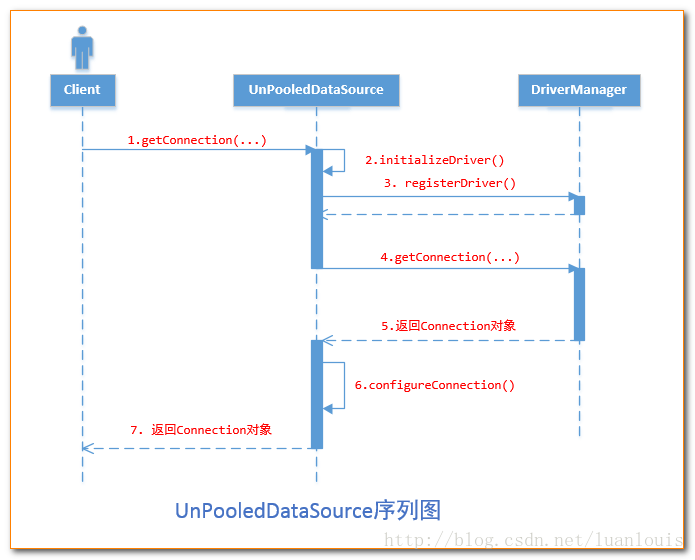
看起来通过UnPooledDataSource获取连接和通过DriverManager获取差不多,只不过MyBatis做了一些包装和校验。
当然这只是最基础的实现,而应用最广泛的应该是池化版本,即PooledDataSource。它的实现见《MyBatis原理——数据库连接池的实现》


 1135
1135


 被折叠的 条评论
为什么被折叠?
被折叠的 条评论
为什么被折叠?
 到【灌水乐园】发言


