


paper:AutoAugment: Learning Augmentation Policies from Data
official implementation:https://github.com/tensorflow/models/tree/master/research/autoaugment
third-party implementation:https://github.com/open-mmlab/mmpretrain/blob/main/mmpretrain/datasets/transforms/auto_augment.py
背景
数据增强是提升分类模型精度的一种有效技术,但是,目前的数据增强都是手动设计的。
本文的创新点
本文提出了AutoAugment,自动搜索改进的数据增强策略。实现中,作者设计了一个搜索空间,其中一个策略由多个子策略组成,对于每个mini-batch中的每张图片随机选择一个子策略。每个子策略包含两个算子,每个算子是一个图像处理函数如平移、旋转、剪切以及函数对应的概率和大小。然后通过搜索算法找到最佳策略,使得模型在目标数据集上达到最高的验证精度。
方法介绍
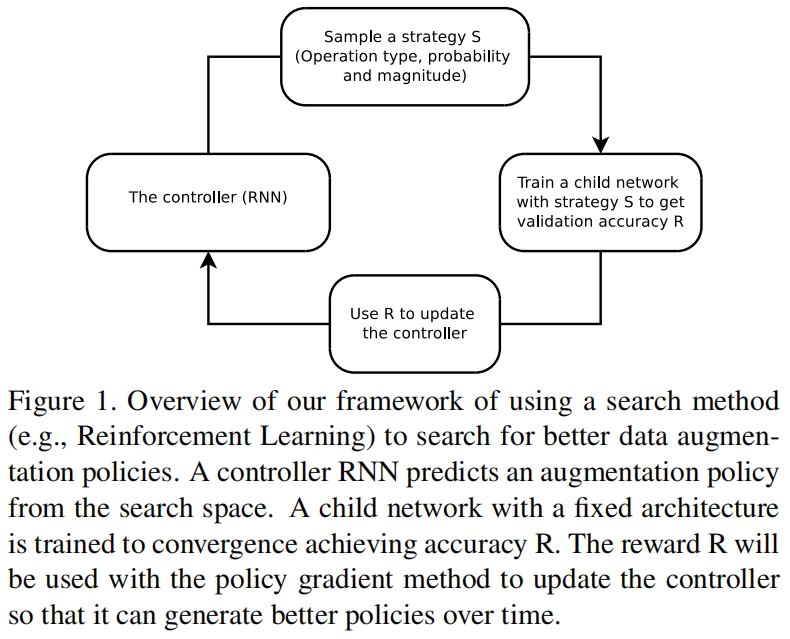
本文将寻找最佳增强策略的问题表述为一个离散搜索问题,如图1所示。
具体包括两个部分,一个搜索算法和一个搜索空间。下面详细介绍一下这两部分
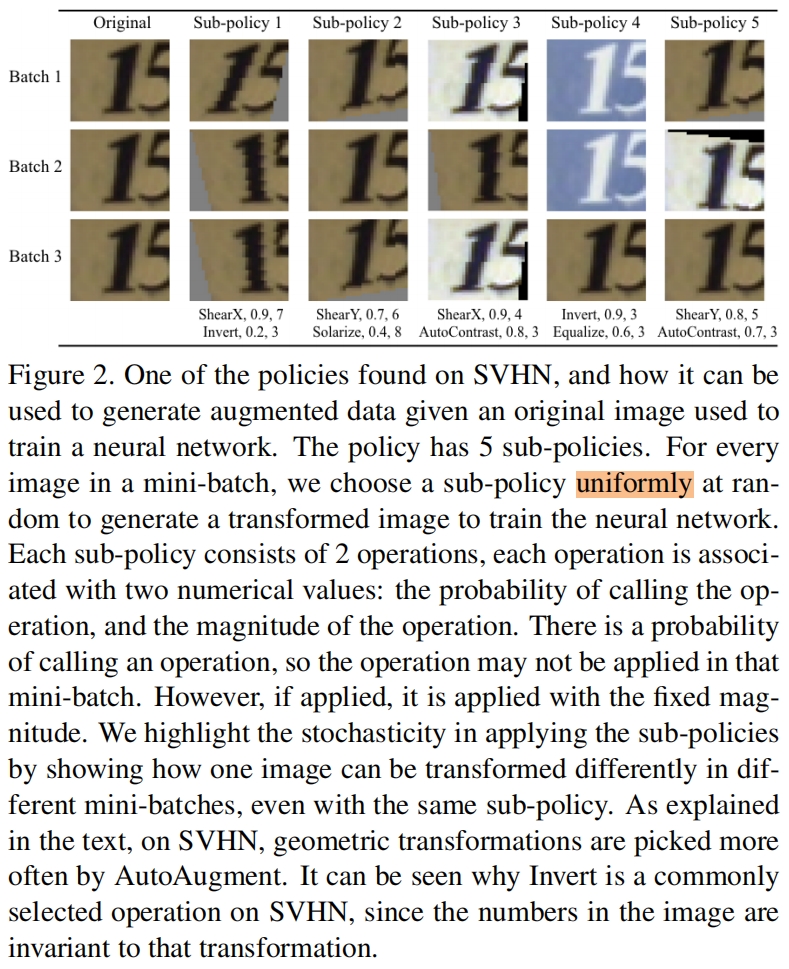
搜索空间细节: 作者设计的搜索空间中,一个策略包括两个子策略,每个子策略由两个依次进行的图像处理操作组成。此外每个操作与两个超参相关联,1)应用该操作的概率,2)该操作的大小。图2是一个具体示例,第一个子策略是ShearX和Invert,应用ShearX的概率为0.7,当应用时幅度为10中的7。应用Invert的概率为0.8,Invert操作不分大小。需要注意的是,应用是有前后顺序的。
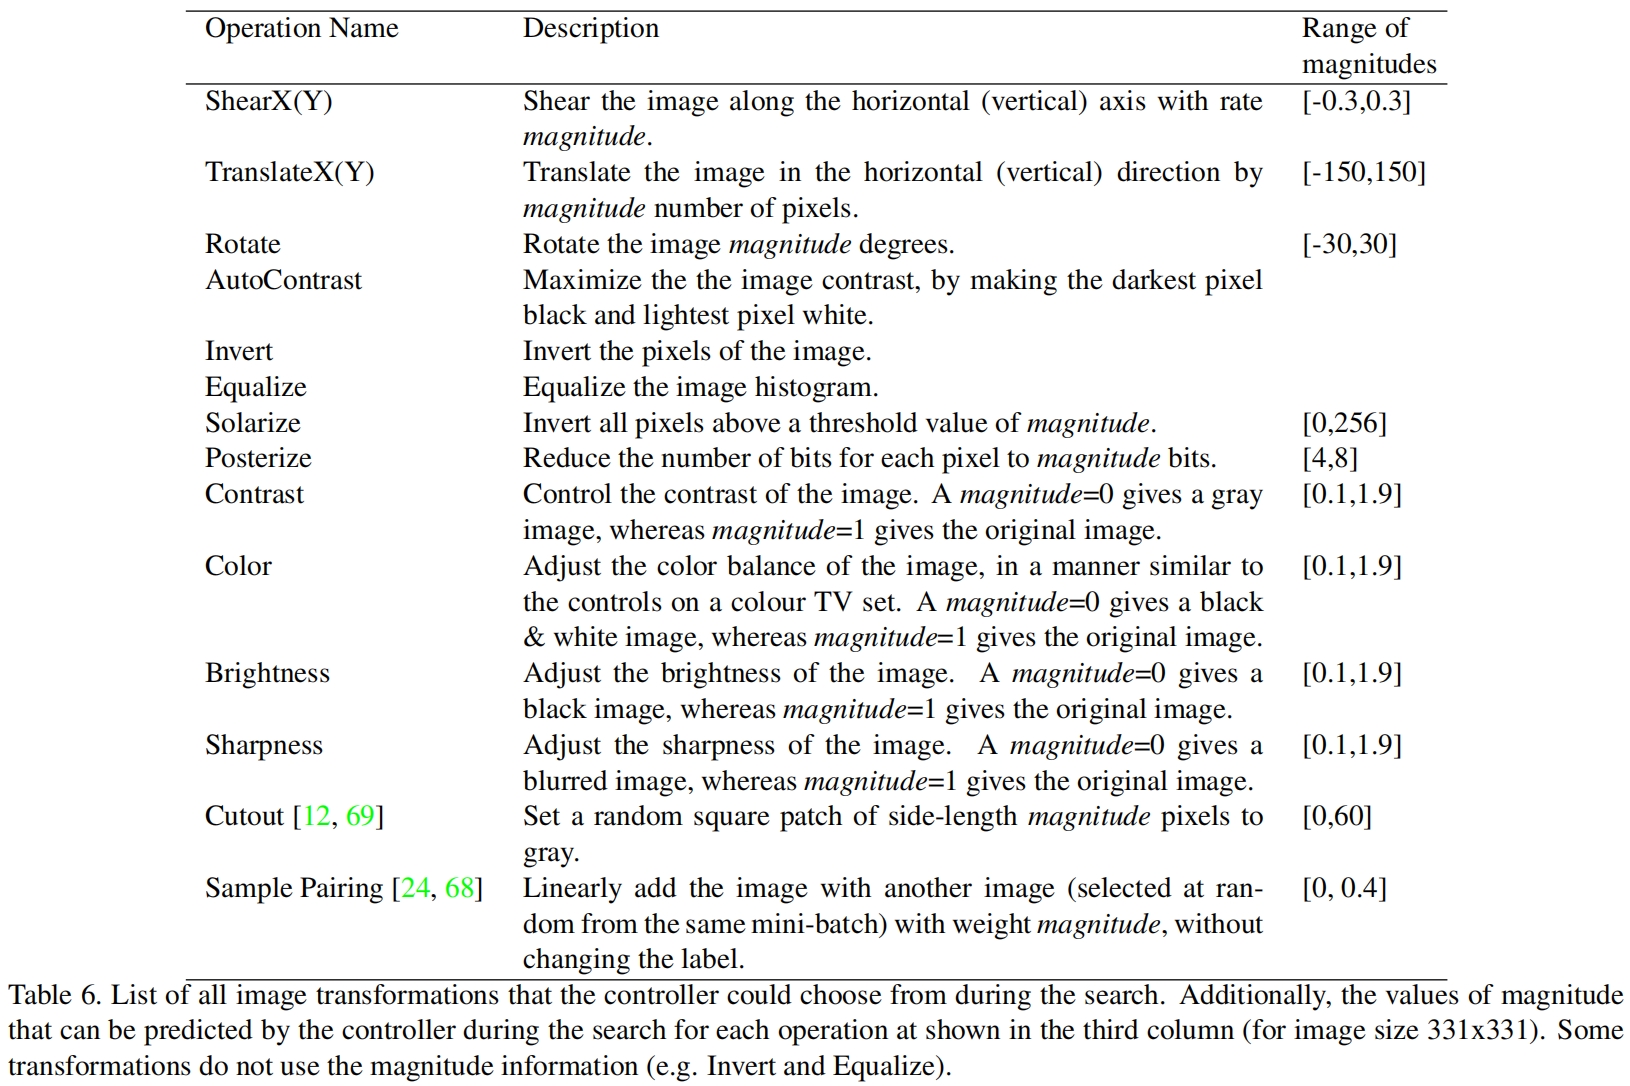
具体的操作来自Python图像处理库PIL,作者选择了PIL中所有同时以图像为输入和输出的函数,并额外添加了两个Cutout和SamplePairing。一共16种操作,包括ShearX/Y、TranslateX/Y、Rotate、AutoContrast、Invert、Equalize、Solarize、Posterize、Contrast、Color、Brightness、Sharpness、Cutout、Sample-Pairing。每个操作有一个默认的取值范围,作者将范围按均匀间距离散为10个值,从而可以使用一个离散的搜索算法来寻找最佳值。同样将应用操作的概率均匀离散化为11个值,这样寻找每个子策略就变成了一个在有 \((16\times 10\times 11)^2\) 种可能性的空间中的搜索问题。我们的目标是同时找到5个这样的子策略以增加多样性,5个子策略的搜索空间大约有 \((16\times10\times11)^{10}\approx 2.9\times 10^{32}\) 种可能性。所有操作以及对应的取值范围如下表所示
搜索算法细节: 搜索算法作者选择了强化学习,具体包括两个部分,controller是一个循环神经网络RNN,训练算法采用了近端策略优化算法Proximal Policy Optimization, PPO。每个step,控制器预测softmax输出的决策,然后作为embedding输入到下一个step。控制器总共有30个softmax输出来预测5个子策略,每个包括2个operation,每个operation包括一个类型、大小和概率。
控制器RNN的训练:控制器用奖励信号进行训练,它描述了该策略在提高子模型(作为搜索过程一部分进行训练的神经网络)泛化性上表现的有多好。本文的实验中,作者留了一个验证集来横向子模型的泛化能力。通过在训练集上应用5个子策略得到的增强数据对子模型进行训练,然后在验证集上评估精度,该精度作为reward signal来训练RNN controller。
控制器的结构和训练参数:控制器RNN是一个单层的LSTM,每层有100个隐藏神经元,对与每个架构预测相关联的两个卷积cell有 \(2\times5B\) 个softmax预测(B通常为5)。控制器RNN的10B个预测中的每一个都与一个概率相关联,子网络的联合概率是这10B个softmax概率的乘积,该联合概率用来计算控制器RNN的梯度,梯度根据子网络在验证集上的精度进行缩放然后用来更新控制器,从而使控制器给差的子网络分配小的概率给好的子网络分配大的概率。
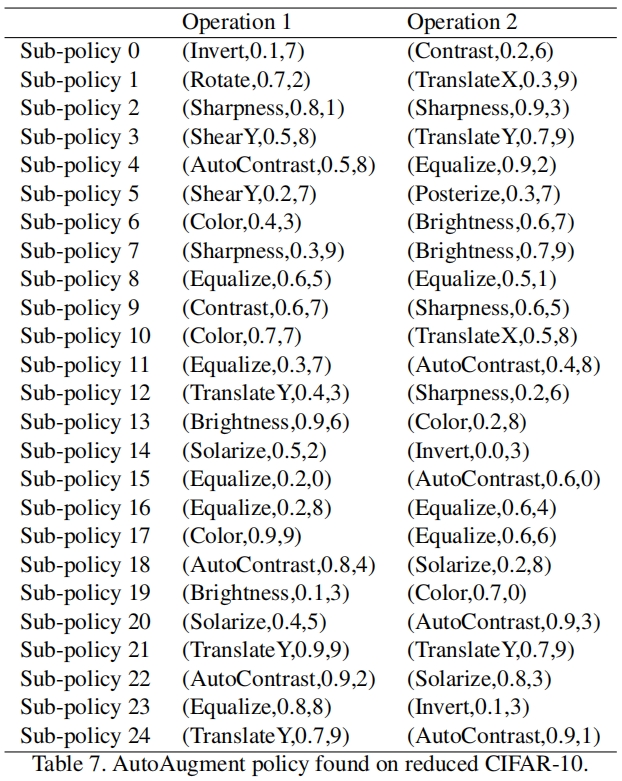
搜索结束时,将最好的5个策略的子策略concatenate最终得到一个策略(包含25个子策略),然后用于训练模型。
代码解析
论文中作者只给出了在reduced CIFAR-10、reduced SVHN、reduced ImageNet上找到了最终策略。如下
这里以MMPretrain中的ImageNet上的策略为例,讲解一下各个子策略的具体实现,下面是完整的策略
AUTOAUG_POLICIES = {
# Policy for ImageNet, refers to
# https://github.com/DeepVoltaire/AutoAugment/blame/master/autoaugment.py
'imagenet': [
[dict(type='Posterize', bits=4, prob=0.4), dict(type='Rotate', angle=30., prob=0.6)],
[dict(type='Solarize', thr=256 / 9 * 4, prob=0.6), dict(type='AutoContrast', prob=0.6)],
[dict(type='Equalize', prob=0.8), dict(type='Equalize', prob=0.6)],
[dict(type='Posterize', bits=5, prob=0.6), dict(type='Posterize', bits=5, prob=0.6)],
[dict(type='Equalize', prob=0.4), dict(type='Solarize', thr=256 / 9 * 5, prob=0.2)],
[dict(type='Equalize', prob=0.4), dict(type='Rotate', angle=30 / 9 * 8, prob=0.8)],
[dict(type='Solarize', thr=256 / 9 * 6, prob=0.6), dict(type='Equalize', prob=0.6)],
[dict(type='Posterize', bits=6, prob=0.8), dict(type='Equalize', prob=1.)],
[dict(type='Rotate', angle=10., prob=0.2), dict(type='Solarize', thr=256 / 9, prob=0.6)],
[dict(type='Equalize', prob=0.6), dict(type='Posterize', bits=5, prob=0.4)],
[dict(type='Rotate', angle=30 / 9 * 8, prob=0.8), dict(type='ColorTransform', magnitude=0., prob=0.4)],
[dict(type='Rotate', angle=30., prob=0.4), dict(type='Equalize', prob=0.6)],
[dict(type='Equalize', prob=0.0), dict(type='Equalize', prob=0.8)],
[dict(type='Invert', prob=0.6), dict(type='Equalize', prob=1.)],
[dict(type='ColorTransform', magnitude=0.4, prob=0.6), dict(type='Contrast', magnitude=0.8, prob=1.)],
[dict(type='Rotate', angle=30 / 9 * 8, prob=0.8), dict(type='ColorTransform', magnitude=0.2, prob=1.)],
[dict(type='ColorTransform', magnitude=0.8, prob=0.8), dict(type='Solarize', thr=256 / 9 * 2, prob=0.8)],
[dict(type='Sharpness', magnitude=0.7, prob=0.4), dict(type='Invert', prob=0.6)],
[dict(type='Shear', magnitude=0.3 / 9 * 5, prob=0.6, direction='horizontal'), dict(type='Equalize', prob=1.)],
[dict(type='ColorTransform', magnitude=0., prob=0.4), dict(type='Equalize', prob=0.6)],
[dict(type='Equalize', prob=0.4), dict(type='Solarize', thr=256 / 9 * 5, prob=0.2)],
[dict(type='Solarize', thr=256 / 9 * 4, prob=0.6), dict(type='AutoContrast', prob=0.6)],
[dict(type='Invert', prob=0.6), dict(type='Equalize', prob=1.)],
[dict(type='ColorTransform', magnitude=0.4, prob=0.6), dict(type='Contrast', magnitude=0.8, prob=1.)],
[dict(type='Equalize', prob=0.8), dict(type='Equalize', prob=0.6)],
],
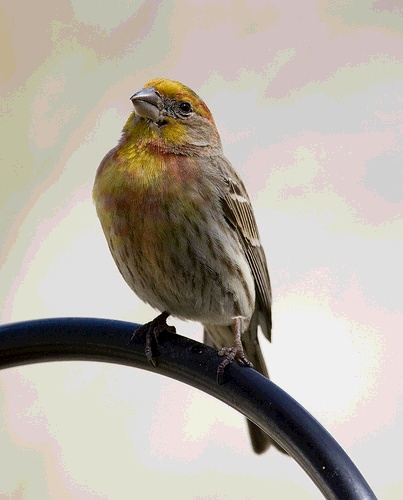
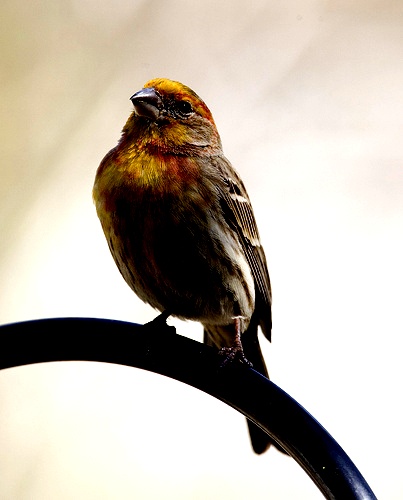
}输入图片如下

Posterize
Posterize是对图像进行色阶处理,减少每个通道的位数。在RGB图像中,每个通道的取值范围是0~255(8位表示),通过减少每个颜色通道的位数,可以降低图像的色彩深度,从而使图像的颜色变得更加简化和平坦,类似于海报的效果。例如,如果将每个颜色通道的位数从 8 位减少到 4 位,那么每个通道的取值范围将从 0-255 缩小到 0-15。这样一来,图像中的每个像素的颜色就只能取 16 种不同的值,从而使图像的色彩变得更加明显和分明。
代码如下,假设bits=4,具体实现并不是按上面的描述直接从8位减少到4位,每个通道的像素值都缩小到0-15后整体的图像都会变得非常黑,丢失了太多信息。这里的做法是先通过np.right_shift右移4位后再np.left_shift左移还原回去,但在还原的过程中部分像素值会发生变化。比如假设原始像素值为255,右移4位后变成了15,再左移4位后得到240而不是255。
def posterize(img, bits):
    """Posterize an image (reduce the number of bits for each color channel)

    Args:
        img (ndarray): Image to be posterized.
        bits (int): Number of bits (1 to 8) to use for posterizing.

    Returns:
        ndarray: The posterized image.
    """
    shift = 8 - bits
    img = np.left_shift(np.right_shift(img, shift), shift)
    return img
处理后的图像如下所示
Solarize
Solarize是将超过设定阈值的像素值进行反转,非常简单,具体实现如下
def solarize(img, thr=128):
    """Solarize an image (invert all pixel values above a threshold)

    Args:
        img (ndarray): Image to be solarized.
        thr (int): Threshold for solarizing (0 - 255).

    Returns:
        ndarray: The solarized image.
    """
    img = np.where(img < thr, img, 255 - img)
    return img
假设thr=int(256 / 9 * 4),处理后的图像如下
AutoContrast
代码如下,其中参数cutoff是一个数组,表示去除的灰度值最低和最高的像素个数的百分比。然后将剩余的像素重新映射回0-255。但是这里有个问题,在上面的policy中,AutoContrast只指定了概率没有指定cutoff值,cutoff默认为0,则返回的是原图并没有调整对比度。
def auto_contrast(img, cutoff=0):
    """Auto adjust image contrast.

    This function maximize (normalize) image contrast by first removing cutoff
    percent of the lightest and darkest pixels from the histogram and remapping
    the image so that the darkest pixel becomes black (0), and the lightest
    becomes white (255).

    Args:
        img (ndarray): Image to be contrasted. BGR order.
        cutoff (int | float | tuple): The cutoff percent of the lightest and
            darkest pixels to be removed. If given as tuple, it shall be
            (low, high). Otherwise, the single value will be used for both.
            Defaults to 0.

    Returns:
        ndarray: The contrasted image.
    """

    def _auto_contrast_channel(im, c, cutoff):
        im = im[:, :, c]
        # Compute the histogram of the image channel.
        histo = np.histogram(im, 256, (0, 255))[0]
        # Remove cut-off percent pixels from histo
        histo_sum = np.cumsum(histo)
        cut_low = histo_sum[-1] * cutoff[0] // 100
        cut_high = histo_sum[-1] - histo_sum[-1] * cutoff[1] // 100
        histo_sum = np.clip(histo_sum, cut_low, cut_high) - cut_low
        histo = np.concatenate([[histo_sum[0]], np.diff(histo_sum)], 0)

        # Compute mapping
        low, high = np.nonzero(histo)[0][0], np.nonzero(histo)[0][-1]
        # If all the values have been cut off, return the origin img
        if low >= high:
            return im
        scale = 255.0 / (high - low)
        offset = -low * scale
        lut = np.array(range(256))
        lut = lut * scale + offset
        lut = np.clip(lut, 0, 255)
        return lut[im]

    if isinstance(cutoff, (int, float)):
        cutoff = (cutoff, cutoff)
    else:
        assert isinstance(cutoff, tuple), 'cutoff must be of type int, ' \
            f'float or tuple, but got {type(cutoff)} instead.'
    # Auto adjusts contrast for each channel independently and then stacks
    # the result.
    s1 = _auto_contrast_channel(img, 0, cutoff)
    s2 = _auto_contrast_channel(img, 1, cutoff)
    s3 = _auto_contrast_channel(img, 2, cutoff)
    contrasted_img = np.stack([s1, s2, s3], axis=-1)
    return contrasted_img.astype(img.dtype)
Equalize
直方图均衡化,具体就是根据原灰度值的累积概率乘255,可以参考【数据增强】直方图均衡化(附python代码) - 知乎其中赋分制比方的解释。图像处理笔记2-直方图与直方图均衡化histogram equalization - 知乎里面有个具体的例子
def imequalize(img):
    """Equalize the image histogram.

    This function applies a non-linear mapping to the input image,
    in order to create a uniform distribution of grayscale values
    in the output image.

    Args:
        img (ndarray): Image to be equalized.

    Returns:
        ndarray: The equalized image.
    """

    def _scale_channel(im, c):
        """Scale the data in the corresponding channel."""
        im = im[:, :, c]
        # Compute the histogram of the image channel.
        histo = np.histogram(im, 256, (0, 255))[0]
        # For computing the step, filter out the nonzeros.
        nonzero_histo = histo[histo > 0]
        step = (np.sum(nonzero_histo) - nonzero_histo[-1]) // 255
        if not step:
            lut = np.array(range(256))
        else:
            # Compute the cumulative sum, shifted by step // 2
            # and then normalized by step.
            lut = (np.cumsum(histo) + (step // 2)) // step
            # Shift lut, prepending with 0.
            lut = np.concatenate([[0], lut[:-1]], 0)
            # handle potential integer overflow
            lut[lut > 255] = 255
        # If step is zero, return the original image.
        # Otherwise, index from lut.
        return np.where(np.equal(step, 0), im, lut[im])

    # Scales each channel independently and then stacks
    # the result.
    s1 = _scale_channel(img, 0)
    s2 = _scale_channel(img, 1)
    s3 = _scale_channel(img, 2)
    equalized_img = np.stack([s1, s2, s3], axis=-1)
    return equalized_img.astype(img.dtype)
在上面的代码中,把22行的step原式直接带入28行,去掉22行-nonzero_histo[-1]和28行的+(step//2),就得到了下式,就是上面说的原灰度值的累积概率乘以255
lut = np.cumsum(histo) // np.sum(histo) * 255Rotate
旋转这里就不解释了
def imrotate(img: np.ndarray,
             angle: float,
             center: Optional[Tuple[float, float]] = None,
             scale: float = 1.0,
             border_value: int = 0,
             interpolation: str = 'bilinear',
             auto_bound: bool = False,
             border_mode: str = 'constant') -> np.ndarray:
    """Rotate an image.

    Args:
        img (np.ndarray): Image to be rotated.
        angle (float): Rotation angle in degrees, positive values mean
            clockwise rotation.
        center (tuple[float], optional): Center point (w, h) of the rotation in
            the source image. If not specified, the center of the image will be
            used.
        scale (float): Isotropic scale factor.
        border_value (int): Border value used in case of a constant border.
            Defaults to 0.
        interpolation (str): Same as :func:`resize`.
        auto_bound (bool): Whether to adjust the image size to cover the whole
            rotated image.
        border_mode (str): Pixel extrapolation method. Defaults to 'constant'.

    Returns:
        np.ndarray: The rotated image.
    """
    if center is not None and auto_bound:
        raise ValueError('`auto_bound` conflicts with `center`')
    h, w = img.shape[:2]
    if center is None:
        center = ((w - 1) * 0.5, (h - 1) * 0.5)
    assert isinstance(center, tuple)

    matrix = cv2.getRotationMatrix2D(center, -angle, scale)
    if auto_bound:
        cos = np.abs(matrix[0, 0])
        sin = np.abs(matrix[0, 1])
        new_w = h * sin + w * cos
        new_h = h * cos + w * sin
        matrix[0, 2] += (new_w - w) * 0.5
        matrix[1, 2] += (new_h - h) * 0.5
        w = int(np.round(new_w))
        h = int(np.round(new_h))
    rotated = cv2.warpAffine(
        img,
        matrix, (w, h),
        flags=cv2_interp_codes[interpolation],
        borderMode=cv2_border_modes[border_mode],
        borderValue=border_value)
    return rotated
ColorTransform
def adjust_color(img, alpha=1, beta=None, gamma=0, backend=None):
    r"""It blends the source image and its gray image:

    .. math::
        output = img * alpha + gray\_img * beta + gamma

    Args:
        img (ndarray): The input source image.
        alpha (int | float): Weight for the source image. Default 1.
        beta (int | float): Weight for the converted gray image.
            If None, it's assigned the value (1 - `alpha`).
        gamma (int | float): Scalar added to each sum.
            Same as :func:`cv2.addWeighted`. Default 0.
        backend (str | None): The image processing backend type. Options are
            `cv2`, `pillow`, `None`. If backend is None, the global
            ``imread_backend`` specified by ``mmcv.use_backend()`` will be
            used. Defaults to None.

    Returns:
        ndarray: Colored image which has the same size and dtype as input.
    """
    if backend is None:
        backend = imread_backend
    if backend not in ['cv2', 'pillow']:
        raise ValueError(f'backend: {backend} is not supported.'
                         f"Supported backends are 'cv2', 'pillow'")

    if backend == 'pillow':
        assert img.dtype == np.uint8, 'Pillow backend only support uint8 type'
        warnings.warn("Only use 'alpha' for pillow backend.")
        # Image.fromarray defaultly supports RGB, not BGR.
        pil_image = Image.fromarray(img[..., ::-1], mode='RGB')
        enhancer = ImageEnhance.Color(pil_image)
        pil_image = enhancer.enhance(alpha)
        return np.array(pil_image, dtype=img.dtype)[..., ::-1]
    else:
        gray_img = bgr2gray(img)
        gray_img = np.tile(gray_img[..., None], [1, 1, 3])
        if beta is None:
            beta = 1 - alpha
        colored_img = cv2.addWeighted(img, alpha, gray_img, beta, gamma)
        if not colored_img.dtype == np.uint8:
            # Note when the dtype of `img` is not the default `np.uint8`
            # (e.g. np.float32), the value in `colored_img` got from cv2
            # is not guaranteed to be in range [0, 255], so here clip
            # is needed.
            colored_img = np.clip(colored_img, 0, 255)
        return colored_img.astype(img.dtype)


def transform(self, results):
    """Apply transform to results."""
    if self.random_disable():
        return results

    if self.magnitude is not None:
        magnitude = self.random_negative(self.magnitude)
    else:
        magnitude = self.random_negative(self.random_magnitude())

    img = results['img']
    img_color_adjusted = adjust_color(img, alpha=1 + magnitude)
    results['img'] = img_color_adjusted.astype(img.dtype)
magnitude按给定概率取负,然后加1作为alpha的值。beta默认为0。manitude取0.8时,输出图片如下
Invert
def iminvert(img):
    """Invert (negate) an image.

    Args:
        img (ndarray): Image to be inverted.

    Returns:
        ndarray: The inverted image.
    """
    return np.full_like(img, 255) - img
Contrast
def adjust_contrast(img, factor=1., backend=None):
    """Adjust image contrast.

    This function controls the contrast of an image. An
    enhancement factor of 0.0 gives a solid grey
    image. A factor of 1.0 gives the original image. It
    blends the source image and the degenerated mean image:

    .. math::
        output = img * factor + degenerated * (1 - factor)

    Args:
        img (ndarray): Image to be contrasted. BGR order.
        factor (float): Same as :func:`mmcv.adjust_brightness`.
        backend (str | None): The image processing backend type. Options are
            `cv2`, `pillow`, `None`. If backend is None, the global
            ``imread_backend`` specified by ``mmcv.use_backend()`` will be
            used. Defaults to None.

    Returns:
        ndarray: The contrasted image.
    """
    if backend is None:
        backend = imread_backend
    if backend not in ['cv2', 'pillow']:
        raise ValueError(f'backend: {backend} is not supported.'
                         f"Supported backends are 'cv2', 'pillow'")

    if backend == 'pillow':
        assert img.dtype == np.uint8, 'Pillow backend only support uint8 type'
        # Image.fromarray defaultly supports RGB, not BGR.
        pil_image = Image.fromarray(img[..., ::-1], mode='RGB')
        enhancer = ImageEnhance.Contrast(pil_image)
        pil_image = enhancer.enhance(factor)
        return np.array(pil_image, dtype=img.dtype)[..., ::-1]
    else:
        gray_img = bgr2gray(img)
        hist = np.histogram(gray_img, 256, (0, 255))[0]
        mean = round(np.sum(gray_img) / np.sum(hist))
        degenerated = (np.ones_like(img[..., 0]) * mean).astype(img.dtype)
        degenerated = gray2bgr(degenerated)
        contrasted_img = cv2.addWeighted(
            img.astype(np.float32), factor, degenerated.astype(np.float32),
            1 - factor, 0)
        contrasted_img = np.clip(contrasted_img, 0, 255)
        return contrasted_img.astype(img.dtype)
magnitude也是按概率取负,然后加1作为factor的值,当magnitude=0.8,factor=1.8时,输出如下
Sharpness
def adjust_sharpness(img, factor=1., kernel=None):
    """Adjust image sharpness.

    This function controls the sharpness of an image. An
    enhancement factor of 0.0 gives a blurred image. A
    factor of 1.0 gives the original image. And a factor
    of 2.0 gives a sharpened image. It blends the source
    image and the degenerated mean image:

    .. math::
        output = img * factor + degenerated * (1 - factor)

    Args:
        img (ndarray): Image to be sharpened. BGR order.
        factor (float): Same as :func:`mmcv.adjust_brightness`.
        kernel (np.ndarray, optional): Filter kernel to be applied on the img
            to obtain the degenerated img. Defaults to None.

    Note:
        No value sanity check is enforced on the kernel set by users. So with
        an inappropriate kernel, the ``adjust_sharpness`` may fail to perform
        the function its name indicates but end up performing whatever
        transform determined by the kernel.

    Returns:
        ndarray: The sharpened image.
    """

    if kernel is None:
        # adopted from PIL.ImageFilter.SMOOTH
        kernel = np.array([[1., 1., 1.], [1., 5., 1.], [1., 1., 1.]]) / 13
    assert isinstance(kernel, np.ndarray), \
        f'kernel must be of type np.ndarray, but got {type(kernel)} instead.'
    assert kernel.ndim == 2, \
        f'kernel must have a dimension of 2, but got {kernel.ndim} instead.'

    degenerated = cv2.filter2D(img, -1, kernel)
    sharpened_img = cv2.addWeighted(
        img.astype(np.float32), factor, degenerated.astype(np.float32),
        1 - factor, 0)
    sharpened_img = np.clip(sharpened_img, 0, 255)
    return sharpened_img.astype(img.dtype)
当magnitude=0.8,factor=1.8时,输出如下

Shear
def _get_shear_matrix(magnitude: Union[int, float],
                      direction: str = 'horizontal') -> np.ndarray:
    """Generate the shear matrix for transformation.

    Args:
        magnitude (int | float): The magnitude used for shear.
        direction (str): The flip direction, either "horizontal"
            or "vertical".

    Returns:
        ndarray: The shear matrix with dtype float32.
    """
    if direction == 'horizontal':
        shear_matrix = np.float32([[1, magnitude, 0], [0, 1, 0]])
    elif direction == 'vertical':
        shear_matrix = np.float32([[1, 0, 0], [magnitude, 1, 0]])
    return shear_matrix


cv2_interp_codes = {
    'nearest': cv2.INTER_NEAREST,
    'bilinear': cv2.INTER_LINEAR,
    'bicubic': cv2.INTER_CUBIC,
    'area': cv2.INTER_AREA,
    'lanczos': cv2.INTER_LANCZOS4
}


def imshear(img: np.ndarray,
            magnitude: Union[int, float],
            direction: str = 'horizontal',
            border_value: Union[int, Tuple[int, int]] = 0,
            interpolation: str = 'bilinear') -> np.ndarray:
    """Shear an image.

    Args:
        img (ndarray): Image to be sheared with format (h, w)
            or (h, w, c).
        magnitude (int | float): The magnitude used for shear.
        direction (str): The flip direction, either "horizontal"
            or "vertical".
        border_value (int | tuple[int]): Value used in case of a
            constant border.
        interpolation (str): Same as :func:`resize`.

    Returns:
        ndarray: The sheared image.
    """
    assert direction in ['horizontal',
                         'vertical'], f'Invalid direction: {direction}'
    height, width = img.shape[:2]
    if img.ndim == 2:
        channels = 1
    elif img.ndim == 3:
        channels = img.shape[-1]
    if isinstance(border_value, int):
        border_value = tuple([border_value] * channels)  # type: ignore
    elif isinstance(border_value, tuple):
        assert len(border_value) == channels, \
            'Expected the num of elements in tuple equals the channels' \
            'of input image. Found {} vs {}'.format(
                len(border_value), channels)
    else:
        raise ValueError(
            f'Invalid type {type(border_value)} for `border_value`')
    shear_matrix = _get_shear_matrix(magnitude, direction)
    sheared = cv2.warpAffine(
        img,
        shear_matrix,
        (width, height),
        # Note case when the number elements in `border_value`
        # greater than 3 (e.g. shearing masks whose channels large
        # than 3) will raise TypeError in `cv2.warpAffine`.
        # Here simply slice the first 3 values in `border_value`.
        borderValue=border_value[:3],  # type: ignore
        flags=cv2_interp_codes[interpolation])
    return sheared
auto_augmeng中只用到一次shear,参数如下dict(type='Shear', magnitude=0.3 / 9 * 5, prob=0.6, direction='horizontal'),默认border_value=128,interpolation='bicubic',输出如下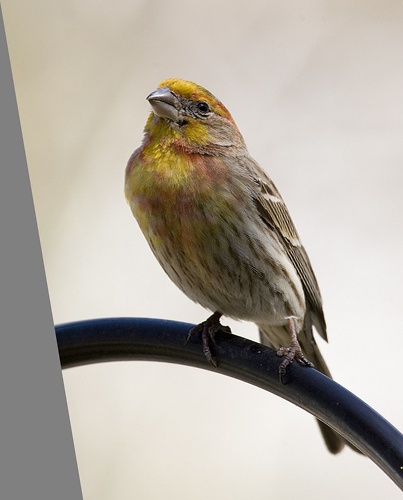


 1056
1056

 被折叠的 条评论
为什么被折叠?
被折叠的 条评论
为什么被折叠?
 到【灌水乐园】发言


