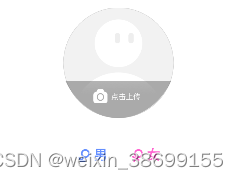
记录demo中实现一个圆形头像的选择与上传

先自定义实现头像上传View
/**
 * 带有自定义字体TextView。
 */
class EditAvatarUploadView : AppCompatTextView {
    lateinit var paint:Paint

    constructor(context: Context) : this(context, null){
        iniPaint()
    }

    constructor(context: Context, attrs: AttributeSet?) : this(context, attrs, 0){
        iniPaint()
    }

    constructor(context: Context, attrs: AttributeSet?, defStyleAttr: Int) : super(context, attrs, defStyleAttr) {
        iniPaint()
    }


    override fun onLayout(changed: Boolean, left: Int, top: Int, right: Int, bottom: Int) {
        super.onLayout(changed, left, top, right, bottom)

        iniPaint()
    }

    private fun iniPaint() {
        paint = Paint()
        paint.setAntiAlias(true)
        paint.setColor(Color.LTGRAY)
        paint.setStyle(Paint.Style.STROKE)
        paint.textSize= 20F
    }


    override fun onDraw(canvas: Canvas?) {
        super.onDraw(canvas)
        //得到屏幕宽高
        var width = width
        var radius = width - 300 / 2
        var height = height


        canvas!!.drawCircle((width / 2).toFloat(), (height / 2).toFloat(), radius.toFloat(), paint)
        //绘制一条直线(两点确定一线)
       /* paint.setColor(Color.RED)
        canvas.drawLine(5F, (height/2+50).toFloat(), width.toFloat()-5, (height/2+50).toFloat(), paint)*/

        drawMask(canvas)
        drawCam(canvas)
        drawText(canvas)

    }

    fun drawMask(canvas: Canvas) {
        val bitmap =
            BitmapFactory.decodeResource(context.getResources(), R.mipmap.login_upload_half_mask)
        val dst = Rect(6, 60, 293, 160)
        /***********绘制圆弧
         * 矩形的宽度width=C(right)-A(left),高度height=D(bottom)-B(top)*/
        canvas.translate(0F, (width/2-10).toFloat())
        val rectf_head = RectF(1f, 0f, 291f, 207f) //确定外切矩形范围

       rectf_head.offset(5f, 90f) //使rectf_head所确定的矩形向右偏移100像素,向下偏移20像素
        //开始角度(以时钟3点的方向为0°,逆时针为正方向)
        //(以时钟3点的方向为0°,逆时针为正方向)
        //canvas.drawArc(rectf_head, 0F, 180F, false, paint) //绘制圆弧,不含圆心
        canvas.drawBitmap(bitmap, null, dst, null);

    }

    fun drawCam(canvas: Canvas) {
        val bitmap =
            BitmapFactory.decodeResource(context.getResources(), R.mipmap.login_edit_camera_icon)
        val dst = Rect(10, 60, 50, 100)
        dst.offset(70, 20)
        canvas.drawBitmap(bitmap, null, dst, null);

    }

    fun drawText(canvas: Canvas) {

        val text = "点击上传"
        paint.setColor(Color.WHITE)
        //x表示文本原点的x坐标;y表示文本基线的y坐标。
        canvas.drawText(text, 130F, 110F, paint)

    }

}
看看效果:

BitmapShader实现圆形的渲染:
BitmapShader是Shader的子类,BitmapShader可以根据设置的方式将图片铺满所选区域:
(1)CLAMP:拉伸,在x方向上是图片的最后一列像素重复平铺,而y方向是最后一行往下拉伸
(2)REPEAT: 重复,很容易理解,图片重复平铺过去
(3)MIRROR:镜像,就是将图片翻转
先初始化Paint对象:
mBitmapShader = BitmapShader(mBitmap!!, Shader.TileMode.CLAMP, Shader.TileMode.CLAMP)
        paint.setAntiAlias(true)
        paint.shader = mBitmapShader
        paint.setColor(Color.LTGRAY)
在onDraw方法中,用这个Paint画出来我们想要的圆形和边框:
  override fun onDraw(canvas: Canvas) {
        /*先绘制背景,再绘制图片,最后再绘制边框,*/
        if (drawable == null) {
            return
        }
        mDrawableRadius = (width - 300 / 2).toFloat()
        canvas.drawCircle(
            (width / 2).toFloat(),
            (height / 2).toFloat(),
            mDrawableRadius,
            paint
        )
        // 绘制边框
        if (mBorderWidth != 0) {
            canvas.drawCircle(
                (width / 2).toFloat(),
                (height / 2).toFloat(),
                mBorderRadius,
                mBorderPaint
            )
        }

        drawMask(canvas)
        drawCam(canvas)
        drawText(canvas)
    }
测试发现多次替换图片时由于缓存原因,图片更新不及时
   val optionsa = RequestOptions()
            /*  optionsa.placeholder(R.mipmap.ic_launcher)
              optionsa.error(R.mipmap.ic_launcher_round) //异常显示图*/

            optionsa.diskCacheStrategy(DiskCacheStrategy.NONE) //禁用掉Glide的缓存功能

            optionsa.skipMemoryCache(true) //禁用掉Glide的内存缓存

            //file:/storage/emulated/0/Android/data/com.jiangxue.heartview/cache/avatar.png
            val loadSdCard = ImageUtil.loadSdCard(editAvatarView, pathList?.get(0))
            Glide.with(this).load(loadSdCard).apply(optionsa).into(editAvatarView)


 827
827


 被折叠的 条评论
为什么被折叠?


