


1 网络编程概述
计算机网络
是指将地理位置不同的具有独立功能更的多台计算机及其外部设备,通过通信线路连接起来,在网络操作系统,网络管理软件及网络通信协议的管理和协调下,实现资源共享和信息传递的计算机系统。
网络编程
就是用来实现网络互连的不同计算机上运行的程序间可以进行数据交换。
2 网络模型
计算机网络之间以何种规则进行通信,就是网络模型研究问题。
OSI参考模型 TCP/IP参考模型
--------- ----------
应用层
---------
表示层 应用层
---------
会话层
--------- -----------
传输层 传输层
--------- -----------
网络层 网络层
--------- -----------
数据链路层
--------- 主机至网络层
物理层
--------- -----------
网络模型7层概述:
1.物理层:主要定义物理设备标准,如网线的接口类型、光纤的接口类型、各种传输介质的传输速率等。它的主要作用是传输比特流(就是由1、0转化为电流强弱来进行传输,到达目的地后在转化为1、0,也就是我们常说的数模转换与模数转换)。这一层的数据叫做比特。
2. 数据链路层:主要将从物理层接收的数据进行MAC地址(网卡的地址)的封装与解封装。常把这一层的数据叫做帧。在这一层工作的设备是交换机,数据通过交换机来传输。
3. 网络层:主要将从下层接收到的数据进行IP地址(例192.168.0.1)的封装与解封装。在这一层工作的设备是路由器,常把这一层的数据叫做数据包。
4. 传输层:定义了一些传输数据的协议和端口号(WWW端口80等),如:TCP(传输控制协议,传输效率低,可靠性强,用于传输可靠性要求高,数据量大的数据),UDP(用户数据报协议,与TCP特性恰恰相反,用于传输可靠性要求不高,数据量小的数据,如QQ聊天数据就是通过这种方式传输的)。 主要是将从下层接收的数据进行分段和传输,到达目的地址后再进行重组。常常把这一层数据叫做段。
5.会话层:通过传输层(端口号:传输端口与接收端口)建立数据传输的通路。主要在你的系统之间发起会话或者接受会话请求(设备之间需要互相认识可以是IP也可以是MAC或者是主机名)
6.表示层:主要是进行对接收的数据进行解释、加密与解密、压缩与解压缩等(也就是把计算机能够识别的东西转换成人能够能识别的东西(如图片、声音等)。
7.应用层: 主要是一些终端的应用,比如说FTP(各种文件下载),WEB(IE浏览),QQ之类的(可以把它理解成我们在电脑屏幕上可以看到的东西.就是终端应用)。
3 网络编程三要素
A:IP地址
B:端口
C:协议
(1)
IP地址:
网络中计算机的唯一标识。
计算机只能识别二进制的数据,所以我们的IP地址应该是一个二进制的数据。
但是呢,我们配置的IP地址确不是二进制的,为什么呢?
IP:192.168.1.100
换算:11000000 10101000 00000001 01100100
假如真是:11000000 10101000 00000001 01100100的话。
我们如果每次再上课的时候要配置该IP地址,记忆起来就比较的麻烦。
所以,为了方便表示IP地址,我们就把IP地址的每一个字节上的数据换算成十进制,然后用.分开来表示:
"点分十进制"
IP地址的组成:网络号段+主机号段
A类:第一号段为网络号段+后三段的主机号段
一个网络号:256*256*256 = 16777216
B类:前二号段为网络号段+后二段的主机号段
一个网络号:256*256 = 65536
C类:前三号段为网络号段+后一段的主机号段
一个网络号:256
IP地址的分类:
A类 1.0.0.1---127.255.255.254 (1)10.X.X.X是私有地址(私有地址就是在互联网上不使用,而被用在局域网络中的地址) (2)127.X.X.X是保留地址,用做循环测试用的。
B类 128.0.0.1---191.255.255.254 172.16.0.0---172.31.255.255是私有地址。169.254.X.X是保留地址。
C类 192.0.0.1---223.255.255.254 192.168.X.X是私有地址
D类 224.0.0.1---239.255.255.254
E类 240.0.0.1---247.255.255.254
两个DOS命令:
ipconfig 查看本机ip地址
ping 后面跟ip地址。测试本机与指定的ip地址间的通信是否有问题
特殊的IP地址:
127.0.0.1 回环地址(表示本机)
x.x.x.255 广播地址
x.x.x.0 网络地址
(2)
端口号:
正在运行的程序的标识。
有效端口:0~65535,其中0~1024系统使用或保留端口。
(3)
协议:
通信的规则
UDP:
把数据打包
数据有限制
不建立连接
速度快
不可靠
TCP:
建立连接通道
数据无限制
速度慢
可靠
举例:
UDP:发短信
TCP:打电话
4 InetAddress类的概述
如果一个类没有构造方法:
A:成员全部是静态的(Math,Arrays,Collections)
B:单例设计模式(Runtime)
C:类中有静态方法返回该类的对象(InetAddress)
class Demo {
private Demo(){}
public static Demo getXxx() {
return new Demo();
}
}
看InetAddress的成员方法:
public static InetAddress getByName(String host):根据主机名或者IP地址的字符串表示得到IP地址对象
public class InetAddressDemo {
public static void main(String[] args) throws UnknownHostException {
// public static InetAddress getByName(String host)
// InetAddress address = InetAddress.getByName("liuyi");
// InetAddress address = InetAddress.getByName("192.168.12.92");
InetAddress address = InetAddress.getByName("192.168.12.63");
// 获取两个东西:主机名,IP地址
// public String getHostName()
String name = address.getHostName();
// public String getHostAddress()
String ip = address.getHostAddress();
System.out.println(name + "---" + ip);
}
}
5 Socket
Socket:网络套接字
Socket:网络编程,套接字编程
Socket包含了:IP地址+端口
Socket原理机制:
通信的两端都有Socket
网络通信其实就是Socket间的通信
数据在两个Socket间通过IO传输
--------------------------------------------------------------------------
计算机A 计算机B |
QQ QQ |
Socket 在某种协议下通过IO流传输 Socket |
(IP和端口)--------------------------------------------(IP和端口) |
---------------------------------------------------------------------------
6 UDP协议
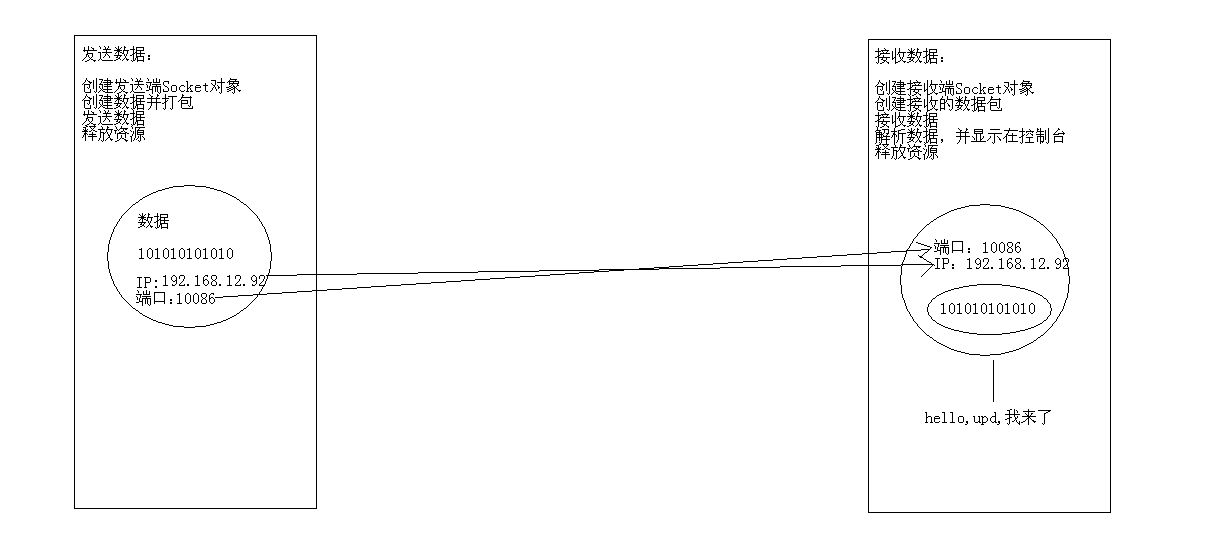
(1)UDP协议发送数据
A:创建发送端Socket对象
B:创建数据,并把数据打包
C:调用Socket对象的发送方法发送数据包
D:释放资源
public class SendDemo {
public static void main(String[] args) throws IOException {
// 创建发送端Socket对象
// DatagramSocket()
DatagramSocket ds = new DatagramSocket();
// 创建数据,并把数据打包 数据 长度 IP 端口
// DatagramPacket(byte[] buf, int length, InetAddress address, int port)
// 创建数据
byte[] bys = "hello,udp,我来了".getBytes();
// 长度
int length = bys.length;
// IP地址对象
InetAddress address = InetAddress.getByName("192.168.12.92");
// 端口
int port = 10086;
DatagramPacket dp = new DatagramPacket(bys, length, address, port);
// 调用Socket对象的发送方法发送数据包
// public void send(DatagramPacket p)
ds.send(dp);
// 释放资源
ds.close();
}
}
(2)UDP协议接收数据
A:创建接收端Socket对象
B:创建一个数据包(接收容器)
C:调用Socket对象的接收方法接收数据
D:解析数据包,并显示在控制台
E:释放资源
public class ReceiveDemo {
public static void main(String[] args) throws IOException {
// 创建接收端Socket对象
// DatagramSocket(int port)
DatagramSocket ds = new DatagramSocket(10086);
// 创建一个数据包(接收容器)
// DatagramPacket(byte[] buf, int length)
byte[] bys = new byte[1024];
int length = bys.length;
DatagramPacket dp = new DatagramPacket(bys, length);
// 调用Socket对象的接收方法接收数据
// public void receive(DatagramPacket p)
ds.receive(dp); // 阻塞式
// 解析数据包,并显示在控制台
// 获取对方的ip
// public InetAddress getAddress()
InetAddress address = dp.getAddress();
String ip = address.getHostAddress();
// public byte[] getData():获取数据缓冲区
// public int getLength():获取数据的实际长度
byte[] bys2 = dp.getData();
int len = dp.getLength();
String s = new String(bys2, 0, len);
System.out.println(ip + "传递的数据是:" + s);
// 释放资源
ds.close();
}
}
(3)UDP发送和接收数据图解
7 UDP优化
import java.io.IOException;
import java.net.DatagramPacket;
import java.net.DatagramSocket;
public class ReceiveDemo {
public static void main(String[] args) throws IOException {
// 创建接收端的Socket对象
DatagramSocket ds = new DatagramSocket(12345);
// 创建一个包裹
byte[] bys = new byte[1024];
DatagramPacket dp = new DatagramPacket(bys, bys.length);
// 接收数据
ds.receive(dp);
// 解析数据
String ip = dp.getAddress().getHostAddress();
String s = new String(dp.getData(), 0, dp.getLength());
System.out.println("from " + ip + " data is : " + s);
// 释放资源
ds.close();
}
}
import java.io.IOException;
import java.net.DatagramPacket;
import java.net.DatagramSocket;
import java.net.InetAddress;
public class SendDemo {
public static void main(String[] args) throws IOException {
// 创建发送端的Socket对象
DatagramSocket ds = new DatagramSocket();
// 创建数据并打包
byte[] bys = "helloworld".getBytes();
DatagramPacket dp = new DatagramPacket(bys, bys.length,InetAddress.getByName("192.168.12.92"), 12345);
// 发送数据
ds.send(dp);
// 释放资源
ds.close();
}
}
8 发送端的数据来自于键盘录入案例
public class ReceiveDemo {
public static void main(String[] args) throws IOException {
// 创建接收端的Socket对象
DatagramSocket ds = new DatagramSocket(12345);
while (true) {
// 创建一个包裹
byte[] bys = new byte[1024];
DatagramPacket dp = new DatagramPacket(bys, bys.length);
// 接收数据
ds.receive(dp);
// 解析数据
String ip = dp.getAddress().getHostAddress();
String s = new String(dp.getData(), 0, dp.getLength());
System.out.println("from " + ip + " data is : " + s);
}
// 释放资源
// 接收端应该一直开着等待接收数据,是不需要关闭
// ds.close();
}
}
数据来自于键盘录入
键盘录入数据要自己控制录入结束。
public class SendDemo {
public static void main(String[] args) throws IOException {
// 创建发送端的Socket对象
DatagramSocket ds = new DatagramSocket();
// 封装键盘录入数据
BufferedReader br = new BufferedReader(new InputStreamReader(System.in));
String line = null;
while ((line = br.readLine()) != null) {
if ("886".equals(line)) {
break;
}
// 创建数据并打包
byte[] bys = line.getBytes();
// DatagramPacket dp = new DatagramPacket(bys, bys.length,
// InetAddress.getByName("192.168.12.92"), 12345);
DatagramPacket dp = new DatagramPacket(bys, bys.length,
InetAddress.getByName("192.168.12.255"), 12345);
// 发送数据
ds.send(dp);
}
// 释放资源
ds.close();
}
}
9 多线程实现聊天室程序
通过多线程改进刚才的聊天程序,这样我就可以实现在一个窗口发送和接收数据了。
public class ChatRoom {
public static void main(String[] args) throws IOException {
DatagramSocket dsSend = new DatagramSocket();
DatagramSocket dsReceive = new DatagramSocket(12306);
SendThread st = new SendThread(dsSend);
ReceiveThread rt = new ReceiveThread(dsReceive);
Thread t1 = new Thread(st);
Thread t2 = new Thread(rt);
t1.start();
t2.start();
}
}
public class SendThread implements Runnable {
private DatagramSocket ds;
public SendThread(DatagramSocket ds) {
this.ds = ds;
}
@Override
public void run() {
try {
// 封装键盘录入数据
BufferedReader br = new BufferedReader(new InputStreamReader(System.in));
String line = null;
while ((line = br.readLine()) != null) {
if ("886".equals(line)) {
break;
}
// 创建数据并打包
byte[] bys = line.getBytes();
// DatagramPacket dp = new DatagramPacket(bys, bys.length,
// InetAddress.getByName("192.168.12.92"), 12345);
DatagramPacket dp = new DatagramPacket(bys, bys.length,InetAddress.getByName("192.168.12.255"), 12306);
// 发送数据
ds.send(dp);
}
// 释放资源
ds.close();
} catch (IOException e) {
e.printStackTrace();
}
}
}
public class ReceiveThread implements Runnable {
private DatagramSocket ds;
public ReceiveThread(DatagramSocket ds) {
this.ds = ds;
}
@Override
public void run() {
try {
while (true) {
// 创建一个包裹
byte[] bys = new byte[1024];
DatagramPacket dp = new DatagramPacket(bys, bys.length);
// 接收数据
ds.receive(dp);
// 解析数据
String ip = dp.getAddress().getHostAddress();
String s = new String(dp.getData(), 0, dp.getLength());
System.out.println("from " + ip + " data is : " + s);
}
} catch (IOException e) {
e.printStackTrace();
}
}
}
10 TCP协议
(1)TCP协议发送数据
A:创建发送端的Socket对象
这一步如果成功,就说明连接已经成功了。
B:获取输出流,写数据
C:释放资源
连接被拒绝。TCP协议一定要先看服务器。
java.net.ConnectException: Connection refused: connect
public class ClientDemo {
public static void main(String[] args) throws IOException {
// 创建发送端的Socket对象
// Socket(InetAddress address, int port)
// Socket(String host, int port)
// Socket s = new Socket(InetAddress.getByName("192.168.12.92"), 8888);
// public OutputStream getOutputStream()
OutputStream os = s.getOutputStream();
s.close();
}
}
(2) TCP协议接收数据
A:创建接收端的Socket对象
B:监听客户端连接。返回一个对应的Socket对象
C:获取输入流,读取数据显示在控制台
D:释放资源
public class ServerDemo {
public static void main(String[] args) throws IOException {
// 创建接收端的Socket对象
// ServerSocket(int port)
ServerSocket ss = new ServerSocket(8888);
// 监听客户端连接。返回一个对应的Socket对象
// public Socket accept()
Socket s = ss.accept(); // 侦听并接受到此套接字的连接。此方法在连接传入之前一直阻塞。
// 获取输入流,读取数据显示在控制台
InputStream is = s.getInputStream();
byte[] bys = new byte[1024];
int len = is.read(bys); // 阻塞式方法
String str = new String(bys, 0, len);
String ip = s.getInetAddress().getHostAddress();
System.out.println(ip + "---" + str);
// 释放资源
s.close();
// ss.close(); //这个不应该关闭
}
}
(3)TCP协议发送和接收数据图解
11 服务器给客户端一个反馈的案例
import java.io.IOException;
import java.io.InputStream;
import java.io.OutputStream;
import java.net.ServerSocket;
import java.net.Socket;
public class ServerDemo {
public static void main(String[] args) throws IOException {
// 创建服务器Socket对象
ServerSocket ss = new ServerSocket(9999);
// 监听客户端的连接
Socket s = ss.accept(); // 阻塞
// 获取输入流
InputStream is = s.getInputStream();
byte[] bys = new byte[1024];
int len = is.read(bys); // 阻塞
String server = new String(bys, 0, len);
System.out.println("server:" + server);
// 获取输出流
OutputStream os = s.getOutputStream();
os.write("数据已经收到".getBytes());
// 释放资源
s.close();
// ss.close();
}
}
import java.io.IOException;
import java.io.InputStream;
import java.io.OutputStream;
import java.net.Socket;
public class ClientDemo {
public static void main(String[] args) throws IOException {
// 创建客户端Socket对象
Socket s = new Socket("192.168.12.92", 9999);
// 获取输出流
OutputStream os = s.getOutputStream();
os.write("今天天气很好,适合睡觉".getBytes());
// 获取输入流
InputStream is = s.getInputStream();
byte[] bys = new byte[1024];
int len = is.read(bys);// 阻塞
String client = new String(bys, 0, len);
System.out.println("client:" + client);
// 释放资源
s.close();
}
}
// 先开服务器 再开客户端
// 输出:
client:数据已经收到
server:今天天气很好,适合睡觉
12 客户端键盘录入服务器控制台输出
public class ClientDemo {
public static void main(String[] args) throws IOException {
// 创建客户端Socket对象
Socket s = new Socket("192.168.12.92", 22222);
// 键盘录入数据
BufferedReader br = new BufferedReader(new InputStreamReader(System.in));
// 把通道内的流给包装一下
BufferedWriter bw = new BufferedWriter(new OutputStreamWriter(s.getOutputStream()));
String line = null;
while ((line = br.readLine()) != null) {
// 键盘录入数据要自定义结束标记
if ("886".equals(line)) {
break;
}
bw.write(line);
bw.newLine();
bw.flush();
}
// 释放资源
// bw.close();
// br.close();
s.close();
}
}
public class ServerDemo {
public static void main(String[] args) throws IOException {
// 创建服务器Socket对象
ServerSocket ss = new ServerSocket(22222);
// 监听客户端连接
Socket s = ss.accept();
// 包装通道内容的流
BufferedReader br = new BufferedReader(new InputStreamReader(s.getInputStream()));
String line = null;
while ((line = br.readLine()) != null) {
System.out.println(line);
}
// br.close();
s.close();
// ss.close();
}
}
13 客户端键盘录入,服务器输出文本文件
public class ClientDemo {
public static void main(String[] args) throws IOException {
// 创建客户端Socket对象
Socket s = new Socket("192.168.12.92", 23456);
// 封装键盘录入
BufferedReader br = new BufferedReader(new InputStreamReader(System.in));
// 封装通道内的数据
BufferedWriter bw = new BufferedWriter(new OutputStreamWriter(s.getOutputStream()));
String line = null;
while ((line = br.readLine()) != null) {
if ("over".equals(line)) {
break;
}
bw.write(line);
bw.newLine();
bw.flush();
}
// bw.close();
// br.close();
s.close();
}
}
public class ServerDemo {
public static void main(String[] args) throws IOException {
// 创建服务器Socket对象
ServerSocket ss = new ServerSocket(23456);
// 监听客户端连接
Socket s = ss.accept();
// 封装通道内的数据
BufferedReader br = new BufferedReader(new InputStreamReader(s.getInputStream()));
// 封装文本文件
BufferedWriter bw = new BufferedWriter(new FileWriter("a.txt"));
String line = null;
while ((line = br.readLine()) != null) {
bw.write(line);
bw.newLine();
bw.flush();
}
bw.close();
// br.close();
s.close();
// ss.close();
}
}
14 客户端文本文件,服务器输出到控制台
public class ClientDemo {
public static void main(String[] args) throws IOException {
// 创建Socket对象
Socket s = new Socket("192.168.12.92", 34567);
// 封装文本文件
BufferedReader br = new BufferedReader(new FileReader("InetAddressDemo.java"));
// 封装通道内的流
BufferedWriter bw = new BufferedWriter(new OutputStreamWriter(s.getOutputStream()));
String line = null;
while ((line = br.readLine()) != null) {
bw.write(line);
bw.newLine();
bw.flush();
}
br.close();
s.close();
}
}
public class ServerDemo {
public static void main(String[] args) throws IOException {
// 创建服务器Socket对象
ServerSocket ss = new ServerSocket(34567);
// 监听客户端连接
Socket s = ss.accept();
// 封装通道内的流
BufferedReader br = new BufferedReader(new InputStreamReader(s.getInputStream()));
String line = null;
while ((line = br.readLine()) != null) {
System.out.println(line);
}
s.close();
}
}
15 客户端文本文件,服务器输出文本文件
public class UploadServer {
public static void main(String[] args) throws IOException {
// 创建服务器端的Socket对象
ServerSocket ss = new ServerSocket(11111);
// 监听客户端连接
Socket s = ss.accept();
// 封装通道内的流
BufferedReader br = new BufferedReader(new InputStreamReader(s.getInputStream()));
// 封装文本文件
BufferedWriter bw = new BufferedWriter(new FileWriter("Copy.java"));
String line = null;
while ((line = br.readLine()) != null) {
bw.write(line);
bw.newLine();
bw.flush();
}
bw.close();
s.close();
}
}
public class UploadClient {
public static void main(String[] args) throws IOException {
// 创建客户端Socket对象
Socket s = new Socket("192.168.12.92", 11111);
// 封装文本文件
BufferedReader br = new BufferedReader(new FileReader("InetAddressDemo.java"));
// 封装通道内流
BufferedWriter bw = new BufferedWriter(new OutputStreamWriter(s.getOutputStream()));
String line = null;
while ((line = br.readLine()) != null) {
bw.write(line);
bw.newLine();
bw.flush();
}
// 释放资源
br.close();
s.close();
}
}
16 TCP上传文本文件并给出反馈
按照我们正常的思路加入反馈信息,结果却没反应。为什么呢?
读取文本文件是可以以null作为结束信息的,但是呢,通道内是不能这样结束信息的。
所以,服务器根本就不知道你结束了。而你还想服务器给你反馈。所以,就相互等待了。
如何解决呢?
A:在多写一条数据,告诉服务器,读取到这条数据说明我就结束,你也结束吧。
这样做可以解决问题,但是不好。
B:Socket对象提供了一种解决方案
public void shutdownOutput()
public class UploadServer {
public static void main(String[] args) throws IOException {
// 创建服务器端的Socket对象
ServerSocket ss = new ServerSocket(11111);
// 监听客户端连接
Socket s = ss.accept();// 阻塞
// 封装通道内的流
BufferedReader br = new BufferedReader(new InputStreamReader(s.getInputStream()));
// 封装文本文件
BufferedWriter bw = new BufferedWriter(new FileWriter("Copy.java"));
String line = null;
while ((line = br.readLine()) != null) { // 阻塞
// if("over".equals(line)){
// break;
// }
bw.write(line);
bw.newLine();
bw.flush();
}
// 给出反馈
BufferedWriter bwServer = new BufferedWriter(new OutputStreamWriter(s.getOutputStream()));
bwServer.write("文件上传成功");
bwServer.newLine();
bwServer.flush();
// 释放资源
bw.close();
s.close();
}
}
public class UploadClient {
public static void main(String[] args) throws IOException {
// 创建客户端Socket对象
Socket s = new Socket("192.168.12.92", 11111);
// 封装文本文件
BufferedReader br = new BufferedReader(new FileReader("InetAddressDemo.java"));
// 封装通道内流
BufferedWriter bw = new BufferedWriter(new OutputStreamWriter(s.getOutputStream()));
String line = null;
while ((line = br.readLine()) != null) { // 阻塞
bw.write(line);
bw.newLine();
bw.flush();
}
//自定义一个结束标记
//bw.write("over");
//bw.newLine();
//bw.flush();
//Socket提供了一个终止,它会通知服务器你别等了,我没有数据过来了
s.shutdownOutput();
// 接收反馈
BufferedReader brClient = new BufferedReader(new InputStreamReader(s.getInputStream()));
String client = brClient.readLine(); // 阻塞
System.out.println(client);
// 释放资源
br.close();
s.close();
}
}
17 多个客户端上传到服务器
通过while循环可以改进一个服务器接收多个客户端。
但是这个是有问题的。
如果是这种情况,假设我还有张三,李四,王五这三个人分别执行客户端
张三:好好学习.avi(100M) 256k
李四:天天向上.mp3(3M) 1M
王五:ILoveJava.txt(1k) 100M
这样会依次执行。。。所以应该用多线程
//客户端不用改
public class UploadClient {
public static void main(String[] args) throws IOException {
// 创建客户端Socket对象
Socket s = new Socket("192.168.12.92", 11111);
// 封装文本文件
BufferedReader br = new BufferedReader(new FileReader("InetAddressDemo.java"));
// 封装通道内流
BufferedWriter bw = new BufferedWriter(new OutputStreamWriter(s.getOutputStream()));
String line = null;
while ((line = br.readLine()) != null) { // 阻塞
bw.write(line);
bw.newLine();
bw.flush();
}
//自定义一个结束标记
//bw.write("over");
//bw.newLine();
//bw.flush();
//Socket提供了一个终止,它会通知服务器你别等了,我没有数据过来了
s.shutdownOutput();
// 接收反馈
BufferedReader brClient = new BufferedReader(new InputStreamReader(s.getInputStream()));
String client = brClient.readLine(); // 阻塞
System.out.println(client);
// 释放资源
br.close();
s.close();
}
}
public class UserThread implements Runnable {
private Socket s;
public UserThread(Socket s) {
this.s = s;
}
@Override
public void run() {
try {
// 封装通道内的流
BufferedReader br = new BufferedReader(new InputStreamReader(s.getInputStream()));
// 封装文本文件
// BufferedWriter bw = new BufferedWriter(new
// FileWriter("Copy.java"));
// 为了防止名称冲突
String newName = System.currentTimeMillis() + ".java";
BufferedWriter bw = new BufferedWriter(new FileWriter(newName));
String line = null;
while ((line = br.readLine()) != null) { // 阻塞
bw.write(line);
bw.newLine();
bw.flush();
}
// 给出反馈
BufferedWriter bwServer = new BufferedWriter(new OutputStreamWriter(s.getOutputStream()));
bwServer.write("文件上传成功");
bwServer.newLine();
bwServer.flush();
// 释放资源
bw.close();
s.close();
} catch (IOException e) {
e.printStackTrace();
}
}
}
public class UploadServer {
public static void main(String[] args) throws IOException {
// 创建服务器Socket对象
ServerSocket ss = new ServerSocket(11111);
while (true) {
Socket s = ss.accept();
new Thread(new UserThread(s)).start();
}
}
}
计算机网络
是指将地理位置不同的具有独立功能更的多台计算机及其外部设备,通过通信线路连接起来,在网络操作系统,网络管理软件及网络通信协议的管理和协调下,实现资源共享和信息传递的计算机系统。
网络编程
就是用来实现网络互连的不同计算机上运行的程序间可以进行数据交换。
2 网络模型
计算机网络之间以何种规则进行通信,就是网络模型研究问题。
OSI参考模型 TCP/IP参考模型
--------- ----------
应用层
---------
表示层 应用层
---------
会话层
--------- -----------
传输层 传输层
--------- -----------
网络层 网络层
--------- -----------
数据链路层
--------- 主机至网络层
物理层
--------- -----------
网络模型7层概述:
1.物理层:主要定义物理设备标准,如网线的接口类型、光纤的接口类型、各种传输介质的传输速率等。它的主要作用是传输比特流(就是由1、0转化为电流强弱来进行传输,到达目的地后在转化为1、0,也就是我们常说的数模转换与模数转换)。这一层的数据叫做比特。
2. 数据链路层:主要将从物理层接收的数据进行MAC地址(网卡的地址)的封装与解封装。常把这一层的数据叫做帧。在这一层工作的设备是交换机,数据通过交换机来传输。
3. 网络层:主要将从下层接收到的数据进行IP地址(例192.168.0.1)的封装与解封装。在这一层工作的设备是路由器,常把这一层的数据叫做数据包。
4. 传输层:定义了一些传输数据的协议和端口号(WWW端口80等),如:TCP(传输控制协议,传输效率低,可靠性强,用于传输可靠性要求高,数据量大的数据),UDP(用户数据报协议,与TCP特性恰恰相反,用于传输可靠性要求不高,数据量小的数据,如QQ聊天数据就是通过这种方式传输的)。 主要是将从下层接收的数据进行分段和传输,到达目的地址后再进行重组。常常把这一层数据叫做段。
5.会话层:通过传输层(端口号:传输端口与接收端口)建立数据传输的通路。主要在你的系统之间发起会话或者接受会话请求(设备之间需要互相认识可以是IP也可以是MAC或者是主机名)
6.表示层:主要是进行对接收的数据进行解释、加密与解密、压缩与解压缩等(也就是把计算机能够识别的东西转换成人能够能识别的东西(如图片、声音等)。
7.应用层: 主要是一些终端的应用,比如说FTP(各种文件下载),WEB(IE浏览),QQ之类的(可以把它理解成我们在电脑屏幕上可以看到的东西.就是终端应用)。
3 网络编程三要素
A:IP地址
B:端口
C:协议
(1)
IP地址:
网络中计算机的唯一标识。
计算机只能识别二进制的数据,所以我们的IP地址应该是一个二进制的数据。
但是呢,我们配置的IP地址确不是二进制的,为什么呢?
IP:192.168.1.100
换算:11000000 10101000 00000001 01100100
假如真是:11000000 10101000 00000001 01100100的话。
我们如果每次再上课的时候要配置该IP地址,记忆起来就比较的麻烦。
所以,为了方便表示IP地址,我们就把IP地址的每一个字节上的数据换算成十进制,然后用.分开来表示:
"点分十进制"
IP地址的组成:网络号段+主机号段
A类:第一号段为网络号段+后三段的主机号段
一个网络号:256*256*256 = 16777216
B类:前二号段为网络号段+后二段的主机号段
一个网络号:256*256 = 65536
C类:前三号段为网络号段+后一段的主机号段
一个网络号:256
IP地址的分类:
A类 1.0.0.1---127.255.255.254 (1)10.X.X.X是私有地址(私有地址就是在互联网上不使用,而被用在局域网络中的地址) (2)127.X.X.X是保留地址,用做循环测试用的。
B类 128.0.0.1---191.255.255.254 172.16.0.0---172.31.255.255是私有地址。169.254.X.X是保留地址。
C类 192.0.0.1---223.255.255.254 192.168.X.X是私有地址
D类 224.0.0.1---239.255.255.254
E类 240.0.0.1---247.255.255.254
两个DOS命令:
ipconfig 查看本机ip地址
ping 后面跟ip地址。测试本机与指定的ip地址间的通信是否有问题
特殊的IP地址:
127.0.0.1 回环地址(表示本机)
x.x.x.255 广播地址
x.x.x.0 网络地址
(2)
端口号:
正在运行的程序的标识。
有效端口:0~65535,其中0~1024系统使用或保留端口。
(3)
协议:
通信的规则
UDP:
把数据打包
数据有限制
不建立连接
速度快
不可靠
TCP:
建立连接通道
数据无限制
速度慢
可靠
举例:
UDP:发短信
TCP:打电话
4 InetAddress类的概述
如果一个类没有构造方法:
A:成员全部是静态的(Math,Arrays,Collections)
B:单例设计模式(Runtime)
C:类中有静态方法返回该类的对象(InetAddress)
class Demo {
private Demo(){}
public static Demo getXxx() {
return new Demo();
}
}
看InetAddress的成员方法:
public static InetAddress getByName(String host):根据主机名或者IP地址的字符串表示得到IP地址对象
public class InetAddressDemo {
public static void main(String[] args) throws UnknownHostException {
// public static InetAddress getByName(String host)
// InetAddress address = InetAddress.getByName("liuyi");
// InetAddress address = InetAddress.getByName("192.168.12.92");
InetAddress address = InetAddress.getByName("192.168.12.63");
// 获取两个东西:主机名,IP地址
// public String getHostName()
String name = address.getHostName();
// public String getHostAddress()
String ip = address.getHostAddress();
System.out.println(name + "---" + ip);
}
}
5 Socket
Socket:网络套接字
Socket:网络编程,套接字编程
Socket包含了:IP地址+端口
Socket原理机制:
通信的两端都有Socket
网络通信其实就是Socket间的通信
数据在两个Socket间通过IO传输
--------------------------------------------------------------------------
计算机A 计算机B |
QQ QQ |
Socket 在某种协议下通过IO流传输 Socket |
(IP和端口)--------------------------------------------(IP和端口) |
---------------------------------------------------------------------------
6 UDP协议
(1)UDP协议发送数据
A:创建发送端Socket对象
B:创建数据,并把数据打包
C:调用Socket对象的发送方法发送数据包
D:释放资源
public class SendDemo {
public static void main(String[] args) throws IOException {
// 创建发送端Socket对象
// DatagramSocket()
DatagramSocket ds = new DatagramSocket();
// 创建数据,并把数据打包 数据 长度 IP 端口
// DatagramPacket(byte[] buf, int length, InetAddress address, int port)
// 创建数据
byte[] bys = "hello,udp,我来了".getBytes();
// 长度
int length = bys.length;
// IP地址对象
InetAddress address = InetAddress.getByName("192.168.12.92");
// 端口
int port = 10086;
DatagramPacket dp = new DatagramPacket(bys, length, address, port);
// 调用Socket对象的发送方法发送数据包
// public void send(DatagramPacket p)
ds.send(dp);
// 释放资源
ds.close();
}
}
(2)UDP协议接收数据
A:创建接收端Socket对象
B:创建一个数据包(接收容器)
C:调用Socket对象的接收方法接收数据
D:解析数据包,并显示在控制台
E:释放资源
public class ReceiveDemo {
public static void main(String[] args) throws IOException {
// 创建接收端Socket对象
// DatagramSocket(int port)
DatagramSocket ds = new DatagramSocket(10086);
// 创建一个数据包(接收容器)
// DatagramPacket(byte[] buf, int length)
byte[] bys = new byte[1024];
int length = bys.length;
DatagramPacket dp = new DatagramPacket(bys, length);
// 调用Socket对象的接收方法接收数据
// public void receive(DatagramPacket p)
ds.receive(dp); // 阻塞式
// 解析数据包,并显示在控制台
// 获取对方的ip
// public InetAddress getAddress()
InetAddress address = dp.getAddress();
String ip = address.getHostAddress();
// public byte[] getData():获取数据缓冲区
// public int getLength():获取数据的实际长度
byte[] bys2 = dp.getData();
int len = dp.getLength();
String s = new String(bys2, 0, len);
System.out.println(ip + "传递的数据是:" + s);
// 释放资源
ds.close();
}
}
(3)UDP发送和接收数据图解
7 UDP优化
import java.io.IOException;
import java.net.DatagramPacket;
import java.net.DatagramSocket;
public class ReceiveDemo {
public static void main(String[] args) throws IOException {
// 创建接收端的Socket对象
DatagramSocket ds = new DatagramSocket(12345);
// 创建一个包裹
byte[] bys = new byte[1024];
DatagramPacket dp = new DatagramPacket(bys, bys.length);
// 接收数据
ds.receive(dp);
// 解析数据
String ip = dp.getAddress().getHostAddress();
String s = new String(dp.getData(), 0, dp.getLength());
System.out.println("from " + ip + " data is : " + s);
// 释放资源
ds.close();
}
}
import java.io.IOException;
import java.net.DatagramPacket;
import java.net.DatagramSocket;
import java.net.InetAddress;
public class SendDemo {
public static void main(String[] args) throws IOException {
// 创建发送端的Socket对象
DatagramSocket ds = new DatagramSocket();
// 创建数据并打包
byte[] bys = "helloworld".getBytes();
DatagramPacket dp = new DatagramPacket(bys, bys.length,InetAddress.getByName("192.168.12.92"), 12345);
// 发送数据
ds.send(dp);
// 释放资源
ds.close();
}
}
8 发送端的数据来自于键盘录入案例
public class ReceiveDemo {
public static void main(String[] args) throws IOException {
// 创建接收端的Socket对象
DatagramSocket ds = new DatagramSocket(12345);
while (true) {
// 创建一个包裹
byte[] bys = new byte[1024];
DatagramPacket dp = new DatagramPacket(bys, bys.length);
// 接收数据
ds.receive(dp);
// 解析数据
String ip = dp.getAddress().getHostAddress();
String s = new String(dp.getData(), 0, dp.getLength());
System.out.println("from " + ip + " data is : " + s);
}
// 释放资源
// 接收端应该一直开着等待接收数据,是不需要关闭
// ds.close();
}
}
数据来自于键盘录入
键盘录入数据要自己控制录入结束。
public class SendDemo {
public static void main(String[] args) throws IOException {
// 创建发送端的Socket对象
DatagramSocket ds = new DatagramSocket();
// 封装键盘录入数据
BufferedReader br = new BufferedReader(new InputStreamReader(System.in));
String line = null;
while ((line = br.readLine()) != null) {
if ("886".equals(line)) {
break;
}
// 创建数据并打包
byte[] bys = line.getBytes();
// DatagramPacket dp = new DatagramPacket(bys, bys.length,
// InetAddress.getByName("192.168.12.92"), 12345);
DatagramPacket dp = new DatagramPacket(bys, bys.length,
InetAddress.getByName("192.168.12.255"), 12345);
// 发送数据
ds.send(dp);
}
// 释放资源
ds.close();
}
}
9 多线程实现聊天室程序
通过多线程改进刚才的聊天程序,这样我就可以实现在一个窗口发送和接收数据了。
public class ChatRoom {
public static void main(String[] args) throws IOException {
DatagramSocket dsSend = new DatagramSocket();
DatagramSocket dsReceive = new DatagramSocket(12306);
SendThread st = new SendThread(dsSend);
ReceiveThread rt = new ReceiveThread(dsReceive);
Thread t1 = new Thread(st);
Thread t2 = new Thread(rt);
t1.start();
t2.start();
}
}
public class SendThread implements Runnable {
private DatagramSocket ds;
public SendThread(DatagramSocket ds) {
this.ds = ds;
}
@Override
public void run() {
try {
// 封装键盘录入数据
BufferedReader br = new BufferedReader(new InputStreamReader(System.in));
String line = null;
while ((line = br.readLine()) != null) {
if ("886".equals(line)) {
break;
}
// 创建数据并打包
byte[] bys = line.getBytes();
// DatagramPacket dp = new DatagramPacket(bys, bys.length,
// InetAddress.getByName("192.168.12.92"), 12345);
DatagramPacket dp = new DatagramPacket(bys, bys.length,InetAddress.getByName("192.168.12.255"), 12306);
// 发送数据
ds.send(dp);
}
// 释放资源
ds.close();
} catch (IOException e) {
e.printStackTrace();
}
}
}
public class ReceiveThread implements Runnable {
private DatagramSocket ds;
public ReceiveThread(DatagramSocket ds) {
this.ds = ds;
}
@Override
public void run() {
try {
while (true) {
// 创建一个包裹
byte[] bys = new byte[1024];
DatagramPacket dp = new DatagramPacket(bys, bys.length);
// 接收数据
ds.receive(dp);
// 解析数据
String ip = dp.getAddress().getHostAddress();
String s = new String(dp.getData(), 0, dp.getLength());
System.out.println("from " + ip + " data is : " + s);
}
} catch (IOException e) {
e.printStackTrace();
}
}
}
10 TCP协议
(1)TCP协议发送数据
A:创建发送端的Socket对象
这一步如果成功,就说明连接已经成功了。
B:获取输出流,写数据
C:释放资源
连接被拒绝。TCP协议一定要先看服务器。
java.net.ConnectException: Connection refused: connect
public class ClientDemo {
public static void main(String[] args) throws IOException {
// 创建发送端的Socket对象
// Socket(InetAddress address, int port)
// Socket(String host, int port)
// Socket s = new Socket(InetAddress.getByName("192.168.12.92"), 8888);
Socket s = new Socket("192.168.12.92", 8888);
// 获取输出流,写数据// public OutputStream getOutputStream()
OutputStream os = s.getOutputStream();
os.write("hello,tcp,我来了".getBytes());
// 释放资源s.close();
}
}
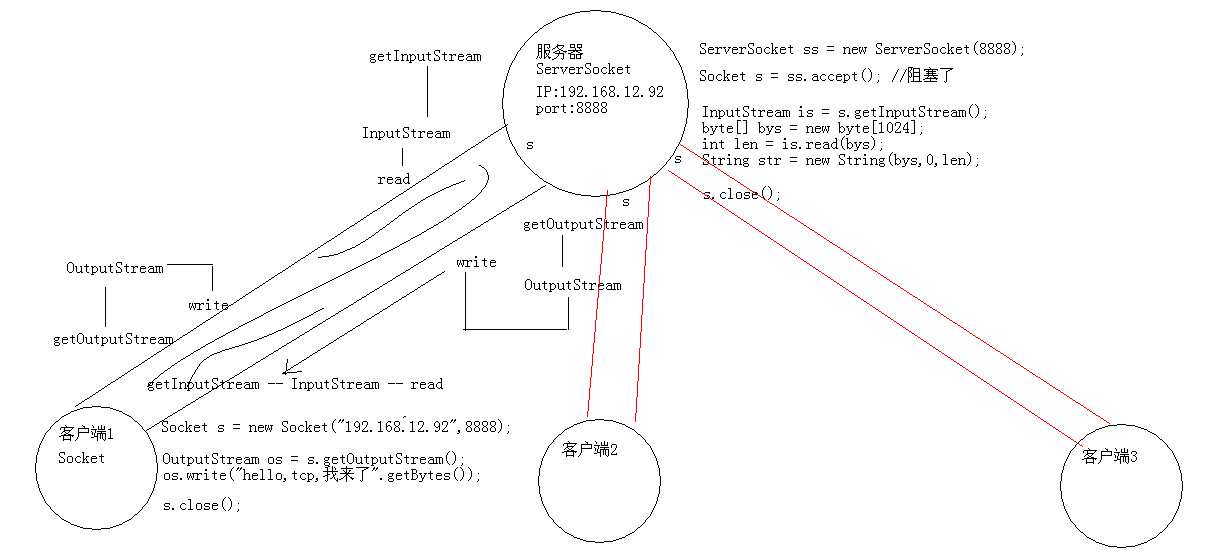
(2) TCP协议接收数据
A:创建接收端的Socket对象
B:监听客户端连接。返回一个对应的Socket对象
C:获取输入流,读取数据显示在控制台
D:释放资源
public class ServerDemo {
public static void main(String[] args) throws IOException {
// 创建接收端的Socket对象
// ServerSocket(int port)
ServerSocket ss = new ServerSocket(8888);
// 监听客户端连接。返回一个对应的Socket对象
// public Socket accept()
Socket s = ss.accept(); // 侦听并接受到此套接字的连接。此方法在连接传入之前一直阻塞。
// 获取输入流,读取数据显示在控制台
InputStream is = s.getInputStream();
byte[] bys = new byte[1024];
int len = is.read(bys); // 阻塞式方法
String str = new String(bys, 0, len);
String ip = s.getInetAddress().getHostAddress();
System.out.println(ip + "---" + str);
// 释放资源
s.close();
// ss.close(); //这个不应该关闭
}
}
(3)TCP协议发送和接收数据图解
11 服务器给客户端一个反馈的案例
import java.io.IOException;
import java.io.InputStream;
import java.io.OutputStream;
import java.net.ServerSocket;
import java.net.Socket;
public class ServerDemo {
public static void main(String[] args) throws IOException {
// 创建服务器Socket对象
ServerSocket ss = new ServerSocket(9999);
// 监听客户端的连接
Socket s = ss.accept(); // 阻塞
// 获取输入流
InputStream is = s.getInputStream();
byte[] bys = new byte[1024];
int len = is.read(bys); // 阻塞
String server = new String(bys, 0, len);
System.out.println("server:" + server);
// 获取输出流
OutputStream os = s.getOutputStream();
os.write("数据已经收到".getBytes());
// 释放资源
s.close();
// ss.close();
}
}
import java.io.IOException;
import java.io.InputStream;
import java.io.OutputStream;
import java.net.Socket;
public class ClientDemo {
public static void main(String[] args) throws IOException {
// 创建客户端Socket对象
Socket s = new Socket("192.168.12.92", 9999);
// 获取输出流
OutputStream os = s.getOutputStream();
os.write("今天天气很好,适合睡觉".getBytes());
// 获取输入流
InputStream is = s.getInputStream();
byte[] bys = new byte[1024];
int len = is.read(bys);// 阻塞
String client = new String(bys, 0, len);
System.out.println("client:" + client);
// 释放资源
s.close();
}
}
// 先开服务器 再开客户端
// 输出:
client:数据已经收到
server:今天天气很好,适合睡觉
12 客户端键盘录入服务器控制台输出
public class ClientDemo {
public static void main(String[] args) throws IOException {
// 创建客户端Socket对象
Socket s = new Socket("192.168.12.92", 22222);
// 键盘录入数据
BufferedReader br = new BufferedReader(new InputStreamReader(System.in));
// 把通道内的流给包装一下
BufferedWriter bw = new BufferedWriter(new OutputStreamWriter(s.getOutputStream()));
String line = null;
while ((line = br.readLine()) != null) {
// 键盘录入数据要自定义结束标记
if ("886".equals(line)) {
break;
}
bw.write(line);
bw.newLine();
bw.flush();
}
// 释放资源
// bw.close();
// br.close();
s.close();
}
}
public class ServerDemo {
public static void main(String[] args) throws IOException {
// 创建服务器Socket对象
ServerSocket ss = new ServerSocket(22222);
// 监听客户端连接
Socket s = ss.accept();
// 包装通道内容的流
BufferedReader br = new BufferedReader(new InputStreamReader(s.getInputStream()));
String line = null;
while ((line = br.readLine()) != null) {
System.out.println(line);
}
// br.close();
s.close();
// ss.close();
}
}
13 客户端键盘录入,服务器输出文本文件
public class ClientDemo {
public static void main(String[] args) throws IOException {
// 创建客户端Socket对象
Socket s = new Socket("192.168.12.92", 23456);
// 封装键盘录入
BufferedReader br = new BufferedReader(new InputStreamReader(System.in));
// 封装通道内的数据
BufferedWriter bw = new BufferedWriter(new OutputStreamWriter(s.getOutputStream()));
String line = null;
while ((line = br.readLine()) != null) {
if ("over".equals(line)) {
break;
}
bw.write(line);
bw.newLine();
bw.flush();
}
// bw.close();
// br.close();
s.close();
}
}
public class ServerDemo {
public static void main(String[] args) throws IOException {
// 创建服务器Socket对象
ServerSocket ss = new ServerSocket(23456);
// 监听客户端连接
Socket s = ss.accept();
// 封装通道内的数据
BufferedReader br = new BufferedReader(new InputStreamReader(s.getInputStream()));
// 封装文本文件
BufferedWriter bw = new BufferedWriter(new FileWriter("a.txt"));
String line = null;
while ((line = br.readLine()) != null) {
bw.write(line);
bw.newLine();
bw.flush();
}
bw.close();
// br.close();
s.close();
// ss.close();
}
}
14 客户端文本文件,服务器输出到控制台
public class ClientDemo {
public static void main(String[] args) throws IOException {
// 创建Socket对象
Socket s = new Socket("192.168.12.92", 34567);
// 封装文本文件
BufferedReader br = new BufferedReader(new FileReader("InetAddressDemo.java"));
// 封装通道内的流
BufferedWriter bw = new BufferedWriter(new OutputStreamWriter(s.getOutputStream()));
String line = null;
while ((line = br.readLine()) != null) {
bw.write(line);
bw.newLine();
bw.flush();
}
br.close();
s.close();
}
}
public class ServerDemo {
public static void main(String[] args) throws IOException {
// 创建服务器Socket对象
ServerSocket ss = new ServerSocket(34567);
// 监听客户端连接
Socket s = ss.accept();
// 封装通道内的流
BufferedReader br = new BufferedReader(new InputStreamReader(s.getInputStream()));
String line = null;
while ((line = br.readLine()) != null) {
System.out.println(line);
}
s.close();
}
}
15 客户端文本文件,服务器输出文本文件
public class UploadServer {
public static void main(String[] args) throws IOException {
// 创建服务器端的Socket对象
ServerSocket ss = new ServerSocket(11111);
// 监听客户端连接
Socket s = ss.accept();
// 封装通道内的流
BufferedReader br = new BufferedReader(new InputStreamReader(s.getInputStream()));
// 封装文本文件
BufferedWriter bw = new BufferedWriter(new FileWriter("Copy.java"));
String line = null;
while ((line = br.readLine()) != null) {
bw.write(line);
bw.newLine();
bw.flush();
}
bw.close();
s.close();
}
}
public class UploadClient {
public static void main(String[] args) throws IOException {
// 创建客户端Socket对象
Socket s = new Socket("192.168.12.92", 11111);
// 封装文本文件
BufferedReader br = new BufferedReader(new FileReader("InetAddressDemo.java"));
// 封装通道内流
BufferedWriter bw = new BufferedWriter(new OutputStreamWriter(s.getOutputStream()));
String line = null;
while ((line = br.readLine()) != null) {
bw.write(line);
bw.newLine();
bw.flush();
}
// 释放资源
br.close();
s.close();
}
}
16 TCP上传文本文件并给出反馈
按照我们正常的思路加入反馈信息,结果却没反应。为什么呢?
读取文本文件是可以以null作为结束信息的,但是呢,通道内是不能这样结束信息的。
所以,服务器根本就不知道你结束了。而你还想服务器给你反馈。所以,就相互等待了。
如何解决呢?
A:在多写一条数据,告诉服务器,读取到这条数据说明我就结束,你也结束吧。
这样做可以解决问题,但是不好。
B:Socket对象提供了一种解决方案
public void shutdownOutput()
public class UploadServer {
public static void main(String[] args) throws IOException {
// 创建服务器端的Socket对象
ServerSocket ss = new ServerSocket(11111);
// 监听客户端连接
Socket s = ss.accept();// 阻塞
// 封装通道内的流
BufferedReader br = new BufferedReader(new InputStreamReader(s.getInputStream()));
// 封装文本文件
BufferedWriter bw = new BufferedWriter(new FileWriter("Copy.java"));
String line = null;
while ((line = br.readLine()) != null) { // 阻塞
// if("over".equals(line)){
// break;
// }
bw.write(line);
bw.newLine();
bw.flush();
}
// 给出反馈
BufferedWriter bwServer = new BufferedWriter(new OutputStreamWriter(s.getOutputStream()));
bwServer.write("文件上传成功");
bwServer.newLine();
bwServer.flush();
// 释放资源
bw.close();
s.close();
}
}
public class UploadClient {
public static void main(String[] args) throws IOException {
// 创建客户端Socket对象
Socket s = new Socket("192.168.12.92", 11111);
// 封装文本文件
BufferedReader br = new BufferedReader(new FileReader("InetAddressDemo.java"));
// 封装通道内流
BufferedWriter bw = new BufferedWriter(new OutputStreamWriter(s.getOutputStream()));
String line = null;
while ((line = br.readLine()) != null) { // 阻塞
bw.write(line);
bw.newLine();
bw.flush();
}
//自定义一个结束标记
//bw.write("over");
//bw.newLine();
//bw.flush();
//Socket提供了一个终止,它会通知服务器你别等了,我没有数据过来了
s.shutdownOutput();
// 接收反馈
BufferedReader brClient = new BufferedReader(new InputStreamReader(s.getInputStream()));
String client = brClient.readLine(); // 阻塞
System.out.println(client);
// 释放资源
br.close();
s.close();
}
}
17 多个客户端上传到服务器
通过while循环可以改进一个服务器接收多个客户端。
但是这个是有问题的。
如果是这种情况,假设我还有张三,李四,王五这三个人分别执行客户端
张三:好好学习.avi(100M) 256k
李四:天天向上.mp3(3M) 1M
王五:ILoveJava.txt(1k) 100M
这样会依次执行。。。所以应该用多线程
//客户端不用改
public class UploadClient {
public static void main(String[] args) throws IOException {
// 创建客户端Socket对象
Socket s = new Socket("192.168.12.92", 11111);
// 封装文本文件
BufferedReader br = new BufferedReader(new FileReader("InetAddressDemo.java"));
// 封装通道内流
BufferedWriter bw = new BufferedWriter(new OutputStreamWriter(s.getOutputStream()));
String line = null;
while ((line = br.readLine()) != null) { // 阻塞
bw.write(line);
bw.newLine();
bw.flush();
}
//自定义一个结束标记
//bw.write("over");
//bw.newLine();
//bw.flush();
//Socket提供了一个终止,它会通知服务器你别等了,我没有数据过来了
s.shutdownOutput();
// 接收反馈
BufferedReader brClient = new BufferedReader(new InputStreamReader(s.getInputStream()));
String client = brClient.readLine(); // 阻塞
System.out.println(client);
// 释放资源
br.close();
s.close();
}
}
public class UserThread implements Runnable {
private Socket s;
public UserThread(Socket s) {
this.s = s;
}
@Override
public void run() {
try {
// 封装通道内的流
BufferedReader br = new BufferedReader(new InputStreamReader(s.getInputStream()));
// 封装文本文件
// BufferedWriter bw = new BufferedWriter(new
// FileWriter("Copy.java"));
// 为了防止名称冲突
String newName = System.currentTimeMillis() + ".java";
BufferedWriter bw = new BufferedWriter(new FileWriter(newName));
String line = null;
while ((line = br.readLine()) != null) { // 阻塞
bw.write(line);
bw.newLine();
bw.flush();
}
// 给出反馈
BufferedWriter bwServer = new BufferedWriter(new OutputStreamWriter(s.getOutputStream()));
bwServer.write("文件上传成功");
bwServer.newLine();
bwServer.flush();
// 释放资源
bw.close();
s.close();
} catch (IOException e) {
e.printStackTrace();
}
}
}
public class UploadServer {
public static void main(String[] args) throws IOException {
// 创建服务器Socket对象
ServerSocket ss = new ServerSocket(11111);
while (true) {
Socket s = ss.accept();
new Thread(new UserThread(s)).start();
}
}
}


 3531
3531

 被折叠的 条评论
为什么被折叠?
被折叠的 条评论
为什么被折叠?
 到【灌水乐园】发言


