


创建代码
在代码库根目录执行maven命令,用于快速生成一个基础的Maven项目
mvn archetype:generate \
  -DgroupId=com.mycompany \
  -DartifactId=my-maven-project \
  -Dversion=1.0.0 \
  -DarchetypeArtifactId=maven-archetype-quickstart \
  -DinteractiveMode=false
这个命令会创建一个名为 my-maven-project 的简单的Maven项目,其中包含了一个pom.xml文件,和一个 src/main/java/com/mycompany 目录、其中有一个简单的 App.java 文件。
*注意,如果是为了发布到中央仓库,version不能标识为SNAPSHOT版本,因为maven不能发布SNAPSHOT版本,如果此处创建为SNAPSHOT,后面pom.xml里必须在发布前去掉SNAPSHOT
现在开始把你的代码搬到这个目录里,把你项目的依赖加到pom.xml里,此处过程省略
开始
网上有很多过时的文章,都是说要到sonatype的jira平台上提交的,就类似这篇:
手把手教你如何上传自己的组建到maven中央仓库_java怎么推送自己的库到maven仓库-CSDN博客
但是!2024年的流程已经变化了,最新的流程是只需要在sonatype网站注册一个账号,并且申请一个自己的namespace,就可以推送了,但是好像需要有自己的域名。或者更简单的方式是,使用第三方登录,授权登录自己在github、bitbucket等老牌git托管商的账号,这样连namespace都不用申请了,sonatype会直接给你分配一个根据你的托管商账号名字的namespace。
参考官方文档:
Register to Publish Via the Central Portal - The Central Repository Documentation
本文为了方便,我就直接使用github账号授权方式了
注册中央仓库账户
打开网址:
点击右上角的“登录”链接:

中央门户支持通过 Google 或 GitHub 进行社交登录。您还可以选择自己的用户名和密码。如果您选择使用社交登录帐户进行注册,Sonatype 将有权访问与您的社交登录帐户关联的电子邮件地址。
成功授权登录github账号后,就直接登录了,点击右上角账户下拉菜单里的“View Namespaces”,能查看到自己的namespace,就像这样

然后再点击右上角账户下拉菜单里的“View Account”,进入创建token页面,点击右侧的“Generate User Token”按钮,会弹出你的token,只显示一分钟,快速将内容复制下来

这个弹窗内部往下拉一点,是maven配置样例
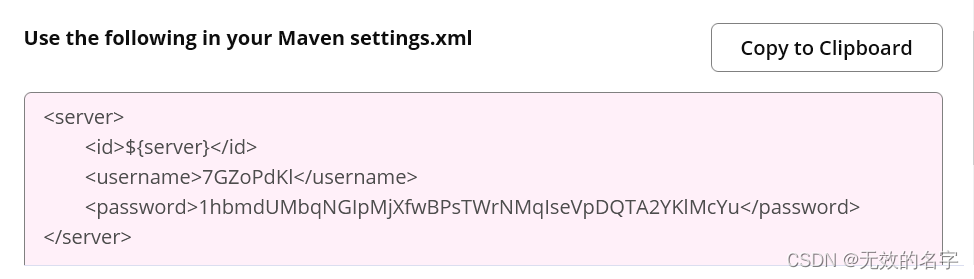
这个配置内容可以直接拷贝到maven配置文件settings.xml的servers段配置里,但是请注意“${server}”必须替换为字符串“central”表示中央仓库
创建gpg密钥
确保您已经安装了GPG工具。如果没有,请访问GnuPG官方网站下载并安装。
生成GPG密钥对
gpg --gen-key按照提示操作,创建一个密钥对,可能会要你输入密钥密码passphrase,这个密码后面也要配置到maven配置文件settings.xml里。记下本次生成的密钥ID,或者用这个命令查看,
gpg --list-keys将公钥上传到公钥服务器,将YOUR_KEY_ID替换为您在第2步中生成的密钥ID,就是上面的生成结果里pub下长的那一串hash值
gpg --keyserver keyserver.ubuntu.com --send-keys YOUR_KEY_ID如果您有多个密钥,本地 gpg 将使用第一个列出的签名密钥,如果您需要使用特定密钥,您可以在一个<configuration>部分内添加 gpg 密钥的详细信息,并使用本地settings.xml通过签名密钥名发现密码。举例:
pom.xml
<build>
  <plugins>
    <plugin>
      <groupId>org.apache.maven.plugins</groupId>
      <artifactId>maven-gpg-plugin</artifactId>
      <version>1.5</version>
      <executions>
        <execution>
          <id>sign-artifacts</id>
          <phase>verify</phase>
          <goals>
            <goal>sign</goal>
          </goals>
          <configuration>
            <keyname>${gpg.keyname}</keyname>
            <passphraseServerId>${gpg.keyname}</passphraseServerId>
          </configuration>
        </execution>
      </executions>
    </plugin>
  </plugins>
</build>
settings.xml
<profiles>
  <profile>
    <id>central</id>
    <activation>
      <activeByDefault>true</activeByDefault>
    </activation>
    <properties>
      <gpg.executable>gpg</gpg.executable>
      <gpg.keyname>YOUR_KEY_ID</gpg.keyname>
      <gpg.passphrase>YOUR_KEY_PASSWORD</gpg.passphrase>
    </properties>
  </profile>
</profiles>
pom.xml修改
pom.xml需要做发布配置
<developers>
  <developer>
    <name>xxx</name>
    <email>xxx@zzz.com</email>
    <url>https://github.com/xxx</url>
  </developer>
</developers>

<licenses>
  <license>
    <name>The Apache Software License, Version 2.0</name>
    <url>http://www.apache.org/licenses/LICENSE-2.0.txt</url>
    <distribution>repo</distribution>
    <comments>The Apache Software License, Version 2.0</comments>
  </license>
</licenses>

<scm>
  <connection>scm:git:https://github.com/xxx/yyy.git</connection>
  <developerConnection>scm:git:https://github.com/xxx/yyy.git</developerConnection>
  <url>https://github.com/xxx/yyy</url>
</scm>

<distributionManagement>
  <snapshotRepository>
    <id>central</id>
    <url>https://s01.oss.sonatype.org/content/repositories/snapshots</url>
  </snapshotRepository>
  <repository>
    <id>central</id>
    <url>https://s01.oss.sonatype.org/service/local/staging/deploy/maven2/</url>
  </repository>
</distributionManagement>

<build>
  <plugins>
    <plugin>
      <groupId>org.sonatype.central</groupId>
      <artifactId>central-publishing-maven-plugin</artifactId>
      <version>0.4.0</version>
      <extensions>true</extensions>
      <configuration>
        <publishingServerId>central</publishingServerId>
        <tokenAuth>true</tokenAuth>
        <autoPublish>true</autoPublish>
      </configuration>
    </plugin>
    <plugin>
      <groupId>org.apache.maven.plugins</groupId>
      <artifactId>maven-gpg-plugin</artifactId>
      <version>1.5</version>
      <executions>
        <execution>
          <id>sign-artifacts</id>
          <phase>verify</phase>
          <goals>
            <goal>sign</goal>
          </goals>
          <configuration>
            <keyname>${gpg.keyname}</keyname>
            <passphraseServerId>${gpg.keyname}</passphraseServerId>
          </configuration>
          <gpgArguments>
            <arg>--pinentry-mode</arg>
            <arg>loopback</arg>
          </gpgArguments>
        </execution>
      </executions>
    </plugin>
    <plugin>
      <groupId>org.apache.maven.plugins</groupId>
      <artifactId>maven-source-plugin</artifactId>
      <version>2.2.1</version>
      <executions>
        <execution>
          <id>attach-sources</id>
          <goals>
            <goal>jar-no-fork</goal>
          </goals>
        </execution>
      </executions>
    </plugin>
    <plugin>
      <groupId>org.apache.maven.plugins</groupId>
      <artifactId>maven-javadoc-plugin</artifactId>
      <version>2.9.1</version>
      <executions>
        <execution>
          <id>attach-javadocs</id>
          <goals>
            <goal>jar</goal>
          </goals>
        </execution>
      </executions>
    </plugin>
  </plugins>
</build>
maven配置修改
修改settings.xml
<settings>
  <servers>
    <server>
      <id>central</id>
      <username>token-username</username>
      <password>token-password</password>
    </server>
  </servers>
<profiles>
  <profile>
    <id>central</id>
    <activation>
      <activeByDefault>true</activeByDefault>
    </activation>
    <properties>
      <gpg.executable>gpg</gpg.executable>
      <gpg.keyname>YOUR_KEY_ID</gpg.keyname>
      <gpg.passphrase>YOUR_KEY_phrase</gpg.passphrase>
    </properties>
  </profile>
</profiles>
</settings>
开始发版
命令行下进入你的本地项目目录,执行命令
mvn deploymaven会执行一系列的操作,比如运行测试用例、检查代码合规等,最后会报出有哪些问题需要整改,按照问题提示逐一百度改之即可
查看发布进展
本地命令执行成功的话,可以到这个网址看看publish情况
可能会显示你的版本“PUBLISHING”,时间不应超过几分钟。单击“REFRESG”按钮可查看最新过程的状态。如果您的组件不满足所有要求,您的部署将失败,部署卡的右侧列(标记为“验证结果”)将详细说明哪些验证失败。
发布成功
发布成功后,可以到官方仓库首页搜索你的项目名字试试:
gpg密钥的导入、导出
由于主机上可以保存多对GPG秘钥对,因此我们需要注意公钥和私钥是成对匹配的
查看主机上的公钥
gpg --list-keys
查看主机上的私钥
gpg --list-secret-keys

我们假定公钥的hash是81451E9950A283EC93FC270736C7920BBBAF1229

导出公钥
gpg --armor --output gpg.pub --export 81451E9950A283EC93FC270736C7920BBBAF1229
导出私钥
gpg --armor --output gpg.key --export-secret-keys 81451E9950A283EC93FC270736C7920BBBAF1229

先删除私钥
gpg --batch --yes --delete-secret-keys  81451E9950A283EC93FC270736C7920BBBAF1229
后删除公钥
gpg --batch --yes --delete-keys  81451E9950A283EC93FC270736C7920BBBAF1229

导入公钥
gpg --import  --pinentry-mode loopback --batch gpg.pub
导入私钥
gpg --import  --pinentry-mode loopback --batch gpg.key
处理过期的密钥
生成密钥时,密钥会生成有效期限。在此期限之后,您可以编辑现有密钥以延长其有效时间。
编辑密钥,进入编辑对话
$ gpg --edit-key CA925CD6C9E8D064FF05B4728190C4130ABA0F98
gpg (GnuPG) 2.2.19; Copyright (C) 2019 Free Software Foundation, Inc.
This is free software: you are free to change and redistribute it.
There is NO WARRANTY, to the extent permitted by law.

Secret key is available.

sec  rsa3072/8190C4130ABA0F98
     created: 2021-06-23  expires: 2023-06-23  usage: SC
     trust: ultimate      validity: ultimate
ssb  rsa3072/4656B4857C17C93B
     created: 2021-06-23  expires: 2023-06-23  usage: E
[ultimate] (1). Central Repo Test <central@example.com>

只有一个键可以编辑,直接选择它,输入1:
gpg> 1

sec  rsa3072/8190C4130ABA0F98
     created: 2021-06-23  expires: 2023-06-23  usage: SC
     trust: ultimate      validity: ultimate
ssb  rsa3072/4656B4857C17C93B
     created: 2021-06-23  expires: 2023-06-23  usage: E
[ultimate] (1)* Central Repo Test <central@example.com>

您将看到*后面的 (1),这表示您已选择此密钥进行编辑。要编辑密钥过期时间,请输入以下命令:
gpg> expire
Changing expiration time for the primary key.
Please specify how long the key should be valid.
         0 = key does not expire
      <n>  = key expires in n days
      <n>w = key expires in n weeks
      <n>m = key expires in n months
      <n>y = key expires in n years
Key is valid for? (0)

输入您需要的内容,例如9m(9 个月),然后确认。系统会要求您提供该密钥的密码。关于编辑的最后一步是保存您所做的事情:
gpg> save

现在您可以看到密钥的过期时间已更新:
$ gpg --list-keys
/home/mylocaluser/.gnupg/pubring.kbx
---------------------------------
pub   rsa3072 2021-06-23 [SC] [expires: 2022-03-21]
      CA925CD6C9E8D064FF05B4728190C4130ABA0F98
uid           [ultimate] Central Repo Test <central@example.com>
sub   rsa3072 2021-06-23 [E] [expires: 2023-06-23]

最后,再次分发你的公钥:
gpg --keyserver keyserver.ubuntu.com --send-keys CA925CD6C9E8D064FF05B4728190C4130ABA0F98


 334
334


 被折叠的 条评论
为什么被折叠?
被折叠的 条评论
为什么被折叠?
 到【灌水乐园】发言


