


目录
登录界面
预期效果:

HTML
login.html
<!DOCTYPE html>
<html lang="en">
<head>
    <meta charset="UTF-8">
    <meta http-equiv="X-UA-Compatible" content="IE=edge">
    <meta name="viewport" content="width=device-width, initial-scale=1.0">
    <title>登录页面</title>
    <link rel="stylesheet" href="css/common.css">
    <link rel="stylesheet" href="css/login.css">
</head>
<body>
<!-- 导航栏 -->
<div class="nav">
    <img src="image/background.png" alt="">
    <span class="title">博客系统</span>
</div>

<!-- 正文部分 -->

<script src="./js/jquery.min.js"></script>
<div class="login-container">
    <form action="login" method="post">
        <div class="login-dialog">
            <h3>登录</h3>
            <div class="row">
                <span>用户名</span>
                <input type="text" id="username" placeholder="手机号/邮箱" name="userName">
            </div>
            <div class="row">
                <span>密码</span>
                <input type="password" id="password" name="userPassword">
            </div>
            <div class="row">
                <input type="submit" id="submit" value="登录"></input>
            </div>
        </div>
    </form>
</div>
</body>
</html>
CSS
整个页面通用的CSS。因为页面有些操作是相同的(比如清楚浏览器的默认样式),有的地方贯穿了整个页面(比如导航栏),对于这些地方写一个通用的CSS可以节省工作量。
common.css
    /* 先去除浏览器的公共样式 设置 border-box 避免元素盒子被内边距和边框撑大 */
* {
    margin: 0;
    padding: 0;
    box-sizing: border-box;
}

html, body {
    /*
    html 是页面最顶层元素 高度100% 是相对父元素的高度 (和父元素一样高)
    对于html标签来说,父元素是浏览器窗口 浏览器窗口多高 html就多高
    body 的父亲是html 设为100% 是 body和html一样高

    如果不设置高度,元素默认高度取决于内部的内容
    */
    height: 100%;
}

body {
    background-image: url(../image/background.png);
    background-repeat: no-repeat;
    background-size: cover;
    background-position: center center;
}

/* 实现导航栏的样式 */
.nav {
    /* 设置宽度和父元素一样高 */
    /* 块级元素默认是width:100% */
    width: 100%;
    /* 设置高度是 50px */
    height: 50px;
    background-color: rgba(50, 50, 50, 0.4);
    color: white;

    /* 导航栏里面的元素都是水平排列,弹性布局设置 */
    display: flex;
    /* 垂直方向子元素居中 */
    align-items: center;
}

.nav img {
    width: 40px;
    height: 40px;
    margin-left: 30px;
    margin-right: 10px;
    /* 圆角 */
    border-radius: 50%;
}

.nav .spacer {
    width: 70%;
}

.nav a {
    color: white;
    /* 去掉下划线 */
    text-decoration: none;
    /* 加上内边距,不要让标签过于紧凑 */
    padding: 0 10px;
}

/* 页面主题样式 */
.container {
    /* 设置主体部分宽度 1000px */
    width: 1000px;
    /* 高度能填充整个页面 */
    height: calc(100% - 50px);
    /* 水平居中 */
    margin: 0 auto;

    /* 为了方便看效果,临时加背景色,后面再去掉 */
    /* background-color: bule; */

    /* 弹性布局 */
    display: flex;
    align-items: center;
    justify-content: space-between;
}

.container-left {
    /* 尺寸写百分数,相对于父元素为基准 */
    height: 100%;
    width: 200px;
}

.container-right {
    height: 100%;
    /* 留出 5px 作为中缝 */
    width: 795px;

    background-color: rgba(225, 225, 225, 0.8);
    border-radius: 10px;

    /* 让这个元素自己带上滚动条 */
    /* 内容没有溢出,没有滚动条;溢出,自动加滚动条 */
    overflow: auto;
}

/* 左侧用户信息 */
.card {
    background-color: 225, 225, 225, 0.8;
    border-radius: 10px;
    /* 设置内边距,让内容和边框之间有点距离 */
    padding: 30px;
}

/* 用户头像 */
.card img {
    width: 140px;
    height: 140px;
    border-radius: 50%;
}

/* 用户名字 */
.card h3 {
    /* 文字水平居中 */
    text-align: center;
    /* 让文字和上下都有内边距 */
    padding: 10px;
}

/* 用户的gitee链接 */
.card a {
    text-align: center;
    display: block;
    color: aquamarine;
    text-decoration: none;
    padding: 10px;
}

.card .counter {
    /* 为了让里面的元素水平排列,使用弹性布局 */
    display: flex;
    justify-content: space-around;
    padding: 5px    ;
}
login.css
/* 登录页面的样式 */
.login-container {
    width: 100%;
    height: calc(100% - 50px);
    display: flex;
    justify-content: center;
    align-items: center;
}

.login-dialog {
    width: 400px;
    height: 330px;
    background-color: rgba(225, 225, 225, 0.8);
    border-radius: 10px;
}

.login-dialog {
    text-align: center;
    padding: 50px 0;
}

.login-dialog h3 {
    text-align: center;
    padding: 50px 0;
}

.login-dialog .row {
    height: 50px;
    display: flex;
    justify-content: center;
    align-items: center;
}

.login-dialog .row span {
    width: 100px;
    font-size: 18px;
}

#username, #password {
    width: 200px;
    height: 40px;
    border-radius: 5px;
    /* 去掉边框 */
    border: none;
    /* 放大字体 */
    font-size: 18px;
    padding-left: 5px;
}

#submit {
    width: 300px;
    height: 40px;
    color: black;
    background-color: aqua;
    border: none;
    border-radius: 10px;
}

#submit:active {
    background-color: #666;
}
效果

博客列表页
预期效果
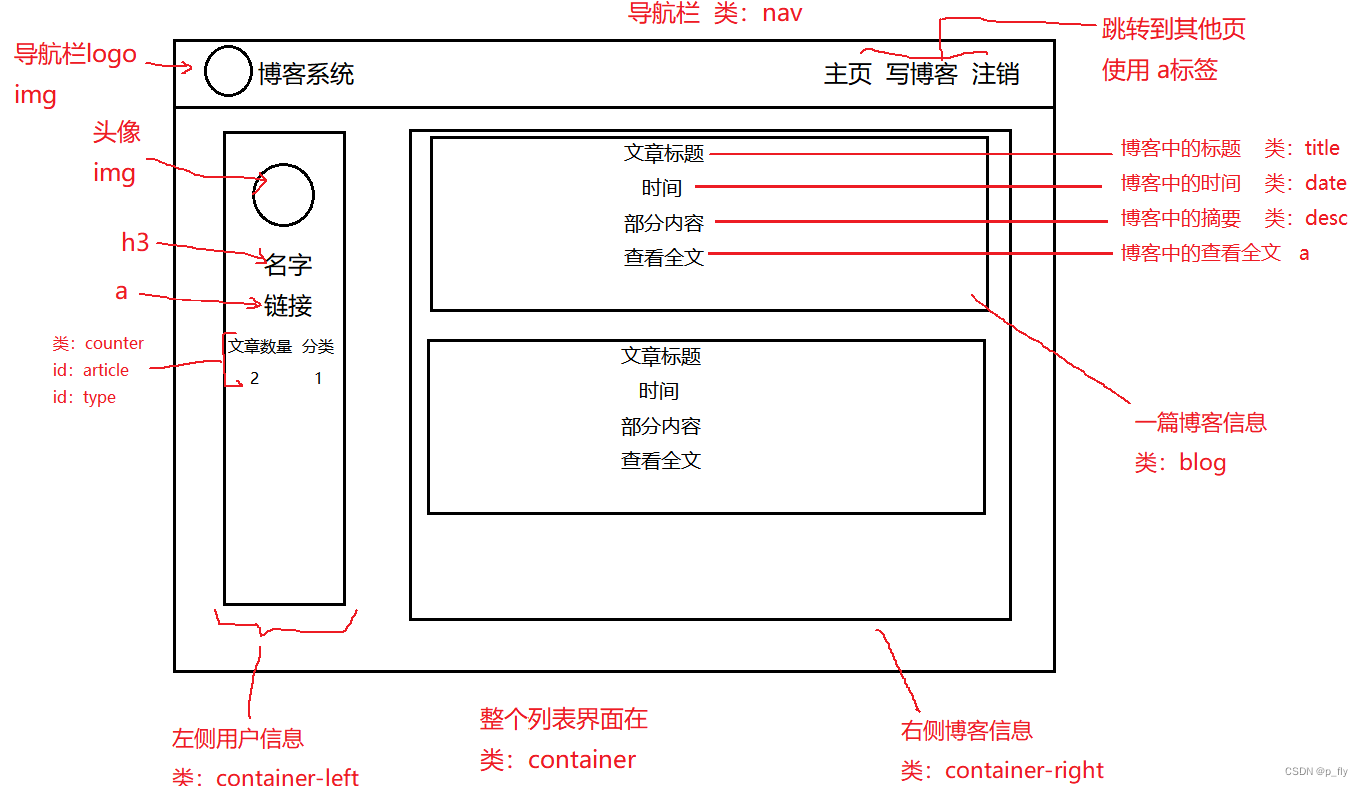
HTML
blog_list.html
<!DOCTYPE html>
<html lang="en">
<head>
<meta charset="UTF-8">
<meta http-equiv="X-UA-Compatible" content="IE=edge">
<meta name="viewport" content="width=device-width, initial-scale=1.0">
<title>博客列表页</title>
<link rel="stylesheet" href="css/blog_list.css">
<link rel="stylesheet" href="css/common.css">
</head>
<body>
<!-- 导航栏 -->
<div class="nav">
<img src="image/background.png" alt="">
<span class="title">我的博客系统</span>
<!-- 占位标签 把a标签挤到右边 -->
<div class="spacer"></div>
<a href="blog_list.html">主页</a>
<a href="blog_editor.html">写博客</a>
<a href="logout">注销</a>
</div>
<!-- 页面主题部分 -->
<div class="container">
<!-- 左侧信息 -->
<div class="container-left">
<!-- 使用 .card 表示用户信息 -->
<div class="card">
<!-- 用户头像 -->
<img src="image/head.png" alt="">
<!-- 用户名 -->
<h3>Jay</h3>
<a href="#">gitee地址</a>
<div class="counter">
<span>文章</span>
<span>分类</span>
</div>
<div class="counter">
<span id="article">2</span>
<span id="type">1</span>
</div>
</div>
</div>
<!-- 右侧信息 -->
<div class="container-right">
</div>
</div>
<script src="./js/jquery.min.js"></script>
<script>
// 页面加载的时候,向服务器发起请求,获取博客列表
function getBlogs() {
$.ajax({
type: 'get',
url: 'blog',
success: function(body) {
let containerRight = document.querySelector('.container-right');
// 相应正文 是一个json字符串 但是已经被jquery解析成 JavaScript 对象数组
// 构造页面请求
for(let blog of body) {
// 整个博客的div
let blogDiv = document.createElement('div');
blogDiv.className = 'blog';
// 博客标题
let titleDiv = document.createElement('div');
titleDiv.className = 'title';
titleDiv.innerHTML = blog.blogTitle;
// 挂到blogDiv下
blogDiv.appendChild(titleDiv);
// 前端把时间戳转成标准格式 发布时间
// let dateDiv = document.createElement('div');
// dateDiv.className = 'date';
// let date = new Date(blog.dateTime);
// let formattedDate = date.toLocaleString();
// dateDiv.innerHTML = formattedDate;
// blogDiv.appendChild(dateDiv);
// 后端把时间转成标准格式传过来
let dateDiv = document.createElement('div');
dateDiv.className = 'date';
dateDiv.innerHTML = blog.dateTime;
blogDiv.append(dateDiv);
// 博客摘要
let descDiv = document.createElement('div');
descDiv.className = 'desc';
descDiv.innerHTML = blog.blogContent;
blogDiv.appendChild(descDiv);
// 查看全文按钮
let a = document.createElement('a');
a.innerHTML = '查看全文 >>';
// 把博客ID传过去
a.href = 'blog_detail.html?blogId=' + blog.blogId;
blogDiv.appendChild(a);
// 最后把blogDiv 放到父元素中
containerRight.appendChild(blogDiv);
}
}
});
}
// 最后调用方法
getBlogs();
function checkLogin() {
$.ajax({
type: 'get',
url: 'login',
success: function(body) {
// console.log(body.userId);
if (body.userId && body.userId > 0) {
// 把名字显示到当前页面
let h3 = document.querySelector('.container-left .card h3');
h3.innerHTML = body.userName;
console.log("已登录!");
} else {
console.log("未登录!");
location.assign('login.html');
}
}
});
}
checkLogin();
</script>
</body>
</html>CSS
blog_list.css
/* 博客列表页的样式 */

/* 设置整个博客的容器元素的样式 */
.blog {
    width: 100%;
    padding: 20px;
}

.blog .title {
    text-align: center;
    font-size: 24px;
    font-weight: 700;
    padding: 10px;
}

.blog .date {
    text-align: center;
    color: aqua;
    padding: 10px;
}

.blog .desc {
    text-indent: 2em;
}

.blog a {
    /* 把a标签转成块级元素 */
    display: block;
    width: 120px;
    height: 40px;
    /* 水平居中 */
    margin-top: 20px;
    margin-left: auto;
    margin-right: auto;
    /* 设置边框 */
    border: 2px solid black;
    /* 让文字水平居中 */
    text-align: center;
    /* 让文字垂直居中 */
    line-height: 40px;
    /* 去掉下划线 */
    text-decoration: none;
    color: black;
    /* 圆角矩阵 */
    border-radius: 10px;
    /* 鼠标悬停的过渡效果 */
    transition: all 0.6s;
}

/* 鼠标到按钮的变化 */
.blog a:hover {
    color: white;
    background: #666;
}
有了后端数据后就可以变成这样的页面。

博客详情页
预期效果
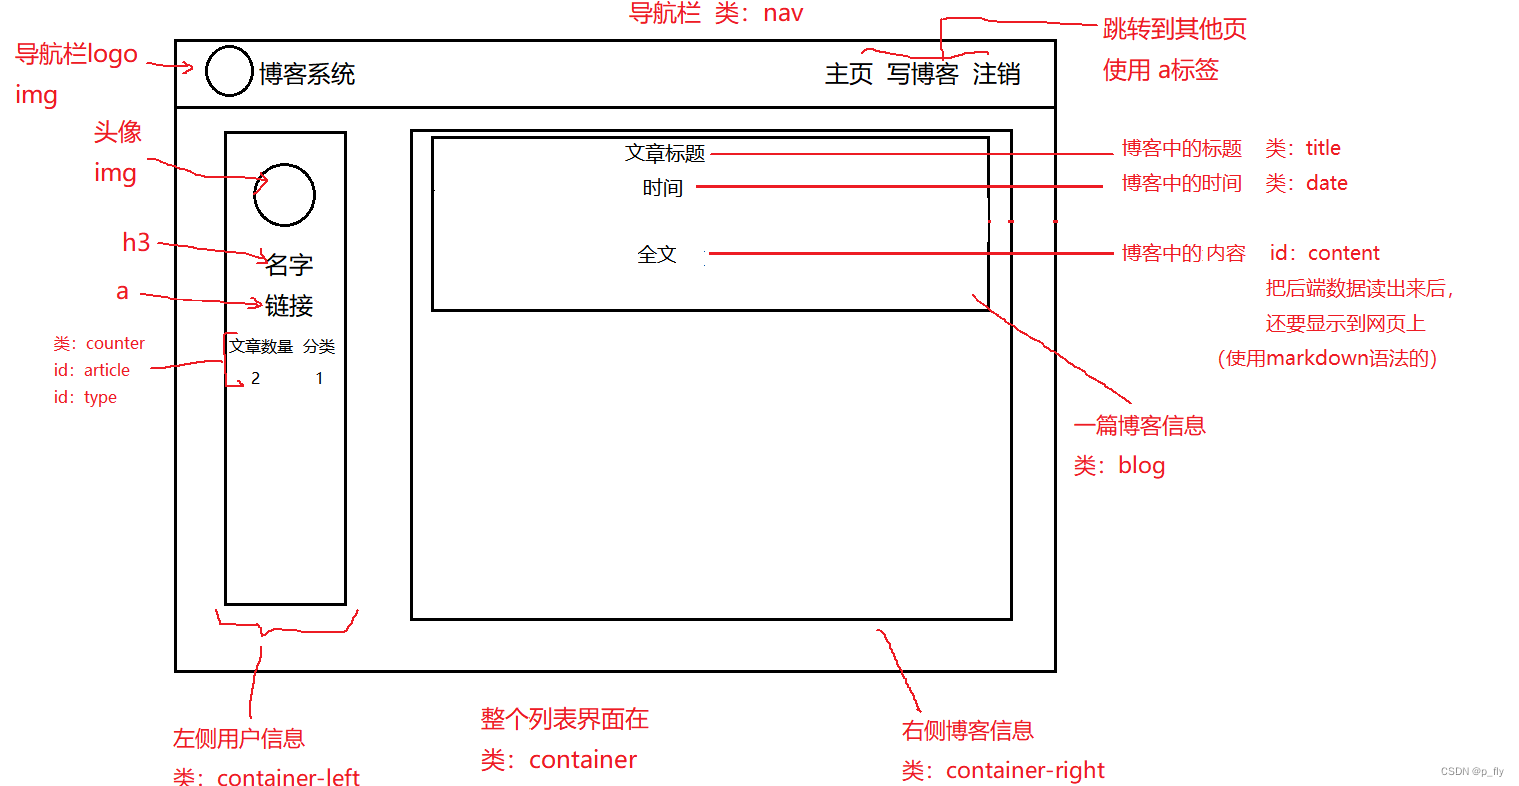
HTML
<!DOCTYPE html>
<html lang="en">
<head>
    <meta charset="UTF-8">
    <meta http-equiv="X-UA-Compatible" content="IE=edge">
    <meta name="viewport" content="width=device-width, initial-scale=1.0">
    <title>博客详情页</title>
    <link rel="stylesheet" href="css/blog_detail.css">
    <link rel="stylesheet" href="css/common.css">
    <link rel="stylesheet" href="editor.md/css/editormd.min.css" />
</head>
<body>

<!-- 导航栏 -->
<div class="nav">
    <img src="./image/background.png" alt="">
    <span class="title">我的博客系统</span>
    <!-- 用于占位, 把下面几个标签挤到右边 -->
    <div class="spacer"></div>
    <a href="blog_list.html">主页</a>
    <a href="blog_editor.html">写博客</a>
    <a href="logout">注销</a>
</div>

<!-- 页面主题 -->
<div class="container">
    <!-- 左侧信息 -->
    <div class="container-left">
        <!-- 使用 .card 表示用户信息 -->
        <div class="card">
            <!-- 用户头像 -->
            <img src="./image/head.png" alt="">
            <!-- 用户名 -->
            <h3>Jay</h3>
            <a href="#">gitee地址</a>
            <div class="counter">
                <span>文章</span>
                <span>分类</span>
            </div>
            <div class="counter">
                <span>2</span>
                <span>1</span>
            </div>
        </div>
    </div>
    <!-- 右侧信息 -->
    <div class="container-right">
        <!-- 博客标题 -->
        <h3 class="title"></h3>
        <!-- 博客发布的时间 -->
        <div class="date"></div>
        <!-- 博客正文 -->
        <div id="content"></div>
    </div>
</div>

<script src="js/jquery.min.js"></script>
<!-- 引入md的依赖 -->
<!-- jquery要在md之前,md依赖jquery -->
<script src="editor.md/lib/marked.min.js"></script>
<script src="editor.md/lib/prettify.min.js"></script>
<script src="editor.md/editormd.js"></script>

<script>
        $.ajax({
            type: 'get',
            url: 'blog' + location.search,
            // 成功后处理响应
            success: function(body) {
                // 标题
                let titleDiv = document.querySelector('.container-right .title');
                titleDiv.innerHTML = body.blogTitle;
                // 时间
                let dateDiv = document.querySelector('.date');
                dateDiv.innerHTML = body.dateTime;
                // 正文  把md渲染过后的写进去  这个选择器只能是id选择器
                editormd.markdownToHTML('content', { markdown: body.blogContent });

                // console.log(body.blogContent);
            }
        });

        function checkLogin() {
            $.ajax({
                type: 'get',
                url: 'login',
                success: function(body) {
                    // console.log(body.userId);
                    if (body.userId && body.userId > 0) {
                        // 把名字显示到当前页面
                        let h3 = document.querySelector('.container-left .card h3');
                        h3.innerHTML = body.userName;
                        console.log("已登录!");
                    } else {
                        console.log("未登录!");
                        location.assign('login.html');
                    }
                }
            });
        }
        checkLogin();

        function getAuthor() {
            $.ajax({
                type: 'get',
                url: 'author' + location.search,
                success: function(body) {
                    let h3 = document.querySelector('.container-left .card h3');
                    h3.innerHTML = body.userName;
                }
            });
        }
        getAuthor();

    </script>
</body>
</html>
CSS
/* 博客列表页的样式 */

/* 设置整个博客的容器元素的样式 */
.blog {
    width: 100%;
    padding: 20px;
}

.blog .title {
    text-align: center;
    font-size: 24px;
    font-weight: 700;
    padding: 10px;
}

.blog .date {
    text-align: center;
    color: aqua;
    padding: 10px;
}

.blog .desc {
    text-indent: 2em;
}

.blog a {
    /* 把a标签转成块级元素 */
    display: block;
    width: 120px;
    height: 40px;
    /* 水平居中 */
    margin-top: 20px;
    margin-left: auto;
    margin-right: auto;
    /* 设置边框 */
    border: 2px solid black;
    /* 让文字水平居中 */
    text-align: center;
    /* 让文字垂直居中 */
    line-height: 40px;
    /* 去掉下划线 */
    text-decoration: none;
    color: black;
    /* 圆角矩阵 */
    border-radius: 10px;
    /* 鼠标悬停的过渡效果 */
    transition: all 0.6s;
}

/* 鼠标到按钮的变化 */
.blog a:hover {
    color: white;
    background: #666;
}
效果

博客编辑页
预期效果

HTML
<!DOCTYPE html>
<html lang="en">
<head>
    <meta charset="UTF-8">
    <meta http-equiv="X-UA-Compatible" content="IE=edge">
    <meta name="viewport" content="width=device-width, initial-scale=1.0">
    <title>博客详情页</title>
    <link rel="stylesheet" href="css/blog_detail.css">
    <link rel="stylesheet" href="css/common.css">
    <link rel="stylesheet" href="editor.md/css/editormd.min.css" />
</head>
<body>

<!-- 导航栏 -->
<div class="nav">
    <img src="./image/background.png" alt="">
    <span class="title">我的博客系统</span>
    <!-- 用于占位, 把下面几个标签挤到右边 -->
    <div class="spacer"></div>
    <a href="blog_list.html">主页</a>
    <a href="blog_editor.html">写博客</a>
    <a href="logout">注销</a>
</div>

<!-- 页面主题 -->
<div class="container">
    <!-- 左侧信息 -->
    <div class="container-left">
        <!-- 使用 .card 表示用户信息 -->
        <div class="card">
            <!-- 用户头像 -->
            <img src="./image/head.png" alt="">
            <!-- 用户名 -->
            <h3>Jay</h3>
            <a href="#">gitee地址</a>
            <div class="counter">
                <span>文章</span>
                <span>分类</span>
            </div>
            <div class="counter">
                <span>2</span>
                <span>1</span>
            </div>
        </div>
    </div>
    <!-- 右侧信息 -->
    <div class="container-right">
        <!-- 博客标题 -->
        <h3 class="title"></h3>
        <!-- 博客发布的时间 -->
        <div class="date"></div>
        <!-- 博客正文 -->
        <div id="content"></div>
    </div>
</div>

<script src="js/jquery.min.js"></script>
<!-- 引入md的依赖 -->
<!-- jquery要在md之前,md依赖jquery -->
<script src="editor.md/lib/marked.min.js"></script>
<script src="editor.md/lib/prettify.min.js"></script>
<script src="editor.md/editormd.js"></script>

<script>
        $.ajax({
            type: 'get',
            url: 'blog' + location.search,
            // 成功后处理响应
            success: function(body) {
                // 标题
                let titleDiv = document.querySelector('.container-right .title');
                titleDiv.innerHTML = body.blogTitle;
                // 时间
                let dateDiv = document.querySelector('.date');
                dateDiv.innerHTML = body.dateTime;
                // 正文  把md渲染过后的写进去  这个选择器只能是id选择器
                editormd.markdownToHTML('content', { markdown: body.blogContent });

                // console.log(body.blogContent);
            }
        });

        function checkLogin() {
            $.ajax({
                type: 'get',
                url: 'login',
                success: function(body) {
                    // console.log(body.userId);
                    if (body.userId && body.userId > 0) {
                        // 把名字显示到当前页面
                        let h3 = document.querySelector('.container-left .card h3');
                        h3.innerHTML = body.userName;
                        console.log("已登录!");
                    } else {
                        console.log("未登录!");
                        location.assign('login.html');
                    }
                }
            });
        }
        checkLogin();

        function getAuthor() {
            $.ajax({
                type: 'get',
                url: 'author' + location.search,
                success: function(body) {
                    let h3 = document.querySelector('.container-left .card h3');
                    h3.innerHTML = body.userName;
                }
            });
        }
        getAuthor();

    </script>
</body>
</html>
CSS
/* 这个文件用来写博客编辑页的样式 */

.blog-edit-container {
    width: 1000px;
    height: calc(100% - 50px);
    margin: 0 auto;
}

.blog-edit-container .title {
    height: 50px;
    display: flex;
    align-items: center;
    justify-content: space-between;
}

#title {
    height: 40px;
    width: 895px;
    border: none;
    padding-left: 5px;
    font-size: 20px;
    border-radius: 5px;
    /* 去掉轮廓线. 鼠标选中后黑圈 */
    outline: none;
    /* 设置背景半透明 */
    background-color: rgba(255, 255, 255, 0.7);
}

/* 获取到焦点 */
#title:focus {
    background-color: rgb(255, 255, 255);
}

#submit {
    height: 40px;
    width: 100px;
    color: white;
    background-color: orange;
    border-radius: 5px;
    border: none;
}

#submit:active {
    background-color: #666;
}

#editor {
    border-radius: 10px;
    /* background-color: rgba(255, 255, 255, 0.8); */
    opacity: 90%;
}
引入editor.md
这里的markdown文章编辑器使用现成的。
GitHub上一搜就有。

效果

至此,前端页面大功告成了。
后端在下篇博客中。
有什么错误评论区指出。希望可以帮到你。


 7135
7135


 被折叠的 条评论
为什么被折叠?
被折叠的 条评论
为什么被折叠?
 到【灌水乐园】发言


