


1 原型模式概念
1.1 介绍
关键字:clone
定义:用原型实例制定创建对象的种类,并且通过拷贝这些原型创建新的对象。
(1)类初始化需要消化非常多的资源,这个资源包括数据、硬件资源等,通过原型拷贝避免这些消耗。
(2)通过new产生的一个对象需要非常繁琐的数据准备或者权限,这时可以使用原型模式。
(3)一个对象需要提供给其他对象访问,而且各个调用者可能都需要修改其值时,可以考虑使用原型模式拷贝多个对象供调用者使用,即保护性拷贝。
2 原型模式UML类图(通用)
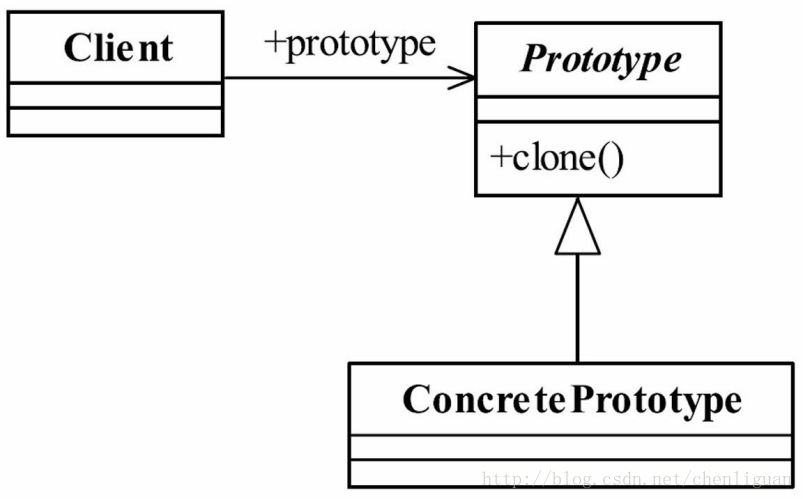
原型模式主要用于对象的复制,它的核心是就是类图中的原型类Prototype。Prototype类需要具备以下两个条件:
(1)实现Cloneable接口。在java语言有一个Cloneable接口,它的作用只有一个,就是在运行时通知虚拟机可以安全地在实现了此接口的类上使用clone方法。在java虚拟机中,只有实现了这个接口的类才可以被拷贝,否则在运行时会抛出CloneNotSupportedException异常。
(2)重写Object类中的clone方法。Java中,所有类的父类都是Object类,Object类中有一个clone方法,作用是返回对象的一个拷贝,但是其作用域protected类型的,一般的类无法调用,因此Prototype类需要将clone方法的作用域修改为public类型。
2 简单实现示范
2.1 原型
public class Prototype implements  Cloneable{


	private String name;
	private String address;
	private List<String> schoolList = new ArrayList<String>();


	@Override
	protected Object clone() throws CloneNotSupportedException {
		// TODO Auto-generated method stub
		return super.clone();
	}

	public String getName() {
		return name;
	}


	public void setName(String name) {
		this.name = name;
	}


	public String getAddress() {
		return address;
	}


	public void setAddress(String address) {
		this.address = address;
	}

	public List<String> getSchoolList() {
		return schoolList;
	}


	public void setSchoolList(List<String> schoolList) {
		this.schoolList = schoolList;
	}

	@Override
	public String toString() {
		// TODO Auto-generated method stub
		return this.name+":住在"+this.address+"----学校"+schoolList;
	}
- 1
- 2
- 3
- 4
- 5
- 6
- 7
- 8
- 9
- 10
- 11
- 12
- 13
- 14
- 15
- 16
- 17
- 18
- 19
- 20
- 21
- 22
- 23
- 24
- 25
- 26
- 27
- 28
- 29
- 30
- 31
- 32
- 33
- 34
- 35
- 36
- 37
- 38
- 39
- 40
- 41
- 42
- 43
- 44
- 45
- 46
- 47
- 48
- 49
- 50
- 51
- 52
- 53
- 54
- 55
- 56
2.2 Client端1
(1)代码
public static void main(String[] args) {

		Prototype prototype = new Prototype();
		prototype.setAddress("北京");
		prototype.setName("张三");
		List<String> schoolList = new ArrayList<String>();
		schoolList.add("清华");
		schoolList.add("北大");
		prototype.setSchoolList(schoolList);
		try {
			Prototype ctrl_v = (Prototype) prototype.clone();
			ctrl_v.setName("李四");
			schoolList.add("复旦");
			schoolList.add("南开");
			ctrl_v.setSchoolList(schoolList);

			System.out.println(ctrl_v.toString());
			System.out.println(prototype.toString());
		} catch (CloneNotSupportedException e) {
			// TODO Auto-generated catch block
			e.printStackTrace();
		}}
- 1
- 2
- 3
- 4
- 5
- 6
- 7
- 8
- 9
- 10
- 11
- 12
- 13
- 14
- 15
- 16
- 17
- 18
- 19
- 20
- 21
- 22
(2)结果:
李四:住在北京----学校[清华, 北大, 复旦, 南开]
张三:住在北京----学校[清华, 北大, 复旦, 南开]
这里有疑惑的地方是学校,姓名为string类型。也就是说八大类型是值类型的。则对字段属于逐位复制。如果字段属于引用类型,则复制引用但是不复制引用的对象。也就是这里的list指向的是同一个引用。
(1)代码:
/**
     * 重写拷贝方法
     */
    @Override
    protected Book clone()  {
        try {
            Book book = (Book) super.clone();
            // 对image对象也调用clone()函数,进行拷贝
            book.image = (ArrayList<String>) this.image.clone();
            return book;
        } catch (CloneNotSupportedException e) {
            e.printStackTrace();
        }
        return null;
}- 1
- 2
- 3
- 4
- 5
- 6
- 7
- 8
- 9
- 10
- 11
- 12
- 13
- 14
- 15
(2)结果:
----------------------Start----------------------
title:书1
image name:图1
----------------------End----------------------
----------------------Start----------------------
title:书1
image name:图1
----------------------End----------------------
----------------------Start----------------------
title:书2
image name:图1
image name:图2
----------------------End----------------------
----------------------Start----------------------
title:书1
image name:图1
----------------------End----------------------
- 1
- 2
- 3
- 4
- 5
- 6
- 7
- 8
- 9
- 10
- 11
- 12
- 13
- 14
- 15
- 16
- 17
- 18
(3)解释:
将book.image指向this.image的一份拷贝,而不是this.image本身,实现了完全的拷贝,这样再互不影响。
3 Android源码中的原型模式
3.1 Intent
Uri uri = Uri.parse("smsto:110");
        Intent intent = new Intent(Intent.ACTION_SEND,uri);
        intent.putExtra("sms_body", "The SMS text");
        //克隆
        Intent intent2 = (Intent)intent.clone();
startActivity(intent2);- 1
- 2
- 3
- 4
- 5
- 6
4 总结
4.1 优点
(1)原型模式是在内存中二进制流的拷贝,要比直接new一个对象性能好很多,特别是要在一个循环体内产生大量对象时,原型模式可能更好的体现其优点。
(2)还有一个重要的用途就是保护性拷贝,也就是对某个对象对外可能是只读的,为了防止外部对这个只读对象的修改,通常可以通过返回一个对象拷贝的形式实现只读的限制。
4.2 缺点
(1)这既是它的优点也是缺点,直接在内存中拷贝,构造函数是不会执行的,在实际开发中应该注意这个潜在问题。优点是减少了约束,缺点也是减少了约束,需要大家在实际应用时考虑。
(2)通过实现Cloneable接口的原型模式在调用clone函数构造实例时并不一定比通过new操作速度快,只有当通过new构造对象较为耗时或者说成本较高时,通过clone方法才能够获得效率上的提升。
5 注意事项
5.1 构造函数不会被执行
一个实现了Cloneable并重写了clone方法的类A,有一个无参构造或有参构造B,通过new关键字产生了一个对象S,再然后通过S.clone()方式产生了一个新的对象T,那么在对象拷贝时构造函数B是不会被执行的。我们来写一小段程序来说明这个问题。
public class Thing implements Cloneable {

    public Thing(){
        System.out.println("构造函数被执行了...");
    }

    @Override
    public Thing clone(){
        Thing thing=null;
        try {
            thing = (Thing)super.clone();
        } catch (CloneNotSupportedException e) {
            e.printStackTrace();
        }
        return thing;
    }
}- 1
- 2
- 3
- 4
- 5
- 6
- 7
- 8
- 9
- 10
- 11
- 12
- 13
- 14
- 15
- 16
- 17
然后我们再来写一个Client类,进行对象的拷贝:
public class Client {

    public static void main(String[] args) {
        Thing thing = new Thing(); //产生一个对象
        Thing cloneThing = thing.clone(); //拷贝一个对象
    }
}
- 1
- 2
- 3
- 4
- 5
- 6
- 7
- 8
运行结果如下所示:
构造函数被执行了...- 1
对象拷贝时构造函数确实没有被执行,这点从原理来讲也是可以讲得通的,Object类的clone方法的原理是从内存中(具体地说就是堆内存)以二进制流的方式进行拷贝,重新分配一个内存块,那构造函数没有被执行是对的。
5.2 浅拷贝和深拷贝
在开发中,为减少错误,建议在使用原型模式时尽量使用深拷贝,避免操作副本时影响原始对象的问题。如果是在涉及类的继承时,父类有多个引用的情况就非常复杂,建议的方案是深拷贝和浅拷贝分开实现。
5.3 clone与final两个冤家
要使用clone方法,类的成员变量上不要增加final关键字。因为final类型是不允许重赋值的。
6 原型模式实战
以下代码是用户在登录之后通过LoginSession的setLoginedUser函数将登录用的信息设置在Session中,setLoginedUser是私有的,外部模块无法调用。
(1)Address.java
/**
 * @author Guan
 * 用户地址类
 */
public class Address {
    public String city;
    public String district;
    public String street;

    public Address(String city, String district, String street) {
        this.city = city;
        this.district = district;
        this.street = street;
    }

    @Override
    public String toString() {
        return "Address{" +
                "city='" + city + '\'' +
                ", district='" + district + '\'' +
                ", street='" + street + '\'' +
                '}';
    }
}
- 1
- 2
- 3
- 4
- 5
- 6
- 7
- 8
- 9
- 10
- 11
- 12
- 13
- 14
- 15
- 16
- 17
- 18
- 19
- 20
- 21
- 22
- 23
- 24
- 25
(2)User.java
/**
 * @author Guan
 * 用户实体类
 */
public class User {
    public int age;
    public String name;
    public String phoneNum;
    public Address address;

    @Override
    public String toString() {
        return "User{" +
                "age=" + age +
                ", name='" + name + '\'' +
                ", phoneNum='" + phoneNum + '\'' +
                ", address=" + address +
                '}';
    }
}- 1
- 2
- 3
- 4
- 5
- 6
- 7
- 8
- 9
- 10
- 11
- 12
- 13
- 14
- 15
- 16
- 17
- 18
- 19
- 20
(3)LoginSession.java
/**
 * @author Guan
 * 登录Session
 */
public class LoginSession {
    static LoginSession loginSession = null;
    private User loginedUser;// 已登录用户

    public LoginSession() {
    }

    public static LoginSession getLoginSession() {
        if (loginSession == null) {
            loginSession = new LoginSession();
        }
        return loginSession;
    }

    public User getLoginedUser() {
//        return loginedUser.clone();// 返回已登录用户的一个拷贝
        return loginedUser;// 返回原始已登录用户
    }

    // 只通过私有方法修改用户信息
    void setLoginedUser(User loginedUser) {
        this.loginedUser = loginedUser;
    }
}
- 1
- 2
- 3
- 4
- 5
- 6
- 7
- 8
- 9
- 10
- 11
- 12
- 13
- 14
- 15
- 16
- 17
- 18
- 19
- 20
- 21
- 22
- 23
- 24
- 25
- 26
- 27
- 28
- 29
(4)Login.java
/**
 * @author Guan
 * 登录接口
 */
public interface Login {
    void login();
}
- 1
- 2
- 3
- 4
- 5
- 6
- 7
- 8
(5)LoginImpl.java
/**
 * @author Guan
 * 登录实现类
 */
public class LoginImpl implements Login{

    public void login() {
        // 登录到服务器,获取到用户信息
        User loginedUser = new User();

        // 将服务器返回的完整信息设置给loginedUser对象
        loginedUser.age = 22;
        loginedUser.name = "xiaoguan";
        loginedUser.address = new Address("深圳市","宝安区","一路");

        // 登录完后将用户信息设置到Session中LoginSession.getLoginSession()中
        LoginSession.getLoginSession().setLoginedUser(loginedUser);
    }
}
- 1
- 2
- 3
- 4
- 5
- 6
- 7
- 8
- 9
- 10
- 11
- 12
- 13
- 14
- 15
- 16
- 17
- 18
- 19
- 20
(6)Client.java
public class Client {

    public static void main(String[] args) {

        // 已登录用户
        LoginImpl loginImpl = new LoginImpl();
        loginImpl.login();
        User tempUser = LoginSession.getLoginSession().getLoginedUser();

        User user = LoginSession.getLoginSession().getLoginedUser();// 获得已登录的User对象
        user.address = new Address("新深圳市","新宝安区","新一路");
        // 只能通过私有方法setLoginedUser更新用户信息
        LoginSession.getLoginSession().setLoginedUser(user);

        System.out.println("tempUser:" + tempUser);
        System.out.println("已登录用户:" + LoginSession.getLoginSession().getLoginedUser());
    }
}
- 1
- 2
- 3
- 4
- 5
- 6
- 7
- 8
- 9
- 10
- 11
- 12
- 13
- 14
- 15
- 16
- 17
- 18
- 19
- 20
(7)结果&分析
在用户点击更新按钮时候,直接调用以上代码更新用户地址,在网络请求成功还是未成功情况下用户信息都被修改了,结果打印如下:

(8)优化
所以需要使用原型模式来进行保护性拷贝,使得在任何地方调用getLoginedUser函数获取到的用户对象都是一个拷贝对象,即使客户端不小心修改了这个拷贝对象,也不会影响最初的已登录用户对象,确保了它的安全。修改代码如下:
/**
 * @author Guan
 * 用户实体类
 */
public class User implements Cloneable{


    /**
     * 拷贝
     */
    public User clone() {
        User user = null;
        try {
            user = (User) super.clone();
        } catch (CloneNotSupportedException e) {
            e.printStackTrace();
        }
        return user;
    }


}- 1
- 2
- 3
- 4
- 5
- 6
- 7
- 8
- 9
- 10
- 11
- 12
- 13
- 14
- 15
- 16
- 17
- 18
- 19
- 20
- 21
- 22
/**
 * @author Guan
 * 登录Session
 */
public class LoginSession {

    public User getLoginedUser() {
        return loginedUser.clone();// 返回已登录用户的一个拷贝
//      return loginedUser;// 返回原始已登录用户
    }

}- 1
- 2
- 3
- 4
- 5
- 6
- 7
- 8
- 9
- 10
- 11
- 12
结果如下:

7 参考文章与链接
《Android源码设计模式解析与实战》
《设计模式之禅》


 2581
2581


 被折叠的 条评论
为什么被折叠?
被折叠的 条评论
为什么被折叠?
 到【灌水乐园】发言


