


Vue3项目开发初始化配置流程
- 具体选型看情况,这个为通用流程
命令行创建
vite创建
-
npm创建
-
npm create @vitejs/app test_demo
-
-
yarn创建
-
yarn create @vitejs/app test_demo
-
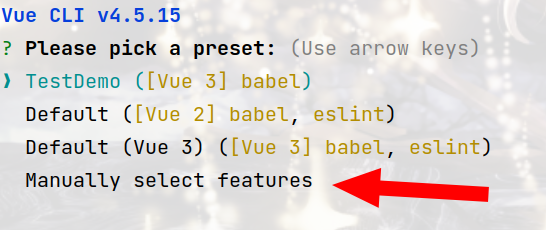
vue-cli创建
-
vue create test_demo- 选择手动选择
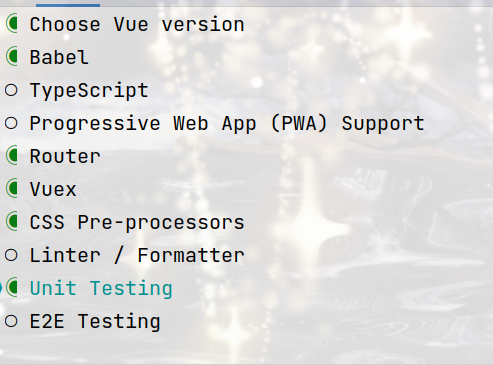
- 这里选择这些,具体看情况
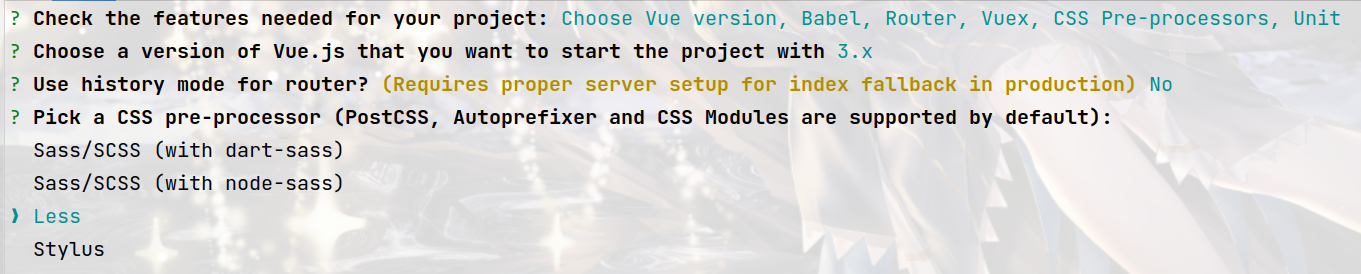
- 这里是vue3教程,自然是3
- 这里历史记录模式选择hash,也可以选择history
- 这里选择less,看具体选型
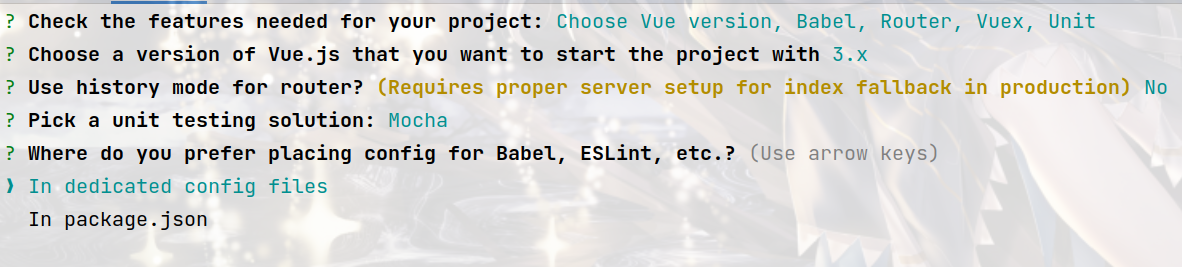
- 这里选择第一个,一般前端第一个用的多
- 这个是说将这些文件放在哪里,选择第一个独立文件,方便管理
- 最后一个是否保存当前预设方便下次选择
- 选择手动选择


初始配置
UI组件按需引入注意:
-
vite创建的项目都可使用
vite-plugin-style-import按需导入UI组件-
网址
- https://github.com/vbenjs/vite-plugin-style-import
-
命令行代码
-
// yarn
yarn add vite-plugin-style-import -D

// npm
npm i vite-plugin-style-import -D
-
-
配置
-
// vite.config.js
import { UserConfigExport } from 'vite'
import styleImport, {
  AndDesignVueResolve,
  VantResolve,
  ElementPlusResolve,
  NutuiResolve,
  AntdResolve,
} from 'vite-plugin-style-import'

export default (): UserConfigExport => {
  return {
    // 1. 如果使用的是ant-design 系列的 需要配置这个
    // 2. 确保less安装在依赖 `yarn add less -D`
    css: {
      preprocessorOptions: {
        less: {
          javascriptEnabled: true,
        },
      },
    },
    plugins: [
      styleImport({
        resolves:[
          AndDesignVueResolve(),
          VantResolve(),
          ElementPlusResolve(),
          NutuiResolve(),
          AntdResolve(),]
        libs: [
          // 如果没有你需要的resolve,可以在lib内直接写,也可以给我们提供PR
          {
            libraryName: 'ant-design-vue',
            esModule: true,
            resolveStyle: (name) => {
              return `ant-design-vue/es/${name}/style/index`
            },
          },
        ],
      }),
    ],
  }
}
-
-
-
在使用vue-cli创建时选择了babel可以使用
babel-plugin-import- 网址
- https://github.com/umijs/babel-plugin-import
- 网址
导入fastcick(可选,如果是移动端,则需要)
-
用于消除物理点击和
click移动浏览器上事件触发之间的 300 毫秒延迟。目的是让您的应用程序感觉更少延迟和更灵敏,同时避免对您当前的逻辑产生任何干扰。 -
网址
- https://github.com/ftlabs/fastclick
-
在
main.js中配置-
//引入fastClick
import FastClick from 'fastclick'
if ('addEventListener' in document) {
    document.addEventListener('DOMContentLoaded', function() {
        FastClick.attach(document.body);
    }, false);
}
-
导入Vant(可选,UI框架)
-
网址
- https://vant-contrib.gitee.io/vant/#/zh-CN/quickstart
-
命令行代码
-
npm-
npm i vant@next -S
-
-
yarn-
yarn add vant@next
-
-
-
引入组件
-
方式一 自动按需引入组件(推荐)
-
babel-plugin-import 是一款 babel 插件,它会在编译过程中将 import 的写法自动转换为按需引入的方式。
-
安装插件
-
//npm
npm i babel-plugin-import -D

//yarn
yarn add babel-plugin-import
-
-
// 在.babelrc 中添加配置 // 注意:webpack 1 无需设置 libraryDirectory { "plugins": [ ["import", { "libraryName": "vant", "libraryDirectory": "es", "style": true }] ] } // 对于使用 babel7 的用户,可以在 babel.config.js 中配置 module.exports = { plugins: [ ['import', { libraryName: 'vant', libraryDirectory: 'es', style: true }, 'vant'] ] }; -
// 接着你可以在代码中直接引入 Vant 组件
// 插件会自动将代码转化为方式二中的按需引入形式
import { createApp } from 'vue'
import App from './App.vue'
import { Button } from 'vant';

createApp(App).use(Button).mount('#app')
-
-
方式二 手动按需引入组件
-
在不使用插件的情况下,可以手动引入需要的组件。
-
import { createApp } from 'vue'
import App from './App.vue'
import Button from 'vant/lib/button';
import 'vant/lib/button/style';

createApp(App).use(Button).mount('#app')
-
-
方式三 导入所有组件
-
Vant支持一次性导入所有组件,引入所有组件会增加代码包体积,因此不推荐这种做法。import { createApp } from 'vue' import App from './App.vue' import Vant from 'vant'; import 'vant/lib/index.css'; createApp(App).use(Vant).mount('#app')
-
-
-
注意:
-
当想要全局导入时,可以选择配置插件的方式
-
// 此文件是 @/plugins/Vant.js import { Tabbar, TabbarItem, Swipe, SwipeItem, Loading } from 'vant'; export default ({ install : (app, options)=> { app .use(Tabbar) .use(TabbarItem) .use(Swipe) .use(SwipeItem) .use(Loading) } }) -
// 此文件是 @/main.js

import { createApp } from 'vue'
import App from './App.vue'

//引入全局UI组件库
import Vant from "@/plugins/vant";

createApp(App).use(Vant).mount('#app')
-
导入Ant-Design-Vue(可选,UI框架)
-
网址
- https://antdv.com/docs/vue/introduce-cn/
-
命令行代码
-
npm-
npm i --save ant-design-vue@next
-
-
yarn-
yarn add ant-design-vue@next
-
-
-
引入组件
-
完整引入
-
import { createApp } from 'vue'
import App from './App.vue'

import { Button } from "ant-design-vue";
import 'ant-design-vue/dist/antd.css';

createApp(App).use(Button).mount('#app')
-
-
按需引入
-
安装插件
-
//npm
npm i babel-plugin-import -D

//yarn
yarn add babel-plugin-import
-
-
// 在.babelrc 中添加配置 // 注意:webpack 1 无需设置 libraryDirectory { "plugins": [ ["import", { "libraryName": "ant-design-vue", "libraryDirectory": "es", "style": 'css' }] ] } // 对于使用 babel7 的用户,可以在 babel.config.js 中配置 module.exports = { plugins: [ ['import', { libraryName: 'ant-design-vue', libraryDirectory: 'es', style: 'css' }, 'ant-design-vue'] ] }; -
// 接着你可以在代码中直接引入 ant-design-vue 组件
import { createApp } from 'vue'
import App from './App.vue'
import { Button } from 'ant-design-vue';

createApp(App).use(Button).mount('#app')
-
-
导入Element-plus(可选,UI框架,还没有正式版)
-
网址
- https://element-plus.gitee.io/zh-CN/
-
命令行代码
-
npm-
npm install element-plus --save
-
-
yarn-
yarn add element-plus
-
-
-
引入组件
-
完整引入
-
// main.js
import { createApp } from 'vue'
import ElementPlus from 'element-plus'
import 'element-plus/dist/index.css'
import App from './App.vue'

const app = createApp(App)

app.use(ElementPlus)
app.mount('#app')
-
-
按需导入
-
自动导入
-
安装插件
-
//npm

npm install -D unplugin-vue-components unplugin-auto-import

//yarn

yarn add unplugin-vue-components unplugin-auto-import
-
-
配置
-
Vite-
// vite.config.ts
import AutoImport from 'unplugin-auto-import/vite'
import Components from 'unplugin-vue-components/vite'
import { ElementPlusResolver } from 'unplugin-vue-components/resolvers'

export default {
  plugins: [
    // ...
    AutoImport({
      resolvers: [ElementPlusResolver()],
    }),
    Components({
      resolvers: [ElementPlusResolver()],
    }),
  ],
}
-
-
Webpack(测试无法使用,可以尝试)-
// webpack.config.js
const AutoImport = require('unplugin-auto-import/webpack')
const Components = require('unplugin-vue-components/webpack')
const { ElementPlusResolver } = require('unplugin-vue-components/resolvers')

module.exports = {
  // ...
  plugins: [
    AutoImport({
      resolvers: [ElementPlusResolver()],
    }),
    Components({
      resolvers: [ElementPlusResolver()],
    }),
  ],
}
-
-
-
-
手动导入
-
可以按照官网去配置
-
也可以使用vue-cli的插件
-
vue create my-app cd my-app vue add element-plus -
不过这种方式需要更改插件文件的配置,使用类似vant插件的语法
-
import { ElButton } from 'element-plus'

export  default ({
  install : (app, options)=> {
    app.use(ElButton)
  }
})
-
-
-
-
-
导入arco-design(可选,UI框架)
-
网址
- https://arco.design/vue/docs/start
-
命令行代码
-
npm-
npm install --save-dev @arco-design/web-vue
-
-
yarn-
yarn add --dev @arco-design/web-vue
-
-
-
引入组件
-
完整引入
-
import { createApp } from 'vue'
import ArcoVue from '@arco-design/web-vue';
import App from './App.vue';
import '@arco-design/web-vue/dist/arco.css';

const app = createApp(App);
app.use(ArcoVue);
app.mount('#app');
-
-
按需加载(模板,需要为vite创建的项目)
-
如果使用模板方式进行开发,可以使用 unplugin-vue-components 插件来开启按需加载的支持。
插件会自动解析模板中的使用到的组件,并导入组件和对应的样式文件。
需要组件库version >= 2.11.0 -
import { defineConfig } from 'vite' import vue from '@vitejs/plugin-vue' import Components from 'unplugin-vue-components/vite'; import { ArcoResolver } from 'unplugin-vue-components/resolvers'; // https://vitejs.dev/config/ export default defineConfig({ plugins: [vue(), Components({ resolvers: [ ArcoResolver() ] }) ] }); -
注意:这种方法并不会处理用户在 script 中手动导入的组件,比如 Message 组件,用户仍需要手动导入组件对应的样式文件,例如
@arco-design/web-vue/es/index.less
-
-
按需加载(需要为vite创建的项目)
-
也可以使用手动导入的方式按需加载组件,组件库已经默认支持 Tree Shaking。可以配合 vite-plugin-style-import 插件自动加载组件样式
-
import { defineConfig } from 'vite'
import vue from '@vitejs/plugin-vue'
import styleImport from 'vite-plugin-style-import'

export default defineConfig({
  plugins: [
    vue(),
    styleImport({
      libs: [
        {
          libraryName: '@arco-design/web-vue',
          esModule: true,
          resolveStyle: (name) => {
            // css
            return `@arco-design/web-vue/es/${name}/style/css.js`
            // less
            return `@arco-design/web-vue/es/${name}/style/index.js`
          },
        }
      ]
    })
  ]
})
-
-
导入NutUI(可选,UI框架)
-
网址
- https://nutui.jd.com/#/start
-
命令行代码
-
// Vue3 项目
//npm
npm i @nutui/nutui@next
//yarn
yarn add nutui@next
-
-
引入组件
-
完整引入
-
import { createApp } from "vue";
import App from "./App.vue";
// 注意:这种方式将会导入所有组件
import NutUI from "@nutui/nutui";
import "@nutui/nutui/dist/style.css";
createApp(App).use(NutUI).mount("#app");
-
-
按需引入
-
Vite 构建工具 通过 vite-plugin 使用按需加载
-
安装插件
-
// npm
npm install vite-plugin-style-import --save-dev

//yarn
yarn add --dev vite-plugin-style-import
-
-
在
vite.config中添加配置:-
import vue from '@vitejs/plugin-vue'
import styleImport from 'vite-plugin-style-import';
export default {
  plugins: [
    vue(),
    styleImport({
      libs: [
        {
          libraryName: '@nutui/nutui',
          libraryNameChangeCase: 'pascalCase',
          resolveStyle: (name) => {
            return `@nutui/nutui/dist/packages/${name}/index.scss`
          }
        }
      ],
    }),
  ],
  css: {
    preprocessorOptions: {
      scss: {
        // 配置 nutui 全局 scss 变量
        additionalData: `@import "@nutui/nutui/dist/styles/variables.scss";`
      }
    }
  }
};
-
-
-
WebPack 构建工具 通过 babel 使用按需加载
-
安装插件
-
//npm
npm install babel-plugin-import --save-dev

//yarn
yarn add --dev babel-plugin-import
-
-
在
.babelrc或babel.config.js中添加配置:-
{
  // ...
  plugins: [
    [
      "import",
      {
        "libraryName": "@nutui/nutui",
        "libraryDirectory": "dist/packages/_es",
        "camel2DashComponentName": false
      },
      'nutui3-vue'
    ],
    [
      "import",
      {
        "libraryName": "@nutui/nutui-taro",
        "libraryDirectory": "dist/packages/_es",
        "camel2DashComponentName": false
      },
      'nutui3-taro'
    ]
  ]
}
-
-
接着像这样在代码中直接引入组件
-
import { createApp } from "vue";
import App from "./App.vue";
import { Button, Icon } from "@nutui/nutui";
import "@nutui/nutui/dist/style.css";
createApp(App).use(Button).use(Icon).mount("#app");
-
-
-
-
导入vue-router(可选,路由管理,如果在使用vue-cli创建时已经引入则不再需要
-
网址
- https://next.router.vuejs.org/zh/guide/
-
命令行代码
-
npm-
npm install vue-router@4
-
-
yarn-
yarn add vue-router@4
-
-
-
配置
-
// 此文件是 @/router/index.js //历史记录模式,除了hash外,还有html5的history import { createRouter, createWebHashHistory } from 'vue-router' import DashBoard from "@/views/dashboard/DashBoard.vue"; //懒加载 const Home = ()=> import('@/views/home/Home.vue') const Category = ()=> import('@/views/category/Category.vue') const routes = [ //重定向 { path : '/', redirect : '/dashboard' }, { path: '/dashboard', component : DashBoard, //嵌套路由 children : [ { path: '/dashboard', redirect : '/dashboard/home' }, { path : 'home', component : Home, //元信息 meta : { name : '首页' } }, { path : 'category', component : Category } ] } ] const router = createRouter({ history: createWebHashHistory(), routes }) export default router -
// 此文件是 @/main.js

import { createApp } from 'vue'
import App from './App.vue'

//引入router
import router from './router'

createApp(App).use(router).mount('#app')
-
导入Vuex(可选,统一状态管理,中大型项目推荐,如果在使用vue-cli创建时已经引入则不再需要)
-
网址
- https://next.vuex.vuejs.org/zh/index.html
-
命令行代码
-
npm-
npm install vuex@next --save
-
-
yarn-
yarn add vuex@next
-
-
-
配置
-
// 此文件是 @/store/index.js import { createStore } from 'vuex' export default createStore({ state: { count : 0 }, mutations: { INCREMENT(state){ state.count++; } }, actions: { ASYNC_INCREMENT(context){ context.commit('INCREMENT') } }, getters: { countCal : (state) => { return count * 2; } } }) -
// 此文件是 @/main.js

import { createApp } from 'vue'
import App from './App.vue'

//引入vuex
import router from './store'

createApp(App).use(router).mount('#app')
-
导入axios(可选,处理网络请求,如果项目需要网络请求可以导入)
-
网址
- http://www.axios-js.com/zh-cn/docs/
-
命令行代码
-
npm-
npm install axios
-
-
yarn-
yarn add axios
-
-
-
配置
-
// 此文件是 @/service/api/ajax.js import axios from "axios"; export default function ajax(url = '', params = {}, type = 'GET'){ //1.变量 let promise //2.返回promise return new Promise((resolve, reject) => { //2.1判断请求类型 if (type.toUpperCase() === 'GET'){ //GET请求 //2.2拼接字符串 let paramsStr = ''; //2.3遍历 Object.keys(params).forEach(key => paramsStr+=`${key}=${params[key]}&`) //2.4过滤最后的& if (paramsStr){ paramsStr = paramsStr.substr(0, paramsStr.lastIndexOf('&')) } //2.5拼接完整路径 url += `?${paramsStr}` //2.6发起get请求 promise = axios.get(url); }else if (type.toUpperCase() === 'POST'){ //POST请求 //2.7发起post请求 promise = axios.post(url, params) } //...其他请求可补充,不过形式其实和POST基本一致 //2.8处理结果并返回 promise.then((res)=>{ resolve(res.data) }).catch((err)=>{ reject(err) }) }) } -
// 此文件是 @/service/api/index.js

import ajax from "@/service/api/ajax";

//定义基础路径
const BASE_URL = 'http://wenhe9.cn'

export const checkHealth = ()=> ajax(BASE_URL + '/api/checkHealth');
-
导入rem配置(可选,适配移动端,如果使用rem做移动尺寸的适配可以使用)
-
(function (doc, win) { var docEl = doc.documentElement, resizeEvt = 'orientationchange' in window ? 'orientationchange' : 'resize', recalc = function() { var clientWidth = docEl.clientWidth; if (!clientWidth) return; docEl.style.fontSize = 15 * (clientWidth / 320) + 'px'; }; if (!doc.addEventListener) return; win.addEventListener(resizeEvt, recalc, false); doc.addEventListener('DOMContentLoaded', recalc, false); })(document, window); -
import { createApp } from 'vue'
import App from './App.vue'

//引入rem
import '@/config/rem'
createApp(App).mount('#app')


 6166
6166


 被折叠的 条评论
为什么被折叠?
被折叠的 条评论
为什么被折叠?
 到【灌水乐园】发言


