


目录
1.将web集群里的web1和web2,LB1和LB2上进行tcp wrappers的配置,只允许堡垒机ssh进来,拒绝其他的机器ssh过去
2.在防火墙服务器上编写脚本,实现snat和dnat功能,并且开启路由功能
项目描述
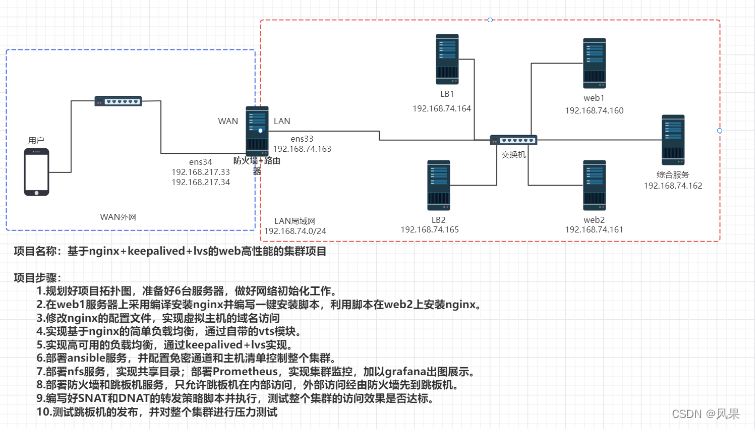
模拟企业环境,构建一个高可用负载均衡的web集群项目。通过nginx实现高可用,通过keepalived+lvs实现负载均衡。
环境设备准备
6台全新的cnetos7.9的虚拟机
2c/4G 、 100G的配置
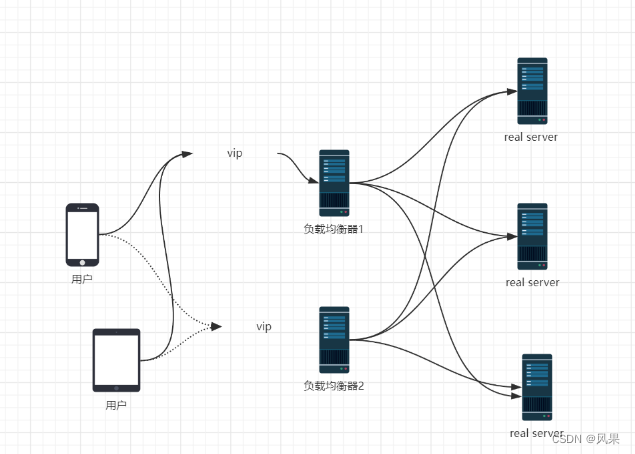
网络拓扑图

网络初始化
配置静态IP地址
| server | IP |
| web1 | 192.168.74.160 |
| web2 | 192.168.74.161 |
| 综合服务器 | 192.168.74.162 |
| firewall(ens33) | 192.168.74.163 |
| firewall(ens34) | 192.168. 217.33+34 |
| LB1 | 192.168.74.164 |
| LB2 | 192.168.74.165 |
防火墙服务器比较特殊,给了两块网卡。ens33(nat模式,对内网)ens34(桥接模式,对外网)
# 用web1举例示范
[root@web1 ~]# cd /etc/sysconfig/network-scripts/

#修改ens33文件
[root@web1 network-scripts]# vi ifcfg-ens33
TYPE=Ethernet
BOOTPROTO=static
DEFROUTE=yes
NAME=ens33
DEVICE=ens33
ONBOOT=yes
IPADDR=192.168.74.160
GATEWAY=192.168.74.2
DNS1=114.114.114.114

#刷新网络
[root@web1 network-scripts]# service network restart
Restarting network (via systemctl)
关闭防火墙和seLinux
#关闭防火墙
#设置开机不启动
service firewalld stop
systemctl disable firewalld

#(临时)关闭selinux
setenforce 0

#永久关闭
vim /etc/selinux/config
#将SELINUX=enforcing ==> SELINUX=disabled

# 永久关闭seLinux
sed -i 's/SELINUX=enforcing/SELINUX=disabled/g' /etc/selinux/config
修改主机名
hostnamectl set-hostname <hostname> && bash项目步骤
一、在web1上安装nginx,采用编译安装
编译安装的经典三步
1.编译前的配置
- 可以指定很多的参数,告诉gcc在后面编译的过程中开启哪些功能,关闭什么功能,可以定制nginx的功能 ==> 去裁缝店量尺寸、选材料和款式
2.编译
本质上是将c语言的代码编译成二进制文件,二进制文件是可以在linux上直接运行的
3.编译安装
将上一步的编译的二进制文件复制到我们当前指定的安装目录下
开始编译安装nginx
#新建/nginx 方便管理
[root@web1 ~]#mkdir /nginx
[root@web1 ~]#cd /nginx


#从官网下载源码包
[root@web1 nginx]# curl -O https://nginx.org/download/nginx-1.25.2.tar.gz

#解压
[root@web1 nginx]# tar xf nginx-1.25.2.tar.gz


[root@web1 nginx]# cd nginx-1.25.2
[root@web1 nginx-1.25.2]# ls
auto  CHANGES  CHANGES.ru  conf  configure  contrib  html  LICENSE  man  README  src

# 编译前的配置
[root@web1 nginx-1.25.2]# ./configure --prefix=/usr/local/scmiqiang99  --user=lilin --group=lilin  --with-http_ssl_module   --with-threads  --with-http_v2_module  --with-http_stub_status_module  --with-stream   --with-http_gunzip_module

Configuration summary
  + using threads
  + using system PCRE library
  + using system OpenSSL library
  + using system zlib library

  nginx path prefix: "/usr/local/scmiqiang99"
  nginx binary file: "/usr/local/scmiqiang99/sbin/nginx"
  nginx modules path: "/usr/local/scmiqiang99/modules"
  nginx configuration prefix: "/usr/local/scmiqiang99/conf"
  nginx configuration file: "/usr/local/scmiqiang99/conf/nginx.conf"
  nginx pid file: "/usr/local/scmiqiang99/logs/nginx.pid"
  nginx error log file: "/usr/local/scmiqiang99/logs/error.log"
  nginx http access log file: "/usr/local/scmiqiang99/logs/access.log"
  nginx http client request body temporary files: "client_body_temp"
  nginx http proxy temporary files: "proxy_temp"
  nginx http fastcgi temporary files: "fastcgi_temp"
  nginx http uwsgi temporary files: "uwsgi_temp"


# 编译
[root@web1 nginx-1.25.2]# make -j 2

#编译安装
[root@web1 nginx-1.25.2]# make install


# 编译安装成功后
[root@web1 nginx-1.25.2]# cd /usr/local/scmiqiang99/
[root@web1 scmiqiang99]# ls
conf  html  logs  sbin
#conf 是存放配置文件
#html 是存放网页的
#logs 是存放nginx日志的(access.log error.log)
#sbin 是存放可执行二进制文件的

#修改环境变量
#临时修改
[root@web1 sbin]# PATH=/usr/local/scmiqiang99/sbin/:$PATH
#修改配置文件,永久修改
[root@web1 sbin]# echo 'PATH=/usr/local/scmiqiang99/sbin/:$PATH' >> /etc/bashrc

# 验证是否配置好PATH
[root@web1 sbin]# su
[root@web1 sbin]# which nginx
/usr/local/scmiqiang99/sbin/nginx


#启动nginx
#报错原因,编译前配置时用户给的是lilin,但此时没这个用户
[root@web1 sbin]# nginx
nginx: [emerg] getpwnam("lilin") failed

[root@web1 sbin]# nginx
[root@web1 sbin]# nginx -s stop  //停止nginx服务

#设置开机自启
[root@web1 sbin]# echo "/usr/local/scmiqiang99/sbin/nginx" >> /etc/rc.local
[root@web1 sbin]# chmod +x /etc/rc.d/rc.local
Nginx启动后,默认会有两个进程(master+worker)
二、在web2上安装nginx,采用脚本自动安装
根据第一步的操作流程编写出对应的脚本,scp到web2执行。
开始脚本自动化安装nginx
[root@web1 nginx]# cat onekey_install_nginx_2023_summer.sh

#!/bin/bash

#安装需要的依赖
yum install epel-release -y

yum -y install zlib zlib-devel openssl openssl-devel pcre pcre-devel gcc gcc-c++ autoconf automake make psmisc net-tools lsof vim  wget -y

# 判断miqiang用户是否存在,不存在则新建
id miqiang || useradd miqiang


# 新建一个文件夹 /nginx
mkdir /nginx
cd /nginx

# 下载nginx的源码包
curl -O https://nginx.org/download/nginx-1.25.2.tar.gz

# 解压源码包
tar xf nginx-1.25.2.tar.gz

# 进入解压后的目录
cd nginx-1.25.2


#编译前的配置
./configure --prefix=/usr/local/scmiqiang99  --user=miqiang --group=miqiang  --with-http_ssl_module   --with-threads  --with-http_v2_module  --with-http_stub_status_module  --with-stream   --with-http_gunzip_module

#添加操作判断
if (( $? != 0 ));then
	echo "请检查编译前配置工作,依赖不完整"
	exit
fi

#编译
make -j 2

#编译安装
make install

#配置PATH变量
PATH=/usr/local/scmiqiang99/sbin/:$PATH
echo 'PATH=/usr/local/scmiqiang99/sbin/:$PATH' >> /etc/bashrc

#启动nginx
nginx

#设置开机自启
echo "/usr/local/scmiqiang99/sbin/nginx" >> /etc/rc.local
chmod +x /etc/rc.d/rc.local

#reboot一下验证是否开机自启
#查看进程
[root@web2 ~]# ps aux|grep nginx
root        944  0.0  0.0  46232  1172 ?        Ss   17:18   0:00 nginx: master process /usr/local/scmiqiang99/sbin/nginx
miqiang     945  0.0  0.0  46696  1924 ?        S    17:18   0:00 nginx: worker process
root       1470  0.0  0.0 112824   980 pts/0    S+   17:19   0:00 grep --color=auto nginx
#查看端口
[root@web2 ~]# netstat -anplut|grep nginx
tcp        0      0 0.0.0.0:80              0.0.0.0:*               LISTEN      944/nginx: master p
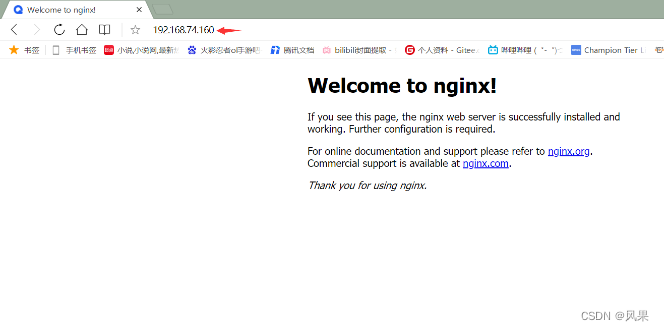
验证安装效果
在浏览器上验证web1和web2的nginx是否启动成功
三、基于域名的虚拟主机配置
修改配置文件
#user  nobody;
worker_processes  1;

#error_log  logs/error.log;
#error_log  logs/error.log  notice;
#error_log  logs/error.log  info;

#pid        logs/nginx.pid;


events {
    worker_connections  1024;
}


http {
    include       mime.types;
    default_type  application/octet-stream;

    log_format  main  '$remote_addr - $remote_user [$time_local] "$request" '
                      '$status $body_bytes_sent "$http_referer" '
                      '"$http_user_agent" "$http_x_forwarded_for"';

    access_log  logs/access.log  main;

    sendfile        on;
    #tcp_nopush     on;

    #keepalive_timeout  0;
    keepalive_timeout  65;

    gzip  on;

    server {
        listen       80;
        server_name  www.sc.com;

        access_log  logs/sc.com.access.log  main;

        location / {
            root   html/sc.com;
            index  index.html index.htm;
        }
        error_page  404              /404.html;
        error_page   500 502 503 504  /50x.html;
        location = /50x.html {
            root   html;
        }
    }
#新增 feng.com
    server {
        listen       80;
        server_name  www.feng.com;

        access_log  logs/feng.com.access.log  main;

        location / {
            root   html/sc.com;
            index  index.html index.htm;
        }
        error_page  404              /404.html;
        error_page   500 502 503 504  /50x.html;
        location = /50x.html {
            root   html;
        }
    }


}
验证修改是否生效,在web2上测试web服务
[root@web2 ~]# curl www.feng.com
welcome to feng.com
[root@web2 ~]# curl www.sc.com
welcome to sc.com
[root@web2 ~]# curl www.feng.com/denf
404 error feng.com

# feng.com 和 sc.com都生效了
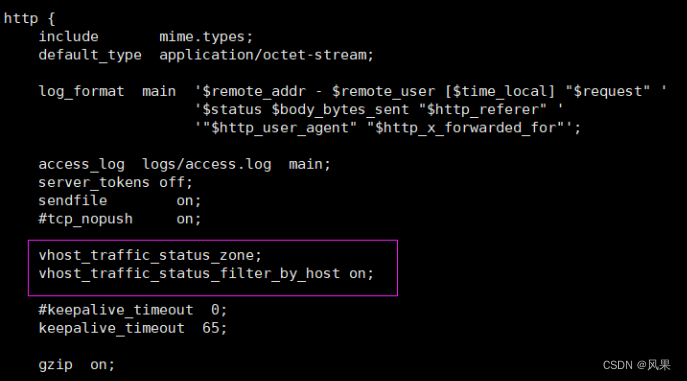
如何隐藏nginx服务的版本号
同样是修改nginx.conf配置文件,在http配置中添加server_tokens off;

四、通过nginx中的vts模块,实现简单的负载均衡
vts概述
Nginx virtual host traffic status module
也就是nginx虚拟主机流量状态监控模块.会记录从nginx重启以来,所有的nginx的请求情况。
VTS是高级的虚拟主机的流量状态统计功能
问题:为什么要开启状态统计功能呢?
需要了解nginx服务是否繁忙
问题: 如何判断安装了nginx的web服务器是否繁忙?
1.看服务器负载 (cpu,磁盘IO, 内存, 网络带宽 )
top 、 galnces、 dstat
2.看nginx的状态统计

体验nginx自带的状态统计模块status
#查看安装的nginx是否支持状态统计功能
[root@web1 html]# nginx -V
nginx version: nginx/1.25.2
built by gcc 4.8.5 20150623 (Red Hat 4.8.5-44) (GCC)
built with OpenSSL 1.0.2k-fips  26 Jan 2017
TLS SNI support enabled
configure arguments: --prefix=/usr/local/scmiqiang99 --user=lilin --group=lilin --with-http_ssl_module --with-threads --with-http_v2_module --with-http_stub_status_module --with-stream --with-http_gunzip_module

#包含--with-http_stub_status_module开启状态统计功能

在web2上测试web1的状态统计功能
[root@web2 conf]# curl www.feng.com/scstatus
安装vts模块
通过xtp传输 nginx-module-vts-master.zip 到/root/nginx/nginx-1.25.2
unzip nginx-module-vts-master.zip //解压
重新编译前的配置工作,添加vts模块到编译前的工作
./configure --prefix=/usr/local/scmiqiang99 --user=miqiang --group=miqiang --with-http_ssl_module --with-threads --with-http_v2_module --with-http_stub_status_module --with-stream --with-http_gunzip_module --add-module=/nginx/nginx-module-vts-master
tips:注意用户是否正确
编译
make -j 2
然后将objs中的新版的nginx复制到安装目录/usr/local/scmiqiang99/sbin/
将原本的nginx,重命名成nginx.old
滚动升级
此时查看进程 ps aux | grep nginx ,仍然只有旧nginx进程

kill -12 <nginx master 进程号> 进行滚动升级
再ps aux | grep nginx 查看,发现新老进程共存

杀死老进程 kill -3 <老的nginx work 进程号>

查看是否升级成功,安装vts成功否
nginx -V,看新增的vts模块是否在里面

修改nginx.conf,添加相应的配置

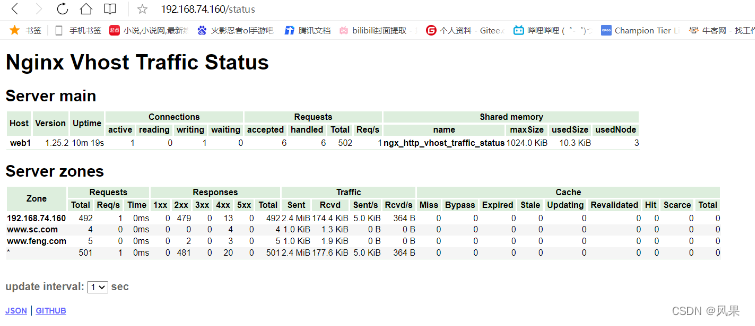
验证vts模块生效情况
访问www.feng.com/status
在windows里面访问情况如下则表示vts成功生效
五、负载均衡和高可用的实现
什么是高可用?
—— High Availablilty(HA)业务执行不是单一道路,一条路发生中断的时候,另一跳路仍可以保证业务进行。本质上就是备份机制,不会出现单点故障。让业务高度可用
什么是负载均衡?
—— Load Balance 大量流量访问的时候,负载均衡器会将流量均匀的分配到后端的web服务器上。
5.1.nginx上的负载均衡
1.在LB1上安装nginx,并搭配负载均衡
将之前写好的nginx安装脚本onekey_install_nginx_2023_summer.sh传输到LB2上
执行脚本安装好nginx
配置nginx的负载均衡

[root@lb1 conf]# ulimit -n
1024
[root@lb1 conf]# ulimit -n 100000 临时修改linux内核限制一个进程只能打开1024个文件,具体的值修改为100000
重启nginx服务
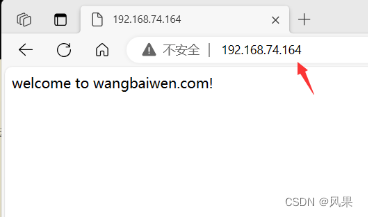
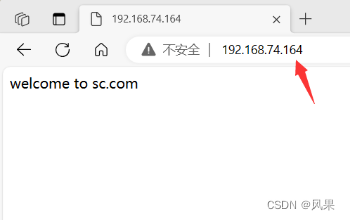
2.访问负载均衡器,进行测试
web1的虚拟域名为 sc.com web2的虚拟域名为wangbaiwen.com
可用看到确实做了负载均衡,流量既到达了web1也能到达web2
3.访问流程

5.2lvs的负载均衡(DR模式)
1.在LB上安装keepalived
[root@lb1 ~]# yum install keepalived -y
[root@lb2 ~]# yum install keepalived -y2.在LB1和LB2上实现双vip配置
修改/etc/keepalived下的keepalived.conf文件内容
web1 192.168.74.160 > > > virtual_ip 192.168.74.188
web2 192.168.74.161 > > > virtual_ip 192.168.74.199
LB1的修改

LB2的修改

查看修改配置后的效果
3.在DR调度器上配置负载均衡策略
在LB1和LB2上执行该脚本
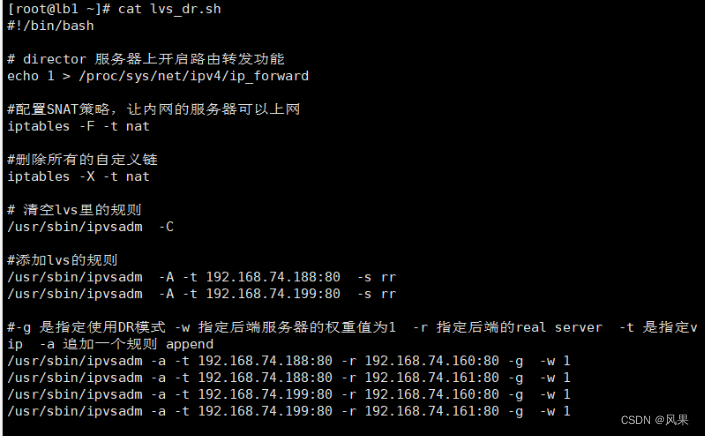
执行后的效果

[root@lb1 ~]# ipvsadm -S > /etc/sysconfig/ipvsadm
[root@lb1 ~]# systemctl enable ipvsadm
在LB1和LB2保存ipvs规则,设置开机自启
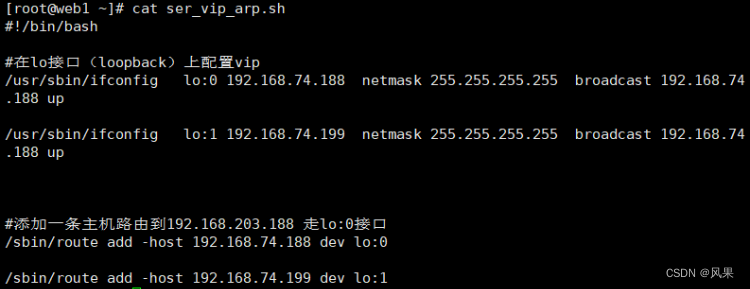
4.在real server上配置vip和毒化arp
在web1和web2上执行该脚本
配置开机自启动
[root@web1 ~]# mkdir /lvs_dr
[root@web1 ~]# cp ser_vip_arp.sh /lvs_dr/
[root@web1 ~]# echo "bash /lvs_dr/set_vip.sh" >>/etc/rc.local
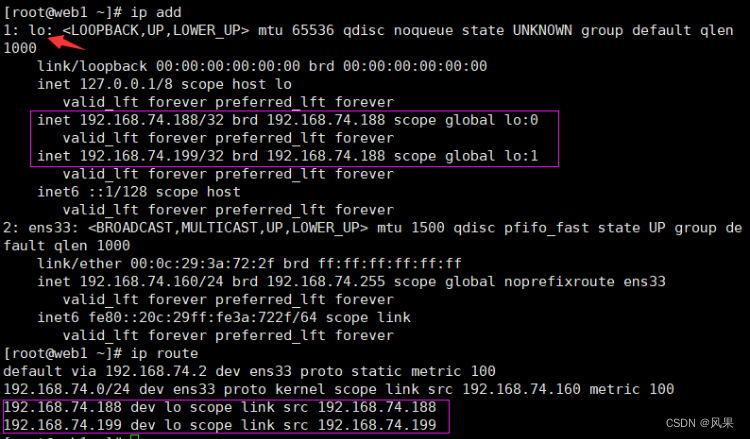
[root@web1 ~]# chmod +x /etc/rc.d/rc.local执行后的效果
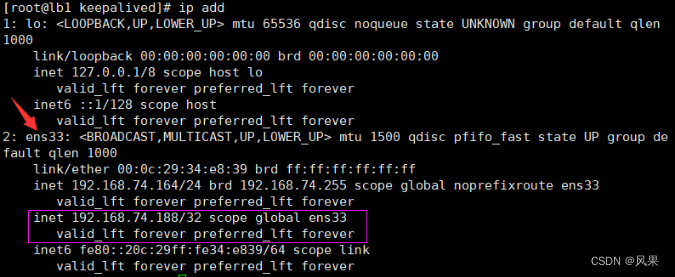
5.目前的访问效果
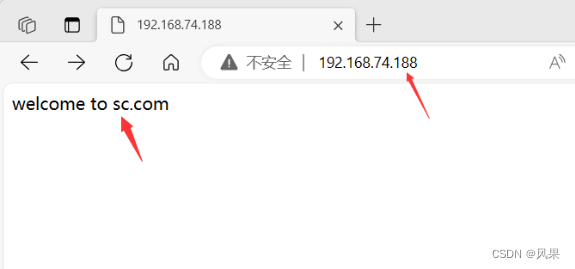
访问74.188时候成功转到web1上
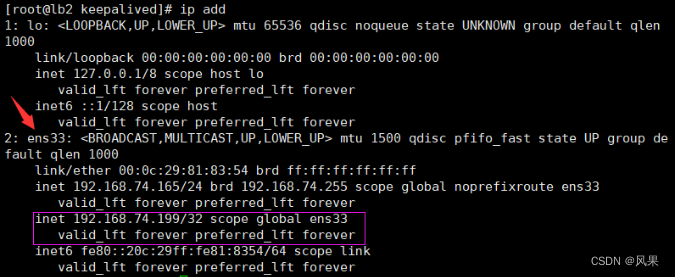
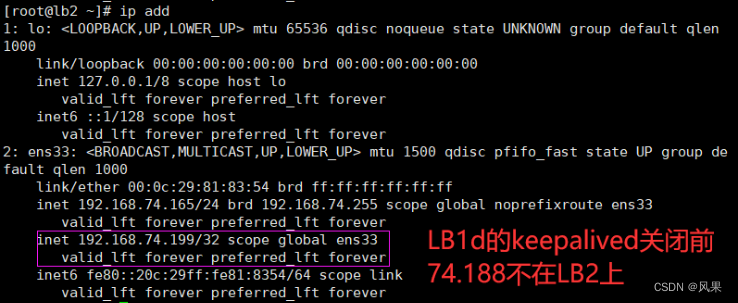
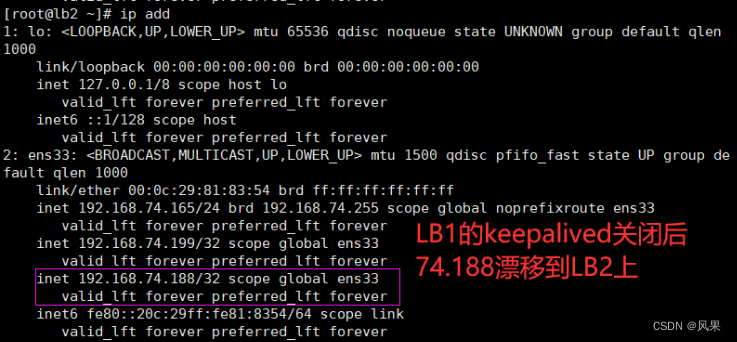
6.测试vip漂移功能
主动停止LB1上的keepalived,发现74.188移动到LB2上。
7.arp毒化和lvs_dr.sh脚本的完善
#让ens33不要响应vip的arp广播
echo "1" > /proc/sys/net/ipv4/conf/all/arp_ignore
echo "1" > /proc/sys/net/ipv4/conf/lo/arp_ignore
echo "2" > /proc/sys/net/ipv4/conf/all/arp_announce
#不告诉其他的机器我的ip地址,不向外发arp广播
echo "2" > /proc/sys/net/ipv4/conf/lo/arp_announce
5.3 lvs上的负载均衡(NAT模式)
1.最终效果
外网访问vip,经由LB转发到real server;
real server往外的传输,也会先到LB,再由LB进行转发。
2.拓扑图
3.具体流程
- 安装keepalived软件
- 配置keepalived.conf文件,添加vip和相关信息
- keepalived.conf文件中添加vip,挂载到ens36作为WAN口
- ens33作为LAN口,配置成real server网关的ip
- 在LB1和LB2上开启路由功能和SNAT功能
- 验证lvs的nat功能,实现负载均衡
- 模拟vip漂移
4.不好的地方
单一vip的时候,总有一台LB处于闲置,只有第一台master挂掉了,才会漂移到第二台。
启用双vip想解决闲置,但因为LB同时承担了路由器的功能,real server数据往外传输的时候也有经由LB,要添加很多多余配置。
六、nfs、ansible的部署,堡垒机的发布
6.1 NFS服务部署
#1.下载nfs
[root@com_server ~]# yum install nfs-utils -y


# 2.设置开机自启
[root@com_server ~]# service nfs restart
Redirecting to /bin/systemctl restart nfs.service
[root@com_server ~]# systemctl  enable nfs
Created symlink from /etc/systemd/system/multi-user.target.wants/nfs-server.service to /usr/lib/systemd/system/nfs-server.service.

#3.设置共享目录,并刷新服务
#将web1上面的html传到nfs共享目录/web下
[root@web1 scmiqiang99]# scp -r html/ 192.168.74.162:/web

[root@com_server ~]# vi /etc/exports
#增加 /web/html 192.168.74.0/24(rw,sync,all_squash)
[root@com_server web]# exportfs -rv
exporting 192.168.74.0/24:/web/html

#4.修改权限
[root@com_server web]# chown nfsnobody:nfsnobody html/
[root@com_server web]# ll
总用量 0
drwxr-xr-x 4 nfsnobody nfsnobody 70 9月  27 17:08 html


#5.挂载共享目录
[root@web1 html]# mount 192.168.74.162:/web/html /usr/local/scmiqiang99/html/
# 查看系统磁盘分区的使用情况
[root@web1 html]# df -Th
文件系统                 类型      容量  已用  可用 已用% 挂载点
devtmpfs                 devtmpfs  1.9G     0  1.9G    0% /dev
tmpfs                    tmpfs     1.9G     0  1.9G    0% /dev/shm
tmpfs                    tmpfs     1.9G   12M  1.9G    1% /run
tmpfs                    tmpfs     1.9G     0  1.9G    0% /sys/fs/cgroup
/dev/mapper/centos-root  xfs        50G  1.7G   49G    4% /
/dev/sda1                xfs      1014M  151M  864M   15% /boot
/dev/mapper/centos-home  xfs        46G   33M   46G    1% /home
tmpfs                    tmpfs     378M     0  378M    0% /run/user/0
192.168.74.162:/web/html nfs4       50G  1.5G   49G    3% /usr/local/scmiqiang99/html


#6.开机自动挂载
[root@web1 html]# echo "mount 192.168.74.162:/web/html /usr/local/scmiqiang99/html/" >>/etc/rc.local
[root@web2 html]# echo "mount 192.168.74.162:/web/html /usr/local/scmiqiang99/html/" >>/etc/rc.local
6.2Ansible服务器的配置和使用
#1.安装ansible
[root@com_server html]# yum install epel-release -y
[root@com_server ansible]# yum install ansible -y


#2.进入ansible目录
[root@com_server html]# cd /etc/ansible/
[root@com_server ansible]# ls
ansible.cfg  hosts  roles

#ansible.cfg  是ansible的配置文件
#hosts 里面定义主机清单
#Roles 基于角色的playbook存放的文件夹


#3.修改主机清单
[root@com_server ansible]# vi hosts
[web]
192.168.74.160
192.168.74.161

[lb]
192.168.74.164
192.168.74.165

[fire]
192.168.74.163


#4.建立免密通道(单向信任关系)
#生成密钥对
[root@com_server ansible]# ssh-keygen
Generating public/private rsa key pair.
Enter file in which to save the key (/root/.ssh/id_rsa):
Created directory '/root/.ssh'.
Enter passphrase (empty for no passphrase):
Enter same passphrase again:
Your identification has been saved in /root/.ssh/id_rsa.
Your public key has been saved in /root/.ssh/id_rsa.pub.
The key fingerprint is:
SHA256:IBlRFkLNsDlfRXg2uPirB+RfYneIq+8zumBBeuwAA9Y root@com_server
The key's randomart image is:
+---[RSA 2048]----+
|....**+. +o      |
|o  E Bo o.+      |
|o   B ...+ .     |
| o + +oo.        |
|  o +o..S. .     |
|   + .o = + .    |
|    +  + * .     |
|   . .  B        |
|      =Ooo       |
+----[SHA256]-----+

#上传公钥,并连接测试
[root@com_server ansible]# ssh-copy-id -i /root/.ssh/id_rsa.pub  root@192.168.74.160
/usr/bin/ssh-copy-id: INFO: Source of key(s) to be installed: "/root/.ssh/id_rsa.pub"
The authenticity of host '192.168.74.160 (192.168.74.160)' can't be established.
ECDSA key fingerprint is SHA256:ZgeaF/tQXvG71UcRjUM/68lPmNIU1CctEiyUV3yJVas.
ECDSA key fingerprint is MD5:04:58:d4:ef:a2:0e:0b:94:82:24:6a:2e:12:b5:82:80.
Are you sure you want to continue connecting (yes/no)? yes
/usr/bin/ssh-copy-id: INFO: attempting to log in with the new key(s), to filter out any that are already installed
/usr/bin/ssh-copy-id: INFO: 1 key(s) remain to be installed -- if you are prompted now it is to install the new keys
root@192.168.74.160's password:

Number of key(s) added: 1

Now try logging into the machine, with:   "ssh 'root@192.168.74.160'"
and check to make sure that only the key(s) you wanted were added.

[root@com_server ansible]# ssh 'root@192.168.74.160'
Last login: Wed Sep 27 14:46:26 2023 from 192.168.74.1
[root@web1 ~]# exit
登出
Connection to 192.168.74.160 closed.

#对web1 web2 LB1 LB2 firewall均建立免密通道
#5.测试效果
[root@com_server ansible]# ansible all -m shell  -a 'ip add'
6.3普罗米修斯的部署
1.Prometheus的安装
#1.获取所需的软件包
[root@com_server ansible]# mkdir /prom
[root@com_server ansible]# cd /prom
[root@com_server prom]# ls
grafana-enterprise-9.1.2-1.x86_64.rpm        prometheus-2.43.0.linux-amd64.tar.gz
node_exporter-1.4.0-rc.0.linux-amd64.tar.gz

#2.解压源码包
[root@com_server prom]# tar xf prometheus-2.43.0.linux-amd64.tar.gz

#3.修改环境变量(临时+永久)
[root@com_server prom]# PATH=/prom/prometheus:$PATH
[root@com_server prom]#  echo 'PATH=/prom/prometheus:$PATH'  >>/etc/profile

#4.把prometheus做成一个服务来进行管理,非常方便日后维护和使用
[root@com_server prometheus]# vi /usr/lib/systemd/system/prometheus.service
[root@com_server prometheus]# cat /usr/lib/systemd/system/prometheus.service

[Unit]
Description=prometheus
[Service]
ExecStart=/prom/prometheus/prometheus --config.file=/prom/prometheus/prometheus.yml
ExecReload=/bin/kill -HUP $MAINPID
KillMode=process
Restart=on-failure
[Install]
WantedBy=multi-user.target

#5.重载服务
#后续可以当作服务启动普罗米修斯
[root@com_server prometheus]#  systemctl  daemon-reload

#6.设置开机启动
[root@com_server prometheus]# systemctl enable prometheus
Created symlink from /etc/systemd/system/multi-user.target.wants/prometheus.service to /usr/lib/systemd/system/prometheus.service.

#7.访问prometheus
http://192.168.74.162:9090
http://192.168.74.162:9090/metrics
2.在整个web集群节点服务器安装exporter
#1.将node-exporter传递到所有的服务器上的/root目录下
[root@com_server prom]#  ansible all -m copy  -a 'src=node_exporter-1.4.0-rc.0.linux-amd64.tar.gz dest=/root/'

#2.编写在其他机器上安装node_exporter的脚本
[root@com_server prom]# vi install_node_exporter.sh
#!/bin/bash

tar xf /root/node_exporter-1.4.0-rc.0.linux-amd64.tar.gz  -C /
cd  /
mv node_exporter-1.4.0-rc.0.linux-amd64/ node_exporter
cd /node_exporter/
PATH=/node_exporter/:$PATH
echo 'PATH=/node_exporter/:$PATH' >>/etc/profile

#生成nodeexporter.service文件
cat >/usr/lib/systemd/system/node_exporter.service  <<EOF
[Unit]
Description=node_exporter
[Service]
ExecStart=/node_exporter/node_exporter --web.listen-address 0.0.0.0:9090
ExecReload=/bin/kill -HUP $MAINPID
KillMode=process
Restart=on-failure
[Install]
WantedBy=multi-user.target
EOF

#让systemd进程识别node_exporter服务
systemctl daemon-reload
#设置开机启动
systemctl  enable node_exporter
#启动node_exporter
systemctl  start node_exporter


#3.在其他机器执行脚本
[root@com_server prom]#ansible all -m script  -a "/prom/install_node_exporter.sh"

#4.验证是否安装node_export
[root@lb1 ~]# ps aux|grep nginx
root       1739  0.0  0.0 112824   976 pts/0    S+   16:42   0:00 grep --color=auto nginx
[root@lb1 ~]# bash install_node_exporter.sh
Created symlink from /etc/systemd/system/multi-user.target.wants/node_exporter.service to /usr/lib/systemd/system/node_exporter.service.
[root@lb1 ~]# ps aux|grep node
root       2142  0.0  0.3 716288 12880 ?        Ssl  18:21   0:00 /node_exporter/node_exporter --web.listen-address 0.0.0.0:9090
root       2147  0.0  0.0 112824   976 pts/0    S+   18:24   0:00 grep --color=auto node
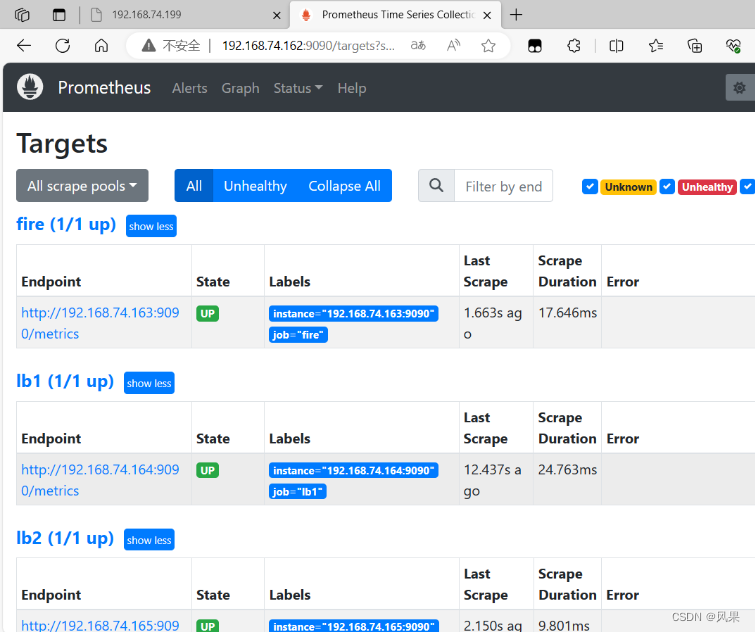
3.访问192.168.74.162/targets的效果
6.4安装grafana
#1.安装
[root@com_server prom]# yum install grafana-enterprise-9.1.2-1.x86_64.rpm -y
#2.设置开机自启
[root@com_server prom]# systemctl start grafana-server
[root@com_server prom]# systemctl enable grafana-server
#3.看监视的端口号
[root@com_server prom]# netstat -anplut|grep grafana
tcp 0 0 192.168.74.162:37118 34.120.177.193:443 ESTABLISHED 3592/grafana-server
tcp6 0 0 :::3000 :::* LISTEN 3592/grafana-server
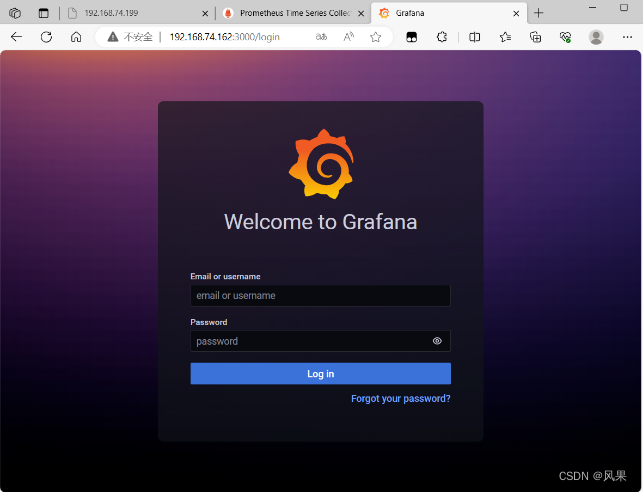
#访问
192.168.74.162:3000
访问效果
初始用户和密码均为:amdin

6.5出图的流程
选择数据源

填写配置后验证连接

导入想要的模板规范后查看效果

6.6堡垒机的实现
1.将web集群里的web1和web2,LB1和LB2上进行tcp wrappers的配置,只允许堡垒机ssh进来,拒绝其他的机器ssh过去
# 编写好数据接收的规则脚本
[root@com_server prom]# cat set_tcp_wrappers.sh
#!/bin/bash

#set /etc/hosts.allow文件的内容,只允许堡垒机访问sshd服务
echo  'sshd:192.168.74.163'  >>/etc/hosts.allow

#单独允许我的windows系统也可以访问(预防Xshell掉了)
echo  'sshd:192.168.74.1'  >>/etc/hosts.allow

#拒绝其他的所有的机器访问sshd
echo  'sshd:ALL'  >>/etc/hosts.deny


# 利用ansible分别在web集群和LB机器上执行该脚本
[root@com_server prom]# ansible web -m script  -a "/prom/set_tcp_wrappers.sh"
[root@com_server prom]# ansible lb -m script  -a "/prom/set_tcp_wrappers.sh"


#验证是否生效
# LB1连接web1失败
[root@lb1 ~]# ssh root@192.168.74.160
ssh_exchange_identification: read: Connection reset by peer

#firewall连接web1成功
[root@firewall ~]# ssh root@192.168.74.160
The authenticity of host '192.168.74.160 (192.168.74.160)' can't be established.
ECDSA key fingerprint is SHA256:ZgeaF/tQXvG71UcRjUM/68lPmNIU1CctEiyUV3yJVas.
ECDSA key fingerprint is MD5:04:58:d4:ef:a2:0e:0b:94:82:24:6a:2e:12:b5:82:80.
Are you sure you want to continue connecting (yes/no)? yes
Warning: Permanently added '192.168.74.160' (ECDSA) to the list of known hosts.
root@192.168.74.160's password:
Last login: Wed Sep 27 22:31:51 2023 from 192.168.74.1
[root@web1 ~]# exit
登出
Connection to 192.168.74.160 closed.
2.在防火墙服务器上编写脚本,实现snat和dnat功能,并且开启路由功能
#1.开启永久路由功能
[root@firewall ~]# vi /etc/sysctl.conf
net.ipv4.ip_forward = 1
[root@firewall ~]#  sysctl -p
net.ipv4.ip_forward = 1


#2.编写firewall 上面的转发策略脚本
[root@firewall ~]# cat set_fw_snat_dnat.sh
#!/bin/bash

#开启路由功能
echo 1 >/proc/sys/net/ipv4/ip_forward

#修改/etc/sysctl.conf里添加下面的配置
#net.ipv4.ip_forward = 1


#清除防火墙规则
iptables=/usr/sbin/iptables

$iptables -F
$iptables -t nat -F

#set snat policy
$iptables  -t nat -A POSTROUTING  -s 192.168.74.0/24  -o ens34  -j MASQUERADE

#set dnat policy 使用2个外网的ip对应内部的2个vip,将2个vip发布出去,提供web服务
$iptables  -t nat -A PREROUTING -d 10.112.217.33 -i ens34 -p tcp --dport 80 -j DNAT --to-destination 192.168.74.188
$iptables  -t nat -A PREROUTING -d 192.168.217.33 -i ens34 -p tcp --dport 80 -j DNAT --to-destination 192.168.74.199

#发布堡垒机,访问防火墙的2233端口转发到堡垒机的22端口
$iptables  -t nat -A PREROUTING -d 10.112.217.33 -i ens34 -p tcp --dport 2233 -j DNAT --to-destination 192.168.74.163:22


#3. 修改内网所有机器的网关为firewall机器上的LAN口(ens33)的地址


#4.因为web服务器上需要配置2个vip,重启网络服务导致2个vip没有了,需要执行脚本配置
[root@web1 ~]# bash ser_vip_arp.sh
#再查看vip是否挂载成功


#5.再次重启keepalived服务,发现重启网络服务后导致vip失效
# 同理检查LB机器上的配置
service keepalived restart


#6.检查snat dnat效果
[root@web2 ~]# ping www.baidu.com
PING www.a.shifen.com (110.242.68.4) 56(84) bytes of data.
64 bytes from 110.242.68.4 (110.242.68.4): icmp_seq=1 ttl=51 time=69.5 ms
64 bytes from 110.242.68.4 (110.242.68.4): icmp_seq=2 ttl=51 time=72.5 ms
64 bytes from 110.242.68.4 (110.242.68.4): icmp_seq=3 ttl=51 time=70.7 ms
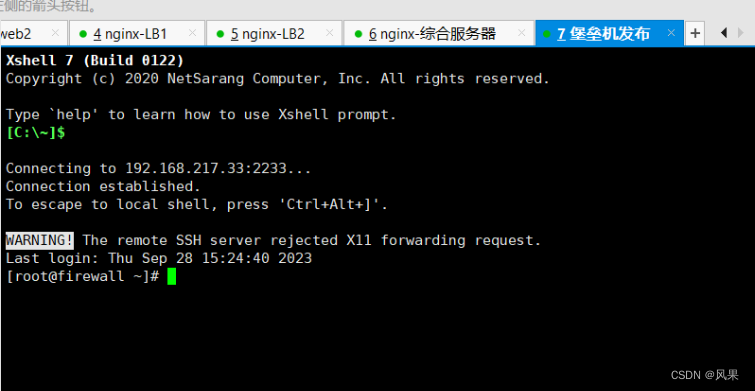
3.堡垒机的发布
在外部尝试连接firewall上的2233端口

七、集群压力测试
Apache自带的一个压力测试软件,可以通过ab命令和选项对某个URL进行压力测试
命令格式是: ab -n10 -c10 URL
安装http-tools工具得到ab软件
[root@com_server ~]# yum install httpd-tools -y

模拟访问
[root@com_server ~]# ab -n 1000 -c 100  http://192.168.217.33/index.html
This is ApacheBench, Version 2.3 <$Revision: 1430300 $>
Copyright 1996 Adam Twiss, Zeus Technology Ltd, http://www.zeustech.net/
Licensed to The Apache Software Foundation, http://www.apache.org/

Benchmarking 192.168.217.33 (be patient)
Completed 100 requests
Completed 200 requests
Completed 300 requests
Completed 400 requests
Completed 500 requests
Completed 600 requests
Completed 700 requests
Completed 800 requests
Completed 900 requests
Completed 1000 requests
Finished 1000 requests


Server Software:        nginx
Server Hostname:        192.168.217.33
Server Port:            80

Document Path:          /index.html
Document Length:        18 bytes

Concurrency Level:      100
Time taken for tests:   0.866 seconds
Complete requests:      1000
Failed requests:        500
   (Connect: 0, Receive: 0, Length: 500, Exceptions: 0)
Write errors:           0
Total transferred:      243000 bytes
HTML transferred:       19000 bytes
Requests per second:    1154.42 [#/sec] (mean)
Time per request:       86.624 [ms] (mean)
Time per request:       0.866 [ms] (mean, across all concurrent requests)
Transfer rate:          273.95 [Kbytes/sec] received

Connection Times (ms)
              min  mean[+/-sd] median   max
Connect:        1   37  20.4     35     104
Processing:     2   47  25.4     42     136
Waiting:        2   44  23.5     40     121
Total:          8   85  33.6     82     189

Percentage of the requests served within a certain time (ms)
  50%     82
  66%     96
  75%    102
  80%    105
  90%    133
  95%    152
  98%    160
  99%    179
 100%    189 (longest request)
总结收获
首先是在拓扑图对整个项目进行总结
收获:
整个还是属于一个网络的项目,所以机器的网络部署贯穿始末,无论是多次的ip配置,还是前前后后各种网络问题的排错,都提高了自己的网络部署能力。
在nginx的安装部分对编译安装和yum安装有本质上的理解;做负载均衡时候从脑裂现象更多的了解了vip和vrrp协议;同时对lvs的DR模式和NAT模式都有所学习看到其优劣。


 1462
1462


 被折叠的 条评论
为什么被折叠?
被折叠的 条评论
为什么被折叠?
 到【灌水乐园】发言


