


手写数字识别一致是一个机器学习里面常见的案例,今天通过CNN来实现一个手写数字识别来介绍一个机器学习的流程。
数据预处理
from keras import datasets
(x_train, y_train), (x_test, y_test) = datasets.mnist.load_data()
x_train = x_train.reshape((60000, 28, 28, 1))
# 归一化,0-255不太方便神经网络进行计算,因此将范围缩小到0—1
x_train = x_train.astype('float32') / 255
x_test = x_test.reshape((10000, 28, 28, 1))
x_test = x_test.astype('float32') / 255
构建模型
from keras import models,layers
from keras import backend as K
K.clear_session()
#初始化模型,可以通过add往里面加层
model = models.Sequential()
model.add(layers.Conv2D(32, (3, 3), input_shape=(28, 28, 1)))
model.add(layers.MaxPooling2D((2, 2)))
model.add(layers.Conv2D(64, (3, 3) ))
model.add(layers.MaxPooling2D((2, 2)))
model.add(layers.Conv2D(128, (3, 3)))
model.add(layers.Flatten())
model.add(layers.Dense(64, activation='relu'))
model.add(layers.Dense(10, activation='softmax'))
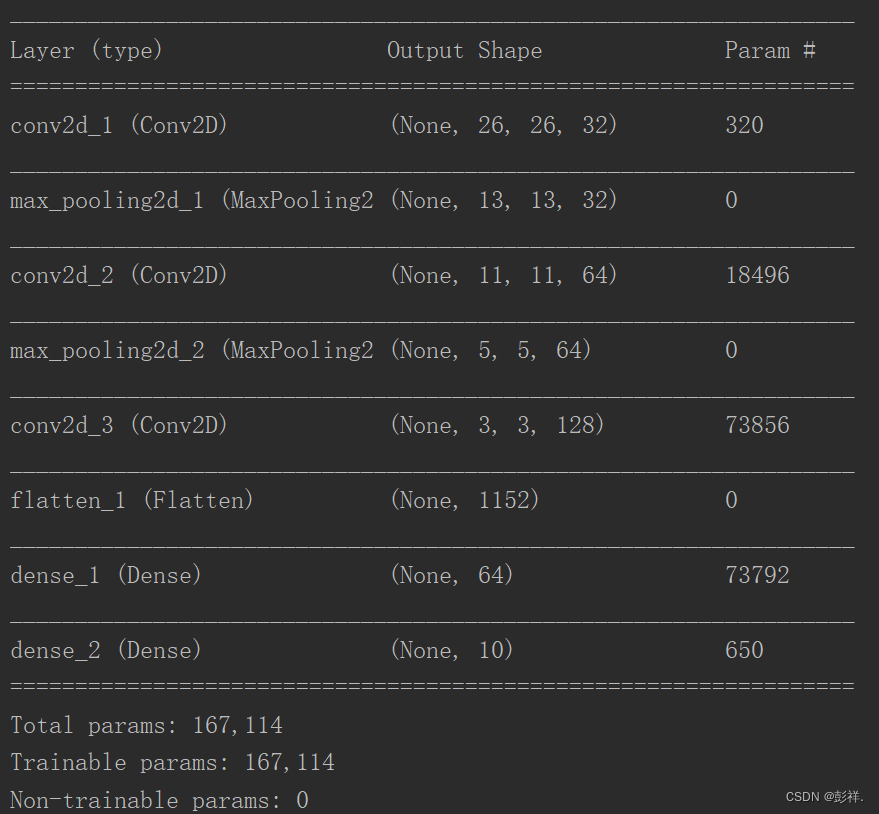
#查看模型结构
model.summary()
模型训练
model.compile() 作用:
设置优化器、损失函数和准确率评测标准。
optimizer:
1.“sgd” 或者 tf.optimizers.SGD(lr = 学习率, decay = 学习率衰减率,momentum = 动量参数)2.“adagrad” 或者 tf.keras.optimizers.Adagrad(lr = 学习率, decay = 学习率衰减率)
3.“adadelta” 或者 tf.keras.optimizers.Adadelta(lr = 学习率,decay = 学习率衰减率)
4.“adam” 或者 tf.keras.optimizers.Adam(lr = 学习率, decay = 学习率衰减率)
loss:
1.“mse” 或者 “mean squared error” 或 tf.keras.losses.MeanSquaredError()
2.“sparse_categorical_crossentropy” 或 tf.keras.losses.SparseCatagoricalCrossentropy(from_logits = False)
Metrics:
1.“accuracy” :
2.“sparse_accuracy":
3.“sparse_categorical_accuracy” :
model.compile(optimizer='rmsprop',
loss='sparse_categorical_crossentropy', # 注意此处loss形式针对未作Onehot的分类标签
metrics=['accuracy'])
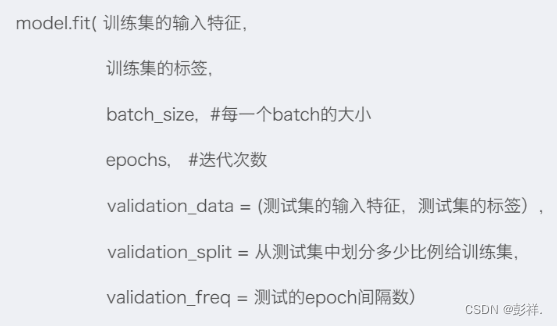
history = model.fit(x_train, y_train, epochs=2,
batch_size=64,validation_data =(x_test,y_test))
import pandas as pd
import matplotlib.pyplot as plt
dfhistory = pd.DataFrame(history.history)
dfhistory.index = range(1,len(dfhistory) + 1)
dfhistory.index.name = 'epoch'
dfhistory.to_csv('hitory_metrics',sep = '\t')
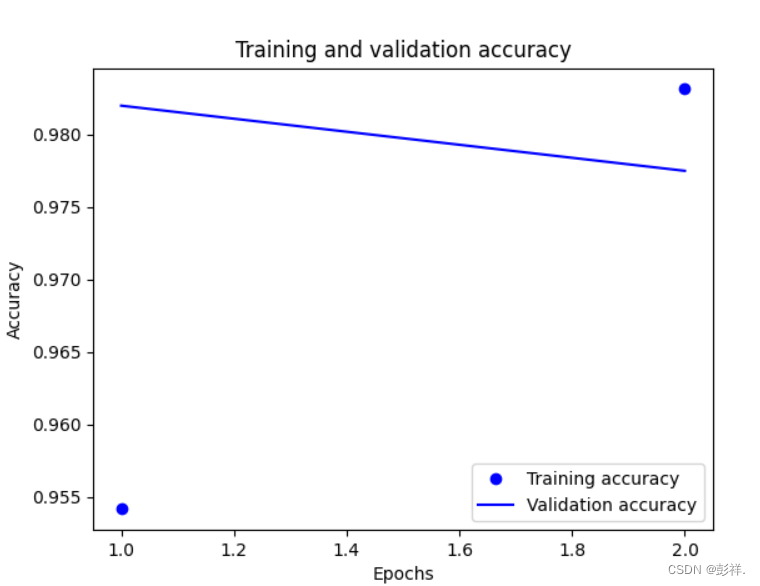
acc = history.history['accuracy']
val_acc = history.history['val_accuracy']
epochs = range(1, len(acc) + 1)
plt.plot(epochs, acc, 'bo', label='Training accuracy')
plt.plot(epochs, val_acc, 'b', label='Validation accuracy')
plt.title('Training and validation accuracy')
plt.xlabel('Epochs')
plt.ylabel('Accuracy')
plt.legend()
plt.show()
model.save('minst_model.h5')
我们在网上随便找一张图片实验

from PIL import Image
import numpy as np
def produceImage(file_in, width, height, file_out):
	image = Image.open(file_in)
	resized_image = image.resize((width, height), Image.ANTIALIAS)
	resized_image.save(file_out)
if __name__ == '__main__':
	file_in = r'image\2.png'
	width = 28
	height = 28
	file_out = r'image\2_1.png'
	produceImage(file_in, width, height, file_out)
	# 把图像转化为黑白的
	im = Image.open(r'image\2_1.png')
	L = im.convert("L")
	L.save(r'image\2_1.png')
通过以上代码进行裁切得到

我们通过刚刚保存的模型去实验
import tensorflow as tf
from PIL import Image
import numpy as np
im_4 = Image.open(r'image\2_1.png')
im_4 = np.reshape(im_4, [1,28,28,1])
#调用模型
new_model =tf.keras.models.load_model('minst_model.h5')
#进行预测
pe_4 = new_model.predict(im_4)
#把最大的坐标找到,因为new_model.predict返回的是[0,0,1,0,0,0,0,0,0,0]这种格式,
#所以需要转换为我们熟悉的格式
pe_4 = tf.argmax(pe_4 ,1)

with tf.Session() as sess:
    print(sess.run(pe_4))
输出结果:
2


 1015
1015


 被折叠的 条评论
为什么被折叠?
被折叠的 条评论
为什么被折叠?
 到【灌水乐园】发言


