


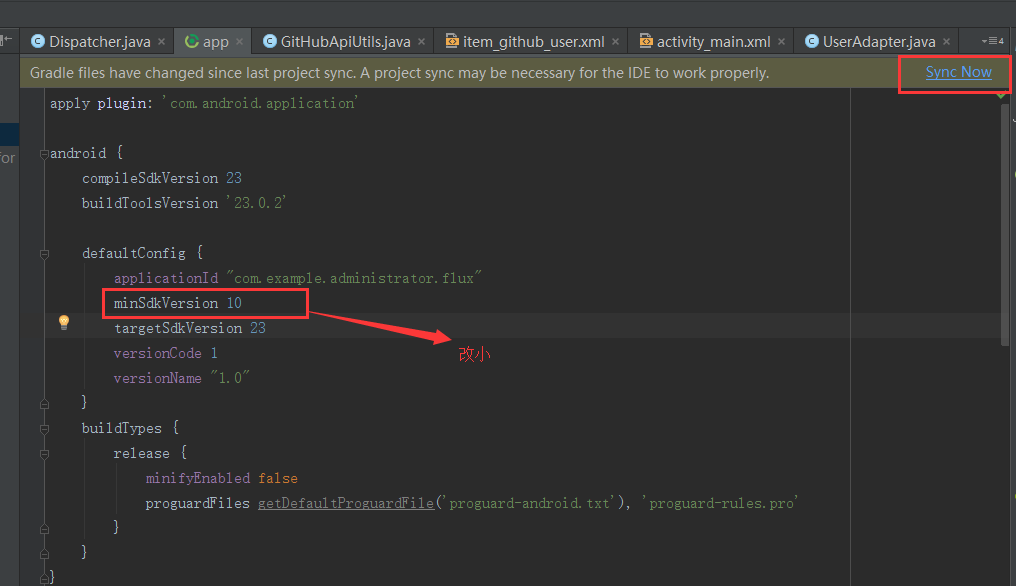
一:错误
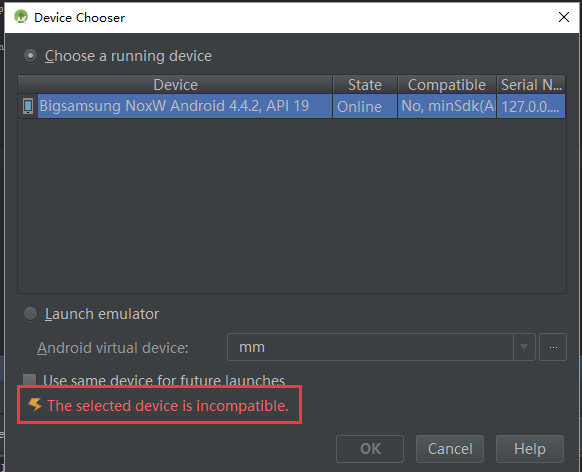
当出现如下错误的时候,说明项目的minSdkVersion比测试机的SDK高,将minSdkVersion=16或者更小
错误二:
Error:(1, 0) Plugin is too old, please update to a more recent version, or set ANDROID_DAILY_OVERRIDE environment variable to “a7fe329839d6518e9c116ccaa357e2c79c65192e”
Fix plugin version and sync project
Open File
解决办法:删除项目中原来的gradle文件,和build.gradle文件:
在把原来项目中能运行项目的build.gradle复制过来
**错误三:**Caused by: java.lang.IllegalStateException: This Activity already has an action bar supplied by the window decor. Do not request Window.FEATURE_SUPPORT_ACTION_BAR and set windowActionBar to false in your theme to use a Toolbar instead.
遇到这种错误那就是要在styles中设置窗口了:
<style name="AppTheme.NoActionBar">
        <item name="windowActionBar">false</item>
        <item name="windowNoTitle">true</item>
    </style>
    <style name="AppTheme.AppBarOverlay" parent="ThemeOverlay.AppCompat.Dark.ActionBar" />
    <style name="AppTheme.PopupOverlay" parent="ThemeOverlay.AppCompat.Light" />


    <!--右滑返回-->
    <style name="AppTheme.NoActionBar.Translucent">
        <item name="android:windowIsTranslucent">true</item>
    </style>
然后再清单文件(manifest)中找到对应的activity:设置theme
<activity android:name=".view.MainActivity"
                  android:screenOrientation="portrait"
                  android:theme="@style/AppTheme.NoActionBar.Translucent">
错误四:

解决办法:
错误5:
解决Execution failed for task ‘:app:clean’. > Unable to delete directory问题
在使用Android Studio编译工程的时候,出现了如下错误:
FAILURE: Build failed with an exception.
02.
03.* What went wrong:
04.Execution failed for task ':app:clean'.
05.> Unable to delete directory: F:\Android\AndroidStudioWorkSpace\AIDLDemo\app\build\outputs\apk
06.
07.* Try:
08.Run with --stacktrace option to get the stack trace. Run with --info or --debug option to get more log output.
09.
10.BUILD FAILED
终极解决办法:
删除F:\Android\AndroidStudioWorkSpace\AIDLDemo\app\ 目录下的build文件夹,然后重启Android Studio即可!
但是直接删除build文件夹删除不了,可以使用360文件粉碎机删除文件就可以了!
错误六
Studio编译的时候出现:
Error:org.gradle.api.internal.changedetection.state.DefaultFileCollectionSnapshotter
F
i
l
e
C
o
l
l
e
c
t
i
o
n
S
n
a
p
s
h
o
t
I
m
p
l
c
a
n
n
o
t
b
e
c
a
s
t
t
o
o
r
g
.
g
r
a
d
l
e
.
a
p
i
.
i
n
t
e
r
n
a
l
.
c
h
a
n
g
e
d
e
t
e
c
t
i
o
n
.
s
t
a
t
e
.
O
u
t
p
u
t
F
i
l
e
s
C
o
l
l
e
c
t
i
o
n
S
n
a
p
s
h
o
t
t
e
r
FileCollectionSnapshotImpl cannot be cast to org.gradle.api.internal.changedetection.state.OutputFilesCollectionSnapshotter
FileCollectionSnapshotImplcannotbecasttoorg.gradle.api.internal.changedetection.state.OutputFilesCollectionSnapshotterOutputFilesSnapshot
Possible causes for this unexpected error include:
- Gradle’s dependency cache may be corrupt (this sometimes occurs after a network connection timeout.)
Re-download dependencies and sync project (requires network) - The state of a Gradle build process (daemon) may be corrupt. Stopping all Gradle daemons may solve this problem.
Stop Gradle build processes (requires restart) - Your project may be using a third-party plugin which is not compatible with the other plugins in the project or the version of Gradle requested by the project.
这个问题的时候
找到项目目录下的.gradle文件下的版本例如2.10,在版本文件内有taskArtifacts文件夹,把taskArtifacts这个文件夹删除后在此编译就可以了
错误七
当出现上述错误的时候解决方法如下,
错误八
在导入studio工程的时候,进行sync的时候,提示Error:Configuration with name ‘default’ not found.
解决办法:
1.打开settings.gradle发现里面有很多个include ':app’这样的include,然而发现在工程的目录下面根本没有include的项目,所以将需要include的项目添加进来,如果include的项目不需要,则将其include语句直接删掉,重新sync尝试。
2.按照上面的操作,要么添加了相应inlcude的工程进来,但是发现还是会提示这样的default not found语句,怎么回事呢,原来用gradle编译的工程,每个工程下面都必须要有build.gradle文件,才能够编译include的工程。整个大工程才能sync通过。把include工程中都添加上相应的gradle配置文件,再重新进行sync,整个工程都通过了。
错误九
UnsupportedMethodException
Unsupported method: AndroidProject.getPluginGeneration().
The version of Gradle you connect to does not support that method.
To resolve the problem you can change/upgrade the target version of Gradle you connect to.
Alternatively, you can ignore this exception and read other information from the model.
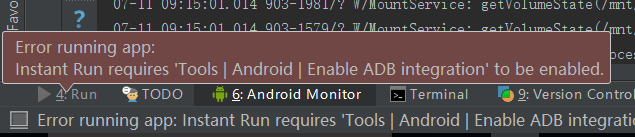
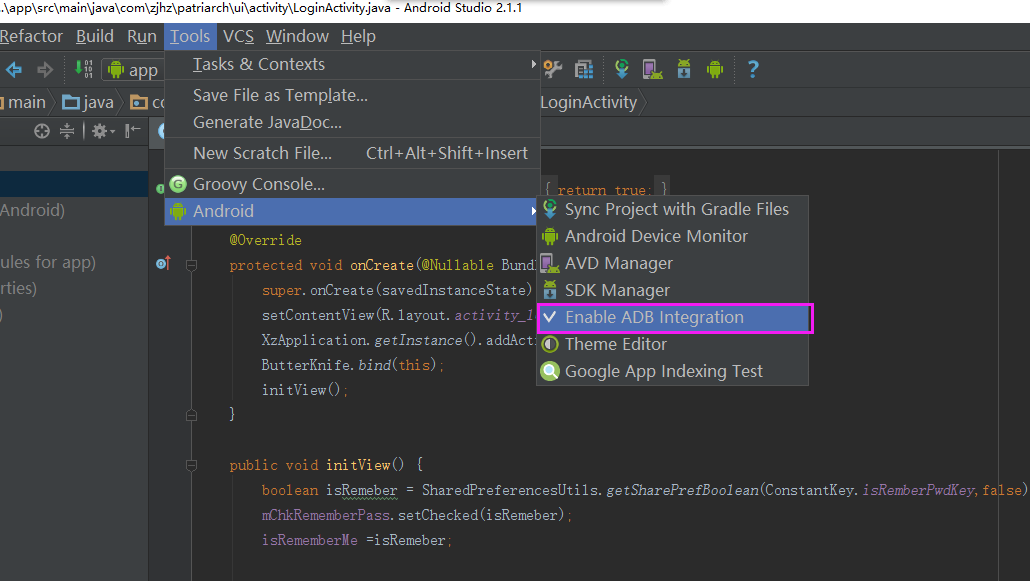
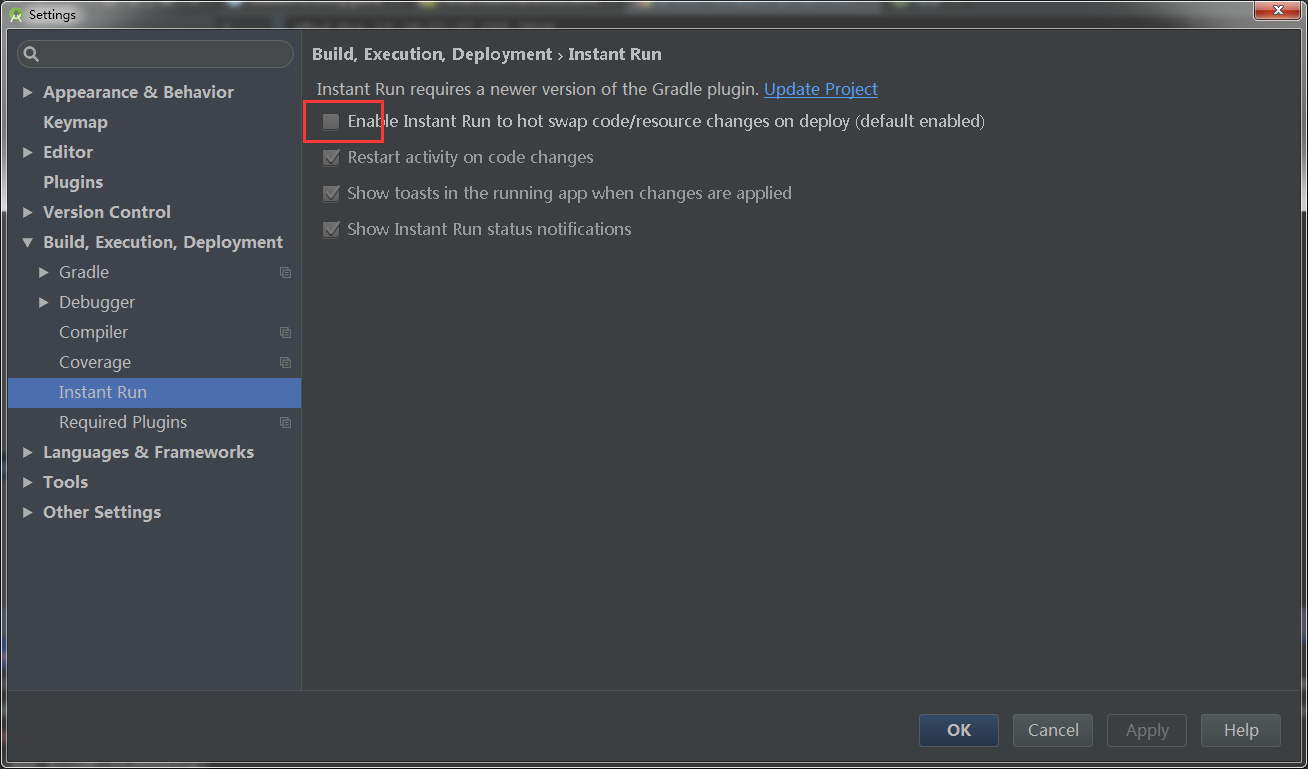
解决方法:关掉instant run
错误十
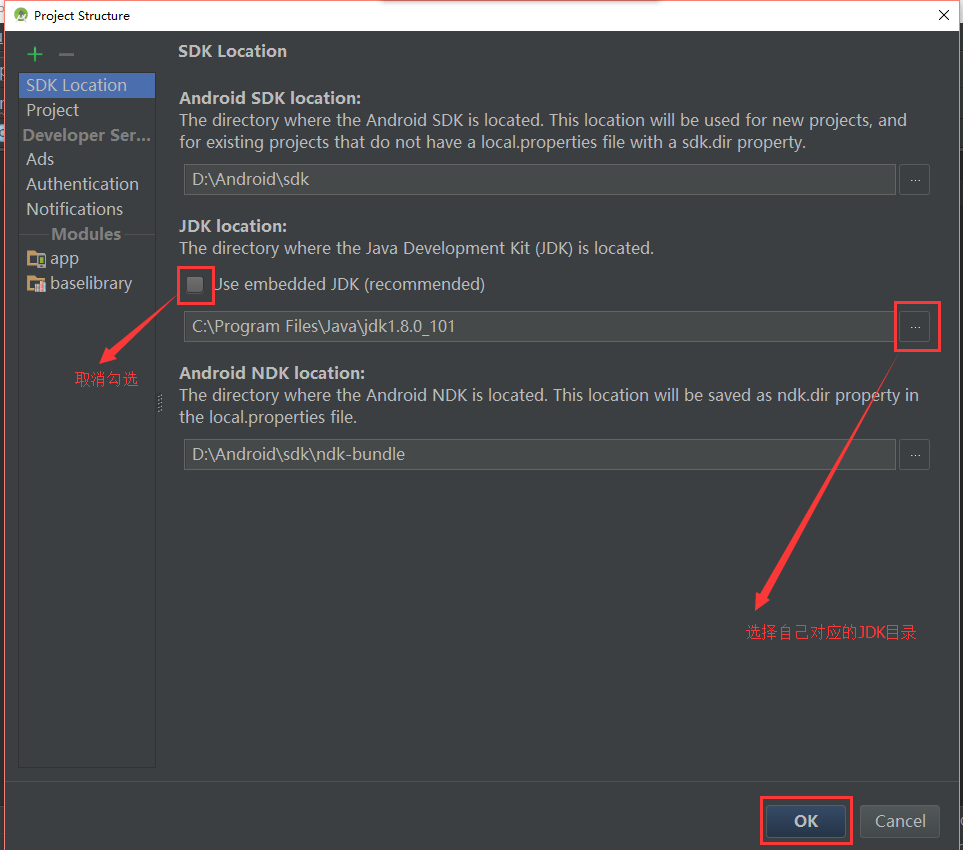
Error:Execution failed for task ‘:pickerview:compileReleaseJava’. > Cannot find System Java Compiler. Ensure that you have installed a JDK (not just a JRE) and configured your JAVA_HOME system variable to point to the according directory.
出现上面的错误解决办法:
错误11:
Error:Execution failed for task ':app:processDebugManifest'.
> Manifest merger failed : Attribute application@icon value=(@drawable/icon_hbh) from AndroidManifest.xml:30:9-42
	is also present at [xxx:wallet:unspecified] AndroidManifest.xml:16:9-43 value=(@mipmap/ic_launcher).
	Suggestion: add 'tools:replace="android:icon"' to <application> element at AndroidManifest.xml:27:5-48:19 to override.
原因:
AS的Gradle插件默认会启用Manifest Merger Tool,若Library项目中也定义了与主项目相同的属性(例如默认生成的android:icon和android:theme),则此时会合并失败,并报上面的错误。
解决方案:
方法1:在在工程的Manifest.xml的application标签下添加tools:replace=“android:icon, android:theme”(多个属性用,隔开,并且记住在manifest根标签上加入xmlns:tools=“http://schemas.android.com/tools”,否则会找不到namespace哦,也可以按到Alt + Enter键快捷添加)
方法2:在build.gradle根标签上加上useOldManifestMerger true (懒人方法)
错误12:
当遇到一些莫名其妙的错误,如果有依赖的库的时候,需要和以来的库中保持SDK版本一致。
错误13:
Error:Dependency xxx:workorder:unspecified on project app resolves to an APK archive which is not supported as a compilation dependency. File: E:\xxx\workorder\build\outputs\apk\workorder-release-unsigned.apk
错误14
ApkProvisionException问题解决
ApkProvisionException: The currently selected variant “debug” uses split APKs, but none of the 1 split apks are compatible with the current device with density “-1” and ABIs “”.
今天遇到这个问题,在网上找了一下解决方案,但是并没有用。
然后查了一下connect的问题解决方案,解决步骤是这样的:
1.删除C:\Windows\System32\drivers\etc这个路径下面的host文件
2.重启
这样打开就解决了
错误15 studio3.0后的问题
error: style attribute ‘@android:attr/windowEnterAnimation’ not found.
在Project/gradle.properties中添加 android.enableAapt2=false,就可以解决问题
错误16
Warning:android-apt plugin is incompatible with future version of Android Gradle plugin. Please use ‘annotationProcessor’ configuration instead.
原因是原来项目里使用的是android-apt生成编译时注解的方式,但是我使用的是Android studio3.0,Gradle已经和这个不兼容了,使用新版本就是会遇到很多坑。。。
然后解决办法就是
把Project的classpath ‘com.neenbedankt.gradle.plugins:android-apt:1.8’删除,
同时把Module中apply plugin: ‘com.neenbedankt.android-apt’的也删除,
然后把dependencies中原来使用apt的改为annotationProcessor
然后重新sync Project,就ok了。
错误17
当我们平常运行AS编译器,发生如下错误:
Error:Execution failed for task ‘:app:preDebugAndroidTestBuild’.
Conflict with dependency ‘com.android.support:support-annotations’ in project ‘:app’. Resolved versions for app (22.1.0) and test app (25.4.0) differ. See https://d.android.com/r/tools/test-apk-dependency-conflicts.html for details.
发生这类型的错误,是当我们修改了.build中的compileSdkVersion,产生所依赖的dependency与当前版本不一致导致的。
解决
build->Rebuid-project
错误18
今天偶先这个问题:
Error:A problem occurred configuring root project ‘company’.
Could not resolve all dependencies for configuration ‘:classpath’.
Timeout waiting to lock artifact cache (C:\Users\Administrator.gradle\caches\modules-2). It is currently in use by another Gradle instance.
Owner PID: 8952
Our PID: 1832
Owner Operation:
Our operation:
Lock file: C:\Users\Administrator.gradle\caches\modules-2\modules-2.lock
没找到准确解决办法,把项目关掉重启就好了
错误19
体验最新版AndroidStudio3.0 Canary 8的时候,发现之前项目的butter knife报错,用到注解的应该都会报错
Error:Execution failed for task ‘:app:javaPreCompileDebug’.
Annotation processors must be explicitly declared now. The following dependencies on the compile classpath are found to contain annotation processor. Please add them to the annotationProcessor configuration.
- butterknife-7.0.1.jar
Alternatively, set android.defaultConfig.javaCompileOptions.annotationProcessorOptions.includeCompileClasspath = true to continue with previous behavior. Note that this option is deprecated and will be removed in the future.
See https://developer.android.com/r/tools/annotation-processor-error-message.html for more details.
解决办法:
在app的build中
android {
…
defaultConfig {
…
//添加如下配置就OK了
javaCompileOptions { annotationProcessorOptions { includeCompileClasspath = true } }
}
…
}
错误20
Error:Failed to complete Gradle execution.
Cause:
invalid stream header: 02ACED00
解决:Clean Project就好了
错误21
Error:Error converting bytecode to dex:
Cause: com.android.dex.DexException: Multiple dex files define Landroid/support/v4/app/FragmentContainer;
应该是V4包冲突了,目前没找到好的解决办法。
implementation (‘android.arch.lifecycle:extensions:1.1.1’){
exclude module: ‘support-v4’
}
这种方法不灵验。


 1444
1444

 被折叠的 条评论
为什么被折叠?
被折叠的 条评论
为什么被折叠?
 到【灌水乐园】发言


