


一、面向对象进阶
- 1.反射补充
- 通过字符串去操作一个对象的属性,称之为反射;
- 示例1:
| 1 2 3 4 5 6 7 8 |
|
- 示例2:
| 1 2 3 4 |
|
- 示例3:__str__ 函数必须有返回值,且必须返回字符串类型;
| 1 2 3 4 5 6 7 8 9 10 |
|
- 2.__setattr__,__delattr__,__getattr__
| 1 2 3 4 5 6 7 |
|
- 示例1:__setattr__ 和 __delattr__

 1 class Foo:
 2     def __init__(self,value):
 3         self.x = value        # 等价于 self.__dict__['x'] = value
 4     def __setattr__(self, key, value):
 5         print('----> from setattr')
 6         # self.key=value      # 这就无限递归了!!!
 7         # self.__dict__[key]=value #应该使用它
 8         self.__dict__[key] = value     # 本质上: f.__dict__['x'] = 100,即给f这个对象设置了属性值;
 9     def __getattr__(self, item):
10         print('++++> from getattr')
11     def __delattr__(self, item):
12         print('====> from delattr')
13         self.__dict__.pop(item)
14
15 f = Foo(100)          # 本质上就是在执行:Foo.__init__(f,100),然后执行里面的赋值语句:f.x = 100;设置了属性x的值,所以会自动调用 __setattr__函数
16 print('-------->>>')
17 print(f.__dict__)     # 查看对象f的属性字典
18 del f.x               # 删除f的x属性,这一步触发了 __delattr__函数,然后执行了 f.__dict__.pop('x')
19 print(f.__dict__)     # 查看删除后的属性字典
20 f.y = 'hello'         # 给对象 f 设置新的属性,触发了 __setattr__函数
21 f.z = 99              # 同上
22 print(f.__dict__)     # 在查看对象f的属性字典
23
24 ---结果:---
25 ----> from setattr
26 -------->>>
27 {'x': 100}
28 ====> from delattr
29 {}
30 ----> from setattr
31 ----> from setattr
32 {'z': 99, 'y': 'hello'}

- 示例2:__getattr__

 1 class Foo:
 2     def __init__(self,value):
 3         self.x = value   # 等价于 self.__dict__['x'] = value
 4     def __setattr__(self, key, value):
 5         print('----> from setattr')
 6         # self.key=value #这就无限递归了,你好好想想
 7         # self.__dict__[key]=value #应该使用它
 8         self.__dict__[key] = value
 9     def __getattr__(self, item):
10         print('++++> from getattr')
11     def __delattr__(self, item):
12         print('====> from delattr')
13         self.__dict__.pop(item)
14
15 f = Foo(100)
16 print(f.__dict__)     # 查看对象 f 的属性字典
17 num = f.y             # 调用对象f的y属性,实际上是没有这个属性,所以触发了 __getattr__ 函数的执行;
18
19 ---结果---
20 ----> from setattr
21 {'x': 100}
22 ++++> from getattr

- 3.__setitem__,__getitem__,__delitem__
- 按照字典的 key-value 方式进行操作;
- 应用:把对对象属性操作的方法和字典类对象的操作统一起来,做一个统一的接口;
- 示例1:

1 class Foo:
2     def __init__(self,name):
3         self.name = name
4
5 f = Foo('standby')
6 print(f.name)
7 # print(f['name'])  # 这么调用会报错:TypeError: 'Foo' object is not subscriptable

- 示例2: __getitem__

 1 class Foo:
 2     def __init__(self,name):
 3         self.name = name
 4     def __getitem__(self, item):
 5         print('__getitem__ is called.')
 6         return self.__dict__[item]
 7 f = Foo('standby')
 8 print(f.name)        # 直接打印 standby
 9 print(f['name'])     # 触发了 __getitem__ 函数的执行
10
11 ---
12 standby
13 __getitem__ is called.
14 standby

- 示例3:__setitem__ 和 __delitem__

 1 class Foo:
 2     def __init__(self,name,age):
 3         self.name = name
 4         self.age = age
 5     def __setitem__(self, key, value):
 6         print('__setitem__ is called.')
 7         self.__dict__[key] = value
 8     def __delitem__(self, key):
 9         print('__delitem__ is called.')
10         self.__dict__.pop(key)
11     def __delattr__(self, item):
12         print('__delattr__ is called.')
13         self.__dict__.pop(item)
14
15 f = Foo('standby',18)       # 实例化一个对象
16 print(f.__dict__)
17 f.name = 'standby666'       # 通过 'obj.attr' 的方式设置对象的name属性
18 print(f.__dict__)
19 f['name'] = 'liulixin'      # 通过字典的方式设置对象的name属性,触发了 __setitem__ 函数的执行
20 print(f.__dict__)
21 del f.age                   # 触发了 __delattr__ 函数的执行
22 print(f.__dict__)
23 del f['name']               # 通过字典的形式删除属性,触发了 __delitem__函数的执行
24 print(f.__dict__)
25
26 ---
27 {'name': 'standby', 'age': 18}
28 {'name': 'standby666', 'age': 18}
29 __setitem__ is called.
30 {'name': 'liulixin', 'age': 18}
31 __delattr__ is called.
32 {'name': 'liulixin'}
33 __delitem__ is called.
34 {}

- 应用:做成统一接口

 1 # 不用 __setitem__ 的情况
 2 class Foo:
 3     def __init__(self,name):
 4         self.name = name
 5     def __setitem__(self, key, value):
 6         print('__setitem__ is called.')
 7         self.__dict__[key] = value
 8 f = Foo('standby')
 9
10 # 没有 __setitem__ 方法的话,就得这样写:
11 def func(obj,key,value):
12     if isinstance(obj,dict):
13         obj[key] = value
14     else:
15         setattr(obj,key,value)
16 print(f.__dict__)
17 func(f,'name','liulixin')
18 print(f.__dict__)
19
20 ---
21 {'name': 'standby'}
22 {'name': 'liulixin'}

 1 # 用 __setitem__ 的情况
 2 class Foo:
 3     def __init__(self,name):
 4         self.name = name
 5     def __setitem__(self, key, value):
 6         print('__setitem__ is called.')
 7         self.__dict__[key] = value
 8 f = Foo('standby')
 9
10 # 有 __setitem__ 方法,就可以统一成如下接口:
11 def func(obj,key,value):
12     obj[key] = value
13 print(f.__dict__)
14 func(f,'name','liulixin')
15 print(f.__dict__)
16
17 ---
18 {'name': 'standby'}
19 __setitem__ is called.
20 {'name': 'liulixin'}

- 4.二次加工标准类(包装)
- 利用类的继承和派生实现
| 1 2 3 4 5 |
|
- 示例:列表类的继承与派生

 1 # 重写一个List类,继承了原来的 list类
 2 class List(list):
 3     def __init__(self,item,flag=False):
 4         super().__init__(item)
 5         self.flag = flag
 6     # 重写了list的 append函数,要去在append前判断元素类型,只有是str才可以append
 7     def append(self,item):
 8         if not isinstance(item,str):
 9             raise TypeError('%s must be str' % item)
10         # super().append(item)
11         super().append(item)
12     # 返回列表的中间元素
13     @property
14     def mid(self):
15         mid_index = len(self)//2
16         return self[mid_index]
17     # 清空列表,操作之前需要判断权限标识位:flag
18     def clear(self):
19         if not self.flag:
20             raise PermissionError('Permission Deny!')
21         super().clear()
22         self.flag = False
23
24 l = List([1,2,3,])
25 print(l)
26 # l.append(9)      # 报错:TypeError: 9 must be str
27 l.append('hello')  # 派生
28 print(l)
29 l.insert(0,7777)   # 继承原来list的insert方法
30 print(l)
31 print(l.mid)       # 调用property
32 # l.clear()        # 报错:PermissionError: Permission Deny!
33 l.flag = True
34 l.clear()          # 派生
35 print(l)
36
37 ---结果---
38 [1, 2, 3]
39 [1, 2, 3, 'hello']
40 [7777, 1, 2, 3, 'hello']
41 2
42 []
- 授权方式(函数)实现
| 1 2 3 4 5 6 7 8 9 10 11 12 |
|
- 示例:open函数的授权,关键在与 __getattr__函数的实现;
 1 import time
 2 class Open():
 3     def __init__(self,filepath,mode='r',encoding='utf-8'):
 4         self.filepath = filepath
 5         self.mode = mode
 6         self.encoding = encoding
 7         # 本质上还是调用原来的 open()函数打开文件
 8         self.f = open(self.filepath,mode=self.mode,encoding=self.encoding)
 9     # 这里,我们重写了write函数,在写入的内容前加上了操作的时间
10     def write(self,msg):
11         t = time.strftime('%Y-%m-%d %X')
12         self.f.write('%s : %s' % (t,msg))
13     # 找不到 attr 就会执行 __getattr__函数
14     # 利用这个特性,拿到 self.f.item (read、close、seek...)
15     def __getattr__(self, item):
16         print('--->>> %s' % item)
17         return getattr(self.f,item)
18 obj = Open(r'1.txt',mode='w+',encoding='utf-8')
19 obj.write('11111\n')
20 obj.write('aaa\n')
21 obj.write('+++1213\n')
22 obj.seek(0)                     # Open类里没有重写seek,read以及close函数,所以在通过 'obj.attr' 方式调用的时候,就会触发 __getattr__函数;
23 res = obj.read()                # getattr(self.f,item) 即调用了真是的open函数的句柄: obj.f.read()
24 print(res)
25 print('----------------->>>')
26 print(type(obj),obj)            # obj 是 Open类的对象
27 print(type(obj.f),obj.f)        # obj.f 才是文件句柄,即原来的open()的对象
28 obj.close()                     # obj.f.close()
29
30 ---结果---
31 --->>> seek
32 --->>> read
33 2017-06-20 22:48:06 : 11111
34 2017-06-20 22:48:06 : aaa
35 2017-06-20 22:48:06 : +++1213
36
37 ----------------->>>
38 <class '__main__.Open'> <__main__.Open object at 0x00000000010824E0>
39 <class '_io.TextIOWrapper'> <_io.TextIOWrapper name='1.txt' mode='w+' encoding='utf-8'>
40 --->>> close

- 5.__str__,__repr__,__format__
| 1 2 3 4 5 6 7 |
|
- __str__ 和 __repr__
- 改变对象的字符串显示;
- 示例1:没有定义 __str__,定义了 __repr__,则会用 __repr__来代替输出

 1 class School:
 2     def __init__(self,name,addr,type):
 3         self.name=name
 4         self.addr=addr
 5         self.type=type
 6     def __repr__(self):
 7         return 'School(%s,%s)' %(self.name,self.addr)
 8 s1=School('Peking University','北京','公立')
 9 print('from repr: ',repr(s1))
10 print('from str: ',str(s1))
11 print(s1)
12
13 ---
14 from repr:  School(Peking University,北京)
15 from str:  School(Peking University,北京)
16 School(Peking University,北京)

- 示例2:__str__ 和 __repr__ 都定义了的情况

 1 class School:
 2     def __init__(self,name,addr,type):
 3         self.name=name
 4         self.addr=addr
 5         self.type=type
 6     def __repr__(self):
 7         return 'School(%s,%s)' %(self.name,self.addr)
 8     def __str__(self):
 9         return '(%s,%s)' %(self.name,self.addr)
10
11 s1=School('Peking University','北京','公立')
12 print('from repr: ',repr(s1))   # 触发 __repr__
13 print('from str: ',str(s1))     # 触发 __str__
14 print(s1)                       # 触发 __str__
15
16 ---
17 from repr:  School(Peking University,北京)
18 from str:  (Peking University,北京)
19 (Peking University,北京)
- __format__
- 自定义格式化字符串;

 1 format_dict={
 2     'nat':'{obj.name}-{obj.addr}-{obj.type}',#学校名-学校地址-学校类型
 3     'tna':'{obj.type}:{obj.name}:{obj.addr}',#学校类型:学校名:学校地址
 4     'tan':'{obj.type}/{obj.addr}/{obj.name}',#学校类型/学校地址/学校名
 5 }
 6 class School:
 7     def __init__(self,name,addr,type):
 8         self.name=name
 9         self.addr=addr
10         self.type=type
11     def __format__(self, format_spec):
12         if not format_spec or format_spec not in format_dict:
13             format_spec='nat'
14         fmt=format_dict[format_spec]
15         return fmt.format(obj=self)
16 s1=School('Peking University','北京','公立')
17 print(format(s1,'nat'))
18 print(format(s1,'tna'))
19 print(format(s1,'tan'))
20 print(format(s1,'asfdasdffd'))
21
22 ---
23 Peking University-北京-公立
24 公立:Peking University:北京
25 公立/北京/Peking University
26 Peking University-北京-公立

- 6.__next__ 和 __iter__ 实现迭代器协议
| 1 2 3 4 5 |
|
- 示例:

 1 from collections import Iterator
 2 class Foo:
 3     def __init__(self,n,end):
 4         self.n = n
 5         self.end = end
 6     def __next__(self):
 7         if self.n >= self.end:
 8             raise StopIteration   # 因为for循环捕捉的就是StopIteration,所以需要在迭代到边界值的时候抛出这个异常;
 9         tmp = self.n
10         self.n += 1
11         return tmp
12     def __iter__(self):
13         return self
14 f = Foo(5,10)
15 print(isinstance(f,Iterator))     # 如果Foo类中不写 __iter__ 函数就不是迭代器
16 print(next(f))                    # next(f) 等价于 f.__next__()
17 print(next(f))
18 print('--->')
19 for item in f:                    # 会捕捉到 StopIteration 异常,如果不加限制会导致无限递归!!!
20     print(item)
21
22 ---结果---
23 True
24 5
25 6
26 --->
27 7
28 8
29 9

- 应用:斐波那契数列
| 1 2 3 4 5 6 7 8 9 10 11 12 13 14 15 16 17 |
|
- 7.__del__ (析构函数)
- 当对象在内存中被释放时,自动触发执行;(关闭到跟对象有关的链接,做一些清理操作)
- 此方法一般无须定义,因为Python是一门高级语言,程序员在使用时无需关心内存的分配和释放,因为此工作都是交给Python解释器来执行;
- 所以,析构函数的调用是由解释器在进行垃圾回收时自动触发执行的;
| 1 2 3 4 5 6 7 8 9 10 11 12 13 14 15 16 |
|
- 8.__enter__ 和 __exit__ 实现上下文管理
- 我们知道在操作文件对象的时候可以这么写:
| 1 2 |
|
- 上述叫做上下文管理协议,即with语句;
- 为了让一个对象兼容with语句,必须在这个对象的类中声明__enter__和__exit__方法;
- __exit__() 中的三个参数分别代表 异常类型,异常值和追溯信息, with语句中代码块出现异常,则with后的代码都无法执行;
- 示例1:
 1 class Foo:
 2     def __init__(self, name):
 3         self.name = name
 4     def __enter__(self):
 5         print('__enter__')
 6         return self
 7     def __exit__(self, exc_type, exc_val, exc_tb):
 8         print('__exit__')
 9 with Foo('standby') as x: # 出现 with语句,则对象的 __enter__函数被触发,返回值则赋给as声明的变量
10     print(x)
11     print('=>')
12     print('==>')
13     print('===>')         # with里的代码块执行完毕,则触发 __exit__函数执行
14
15 ---
16 __enter__
17 <__main__.Foo object at 0x00000000007334E0>
18 =>
19 ==>
20 ===>
21 __exit__

- 示例2: __exit__ 里不加 return True
 1 class Open:
 2     def __init__(self,name,mode='r',encoding='utf-8'):
 3         self.name = name
 4         self.mode = mode
 5         self.encoding = encoding
 6         self.f = open(self.name,mode=self.mode,encoding=self.encoding)
 7     def __enter__(self):
 8         print('__enter__')
 9         return self.f
10     def __exit__(self, exc_type, exc_val, exc_tb):
11         print('__exit__')
12         print(exc_type)
13         print(exc_val)
14         print(exc_tb)
15         self.f.close()
16 with Open('666.txt',mode='w+') as f:
17     print(type(f),f)
18     1/0
19 print('The end.')        # 1/0 异常抛出, 导致 with后的代码没有执行;
20
21 ---
22 __enter__
23 <class '_io.TextIOWrapper'> <_io.TextIOWrapper name='666.txt' mode='w+' encoding='utf-8'>
24 __exit__
25 <class 'ZeroDivisionError'>
26 division by zero
27 <traceback object at 0x00000000010615C8>
28 Traceback (most recent call last):
29   File "D:/soft/work/Python_17/day08/blog.py", line 301, in <module>
30     1/0
31 ZeroDivisionError: division by zero

- 示例3: __exit__ 末尾有 return True
 1 class Open:
 2     def __init__(self,name,mode='r',encoding='utf-8'):
 3         self.name = name
 4         self.mode = mode
 5         self.encoding = encoding
 6         self.f = open(self.name,mode=self.mode,encoding=self.encoding)
 7     def __enter__(self):
 8         print('__enter__')
 9         return self.f
10     def __exit__(self, exc_type, exc_val, exc_tb):
11         print('__exit__')
12         print(exc_type)
13         print(exc_val)
14         print(exc_tb)
15         self.f.close()
16         return True
17 with Open('666.txt',mode='w+') as f:   # Open(...) 触发 __init__的执行, with Open(...) 触发 __enter__的执行
18     print(type(f),f)
19     1/0                 # 1/0 抛出异常,但是由于 __exit__末尾 'return True',导致异常被清空了,所以后面的代码都可以照常执行;
20 print('The end.')
21
22 ---
23 __enter__
24 <class '_io.TextIOWrapper'> <_io.TextIOWrapper name='666.txt' mode='w+' encoding='utf-8'>
25 __exit__
26 <class 'ZeroDivisionError'>
27 division by zero
28 <traceback object at 0x00000000010925C8>
29 The end.

- 9.__call__
- 对象后面加括号,触发执行对象所属的类的 __call__方法执行(实现对象加括号,变成可调用的);
- 所有的可调用,到最后都要转化成函数(__call__)去运行;
- 构造方法的执行是由创建对象触发的,即:对象 = 类名() ;
- 而对于 __call__ 方法的执行是由对象后加括号触发的,即:对象() 或者 类()();
- 示例1:

 1 class Foo:
 2     def __init__(self):
 3         print('Foo.__init__ is called.')
 4         print(type(self),self)
 5     def __call__(self, *args, **kwargs):
 6         print('Foo.__call__ is called.')
 7         print(type(self), self)
 8
 9 print('--->>>')
10 Foo()                # 相当于实例化了一个对象
11 print('---+++')
12 Foo()()              # 1.Foo()得到一个对象obj    2.obj加括号执行(obj()),触发了__call__函数
13
14 ---
15 --->>>
16 Foo.__init__ is called.
17 <class '__main__.Foo'> <__main__.Foo object at 0x000000000103A898>
18 ---+++
19 Foo.__init__ is called.
20 <class '__main__.Foo'> <__main__.Foo object at 0x000000000103A898>
21 Foo.__call__ is called.
22 <class '__main__.Foo'> <__main__.Foo object at 0x000000000103A898>

- 示例2:

 1 class Foo:
 2     def __init__(self):
 3         print('Foo.__init__ is called.')
 4         print(type(self),self)
 5     def __call__(self, *args, **kwargs):
 6         print('Foo.__call__ is called.')
 7         print(type(self), self)
 8
 9 obj = Foo()               # 执行 Foo.__init__(obj)
10 obj()                     # 执行 Foo.__call__(obj)
11 print(type(obj),obj)
12 print(type(Foo),Foo)
13
14 ---
15 Foo.__init__ is called.
16 <class '__main__.Foo'> <__main__.Foo object at 0x00000000007CA978>
17 Foo.__call__ is called.
18 <class '__main__.Foo'> <__main__.Foo object at 0x00000000007CA978>
19 <class '__main__.Foo'> <__main__.Foo object at 0x00000000007CA978>
20 <class 'type'> <class '__main__.Foo'>

- 示例3:
 1 class Foo:
 2     def __call__(self, *args, **kwargs):
 3         print('======>')
 4
 5 obj=Foo()                 # obj是Foo类实例化得到,是Foo类的对象
 6 print('++++++++')
 7 obj()                     # obj(),即 '对象+()' 执行的时候就是触发了其所属的类的 __call__方法的执行;
 8 print(type(Foo),Foo)
 9 print(type(obj),obj)
10
11 ---
12 ++++++++
13 ======>
14 <class 'type'> <class '__main__.Foo'>
15 <class '__main__.Foo'> <__main__.Foo object at 0x0000000000B0A940>
- 10.metaclass(元类)
- 1.exec和eval介绍
- 2.创造类的两种方法
- 3.创建类相关的三个方法
- 1.__call__
- 2.__new__
- 3.__init__
- 4.元类(metaclass)
| 1 2 3 4 5 6 7 8 |
|
更多细节参见:egon老师面向对象进阶
二、socket网络编程
- 1.网络基础
- 网络基础参见:
- 互联网的本质就是一系列的协议;通过这些协议标准,使得不同国家不同种族的人们之间可以相互沟通;
- 互联网协议的功能:定义计算机如何接入internet,以及接入internet的计算机通信的标准;
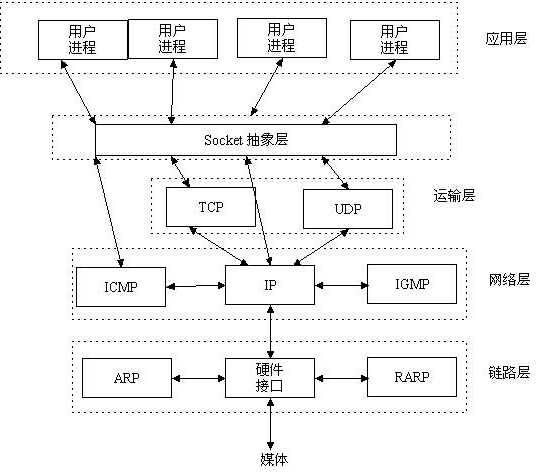
- 2.socket是什么?
- socket是在应用层和传输层之间的一个抽象层(ip+port);
| 1 2 3 4 5 6 7 8 9 10 11 12 |
|
| 1 2 3 4 5 |
|
- 3.socket套接字分类
| 1 2 3 4 5 6 7 8 9 10 11 12 13 14 15 16 |
|
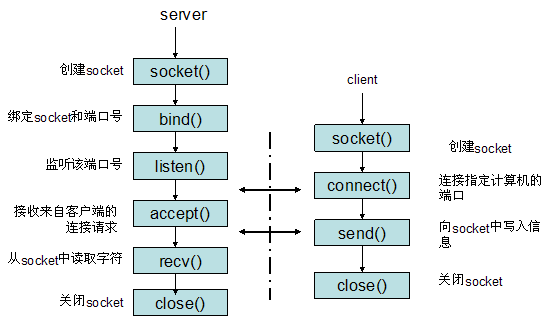
- 4.socket套接字工作流程
- 以使用TCP协议通讯的socket为例:
| 1 2 3 4 5 6 7 8 9 10 11 12 13 14 15 16 17 18 19 20 21 22 23 |
|
- 常用方法:
| 1 2 3 4 5 6 7 8 9 10 11 12 13 14 15 16 17 18 19 20 21 22 23 24 25 26 27 28 29 |
|
- 5.基于TCP的套接字
| 1 2 3 4 5 6 7 8 9 10 11 12 13 14 15 16 17 |
|
- 6.基于UDP的套接字
参见另一片博客:Python线程和协程 - 青山应回首 - 博客园
- 7.recv与recvfrom的区别
- 8.粘包的产生和解决办法
- 粘包产生原因
- socket收发消息的原理示意图:

- 粘包原因
| 1 2 3 4 5 6 7 8 9 10 11 12 13 |
|
- 扩展
| 1 2 3 4 5 6 7 8 9 10 11 12 13 14 15 16 |
|
- 1.只有TCP有粘包现象,UDP永远不会粘包;
- 2.所谓粘包问题主要还是因为接收方不知道消息之间的界限,不知道一次性应该提取多少字节的数据所造成的;
- 3.TCP是面向连接的、面向流的;面向流的通信是无消息保护边界的;
- 4.UDP是无连接的、面向消息的;面向消息的通讯是有消息保护边界的;
- 两种情况下会产生粘包:
- 发送端需要等缓冲区满才发送出去,造成粘包(发送数据时间间隔很短,数据了很小,会合到一起,产生粘包);
- 接收方不及时接收缓冲区的包,造成多个包接收(客户端发送了一段数据,服务端只收了一小部分,服务端下次再收的时候还是从缓冲区拿上次遗留的数据,产生粘包);
- 粘包示例
- Server端

 1 #!/usr/bin/python3
 2 # -*- coding:utf-8 -*-
 3
 4 import time
 5 import socket
 6 import subprocess
 7 phone = socket.socket(socket.AF_INET,socket.SOCK_STREAM)
 8 # Address already in use
 9 phone.setsockopt(socket.SOL_SOCKET,socket.SO_REUSEADDR,1)
10 phone.bind(('127.0.0.1',8090))
11 phone.listen(10)  # tcp 半连接池
12
13 while True:
14     print('Starting...')
15     conn,addr = phone.accept()
16     print('conn is %s' % conn)
17     print('addr is:', addr)
18
19     print('Ready to reveice msg...')
20     while True:
21         try:
22             cmd = conn.recv(1024)  # 写死每次取1024容易造成粘包现象
23             if not cmd: # for linux platform
24                 break
25             t = time.strftime('%Y-%m-%d %X')
26             print('Time: %s\tClient CMD: %s' %(t, cmd.decode('utf-8')))
27             res = subprocess.Popen(cmd.decode('utf-8'),shell=True,
28                                    stdout=subprocess.PIPE,
29                                    stderr=subprocess.PIPE)
30             err = res.stderr.read()
31             if err:
32                 cmd_res = err                  # 如果执行出错,则返回错误信息
33             else:
34                 cmd_res = res.stdout.read()    # 否则返回执行的结果信息
35             conn.send(cmd_res)
36         except Exception as e:
37             print('Exception: %s' % e)
38             break
39     conn.close()
40 phone.close()
- Client端

 1 #!/usr/bin/python3
 2 # -*- coding:utf-8 -*-
 3
 4 import socket
 5
 6 phone = socket.socket(socket.AF_INET,socket.SOCK_STREAM)
 7
 8 phone.connect(('127.0.0.1',8090))
 9 while True:
10     cmd = input('>>>:\t').strip()
11     if not cmd:
12         print('不允许空消息!')
13         continue
14     phone.send(cmd.encode('utf-8'))
15     cmd_res = phone.recv(1024)           # 写死每次取1024容易造成粘包现象
16     print('%s Result:\n%s' % (cmd,cmd_res.decode('gbk')))
17
18 phone.close()
- 粘包解决办法
- Server端

 1 #!/usr/bin/python3
 2 # -*- coding:utf-8 -*-
 3
 4 import time
 5 import socket
 6 import subprocess
 7 import json
 8 import struct
 9
10 phone = socket.socket(socket.AF_INET,socket.SOCK_STREAM)
11 # Address already in use
12 phone.setsockopt(socket.SOL_SOCKET,socket.SO_REUSEADDR,1)
13 phone.bind(('10.0.0.9',8080))
14 phone.listen(5)  # tcp 半连接池
15
16 while True:
17     print('Starting...')
18     conn,addr = phone.accept()
19     print('conn is %s' % conn)
20     print('addr is:', addr)
21     print('Ready to reveice msg...')
22     while True:
23         try:
24             cmd = conn.recv(1024)
25             if not cmd: # for linux platform
26                 break
27             t = time.strftime('%Y-%m-%d %X')
28             print('Time: %s\tClient CMD: %s' % (t, cmd.decode('utf-8')))
29             res = subprocess.Popen(cmd.decode('utf-8'),shell=True,
30                                    stdout=subprocess.PIPE,
31                                    stderr=subprocess.PIPE)
32             cmd_res = res.stderr.read()
33             if not cmd_res:
34                 cmd_res = res.stdout.read()
35             # 自定义数据报头
36             head_dic = {'filename': None, 'hash': None, 'total_size': len(cmd_res)}
37             head_json = json.dumps(head_dic)
38             head_byte = head_json.encode('utf-8')
39             # 先发送数据报头的大小
40             conn.send(struct.pack('i',len(head_byte)))
41             # 再发送数据报头
42             conn.send(head_byte)
43             # 最后发送真实的数据体
44             conn.send(cmd_res)
45         except Exception as e:
46             print('Exception: %s' % e)
47             break
48     conn.close()
49 phone.close()

- Client端
 1 #!/usr/bin/python3
 2 # -*- coding:utf-8 -*-
 3
 4 import socket
 5 import struct
 6 import json
 7
 8 phone = socket.socket(socket.AF_INET,socket.SOCK_STREAM)
 9 phone.connect(('10.0.0.9',8080))
10
11 while True:
12     cmd = input('>>>:\t').strip()
13     if not cmd:
14         print('不允许空消息!')
15         continue
16     phone.send(cmd.encode('utf-8'))
17     # cmd_res = phone.recv(1024)  # 写死1024会造成粘包现象
18     # 先收报头大小
19     head_struct = phone.recv(4)
20     head_len = struct.unpack('i',head_struct)[0]
21     # 再接收数据报头
22     head_byte = phone.recv(head_len)
23     head_json = head_byte.decode('utf-8')
24     head_dict = json.loads(head_json)
25     # 从head_dict中获取真实的数据的大小
26     total_size = head_dict['total_size']
27     # 不能一次都接收完,要每次接收一部分,分多次接收
28     reve_size = 0
29     data = b''
30     while reve_size < total_size:
31         tmp = phone.recv(1024)
32         data += tmp
33         reve_size += len(tmp)
34     print('%s Result:\n%s' % (cmd,data.decode('gbk')))
35 phone.close()

- 不足:
| 1 2 3 4 5 |
|
- 需要注意的几点:
| 1 2 3 4 5 6 7 8 9 10 11 12 13 14 15 16 17 |
|
- 9.认证客户端的链接合法性
- 10.socketserver实现并发
- 扩展:
- tcp半链接池
| 1 2 3 |
|
- tcp保活机制
| 1 2 3 4 5 6 7 8 9 |
|
- struct
- struc.pack
- struct.unpack
- attr 和 item 一些用法
- 创建类的三要素
| 1 2 3 |
|
三、练习
要求:

代码实现:

目录结构

config.py

user.py
- FTP Server 端
| 1 2 3 4 5 6 7 8 9 10 11 12 13 14 15 16 17 18 19 20 21 22 23 24 25 26 27 28 29 30 31 32 33 34 35 36 37 38 39 40 41 42 43 44 45 46 47 48 49 50 51 52 53 54 55 56 57 58 59 60 61 62 63 64 65 66 67 68 69 70 71 72 73 74 75 76 77 78 79 80 81 82 83 84 85 86 87 88 89 90 91 92 93 94 95 96 97 98 99 100 101 102 103 104 105 106 107 108 109 110 111 112 113 114 115 116 117 118 119 120 121 122 |
|
- Client端
| 1 2 3 4 5 6 7 8 9 10 11 12 13 14 15 16 17 18 19 20 21 22 23 24 25 26 27 28 29 30 31 32 33 34 35 36 37 38 39 40 41 42 43 44 45 46 47 48 49 50 51 52 53 54 55 56 57 58 59 60 61 62 63 64 65 66 67 68 69 70 71 72 73 74 75 76 77 78 79 80 81 82 83 84 85 86 87 88 89 90 91 92 93 94 95 96 97 98 99 100 101 102 103 104 105 106 107 108 109 110 111 112 113 114 115 116 117 118 119 120 121 122 123 124 125 126 127 128 129 130 131 132 133 134 135 136 137 138 139 140 141 142 143 144 145 146 147 148 149 150 151 152 153 154 155 156 157 158 159 160 161 162 163 164 165 166 167 168 169 170 171 172 173 174 175 176 177 178 179 180 181 182 183 184 185 186 187 188 189 190 191 192 193 194 195 196 197 198 199 200 201 202 203 204 205 206 207 208 209 210 211 212 213 214 215 216 217 |
|


 194
194


 被折叠的 条评论
为什么被折叠?
被折叠的 条评论
为什么被折叠?
 到【灌水乐园】发言


