CUDA10安装与卸载,CUDA10.2与MMSEG安装

安装CUDA10

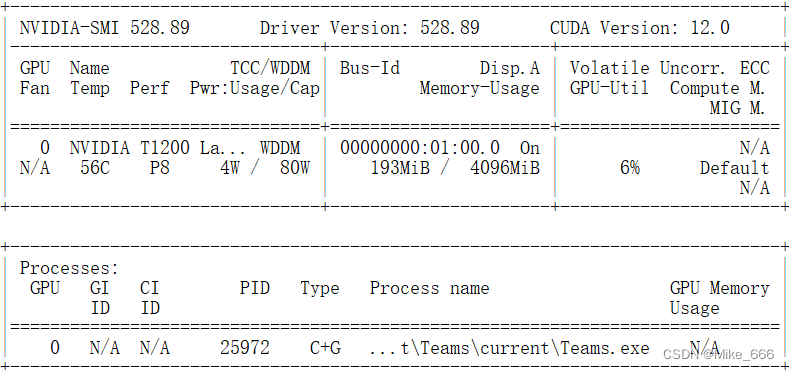
1、因为要用到tensorflow1.15.5的GPU版本,所以想安装cuda10来进行加速,通过nvidia-smi检查本机上的CUDA版本

2、下载的cuda10版本,cuda_10.0.130_411.31_win10.exe

下载的cudnn版本,cudnn-10.0-windows10-x64-v7.6.4.38.zip

然后按照下面这个博客链接进行安装。

win10系统CUDA10.0安装教程(for tensorflow2.0)_cuda10.0下载-CSDN博客

3、安装完后之后,通过nvidia-smi,发现cuda还是上面的情况

通过启动训练程序,发现仍然不能启动GPU加速,

通过搜索发现:
如果您的系统上已经安装了CUDA 12.0的驱动程序,即使安装了CUDA 10.0的运行时库,nvidia-smi也可能会显示CUDA 12.0。在这种情况下,您可能需要更新您的NVIDIA驱动程序,以便显示正确的CUDA版本。您可以通过NVIDIA官方网站下载并安装适用于您的GPU的最新驱动程序。

基于上述理论指导,卸载CUDA12.0的驱动程序,手动卸载没有卸载成功。安装腾讯管家进行卸载,卸载成功。

4、然后下载适合NVIDIA T1200显卡的驱动成功,搜索到下面这个,

471.68-desktop-win10-win11-64bit-international-dch-whql.exe
然后双击应用程序进行安装,安装成功。运行训练程序,成功开启GPU训练。

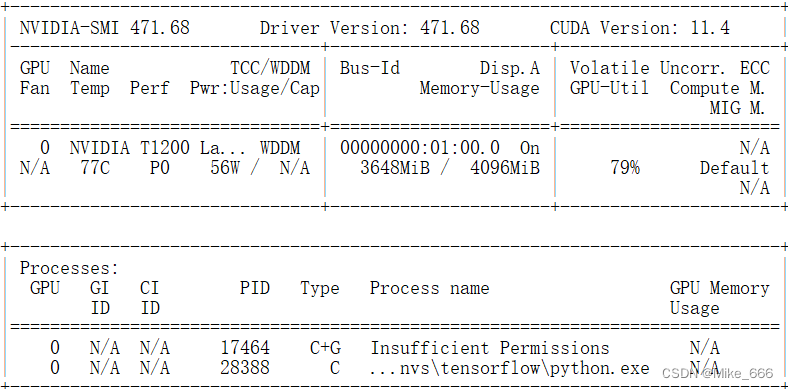
虽然显示的是CUDA Version:11.4,但是可以启动cuda10的加速库。

2024.04.07

--------------------------------------------------------------------------------------------

卸载CUDA10

用了两天之后,发现还是CUDA10.2应用广泛,稳定性强。下载CUDA10.2,在有CUDA10的前提下安装CUDA10.2,安装失败,想着估计还得把CUDA10卸载,才能安装上CUDA10.2。

卸载CUDA10的步骤:

1、把上述步骤倒回去,删除环境变量,删除cudnn。

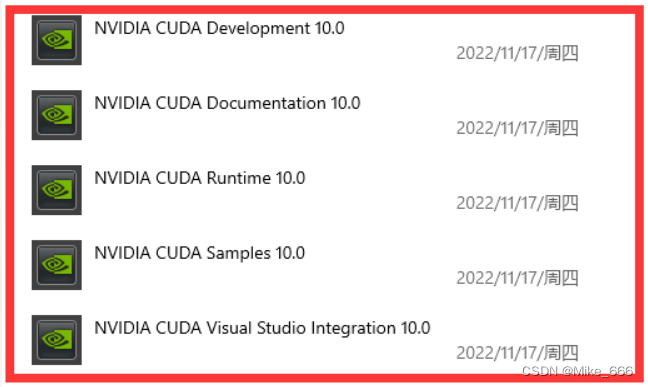
2、参考下面这个博客,卸载其中的5个,从Control Panel、Programs and Features中进行卸载,如果一次卸载不成功,重启电脑再次进行卸载。

Win10卸载cuda10.0,重装cuda11.0-CSDN博客

3、删除环境变量

C:\Program Files\NVIDIA GPU Computing Toolkit\CUDA\v10.2\cudnn\bin

C:\Program Files\NVIDIA GPU Computing Toolkit\CUDA\v10.2\extras\CUPTI\lib64

删除环境变量的方法
win11 系统环境变量下方的“新建 编辑 删除”是灰色的,无法点击_系统变量无法新增修改-CSDN博客
解决方法就是通过 管理员身份进入,从 “控制面板-系统和安全-系统-高级系统设置-环境变量”这种路径进入即可!

4、卸载完成后,重启一下电脑。

-------------------------------------------------------------------------

安装CUDA10.2

下载的cuda10.2和cudnn文件名如下:

cuda_10.2.89_441.22_win10.exe
cudnn-10.2-windows10-x64-v7.6.5.32.zip

按照安装CUDA10的步骤安装CUDA10.2。

---------------------------------------------------------------------------

安装MMSEG

参考资料

a、官方安装方案:

Get started: Install and Run MMSeg — MMSegmentation 1.2.2 documentation

b、民间安装方案:

【OpenMMLab实践】01MMSegmentation官方教程实现过程记录(mmcv,mmsegmentation,torch)_mmcv.utils的get_device-CSDN博客

Pytorch 和CUDA版本对应关系-腾讯云开发者社区-腾讯云

安装步骤:

1、安装Pytorch

# CUDA 10.2
conda install pytorch==1.9.0 torchvision==0.10.0 torchaudio==0.9.0 cudatoolkit=10.2 -c pytorch

2、测试torch和GPU是否可用

import torch
num_gpu = torch.cuda.device_count()
device = torch.device('cuda:0' if (torch.cuda.is_available() and num_gpu>0) else 'cpu')
print('Number of gpu:{}\nDevice:{}'.format(num_gpu,device))
torch.cuda.get_device_name(0)

输出:

Number of gpu:1
Device:cuda:0

3、按照官方步骤来

检查mmseg是否安装成功

# Check Pytorch installation
import torch, torchvision
print(torch.__version__, torch.cuda.is_available())

# Check MMSegmentation installation
import mmseg
print(mmseg.__version__)

输出:

1.9.0 True
1.2.2

4、验证推理的时候出现以下问题

(openmmlab) C:\Users\gjmhs4\mmsegmentation>python demo/image_demo.py demo/demo.png configs/pspnet/pspnet_r50-d8_4xb2-40k_cityscapes-512x1024.py pspnet_r50-d8_512x1024_40k_cityscapes_20200605_003338-2966598c.pth --device cuda:0 --out-file result.jpg
Traceback (most recent call last):
  File "demo/image_demo.py", line 6, in <module>
    from mmseg.apis import inference_model, init_model, show_result_pyplot
  File "c:\users\gjmhs4\mmsegmentation\mmseg\__init__.py", line 4, in <module>
    import mmcv
  File "C:\Users\gjmhs4\AppData\Local\conda\conda\envs\openmmlab\lib\site-packages\mmcv\__init__.py", line 4, in <module>
    from .image import *
  File "C:\Users\gjmhs4\AppData\Local\conda\conda\envs\openmmlab\lib\site-packages\mmcv\image\__init__.py", line 11, in <module>
    from .photometric import (adjust_brightness, adjust_color, adjust_contrast,
  File "C:\Users\gjmhs4\AppData\Local\conda\conda\envs\openmmlab\lib\site-packages\mmcv\image\photometric.py", line 8, in <module>
    from PIL import Image, ImageEnhance
  File "C:\Users\gjmhs4\AppData\Local\conda\conda\envs\openmmlab\lib\site-packages\PIL\Image.py", line 114, in <module>
    from . import _imaging as core
ImportError: DLL load failed while importing _imaging: The specified module could not be found.

解决方案:

[python-pillow] DLL load failed while importing _imaging: The specified module could not be found · Issue #11103 · msys2/MINGW-packages · GitHub

运行

pip install pillow==9.0.0

问题1解决。

再次运行上述指令:

python demo/image_demo.py demo/demo.png configs/pspnet/pspnet_r50-d8_4xb2-40k_cityscapes-512x1024.py pspnet_r50-d8_512x1024_40k_cityscapes_20200605_003338-2966598c.pth --device cuda:0 --out-file result.jpg

出现问题2

ModuleNotFoundError: No module named 'ftfy'

运行

pip install ftfy

问题解决,出现result.jpg图像。

20240410

  • 6
    点赞
  • 2
    收藏
    觉得还不错? 一键收藏
  • 0
    评论
自编译tensorflow: 1.python3.5,tensorflow1.12; 2.支持cuda10.0,cudnn7.3.1,TensorRT-5.0.2.6-cuda10.0-cudnn7.3; 3.无mkl支持; 软硬件硬件环境:Ubuntu16.04,GeForce GTX 1080 TI 配置信息: hp@dla:~/work/ts_compile/tensorflow$ ./configure WARNING: --batch mode is deprecated. Please instead explicitly shut down your Bazel server using the command "bazel shutdown". You have bazel 0.19.1 installed. Please specify the location of python. [Default is /usr/bin/python]: /usr/bin/python3 Found possible Python library paths: /usr/local/lib/python3.5/dist-packages /usr/lib/python3/dist-packages Please input the desired Python library path to use. Default is [/usr/local/lib/python3.5/dist-packages] Do you wish to build TensorFlow with XLA JIT support? [Y/n]: XLA JIT support will be enabled for TensorFlow. Do you wish to build TensorFlow with OpenCL SYCL support? [y/N]: No OpenCL SYCL support will be enabled for TensorFlow. Do you wish to build TensorFlow with ROCm support? [y/N]: No ROCm support will be enabled for TensorFlow. Do you wish to build TensorFlow with CUDA support? [y/N]: y CUDA support will be enabled for TensorFlow. Please specify the CUDA SDK version you want to use. [Leave empty to default to CUDA 10.0]: Please specify the location where CUDA 10.0 toolkit is installed. Refer to README.md for more details. [Default is /usr/local/cuda]: /usr/local/cuda-10.0 Please specify the cuDNN version you want to use. [Leave empty to default to cuDNN 7]: 7.3.1 Please specify the location where cuDNN 7 library is installed. Refer to README.md for more details. [Default is /usr/local/cuda-10.0]: Do you wish to build TensorFlow with TensorRT support? [y/N]: y TensorRT support will be enabled for TensorFlow. Please specify the location where TensorRT is installed. [Default is /usr/lib/x86_64-linux-gnu]://home/hp/bin/TensorRT-5.0.2.6-cuda10.0-cudnn7.3/targets/x86_64-linux-gnu Please specify the locally installed NCCL version you want to use. [Default is to use https://github.com/nvidia/nccl]: Please specify a list of comma-separated Cuda compute capabilities you want to build with. You can find the compute capability of your device at: https://developer.nvidia.com/cuda-gpus. Please note that each additional compute capability significantly increases your build time and binary size. [Default is: 6.1,6.1,6.1]: Do you want to use clang as CUDA compiler? [y/N]: nvcc will be used as CUDA compiler. Please specify which gcc should be used by nvcc as the host compiler. [Default is /usr/bin/gcc]: Do you wish to build TensorFlow with MPI support? [y/N]: No MPI support will be enabled for TensorFlow. Please specify optimization flags to use during compilation when bazel option "--config=opt" is specified [Default is -march=native -Wno-sign-compare]: Would you like to interactively configure ./WORKSPACE for Android builds? [y/N]: Not configuring the WORKSPACE for Android builds. Preconfigured Bazel build configs. You can use any of the below by adding "--config=" to your build command. See .bazelrc for more details. --config=mkl # Build with MKL support. --config=monolithic # Config for mostly static monolithic build. --config=gdr # Build with GDR support. --config=verbs # Build with libverbs support. --config=ngraph # Build with Intel nGraph support. --config=dynamic_kernels # (Experimental) Build kernels into separate shared objects. Preconfigured Bazel build configs to DISABLE default on features: --config=noaws # Disable AWS S3 filesystem support. --config=nogcp # Disable GCP support. --config=nohdfs # Disable HDFS support. --config=noignite # Disable Apacha Ignite support. --config=nokafka # Disable Apache Kafka support. --config=nonccl # Disable NVIDIA NCCL support. Configuration finished 编译: bazel build --config=opt --verbose_failures //tensorflow/tools/pip_package:build_pip_package 卸载已有tensorflow: hp@dla:~/temp$ sudo pip3 uninstall tensorflow 安装自己编译的成果: hp@dla:~/temp$ sudo pip3 install tensorflow-1.12.0-cp35-cp35m-linux_x86_64.whl
安装mmseg需要先安装mmcv,但是直接使用pip install mmcv可能会出现问题。根据引用中提供的解决方案,你可以按照以下步骤进行安装: 1. 打开https://github.com/open-mmlab/mmcv链接。 2. 根据你的cuda版本和torch版本选择合适的组合安装命令。 3. 遵循链接中的指示,继续滑动页面直到找到合适的安装命令。 4. 复制对应的安装命令,并在命令行中运行该命令。 安装mmseg时,你可以使用类似的方法找到对应的安装命令,并按照指示进行安装。记得先安装mmcv再安装mmseg。希望这个解决方案对你有帮助!<span class="em">1</span><span class="em">2</span><span class="em">3</span> #### 引用[.reference_title] - *1* [mmdet3D安装配置指南](https://blog.csdn.net/weixin_43583522/article/details/129923427)[target="_blank" data-report-click={"spm":"1018.2226.3001.9630","extra":{"utm_source":"vip_chatgpt_common_search_pc_result","utm_medium":"distribute.pc_search_result.none-task-cask-2~all~insert_cask~default-1-null.142^v92^chatsearchT0_1"}}] [.reference_item style="max-width: 50%"] - *2* *3* [【python】ModuleNotFoundError: No module named ‘mmseg‘ 或者 ModuleNotFoundError: No module named ...](https://blog.csdn.net/JJxiao520/article/details/130019622)[target="_blank" data-report-click={"spm":"1018.2226.3001.9630","extra":{"utm_source":"vip_chatgpt_common_search_pc_result","utm_medium":"distribute.pc_search_result.none-task-cask-2~all~insert_cask~default-1-null.142^v92^chatsearchT0_1"}}] [.reference_item style="max-width: 50%"] [ .reference_list ]

“相关推荐”对你有帮助么?

  • 非常没帮助
  • 没帮助
  • 一般
  • 有帮助
  • 非常有帮助
提交
评论
添加红包

请填写红包祝福语或标题

红包个数最小为10个

红包金额最低5元

当前余额3.43前往充值 >
需支付:10.00
成就一亿技术人!
领取后你会自动成为博主和红包主的粉丝 规则
hope_wisdom
发出的红包
实付
使用余额支付
点击重新获取
扫码支付
钱包余额 0

抵扣说明:

1.余额是钱包充值的虚拟货币,按照1:1的比例进行支付金额的抵扣。
2.余额无法直接购买下载,可以购买VIP、付费专栏及课程。

余额充值