 QT在Windows和Linux获取及修改网卡信息


QT中没有直接提供获取网关的接口,特此记录。并转载几个读取网卡信息并修改的例子。
利用qt自带的QNetworkInterface接口以及c++Iphlpapi库,获取当前windows电脑下的网卡型号、物理地址、ip地址、子网掩码、网关等信息。
在QT的.pro文件中增加
QT       += core gui
QT       += network

LIBS += -lIphlpapi
#include <QtNetwork/QNetworkInterface>

#include <iostream>
#include <Windows.h>
#include <iphlpapi.h>

#pragma comment(lib, "Iphlpapi.lib")


//获取对应网卡部分信息
BOOL MatchNetcardInfo(UiNetcardVersion &netcardVer)
{
    PIP_ADAPTER_INFO pIPAdapterInfo = new IP_ADAPTER_INFO();
    PIP_ADAPTER_INFO adapters = nullptr;
    ULONG size = sizeof(IP_ADAPTER_INFO);

    int nRet = GetAdaptersInfo(pIPAdapterInfo, &size);


    //pIPAdapterInfo内存不够,重新申请
    if (ERROR_BUFFER_OVERFLOW == nRet)
    {
        delete pIPAdapterInfo;
        pIPAdapterInfo = (PIP_ADAPTER_INFO)new byte[size];
        nRet = GetAdaptersInfo(pIPAdapterInfo, &size);
    }

    if (ERROR_SUCCESS == nRet)
    {
        adapters = pIPAdapterInfo;
        while (adapters)
        {
            //以XX-XX-XX-XX-XX-XX的形式输出MAC
            char buf[20]{0};
            sprintf(buf, "%02X:%02X:%02X:%02X:%02X:%02X", adapters->Address[0], adapters->Address[1], adapters->Address[2], adapters->Address[3], adapters->Address[4], adapters->Address[5]);

            QString macTmp = buf;
            if(macTmp != netcardVer.macAddr){
                adapters = adapters->Next;
                continue;
            }

            netcardVer.desc = adapters->Description;
            //可能网卡有多IP,因此通过循环去判断
            IP_ADDR_STRING* pIpAddrString = &(adapters->IpAddressList);
            do
            {
                netcardVer.ipAddr = pIpAddrString->IpAddress.String;
                netcardVer.netMask = pIpAddrString->IpMask.String;
                netcardVer.gateway = adapters->GatewayList.IpAddress.String;
                pIpAddrString = pIpAddrString->Next;
            } while (pIpAddrString);

            break;
        }
    }

    //释放分配的内存
    if (pIPAdapterInfo)
        delete pIPAdapterInfo;

    return true;
}

//获取网卡信息
void GetNetcardInfo(){
    QList<UiNetcardVersion> netcardList;
    netcardList.clear();


    QList<QNetworkInterface> interfaces = QNetworkInterface::allInterfaces();
    foreach(const QNetworkInterface& it, interfaces){

        if(QNetworkInterface::Loopback == it.type())
            continue;

        UiNetcardVersion netcardVer;
        //获取名称和mac地址
        netcardVer.name = it.humanReadableName();
        netcardVer.macAddr = it.hardwareAddress();
        //获取型号、ip地址、子网掩码、网关
        MatchNetcardInfo(netcardVer);
        //添加到容器
        netcardList.append(netcardVer);
    }
}
一个完整的例子:
websetclient.cc
#include "websetclient.hpp"
#include <QGroupBox>
#include <QLabel>
#include <QFile>
#include <QNetworkInterface>
#include <QProcess>
#include <QMessageBox>
#include <stdio.h>
#include <windows.h>
#include <Iphlpapi.h>
WebSetClient::WebSetClient(QWidget *parent)
: QMainWindow(parent)
{
//布局
initLayout();
//连接信号
connectSignals();
//显示Ip网卡等信息
showIP();
showwNetMask();
showGateWay();
showDNS();
}
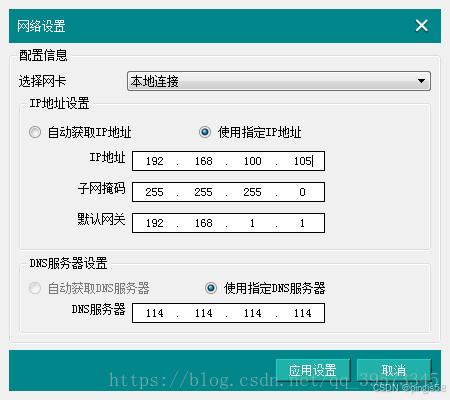
void WebSetClient:: initLayout()
{
QHBoxLayout *hbox1 = new QHBoxLayout;
QLabel *titleLabel = new QLabel("网络设置");
m_closebutton = new QPushButton;
m_closebutton->setIcon(QIcon(":/image/close"));
QWidget *widget1 = new QWidget;
widget1->setLayout(hbox1);
hbox1->addWidget(titleLabel);
hbox1->addStretch();
hbox1->addWidget(m_closebutton);
QGroupBox *infoGroupBox = new QGroupBox;
infoGroupBox->setTitle("配置信息");
QVBoxLayout *vbox2 = new QVBoxLayout;
infoGroupBox->setLayout(vbox2);
//选择网卡+本地连接,hbox11
QLabel *slctNetCard = new QLabel("选择网卡");
m_NetCardComboBox = new QComboBox;
QHBoxLayout *hbox11 = new QHBoxLayout;
hbox11->addWidget(slctNetCard,1);
hbox11->addWidget(m_NetCardComboBox,3);
//ip地址设置,vbox12
QGroupBox *ipGroupBox = new QGroupBox;
ipGroupBox->setTitle("IP地址设置");
QVBoxLayout *vbox12 = new QVBoxLayout;
ipGroupBox->setLayout(vbox12);
QHBoxLayout *hbox21 = new QHBoxLayout;
QHBoxLayout *hbox22 = new QHBoxLayout;
QHBoxLayout *hbox23 = new QHBoxLayout;
QHBoxLayout *hbox24 = new QHBoxLayout;
vbox12->addLayout(hbox21,1);
vbox12->addLayout(hbox22,1);
vbox12->addLayout(hbox23,1);
vbox12->addLayout(hbox24,1);
m_AutoIPRadioButton = new QRadioButton;
m_AutoIPRadioButton->setText("自动获取IP地址");
m_SpecifiedIPRadioButton = new QRadioButton;
m_SpecifiedIPRadioButton->setText("使用指定IP地址");
m_SpecifiedIPRadioButton->setChecked(true);
hbox21->addWidget(m_AutoIPRadioButton);
hbox21->addStretch(1);
hbox21->addWidget(m_SpecifiedIPRadioButton);
hbox21->addStretch(2);
QLabel *ipLabel = new QLabel(" IP地址");
ipLabel->setAlignment(Qt::AlignRight);
m_IPLineedit = new IPControl;
hbox22->addWidget(ipLabel,2);
hbox22->addWidget(m_IPLineedit,4);
hbox22->addStretch(2);
QLabel *maskLabel = new QLabel("子网掩码");
maskLabel->setAlignment(Qt::AlignRight);
m_SubNetMaskLineedit = new IPControl;
hbox23->addWidget(maskLabel,2);
hbox23->addWidget(m_SubNetMaskLineedit,4);
hbox23->addStretch(2);
QLabel *gatewayLabel = new QLabel("默认网关");
gatewayLabel->setAlignment(Qt::AlignRight);
m_DefaultGatewayLineedit = new IPControl;
hbox24->addWidget(gatewayLabel,2);
hbox24->addWidget(m_DefaultGatewayLineedit,4);
hbox24->addStretch(2);
//dns服务器设置,vbox13
QGroupBox *dnsGroupBox = new QGroupBox;
dnsGroupBox->setTitle("DNS服务器设置");
QVBoxLayout *vbox13 = new QVBoxLayout;
dnsGroupBox->setLayout(vbox13);
QHBoxLayout *hbox131 = new QHBoxLayout;
QHBoxLayout *hbox132 = new QHBoxLayout;
vbox13->addLayout(hbox131);
vbox13->addLayout(hbox132);
m_AutoDNSRadioButton = new QRadioButton;
m_AutoDNSRadioButton->setText("自动获取DNS服务器");
m_AutoDNSRadioButton->setEnabled(false);
m_SpecifiedDNSRadioButton = new QRadioButton;
m_SpecifiedDNSRadioButton->setText("使用指定DNS服务器");
m_SpecifiedDNSRadioButton->setChecked(true);
hbox131->addWidget(m_AutoDNSRadioButton);
hbox131->addStretch(1);
hbox131->addWidget(m_SpecifiedDNSRadioButton);
hbox131->addStretch(2);
QLabel *dnsLabel = new QLabel("DNS服务器");
dnsLabel->setAlignment(Qt::AlignRight);
m_DNSLineedit = new IPControl;
hbox132->addWidget(dnsLabel,2);
hbox132->addWidget(m_DNSLineedit,4);
hbox132->addStretch(2);
vbox2->addLayout(hbox11,1);
vbox2->addWidget(ipGroupBox,4);
vbox2->addWidget(dnsGroupBox,2);
//应用,取消
QHBoxLayout *hbox3 = new QHBoxLayout;
QWidget *widget3 = new QWidget;
widget3->setLayout(hbox3);
m_ApplyButton = new QPushButton("应用设置");
m_CancelButton = new QPushButton("取消");
hbox3->addStretch();
hbox3->addWidget(m_ApplyButton);
hbox3->addWidget(m_CancelButton);
//
QVBoxLayout *mainLayout = new QVBoxLayout;
mainLayout->addWidget(widget1);
mainLayout->addWidget(infoGroupBox);
mainLayout->addWidget(widget3);
QWidget *widget = new QWidget;
this->setCentralWidget(widget);
widget->setLayout(mainLayout);
//qss样式
m_ApplyButton->setStyleSheet("QPushButton{background:#20B2AA;"
"color:white;}");
m_CancelButton->setStyleSheet("QPushButton{background:#20B2AA;"
"color:white;}");
widget1->setStyleSheet("QWidget{background-color:#00868B;}");
widget3->setStyleSheet("QWidget{background-color:#00868B;}");
titleLabel->setStyleSheet("QLabel{color:white;}");
m_closebutton->setStyleSheet("QPushButton{background-color:#00868B;border:none;color:white;}");
this->setWindowFlags(Qt::FramelessWindowHint);
this->resize(450,400);
}
void WebSetClient::connectSignals()
{
connect(m_closebutton,SIGNAL(clicked(bool)),this,SLOT(close()));
connect(m_CancelButton,SIGNAL(clicked(bool)),this,SLOT(close()));
connect(m_AutoIPRadioButton,SIGNAL(clicked(bool)),this,SLOT(onAutoIPButtonclicked()));
connect(m_SpecifiedIPRadioButton,SIGNAL(clicked(bool)),this,SLOT(onSpIpButtonclicked()));
connect(m_AutoDNSRadioButton,SIGNAL(clicked(bool)),this,SLOT(onAutoDNSButtonclicked()));
connect(m_SpecifiedDNSRadioButton,SIGNAL(clicked(bool)),this,SLOT(onSpDNSButtonclicked()));
connect(m_ApplyButton,SIGNAL(clicked(bool)),this,SLOT(onApplyButtonclicked()));
}
void WebSetClient::showIP()
{
// 获取第一个本主机的IPv4地址
QList<QHostAddress> ipAddressesList = QNetworkInterface::allAddresses();
int nListSize = ipAddressesList.size();
QString IP;
for (int i = 0; i < nListSize; ++i)
{
if (ipAddressesList.at(i) != QHostAddress::LocalHost &&
ipAddressesList.at(i).toIPv4Address()) {
IP = ipAddressesList.at(1).toString();
m_IPLineedit->setText(IP);
}
}
if (IP.isEmpty())
m_IPLineedit->setText(QHostAddress(QHostAddress::LocalHost).toString());
}
void WebSetClient::showwNetMask(){
//筛选可用的非环路接口
QList<QNetworkInterface> ifaceList = QNetworkInterface::allInterfaces();
for (int i = 0; i < ifaceList.count(); i++)
{
QNetworkInterface var = ifaceList.at(i);
//获取子网掩码
QList<QNetworkAddressEntry> entryList = var.addressEntries();
foreach(QNetworkAddressEntry entry,entryList){
m_SubNetMaskLineedit->setText(entry.netmask().toString());
}
if(var.isValid()
&& !var.flags().testFlag(QNetworkInterface::IsLoopBack)
&& var.flags().testFlag(QNetworkInterface::IsRunning))
{
m_NetCardComboBox->addItem(var.humanReadableName());
}
}
}
void WebSetClient::showGateWay(){
PIP_ADAPTER_INFO pIpAdapterInfo = new IP_ADAPTER_INFO();
unsigned long stSize = sizeof(IP_ADAPTER_INFO);
int nRel = GetAdaptersInfo(pIpAdapterInfo,&stSize);
if (ERROR_BUFFER_OVERFLOW == nRel){
delete pIpAdapterInfo;
pIpAdapterInfo = (PIP_ADAPTER_INFO)new BYTE[stSize];
GetAdaptersInfo(pIpAdapterInfo,&stSize);
}
m_DefaultGatewayLineedit->setText(pIpAdapterInfo->GatewayList.IpAddress.String);
}
void WebSetClient::showDNS(){
FIXED_INFO *FixedInfo = (FIXED_INFO *) GlobalAlloc(GPTR, sizeof(FIXED_INFO));
unsigned long ulOutBufLen = sizeof(FIXED_INFO);
GetNetworkParams(FixedInfo, &ulOutBufLen);
m_DNSLineedit->setText(FixedInfo->DnsServerList.IpAddress.String);
}
WebSetClient::~WebSetClient()
{
}
void WebSetClient::onAutoIPButtonclicked(){
m_IPLineedit->setEnabled(false);
m_SubNetMaskLineedit->setEnabled(false);
m_DefaultGatewayLineedit->setEnabled(false);
m_SpecifiedDNSRadioButton->setChecked(true);
m_AutoDNSRadioButton->setEnabled(true);
m_IPLineedit->setText(" . . . ");
m_DefaultGatewayLineedit->setText(" . . . ");
m_SubNetMaskLineedit->setText(" . . . ");
}
void WebSetClient::onSpIpButtonclicked(){
m_IPLineedit->setEnabled(true);
m_SubNetMaskLineedit->setEnabled(true);
m_DefaultGatewayLineedit->setEnabled(true);
m_SpecifiedDNSRadioButton->setChecked(true);
m_AutoDNSRadioButton->setEnabled(false);
}
void WebSetClient::onAutoDNSButtonclicked(){
m_DNSLineedit->setEnabled(false);
m_DNSLineedit->setText(" . . . ");
}
void WebSetClient::onSpDNSButtonclicked(){
m_DNSLineedit->setEnabled(true);
}
void WebSetClient::onApplyButtonclicked(){
if(m_SpecifiedIPRadioButton->isChecked()){
QString name = m_NetCardComboBox->currentText();
QString ip = m_IPLineedit->text();
QString netmask = m_SubNetMaskLineedit->text();
QString gateway = m_DefaultGatewayLineedit->text();
QString dns = m_DNSLineedit->text();
QProcess p1(this);
QProcess p2(this);
QString ipmaskgateway = "netsh interface ip set address " + name + " static "+ ip + QString(" ") + netmask + QString(" ") + gateway + " 1";
QString adddns = "netsh interface ip set dns " + name + " static " + dns;
QStringList arguments1;
QStringList arguments2;
arguments1 << "/c" << ipmaskgateway;
arguments2 << "/c" << adddns;
p1.start("cmd",arguments1);
p1.waitForFinished(3000);
p2.start("cmd",arguments2);
p2.waitForFinished(3000);
QString strResult1 = QString::fromLocal8Bit(p1.readAllStandardOutput());
QString strResult2 = QString::fromLocal8Bit(p2.readAllStandardOutput());
QMessageBox msgBox(this);
msgBox.setText("IP: "+ strResult1 + "DNS: "+ strResult2);
msgBox.exec();
}
else if (m_AutoIPRadioButton->isChecked())
{
QMessageBox msg(this);
msg.setText("暂不支持");
msg.exec();
}
}main.cc
#include "websetclient.hpp"
#include <QApplication>
#include <QDir>
#include <QTextCodec>
#include <QCoreApplication>

int main(int argc, char *argv[])
{
    QApplication a(argc, argv);
    QDir::setCurrent(QApplication::applicationDirPath());
    QTextCodec::setCodecForCStrings(QTextCodec::codecForName("UTF-8"));//set QString codec
    WebSetClient w;
    w.show();
    return a.exec();
}
websetclient.hpp
#ifndef WEBSETCLIENT_HPP
#define WEBSETCLIENT_HPP

#include <QMainWindow>
#include <QLineEdit>
#include <QVBoxLayout>
#include <QHBoxLayout>
#include <QRadioButton>
#include <QPushButton>
#include <QComboBox>
#include <QWidget>
#include "ipcontrol.hpp"
class WebSetClient : public QMainWindow
{
    Q_OBJECT

public:
    WebSetClient(QWidget *parent = 0);
    ~WebSetClient();

private:
    void initLayout();
    void connectSignals();
    void showIP();
    void showGateWay();
    void showwNetMask();
    void showDNS();
private:
    IPControl *m_IPLineedit;
    IPControl *m_SubNetMaskLineedit;
    IPControl *m_DefaultGatewayLineedit;
    IPControl *m_DNSLineedit;
    QRadioButton *m_AutoIPRadioButton;
    QRadioButton *m_SpecifiedIPRadioButton;
    QRadioButton *m_AutoDNSRadioButton;
    QRadioButton *m_SpecifiedDNSRadioButton;
    QPushButton *m_ApplyButton;
    QPushButton *m_CancelButton;
    QComboBox *m_NetCardComboBox;
    QPushButton *m_closebutton;
public slots:
    void onAutoIPButtonclicked();
    void onSpIpButtonclicked();
    void onAutoDNSButtonclicked();
    void onSpDNSButtonclicked();
    void onApplyButtonclicked();
};

#endif // WEBSETCLIENT_HPP
这里的IP编辑栏可以用lineedit来代替
其他相关LINUX,WINDOWS系统相关的资料
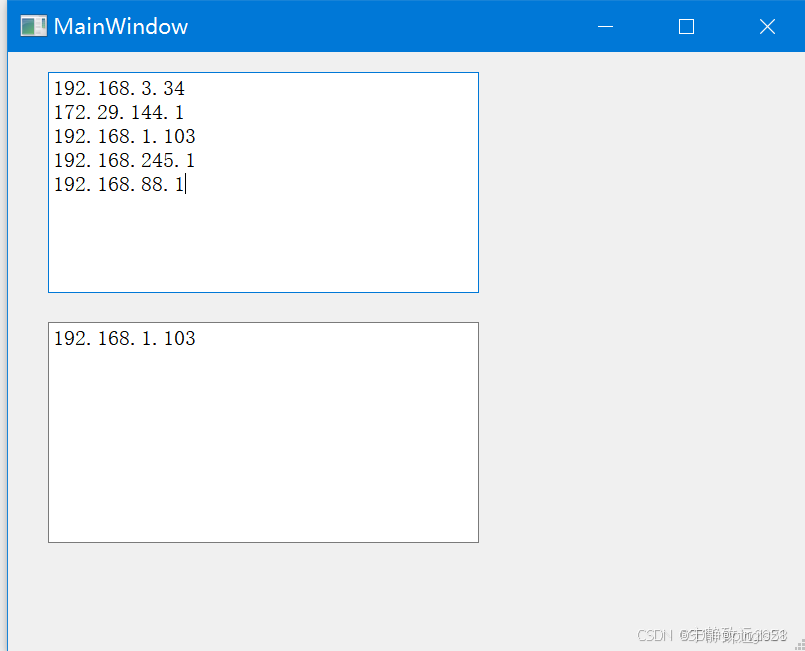
Chapter1 QT 获取本机所有 IP 地址
获取本机所有 IP 地址,包括 IPV6的地址,需要引用 QNetworkInterface
void MainWindow::getLocalIPs()
{
    QString strIP;
    QList<QHostAddress> ipAddressesList;
       QList<QNetworkInterface> interfaces = QNetworkInterface::allInterfaces();
       foreach (QNetworkInterface interface, interfaces) {
           if (interface.flags() & QNetworkInterface::IsUp && !(interface.flags() & QNetworkInterface::IsLoopBack)) {
               QList<QNetworkAddressEntry> addressEntries = interface.addressEntries();
               foreach (QNetworkAddressEntry entry, addressEntries) {
                    //只获取IPV4地址
                    if (entry.ip().protocol() == QAbstractSocket::IPv4Protocol)
                       ipAddressesList.append(entry.ip());
               }
           }
       }


       // 输出所有 IP 地址
       foreach (QHostAddress address, ipAddressesList) {
           strIP = address.toString();
           qDebug() << strIP;
           ui->textEdit->append(address.toString());
           //判断是否含有192.168.1.x IP地址
           if(strIP.contains("192.168.1", Qt::CaseInsensitive))
           {
               ui->textEdit_2->append(strIP);
           }

       }

}
QNetworkInterface 是 Qt 框架中用于检索和处理网络接口的类。它提供了获取本地系统中所有网络接口的信息的能力,并允许访问与这些接口相关的属性,比如IP地址、硬件地址、接口名称等。
以下是一些关于 QNetworkInterface 类的主要功能和应用场景的说明:
1.检索所有网络接口:
通过 QNetworkInterface::allInterfaces() 可以获取当前设备的所有网络接口的列表。这在构建网络工具、诊断工具或其他与网络相关的应用时很有用。
QList<QNetworkInterface> interfaces = QNetworkInterface::allInterfaces();
2.获取接口的详细信息:
每个 QNetworkInterface 对象包含接口的属性,如硬件地址、接口名称、标志(如是否为环回、是否可用、是否为无线等)。
for (const QNetworkInterface &interface : interfaces) {
    QString name = interface.name(); // 接口名称
    QString hardwareAddress = interface.hardwareAddress(); // MAC 地址
    QFlags<QNetworkInterface::InterfaceFlag> flags = interface.flags(); // 接口标志
}
3.获取接口的 IP 地址:
你可以通过 QNetworkInterface::allAddresses() 获取与特定接口关联的所有 IP 地址。这些地址可能是 IPv4 或 IPv6。
QList<QHostAddress> addresses = interface.allAddresses();
for (const QHostAddress &address : addresses) {
    if (address.protocol() == QAbstractSocket::IPv4Protocol) {
        qDebug() << "IPv4 address:" << address.toString();
    } else if (address.protocol() == QAbstractSocket::IPv6Protocol) {
        qDebug() << "IPv6 address:" << address.toString();
    }
}
4.用于网络诊断和监控:
QNetworkInterface 可以帮助构建用于诊断和监控网络状态的工具。例如,查看设备上所有网络接口的状态、检测网络连接问题、获取接口相关信息等。
Chapter2 Qt|判断一个qstring是否包含某串字符
原文链接:Qt|判断一个qstring是否包含某串字符_qstring判断字符串里包含的字符-CSDN博客
QString判断2个字符是否相同
    QString nameString = QString::fromLocal8Bit("admin");
    //判断方法一
    if(nameString == QString::fromLocal8Bit("admin")){
        qDebug() << "相同";
    }

    //判断方法二
    if(nameString.compare(QString::fromLocal8Bit("admin")) == 0){
        qDebug() << "compare相同";
    }
QString判断是否包含某个字符串
    QString urlString = QString("http://baidu/deviceinfo");
    if(urlString.contains("deviceinfo",Qt::CaseSensitive)){
        qDebug() << "包含了";
    }
上面代码中Qt::CaseSensitivity 为枚举类型, 可取值Qt::CaseSensitive 和 Qt::CaseInsensitive, 表示匹配的灵敏度,
Qt::CaseSensitive 代表区分大小写;Qt::CaseInsensitive 代表不区分大小,可以自行尝试;
QString字符串的截取
    QString deviceString = QString("202010103102855125");
    QString deviceString1 = deviceString.mid(0,4);
    qDebug() << "deviceString1" << deviceString1;
    QString deviceString2 = deviceString.mid(4,2);
    qDebug() << "deviceString2" << deviceString2;
从QString mid(int position, int n = -1) const方法就可以看出来,第一个参数是截取位置,第二个参数是截取长度,可以自行尝试;
Chapter3 QT5修改windows电脑IP地址
原文链接:https://blog.csdn.net/fangye945a/article/details/84981525
1、QT修改IP地址程序原理
通过系统调用windows的dos命令来修改IP地址。
例如:netsh interface ip set address “WLAN” static 192.168.10.88 255.255.255.0 192.168.10.1
该条命令的意思是将名为WLAN的网卡的IP地址修改为静态IP,192.168.10.88,子网掩码为255.255.255.0,网关为192.168.10.1。
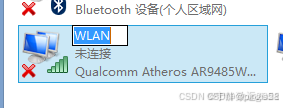
网卡名称查看:网络和共享中心→更改适配器设置
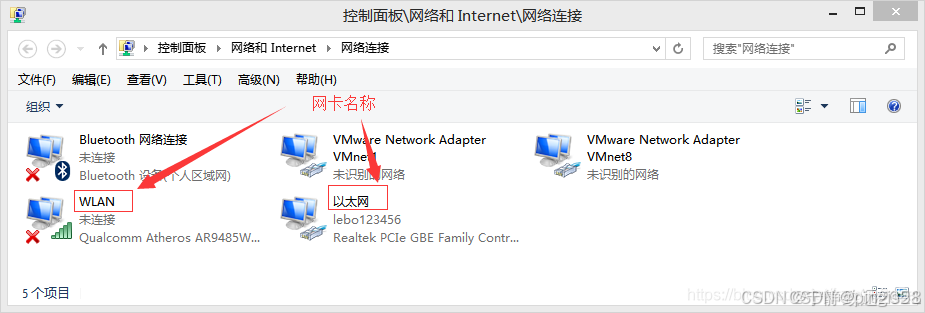
当然,也可以自行修改网卡名,只要保证dos命令中的网卡名跟实际网卡名一致即可。
2、QT调用dos命令
其实使用方法跟linux中的system()系统调用类似,这里是使用QProcess来调用。
首先包含头文件:
#include <QProcess>
然后参考如下代码修改IP:
QProcess *process = new QProcess();
QString cmd = "netsh interface ip set address ";
cmd +="\"WLAN\" ";     //网卡名称要加双引号
cmd +="static ";
cmd += ui->lineEdit()->text(); //从界面上获取IP地址
cmd +=" 255.255.255.0 ";
cmd += "192.168.10.1";
qDebug()<<"cmd = "<<cmd;
process->start(cmd);   //执行dos命令
process->waitForFinished(); //等待执行完成
delete process;
注意命令dos命令之间的空格,程序执行结果如下:

3、注意事项
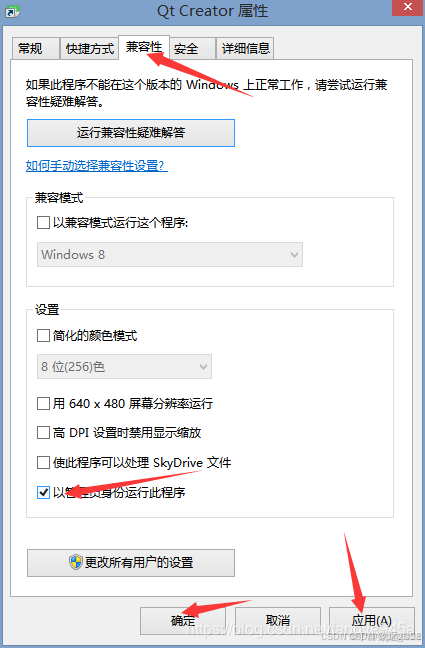
-------------------------------The last but not least --------------------------------------
打开QT时和打开发布的程序时,一定要以管理员身份运行,否则使用该方法修改不了IP。建议在qt程序 属性->兼容性 中勾选以管理员身份运行选项。
Chapter4 Qt Qprocess 调用linux命令修改ip地址(通过shell命令)
原文链接:https://blog.csdn.net/jhonsss/article/details/131224408
Qprocess类用于调用外部程序,可以和他们通信。接口建议去看qt官方文档
1.用ui画个简单的界面。
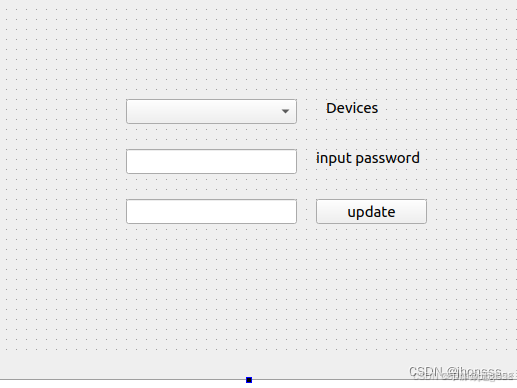
2.获取网卡,提供一个combox供用户选择
QList<QNetworkInterface> list = QNetworkInterface::allInterfaces();//获取网卡放到list中
    foreach (QNetworkInterface interface, list) {    //取出list节点中的QNetworkInterface
        qDebug()<<"Device:" <<interface.name();
        ui->devcieList->addItem(interface.name());//添加到combox中
3.点击update时完成修改对应text里的ip,跳转槽后开始编辑代码:
1.初始化一个Qstring对象用来存命令:
QString cmd = "sudo -S ifconfig ";
    cmd += ui->devcieList->currentText() + " "; //combox获取网卡
    cmd += ui->inputip->text();
    cmd += " netmask 255.255.255.0";
    cmd += " \n";
    qDebug() << "cmd" <<cmd;
2.声明一个Qprocess对象用来进行shell命令执行
QProcess process;
    process.setProcessChannelMode(QProcess::MergedChannels);
    process.start("bash");
    if(!process.waitForStarted())
    {
        qDebug() << "Failed to start process";
        return;
    }

    process.write(cmd.toUtf8());
    process.waitForBytesWritten();

    QString passwd = ui->passwd->text() + "\n";         //text上读取密码
    process.write(passwd.toUtf8());
    process.waitForBytesWritten();
    process.closeWriteChannel();
    process.waitForFinished();

    QString output = process.readAll();
    qDebug() << "output:" <<output;
setProcessChannelMode:设置process信道模式;
start:在新进程中启动给定程序,bash进入linux shell执行步骤;不阻塞状态;
write:开始读cmd中的命令行。
waitforBytesWritten:阻塞等待write结束。
这样输入新的ip地址后就可以修改linux本机的IP了,注意需要以管理员权限。
Chapter5 在windows10下面使用QProcess配置IP信息
原文链接:https://blog.csdn.net/xingchen_youyou/article/details/117522718
首先可以参考两篇文件,在windows下面使用cmd命令配置IP
和Qt Creator 应用程序带有管理员权限。
https://blog.csdn.net/xingchen_youyou/article/details/117522288
https://blog.csdn.net/xingchen_youyou/article/details/117521167
1、新建工程 应用程序 Qt Gui应用 pro文件增加 QT += core gui network

2、增加4个pushbutton,实现下面4个功能。
process1.readAllStandardOutput()会输出很多有用的信息(比如权限问题和命令语法问题),方便调试,因为直接process1.start(“cmd.exe”)跳不出cmd界面。使用cmd命令需要增加"/c"。其实/C 是 /Close的简写,是命令运行之后关闭窗口的意思。
//显示当前目录下的文件
void Widget::on_pushButton_clicked()
{
    QProcess process1(this);
    //process1.start("C:/Users/50338/Desktop/zeal-portable-0.6.1-windows-x64/zeal.exe"); //ok
    //process1.start("C:/Windows/System32/regedt32.exe");
    //process1.start("C:/Windows/System32/keygen.exe");//打不开
    QStringList list1;
    list1 << "/c" << "dir"; //增加这个Ok,没这个不行
    process1.start("cmd",list1);
    process1.waitForStarted();
    process1.waitForFinished();
    QString temp = QString::fromLocal8Bit(process1.readAllStandardOutput());
    qDebug() << "standard output:" << temp;
    qDebug() << "finish";
}

//运行C:/keygen.exe命令
void Widget::on_pushButton_2_clicked()
{
    QProcess process1(this);
    process1.start("C:/keygen.exe");//ok
    process1.waitForStarted();
    process1.waitForFinished();
    QString temp = QString::fromLocal8Bit(process1.readAllStandardOutput());
    qDebug() << "standard output:" << temp;
    qDebug() << "finish";
}

//配置动态IP
void Widget::on_pushButton_3_clicked()
{
    QString cmdline1 = "netsh interface ipv4 set address name=\"WLAN\" source=dhcp";
    QProcess process1(this);
    QStringList list1;
    list1 << "/c" << cmdline1; //增加这个Ok 需要增加 /c
    process1.start("cmd",list1);
    process1.waitForStarted();
    process1.waitForFinished();
    QString temp = QString::fromLocal8Bit(process1.readAllStandardOutput());
    qDebug() << "standard output:" << temp;
}

//配置静态IP和DNS
void Widget::on_pushButton_4_clicked()
{
    QString name = "WLAN";
    QString ip = "192.168.1.113";
    QString cmdline1 = "netsh interface ipv4 set address name= " + name + " source=static address=" + ip + " mask=255.255.255.0 gateway=192.168.1.201 gwmetric=1";
    //QString cmdline1 = "net localgroup administrators 50338 /add";
    QString cmdline2 = "set dnsservers name=" + name + "source=static address=192.168.1.201 register=primary";
    QStringList list2;
    list2 << "/c" << cmdline2;
    QProcess process1(this);
    QStringList list1;
    list1 << "/c" << cmdline1; //增加这个Ok
    process1.start("cmd",list1);
    process1.waitForStarted();
    process1.waitForFinished();
    QString temp = QString::fromLocal8Bit(process1.readAllStandardOutput());

    qDebug() << "standard output 1:" << temp;
    process1.start("cmd",list2);
    process1.waitForStarted();
    process1.waitForFinished();
    temp = QString::fromLocal8Bit(process1.readAllStandardOutput());
    qDebug() << "standard output 2:" << temp;
}
Chapter6 手动修改ARM Linux的静态IP和用QT获取和修改IP
https://blog.csdn.net/weixin_30906185/article/details/98092961?spm=1001.2101.3001.6650.17&utm_medium=distribute.pc_relevant.none-task-blog-2%7Edefault%7EBlogCommendFromBaidu%7ERate-17-98092961-blog-7165287.235%5Ev43%5Epc_blog_bottom_relevance_base2&depth_1-utm_source=distribute.pc_relevant.none-task-blog-2%7Edefault%7EBlogCommendFromBaidu%7ERate-17-98092961-blog-7165287.235%5Ev43%5Epc_blog_bottom_relevance_base2&utm_relevant_index=18
1 vi /etc/network/interfaces
2 #   找到“# Wired or wireless interfaces”
3 2、注释掉 iface eth0 inet dhcp  这是自动获取ip地址
4 3、增加下面语句:
5          iface eth0 inet static
6          address 192.168.1.79
7          netmask 255.255.255.0
8          network 192.168.1.0
9          gateway 192.168.1.1
10 4、保存
11 5、/etc/init.d/networking restart
如何用QT获取和修改IP【转载】
如何用QT读写IP。或者是获取并修改IP。WINDOWS和LINUX下都试过可行_qt 读取修改wifiip-CSDN博客
这是第一种方式
//读取部分

   QSettings *ConfigIni = new QSettings("/etc/eth0-setting",QSettings::IniFormat,0);
   ui->ipInfoLineEdit->setText(ConfigIni->value("IP").toString());//IP地址
   ui->maskInfoLineEdit->setText(ConfigIni->value("Mask").toString()); //子网掩码
   ui->gatewayInfoLineEdit->setText(ConfigIni->value("Gateway").toString());//子网掩码
   ui->dnsInfoLineEdit->setText(ConfigIni->value("DNS").toString());//DNS
   ui->macInfoLineEdit->setText(ConfigIni->value("MAC").toString());//mac

//修改部分

void ipset::ipconfig_set_infile()
{
   //删除原有配置文件
   QDir rmfile;
   rmfile.remove("/etc/eth0-setting");//WINDOWS下就可以不用这两句

   QSettings *ipConfigIni = new QSettings("/etc/eth0-setting",QSettings::IniFormat,0);
   ipConfigIni->setIniCodec("UTF-8");           //设置文件格式为UTF-8
   ipConfigIni->setValue("IP",ui->ipInfoLineEdit->text());//写入配置文件中Ip配置参数
   ipConfigIni->setValue("Mask",ui->maskInfoLineEdit->text());//写入配置文件中Mask配置参数
   ipConfigIni->setValue("Gateway",ui->gatewayInfoLineEdit->text());//写入配置文件中Gateway配置参数
   ipConfigIni->setValue("DNS",ui->dnsInfoLineEdit->text());
   ipConfigIni->setValue("MAC",ui->macInfoLineEdit->text());

}
函数时用Qt下的QSttings。相关内容大家自己看
需要注意的是在linux下,覆盖不了原文件,需要调用QDir::remove函数,先删除再生成。
WINDOWS下就直接覆盖的。
第二种方法是采用QT自带的函数QList< QNetworkInterface >
用这个类可以获取系统底层的网络参数,经过实践是可行的,我参考的文章:http://qt.csdn.net/articles.aspx?pointid=489&pointid2=7
 QList<QNetworkInterface> list = QNetworkInterface::allInterfaces();
      //获取所有网络接口的列表
    foreach(QNetworkInterface interface,list)
      {  //遍历每一个网络接口
      if(interface.name()=="eth0")//我的端口是eth0,你的需要根据自己的来判断
          {
          qDebug() << "Device: "<<interface.name();
          //设备名
          qDebug() << "HardwareAddress: "<<interface.hardwareAddress();
          //硬件地址
          QList<QNetworkAddressEntry> entryList = interface.addressEntries();
          //获取IP地址条目列表,每个条目中包含一个IP地址,一个子网掩码和一个广播地址
          foreach(QNetworkAddressEntry entry,entryList)
                  {  //遍历每一个IP地址条目
					if( entry.ip().toString().size() < 16)//区分IPV6和IPV4
                      {
                qDebug()<<"IP Address: "<<entry.ip().toString();
                 //IP地址
               qDebug()<<"Netmask: "  <<entry.netmask().toString();
                    //子网掩码
              qDebug()<<"Broadcast: "<<entry.broadcast().toString();
                    //广播地址

               ui->ipInfoLineEdit->setText(entry.ip().toString());
               ui->maskInfoLineEdit->setText(entry.netmask().toString());
               ui->gatewayInfoLineEdit->setText(entry.broadcast().toString());
Chapter7 Win下,Qt更改电脑IP、子网掩码和网关
转自:
windows c++qt获取本机网卡信息_qt获取本机的网卡-CSDN博客
https://blog.csdn.net/m0_46577050/article/details/143126132
QT 实现WINDOWS下网络设置功能(IP、子网掩码、网关、DNS)_qnetworkaddressentry setip-CSDN博客


 1201
1201

 被折叠的 条评论
为什么被折叠?
被折叠的 条评论
为什么被折叠?
 到【灌水乐园】发言


