


1 进程
1.1 multiprocessing(跨平台的多进程模块)
在Unix/Linux下,multiprocessing模块封装了fork()调用,而Windows没有fork()调用,因此multiprocessing需要模拟fork。因为父进程所有Python对象都必须通过pickle序列化再传到子进程去,如果multiprocessing在Windows下调用失败了,要先考虑是不是pickle失败了。
Process(进程对象类)
Process(target, args):创建一个进程对象。target为进程执行的函数,args为函数的参数,args是元组,注意单个元素的元组写法。
Process.start():启动子进程。
Process.join():在父进程中调用(Process为子进程对象),等待子进程结束。
Process.terminate():强行终止子进程。
#!/bin/env python
# -*- coding: utf-8 -*-

from multiprocessing import Process
import os

def run_proc(args):
    print('Child process %s is running, args %s.' % (os.getpid(), args))

if __name__ == '__main__':
    print('Parent process %s.' % os.getpid())
    p = Process(target=run_proc, args=('child process 1',))
    print('Child process will start.')
    p.start()
    p.join()
    print('Child process is finished.')
Pool(进程池)
- Pool(n):创建进程池,n为进程池中进程的数量。
- Pool.apply_async(target, args):添加进程,参数target和args的含义与Process相同。如果添加的进程数量超过进程池的大小,多出来的进程暂时等待,但是apply_async()函数异步返回。
- Pool.close():调用join()之前必须先调用close(),调用close()之后就不能继续添加进程。
- Pool.join():等待所有子进程结束。
#!/bin/env python
# -*- coding: utf-8 -*-
from multiprocessing import Pool
import os, time, random
def long_time_task(name):
    print('Run task %s (%s)...' % (name, os.getpid()))
    start = time.time()
    time.sleep(random.random() * 3)
    end = time.time()
    print('Task %s runs %0.2f seconds.' % (name, (end - start)))
if __name__=='__main__':
    print('Parent process %s.' % os.getpid())
    p = Pool(4)
    for i in range(5):
        p.apply_async(long_time_task, args=(i,))
    print('Waiting for all subprocesses done...')
    p.close()
    p.join()
    print('All subprocesses done.')
Queue(进程间通信)
- Queue.put(value):写数据
- Queue.get():读数据
managers(分布式进程)
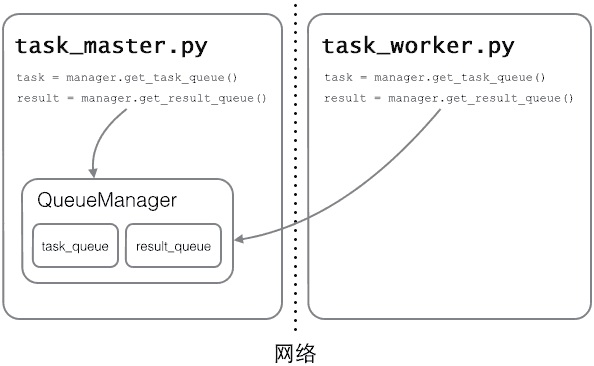
例:如果已经实现了通过Queue通信的多进程程序在一台机器上运行,现在希望把派发任务的进程和处理任务的进程分布到两台机器上。
服务进程负责启动Queue,把Queue注册到网络上,然后往Queue里面写入任务。使用分布式多进程时,添加任务到Queue不可以直接对原始的Queue对象进行操作,必须通过manager.get_task_queue()获得的Queue接口。(实际上就是RPC,服务进程向Queuemanager注册名为get_task_queue的RPC,任务进程通过这个名字获取Queue)
Queue的作用是用来传递任务和接收结果,任务和结果的描述数据要尽量小。比如发送一个处理日志文件的任务,就不要发送几百兆的日志文件本身,而是发送日志文件存放的完整路径,由Worker进程再去共享的磁盘上读取文件。
# task_master.py

import random, time, queue
from multiprocessing.managers import BaseManager

# 发送任务的队列:
task_queue = queue.Queue()
# 接收结果的队列:
result_queue = queue.Queue()

# 从BaseManager继承的QueueManager:
class QueueManager(BaseManager):
    pass

# 把两个Queue都注册到网络上, callable参数关联了Queue对象:
QueueManager.register('get_task_queue', callable=lambda: task_queue)
QueueManager.register('get_result_queue', callable=lambda: result_queue)
# 绑定端口5000, 设置验证码'abc':
manager = QueueManager(address=('', 5000), authkey=b'abc')
# 启动Queue:
manager.start()
# 获得通过网络访问的Queue对象:
task = manager.get_task_queue()
result = manager.get_result_queue()
# 放几个任务进去:
for i in range(10):
    n = random.randint(0, 10000)
    print('Put task %d...' % n)
    task.put(n)
# 从result队列读取结果:
print('Try get results...')
for i in range(10):
    r = result.get(timeout=10)
    print('Result: %s' % r)
# 关闭:
manager.shutdown()
print('master exit.')

# task_worker.py

import time, sys, queue
from multiprocessing.managers import BaseManager

# 创建类似的QueueManager:
class QueueManager(BaseManager):
    pass

# 由于这个QueueManager只从网络上获取Queue,所以注册时只提供名字:
QueueManager.register('get_task_queue')
QueueManager.register('get_result_queue')

# 连接到服务器,也就是运行task_master.py的机器:
server_addr = '127.0.0.1'
print('Connect to server %s...' % server_addr)
# 端口和验证码注意保持与task_master.py设置的完全一致:
m = QueueManager(address=(server_addr, 5000), authkey=b'abc')
# 从网络连接:
m.connect()
# 获取Queue的对象:
task = m.get_task_queue()
result = m.get_result_queue()
# 从task队列取任务,并把结果写入result队列:
for i in range(10):
    try:
        n = task.get(timeout=1)
        print('run task %d * %d...' % (n, n))
        r = '%d * %d = %d' % (n, n, n*n)
        time.sleep(1)
        result.put(r)
    except Queue.Empty:
        print('task queue is empty.')
# 处理结束:
print('worker exit.')
2 线程(threading)
适用场景:I/O密集型操作。对于计算密集型任务,应该使用Python多进程。
GIL锁:Python的线程虽然是真正的线程,但解释器执行代码时,有一个GIL锁(Global Interpreter Lock),任何Python线程执行前,必须先获得GIL锁,然后每执行100条字节码,解释器就自动释放GIL锁,让别的线程有机会执行。这个GIL全局锁实际上把所有线程的执行代码都给上了锁,所以多线程在Python中只能交替执行,即使100个线程跑在100核CPU上,也只能用到1个核。
GIL是Python解释器设计的历史遗留问题,通常我们用的解释器是官方实现的CPython,要真正利用多核,除非重写一个不带GIL的解释器。所以在Python中,可以使用多线程,但不要指望能有效利用多核。如果一定要通过多线程利用多核,有两种办法:通过C扩展来实现,但这样就失去了Python简单易用的特点;通过多进程实现多核任务。多个Python进程有各自独立的GIL锁,互不影响。
2.1 线程管理
- threading.Thread(target, name):创建线程对象,target为线程函数,name为线程名,如果不起名字Python就自动给线程命名为Thread-1,Thread-2。
- Thread.start():启动线程(启动的是调用start()的threading实例对象)。
- Thread.join(timeout):主线程阻塞等待子线程结束。如果超过timeout秒子线程还没结束,主线程会杀死daemon的子线程*,否则主线程自己返回,子线程继续执行直到返回为止。
- Thread.daemon = True:设置为守护线程。
import threading, time

def fun():
    print("thread start")
    time.sleep(3)
    print("thread end")

print("main start")
t = threading.Thread(target=fun)
t.daemon = True
t.start()
t.join()
print("main end")

t.join() #不论子线程是不是daemon,主线程都等待子线程结束
main start
thread start
thread end
main end

t.join(1) && t.daemon == True #主线程杀死daemon子线程
main start
thread start
main end

t.join(1) && t.daemon == False #主线程自己返回,子线程的执行完返回
main start
thread start
main end
thread end
2.2 线程同步
- threading.Lock():创建互斥锁对象。
- threading.Lock().acquire():获取锁。
- threading.Lock().release():释放锁。注意使用finally确保锁一定会被释放。
balance = 0
lock = threading.Lock()
def run_thread(n):
    for i in range(100000):
        lock.acquire()
        try:
            change_it(n)
        finally:
            lock.release()
2.3 ThreadLocal(线程私有数据)
ThreadLocal变量虽然是全局变量(下面代码中的local_school),但每个线程都只能读写自己线程的独立副本,互不干扰。可以把ThreadLocal理解成一个dict,local_school.student表示访问student变量,变量名作为key。
ThreadLocal最常用的地方就是为每个线程绑定一个数据库连接,HTTP请求,用户身份信息等,这样一个线程的所有调用到的处理函数都可以非常方便地访问这些资源。
import threading

# 创建全局ThreadLocal对象:
local_school = threading.local()

def process_student():
    # 获取当前线程关联的student:
    std = local_school.student
    print('Hello, %s (in %s)' % (std, threading.current_thread().name))

def process_thread(name):
    # 绑定ThreadLocal的student:
    local_school.student = name
    process_student()

t1 = threading.Thread(target= process_thread, args=('Alice',), name='Thread-A')
t2 = threading.Thread(target= process_thread, args=('Bob',), name='Thread-B')
t1.start()
t2.start()
t1.join()
t2.join()
3 协程(Coroutine,微线程)
3.1 协程
“Subroutines are special cases of … coroutines.” –Donald Knuth.
Fundamental Algorithms. The Art of Computer Programming 1 (3rd ed.). Addison-Wesley. Section 1.4.2: Coroutines, pp. 193–200.
协程在执行过程中,可以在子程序内部中断,然后转而执行别的子程序,在适当的时候再返回来接着执行。
- 效率高:子程序切换由程序自身控制,没有线程切换的开销。
- 无锁:因为协程是一个线程执行,不存在同时写变量冲突,在协程中控制共享资源不用加锁。
调用包含yield语句的函数返回一个generator对象。主要方法:
generator.send(value):暂停调用generator.send的函数,转而从generator函数上次yield的位置继续执行。value是generator函数上次yield表达式的返回值,generator函数下一次yield的值为generator.send(value)的返回值。
当第一次调用generator函数时传入的value必须为None,因为generator函数从头开始执行,找不到上次yield的位置,传入非None的value就不知道是给哪个yield表达式当作返回值。generator.throw(type):generator函数在上次暂停的位置(通常是yield)抛出type类型的异常,并继续执行到下一个yield,yield的值为throw的返回值。如果没执行到yield,generator.throw()抛出StopIteration。。如果generator函数没有捕捉type异常或者抛出了其他异常,这些异常会被generator.throw()抛出。当generator返回错误值时,调用generator函数的一方可以通过异常的形式告诉generator函数。
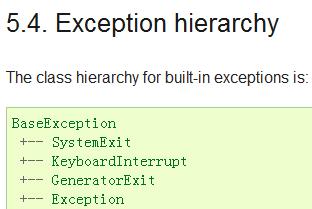
generator.close():让generator函数返回,通过GeneratorExit异常实现的,它和Exception都是并列的,从BaseException派生。
当generator.close()被调用时,generator函数在上次暂停的位置(通常是yield)抛出GeneratorExit。
如果generator函数捕捉了GeneratorExit异常但没有return并再次执行到了yield,调用generator.close()的函数会抛出RuntimeError。这个机制实现了数据收发同步,当调用generator函数的一方已经明确告诉generator函数自己不再接收数据了,但是generator函数偏偏又返回了数据。
generator函数不捕捉GeneratorExit异常即可自动返回。generator函数正确的layout(参考6.2.9.2. Examples):
def generator_func(value=None):
do_set_up()
try:
while True:
try:
recv_from_peer = (yield send_to_peer)
except Exception as e:
do_peer_excption()
finally:
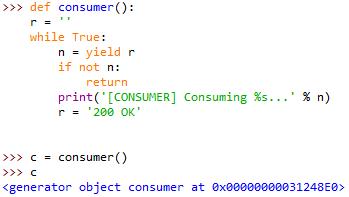
do_tear_down()例:使用协程的生产者-消费者模型。
def consumer():
    r = ''
    while True:
        n = yield r
        if not n:
            return
        print('[CONSUMER] Consuming %s...' % n)
        r = '200 OK'

def produce(c):
    c.send(None)
    n = 0
    while n < 5:
        n = n + 1
        print('[PRODUCER] Producing %s...' % n)
        r = c.send(n)
        print('[PRODUCER] Consumer return: %s' % r)
    c.close()

c = consumer()
produce(c)
3.2 生成器
生成器是一种特殊的可迭代对象。
python中的生成器有两种形式:
- 推导式
- 带有yield语句的函数
当函数中遇到yield value时,函数被挂起,value作为调用next(生成器对象)的返回值。下一次再调用next(生成器对象)时,函数返回继续执行,直到函数执行完成或者再次遇到yield。
当函数执行完成后再调用next(生成器对象),抛出StopIteration异常。
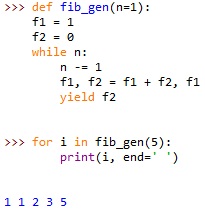
例1:使用生成器实现斐波那契数列。
例2:利用推导式生成列表、字典、集合等
#创建0-99中不是2,但是3的倍数的所有值
list1 = [i for i in range(100) if not (i % 2) and i % 3]

#创建键为0-19,值为键是否为2的倍数的字典
dict1 = {i : i % 2 == 0 for i in range(20)}

#从一个列表中剔除重复元素创建集合
set1 = {i for i in [1, 1, 2, 2, 3, 1, 2]}
注:
- 字符串没有推导式,因为双引号里面的推导式会被解释为字符串。
- 推导式是可迭代物,任何接受iterable形参的函数都可以用推导式作为实参。
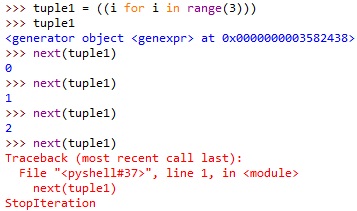
- 元组由于使用圆括号定义,而这里圆括号由于里面是推导式而不是值序列,所以这里圆括号不被解释为元组的定义,返回的是生成器对象。
3.2 异步IO
同步IO+多线程/多进程:因为IO操作阻塞了当前线程,其他代码无法执行,所以必须使用多线程或者多进程来并发执行。每个用户都会分配一个线程,如果遇到IO导致线程被挂起,其他用户的线程不受影响。
异步IO:当代码需要执行一个耗时的IO操作时,它只发出IO指令,并不等待IO结果,然后就去执行其他代码了。一段时间后,当IO返回结果时,再通知CPU进行处理。异步IO模型的核心是消息循环,主线程不断地重复“读取消息-处理消息”这一过程。
asyncio:3.4引入的异步IO标准库模块
- asyncio的编程模型就是一个消息循环。首先从asyncio模块中直接获取一个EventLoop,然后把需要执行的协程扔到EventLoop中执行,就实现了异步IO。
- asyncio实现了TCP、UDP、SSL等协议,aiohttp则是基于asyncio实现的HTTP框架。
- async/await:3.5引入的协程新语法。async等效于@asyncio.coroutine,await等效于yield from。
主要用法:
- @asyncio.coroutine:把一个generator标记为coroutine,进而可以在EventLoop中执行。
- ans = yield from coroutine_func():调用另一个coroutine并获得返回值。当执行到这一句时,当前线程不会阻塞,而是转去执行下一个就绪的消息处理函数。当coroutine_func()执行完以后,再回到当前的协程中继续执行。
例:用asyncio的异步网络连接来获取sina、sohu和163的网站首页。3个连接由一个线程通过coroutine并发完成。
import threading
import asyncio

@asyncio.coroutine
def wget(host):
    print('wget %s... [%s]' % (host, threading.currentThread()))
    connect = asyncio.open_connection(host, 80)
    reader, writer = yield from connect
    header = 'GET / HTTP/1.0\r\nHost: %s\r\n\r\n' % host
    writer.write(header.encode('utf-8'))
    yield from writer.drain()
    while True:
        line = yield from reader.readline()
        if line == b'\r\n':
            break
        print('%s header > %s' % (host, line.decode('utf-8').rstrip()))
    # Ignore the body, close the socket
    writer.close()

loop = asyncio.get_event_loop()
tasks = [wget(host) for host in
    ['www.sina.com.cn', 'www.sohu.com', 'www.163.com']]
loop.run_until_complete(asyncio.wait(tasks))
loop.close()

@asyncio.coroutine
def hello():
    print("Hello world!")
    r = yield from asyncio.sleep(1)
    print("Hello again!")

async def hello():
    print("Hello world!")
    r = await asyncio.sleep(1)
    print("Hello again!")


 508
508

 被折叠的 条评论
为什么被折叠?
被折叠的 条评论
为什么被折叠?
 到【灌水乐园】发言


