


1.struts2 框架介绍
struts2 框架在 struts1 和 WebWork的技术上合并而来的,全新的struts2 框架是以 WebWork 框架为核心,采用拦截器的机制来处理用户请求,是一个基于 MVC 设计模式的 Web 框架,本质上相当于一个 servlet,struts2 作为控制器来建立模型和视图之间的数据交互。
struts2 的开发组经常被指责漏洞的修复手法不妥,要么修复后仍有课利用,要么无法修复长期闲置,其中 2013 年的 struts 高危漏洞引起了不小的轰动,导致中国大陆使用 struts2 的网站被入侵,建议使用 struts2.3 或者以上的最新版本。本文使用的是 struts2.3.34 版本,struts2.5 的版本和 struts2.3 已经有不小的跨度了,一些代码的写法也不同,在学习时要注意版本带来的问题。
下面我们通过一个 java web 项目来学习 struts2 的基础。
2.搭建 struts2 框架
2.1 准备 struts2 包
struts2 也是 Apache 基金会下的一个开源项目,可以直接去官网下载 struts2 的 zip 压缩包,建议下载完整版的包,我下载的是 struts-2.3.34-all.zip,解压后,lib 文件下有我们要使用的 jar 包,但是里面 100 jar 包并不是都必须的,可以在 apps 文件下,找到一个空白的 war 包,用压缩工具打开,将网站 WEB-INF 目录下的 lib 文件夹里面的 jar 包复制到一个文件下,这些就是我们所需的 struts2 框架的 jar 包。
2.2 导入 struts2 的 jar 包
不同与一般的 java 项目,使用 hibernate 时,可以自己建立用户库,在项目中加入构建路径即可,使用 struts2 框架不能使用用户库这种方式,需要将准备好的 struts2 的 jar 包复制到 java web 项目下,一般放在 WEB-INF 文件下的lib 文件夹中。
3.使用 struts2 框架
3.1 创建 action 类
创建一个 java 类,使它继承 ActionSupport 类,重写父类的 execute() 方法,返回值要是 String 类型的。
package cc.wenshixin.action;

import com.opensymphony.xwork2.ActionSupport;

public class HelloStruts extends ActionSupport {

    @Override
    public String execute() throws Exception {
        System.out.println("success");
        return "ok";
    }

}
3.2 配置 action 的 struts.xml 文件
创建完action类,还要配置一下action访问的路径,创建 struts2 的核心配置文件 struts.xml,注意这里 struts 后面没有 2 ,并且该文件必须直接放在 src 下面,也即是 struts2 的核心配置文件名称和位置是固定的。
同 hibernate 框架的映射文件一样,也需要引入 xml 文件的 dtd 约束。要做的配置放在 struts 标签中,package 是配置一个包,extents 属性中写struts的默认配置值 struts-default,namespace 属性中写/。package 标签里面的 action 标签是配置 action 类的,name 属性中写将来要访问的 action 名称,class为 action 类的全路径名。action 标签里面是 result 标签,用来配置根据 action 类中方法的返回值跳转的路径,这里写的是一个jsp文件路径,/代表网站的根目录。
<?xml version="1.0" encoding="UTF-8"?>
<!DOCTYPE struts PUBLIC
  "-//Apache Software Foundation//DTD Struts Configuration 2.3//EN"
  "http://struts.apache.org/dtds/struts-2.3.dtd">

<struts>
  <package name="hellodemo" extends="struts-default" namespace="/">
    <action name="hello" class="cc.wenshixin.action.HelloStruts">
      <result name="ok">/hello.jsp</result>
    </action>
  </package>
</struts>
在网站的根目录下创建一个 hello.jsp文件来测试是否可以访问。
3.3 配置网站的 web.xml 文件
做完上面的操作,就可以启动 tomcat 服务器访问了,访问路径 http://localhost:8080/web项目名/hello.action,得到的是一个 404 的错误,我们还需要配置一下整个网站的 xml 文件。
welcome-file-list 里面的内容是网站欢迎页面支持的文件格式。dispaly-name标签里面是网站项目的名字。重要的是 filter 过滤器标签,filter-class里面是struts过滤器类的名称,这个在 struts2.5 的版本中是不一样的。下面的url-pattern标签中 /* 是指拦截所有用户进行处理。注意 filter-class 标签中的的值要一致。
再来访问一下刚才的路径,出现 jsp 文件中的内容就说明访问成功了。
<?xml version="1.0" encoding="UTF-8"?>
<web-app xmlns:xsi="http://www.w3.org/2001/XMLSchema-instance" xmlns="http://xmlns.jcp.org/xml/ns/javaee" xsi:schemaLocation="http://xmlns.jcp.org/xml/ns/javaee http://xmlns.jcp.org/xml/ns/javaee/web-app_3_1.xsd" id="WebApp_ID" version="3.1">
  <display-name>struts01</display-name>

  <filter>
    <filter-name>struts2</filter-name>
    <filter-class>org.apache.struts2.dispatcher.ng.filter.StrutsPrepareAndExecuteFilter</filter-class>
  </filter>

  <filter-mapping>
    <filter-name>struts2</filter-name>
    <url-pattern>/*</url-pattern>
   </filter-mapping>

  <welcome-file-list>
    <welcome-file>index.html</welcome-file>
    <welcome-file>index.htm</welcome-file>
    <welcome-file>index.jsp</welcome-file>
    <welcome-file>default.html</welcome-file>
    <welcome-file>default.htm</welcome-file>
    <welcome-file>default.jsp</welcome-file>
  </welcome-file-list>
</web-app>
4.struts2 框架及配置详解
4.1 struts2 框架设计思想
前面提到 struts2 是一个 MVC 的 Web 框架,Web 层的框架都是基于前端控制器的模式,如下图所示,传统的方式,页面上的每个请求,是交给一个的 servlet 来处理,这样就需要写很多的 servlet,虽然可以用反射来减少代码量,但是写起来还是很繁杂。而现在每个请求都要经过前端控制器过滤,在转交给相应的 action 处理,前端控制器也是有过滤器实现的。

4.2 struts2 框架执行过程
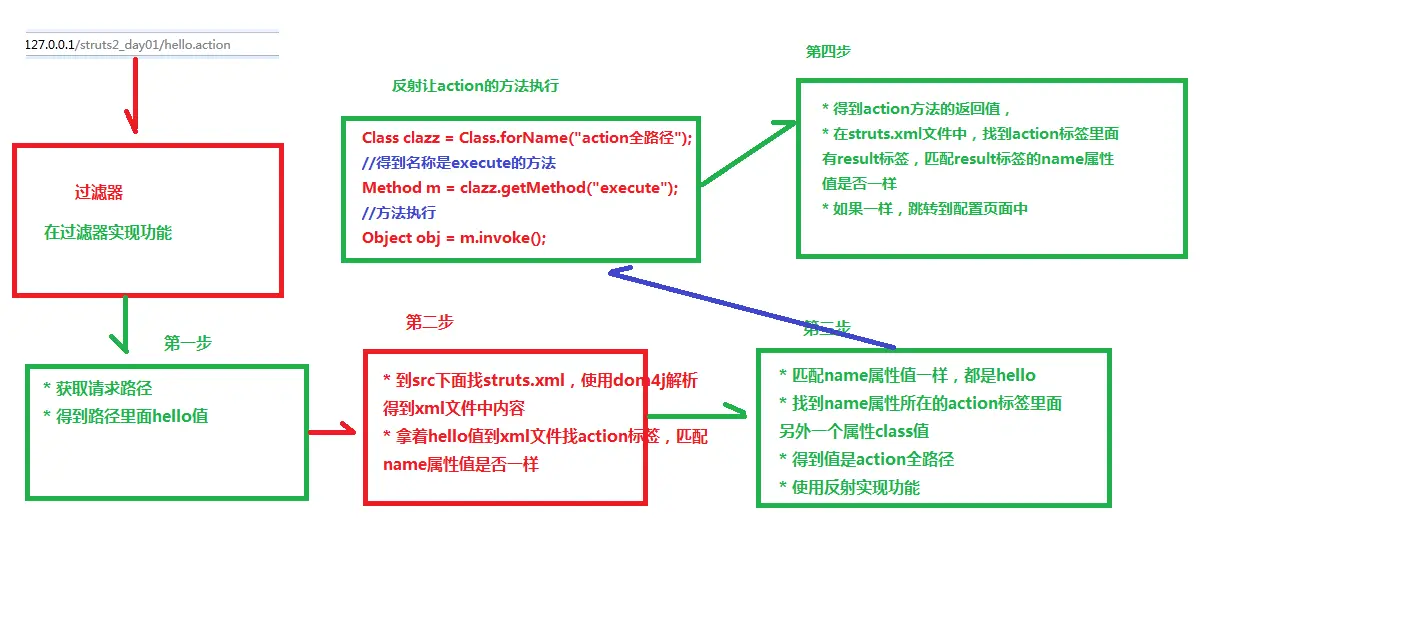
在上面输入 http://localhost:8080/web项目名/hello.action,请求会先被网站 web.xml 文件中的过滤器处理,获取请求的路径和得到路径中的 hello 值,然后在 src 下面找到 struts.xml,使用 dom4j 解析得到 xml 文件中的内容,用得到的 hello 值和 action 标签里面的 name 属性值匹配,匹配成功就找到 name 属性所在的 action 标签里面的 class 属性的值,得到 action 类的全路径,使用反射执行相应的方法实现功能,然后得到 action 类相应方法的返回值,和 action 标签中的 result 标签的 name 属性值匹配,匹配成功就跳转到对应的路径或者是页面。
4.3 struts2 核心配置文件详解
4.3.1 配置文件的加载顺序
在 web.xml 文件中我们设置了 struts2 的核心过滤器:StrutsPrepareAndExecuteFilter,可以打开struts的源代码查看一下这个类里面的内容,这个过滤器有两个功能,预处理和执行,预处理是加载配置文件,对应的是StrutsPrepareAndExecuteFilter类的init()方法,而执行是用一组拦截器来完成相应的功能,对应的是该类中的doFilter()方法。
相关代码:
public class StrutsPrepareAndExecuteFilter implements StrutsStatics, Filter {
    protected PrepareOperations prepare;
    protected ExecuteOperations execute;
    protected List<Pattern> excludedPatterns = null;

    public void init(FilterConfig filterConfig) throws ServletException {
        InitOperations init = new InitOperations();
        Dispatcher dispatcher = null;
        try {
            FilterHostConfig config = new FilterHostConfig(filterConfig);
            init.initLogging(config);
            dispatcher = init.initDispatcher(config); //查看该方法
            init.initStaticContentLoader(config, dispatcher);

            prepare = new PrepareOperations(dispatcher);
            execute = new ExecuteOperations(dispatcher);
            this.excludedPatterns = init.buildExcludedPatternsList(dispatcher);

            postInit(dispatcher, filterConfig);
        } finally {
            if (dispatcher != null) {
                dispatcher.cleanUpAfterInit();
            }
            init.cleanup();
        }
    }


    protected void postInit(Dispatcher dispatcher, FilterConfig filterConfig) {
        }

    public void doFilter(ServletRequest req, ServletResponse res, FilterChain chain) throws IOException, ServletException {

        HttpServletRequest request = (HttpServletRequest) req;
        HttpServletResponse response = (HttpServletResponse) res;

        try {
            if (excludedPatterns != null && prepare.isUrlExcluded(request, excludedPatterns)) {
                chain.doFilter(request, response);
            } else {
                prepare.setEncodingAndLocale(request, response);
                prepare.createActionContext(request, response);
                prepare.assignDispatcherToThread();
                request = prepare.wrapRequest(request);
                ActionMapping mapping = prepare.findActionMapping(request, response, true);
                if (mapping == null) {
                    boolean handled = execute.executeStaticResourceRequest(request, response);
                    if (!handled) {
                        chain.doFilter(request, response);
                    }
                } else {
                    execute.executeAction(request, response, mapping);
                }
            }
        } finally {
            prepare.cleanupRequest(request);
        }
    }
}
 public Dispatcher initDispatcher( HostConfig filterConfig ) {
        Dispatcher dispatcher = createDispatcher(filterConfig);
        dispatcher.init(); //查看该方法
        return dispatcher;
    }
public void init() {

        if (configurationManager == null) {
            configurationManager = createConfigurationManager(DefaultBeanSelectionProvider.DEFAULT_BEAN_NAME);
        }

        try {
            init_FileManager();
            //下面加载struts2的配置文件
            init_DefaultProperties(); // [1] 加载struts2的所有常量
            init_TraditionalXmlConfigurations(); // [2] 加载struts-default.xml文件,struts-plugin.xml文件和struts.xml文件
            init_LegacyStrutsProperties(); // [3] 加载用户自定义的struts.properties文件
            init_CustomConfigurationProviders(); // [5] 加载用户配置提供的对象
            init_FilterInitParameters() ; // [6] 加载网站项目的web.xml文件
            init_AliasStandardObjects() ; // [7] 加载标准对象

            Container container = init_PreloadConfiguration();
            container.inject(this);
            init_CheckWebLogicWorkaround(container);

            if (!dispatcherListeners.isEmpty()) {
                for (DispatcherListener l : dispatcherListeners) {
                    l.dispatcherInitialized(this);
                }
            }
            errorHandler.init(servletContext);

        } catch (Exception ex) {
            if (LOG.isErrorEnabled())
                LOG.error("Dispatcher initialization failed", ex);
            throw new StrutsException(ex);
        }
    }
从上面可以看出,struts2 的配置文件加载顺序为:
-
- default-properties
-
- struts-default.xml
-
- struts-plugin.xml
-
- struts.xml // 配置action以及常量
-
- struts.properties //配置常量
-
- web.xml //配置核心过滤器以及常量
后面三个文件都是可以配置常量的,但是后面文件中的常量值可以把前面同名的常量值覆盖,这是由配置文件的加载顺序决定的。
4.3.2 struts.xml 文件
struts.xml 文件是 struts2 的核心配置文件,其名称和位置都是固定的,在 struts.xml 文件中主要有三个标签:package 、action 、result 标签。
- package 标签
类似于代码包,用以区别不同的 action,要配置 action,在标签外面首先要加上 package 标签。
package 标签的属性:
-
- name 属性
package的区分名,一个配置文件中所有package的name属性值都是要不相同的。
- name 属性
-
- extents 属性
extends="struts-default",该属性的值是固定,写了这个属性之后,package标签中配置的类才有action的功能
- extents 属性
-
- namespace 属性
namespace 属性值/和action标签里面的值构成将来要访问的路径。
- namespace 属性
action 标签
action 标签用来配置 action 的访问路径。
action 标签的属性:
-
- name 属性
同上面一样,namespace属性值/和action标签里面的值构成将来要访问的路径。一个package标签可以写多个action标签,但是每个action中的name属性的值都不能相同。
- name 属性
-
- class 属性
action类的全路径名。
- class 属性
-
- method 属性
action类中要执行的方法名,不写默认就是执行action类的execute方法,在action里面执行多个方法就使用method属性来配置。
- method 属性
result 标签
根据 action 中方法的返回值,配置到不同的路径里面。
result 标签的属性:
-
- name 属性
方法的返回值。
- name 属性
-
- type 属性
配置处理路径(转发和重定向),type属性的默认值是做转发操作。
- type 属性
4.3.3 action 类的编写方式
action 类的编写方式共有三种:
-
- 创建普通类
action 类是可以布集成任何类,也不实现任何接口,但是这种方式很少使用。
- 创建普通类
-
- 创建类,实现action接口
execute() 方法其实是 Action 接口中的,继承的 ActionSupport 类也是实现了 Action 接口,但这种方式也很少使用。
- 创建类,实现action接口
-
- 创建类,继承ActionmSupport类
推荐使用该方式编写 action 类
- 创建类,继承ActionmSupport类
action 类中的方法的访问权限修饰符要是 public。
4.3.3 action 类的访问方法
action 类的访问方法也有三种:
- 第一种 使用 action 标签的 method 属性,在这个属性中写上执行的 action 方法。
action 类的方法是可以没有返回值的(将方法的返回值写成 void,将方法的返回值写成"none"或者常量NONE),这时在配置文件中就不需要配置。但是如果 action 类的方法有返回值,而在配置文件中么没有配置 result 标签的 name 属性,访问就会出现错误。另外 action 类的方法有返回值,那么返回值就必须是 String 类型的。
使用这种方式访问 action 类,如果一个 action 类中有很多方法,那么,就要写很多的 action 标签一一匹配,这时简单的方法就是使用下面通配符的方式配置。
示例代码:
在 action 类中加上方法
    public String update()
        {
            return "update";
        }
在配置文件中加上方法的配置
    <!-- 执行update方法,相应增加所需的页面 -->
    <action name="update" class="cc.wenshixin.action.HelloStruts" method="update">
      <result name="update">/update.jsp</result>
    </action>
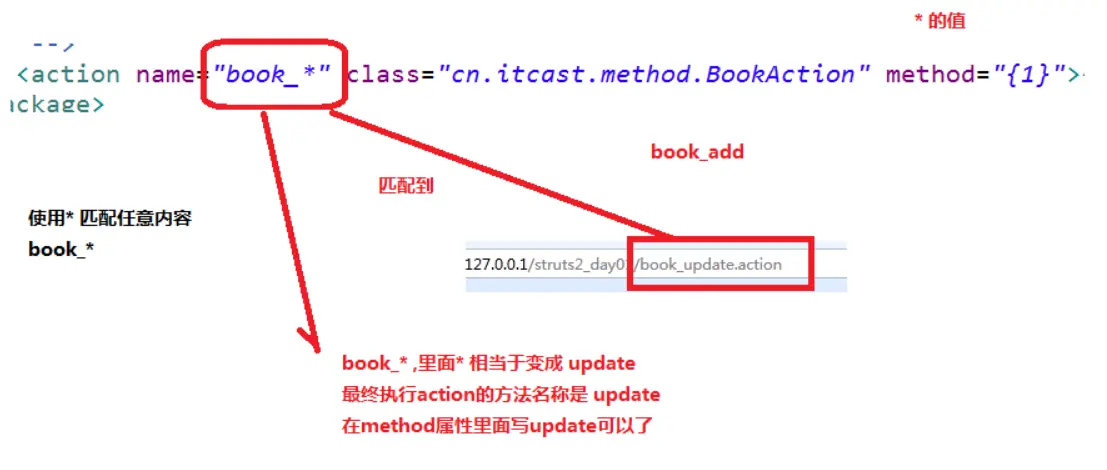
- 使用通配符方式实现
在 action 标签的 name 属性中使用*来匹配所有的方法,然后在 method 属性中使用{1}来替代第一个 * 星号的内容,这样不同的 URL 地址就会统一处理。使用通配符时开发中访问 action 类方法的常用方式。
示例代码
将 action 方法的返回值修改成一样的。
public String update()
    {
        return "test";
    }

    public String delete()
    {
        return "test";
    }
    <action name="test-*" class="cc.wenshixin.action.HelloStruts" method="{1}">
      <result name="test">/test.jsp</result>
    </action>
这样访问 test-upate 页面和 test-delete 页面,得到的返回页面就是一样的。
- 动态访问方式(不使用)
动态访问方式在 struts2 中默认不开启的,如果想使用需要先去开启一个常量,常量也需要配置,动态方式访问主要的控制是在页面端,编写 action 类和配置 action 都很简单,关键是访问路径的编写。


 103
103

 被折叠的 条评论
为什么被折叠?
被折叠的 条评论
为什么被折叠?
 到【灌水乐园】发言


