


目录
设计背景
教育机器人在应用于课堂场景时,对学生上课的精神状态的捕获是十分重要的,教师可以通过学生的精神状态及时调整上课的方式,更加有利于学生吸收课堂知识。基于此作者设计出一个能够通过一些条件判断出学生状态,并将结果反馈到用户(教师)端的功能包。
相关技术
1.opencv
OpenCV(Open Source Computer Vision Library)是一个开源的计算机视觉和机器学习库,由Intel于1999年发起。它包含了大量的图像处理函数和机器学习算法,广泛用于目标检测、图像分割、面部识别、运动跟踪等任务。OpenCV支持多种编程语言,包括C++、Python和Java,并且可以在多种操作系统上运行。由于其高效的性能、丰富的功能和良好的跨平台兼容性,OpenCV成为了计算机视觉领域最受欢迎的工具之一。
2.dlib人脸识别库
dlib是一个功能强大的开源库,由Davis King在2002年开发,主要用于计算机视觉和机器学习领域。在人脸识别方面,dlib展现出了卓越的性能。它提供了基于深度学习的人脸检测器,能够准确快速地定位图像中的人脸位置。同时,dlib的人脸识别功能更是出色,它采用了68点位置标志法来精确捕捉人脸的重要特征,如眉毛、眼睛、鼻子和嘴巴等。这种精确的定位使得dlib在人脸识别、表情分析、面部关键点检测等任务中表现出色,为开发者提供了强大且灵活的工具来构建各种人脸识别应用。
3.七牛云和pushplus
七牛云(Qiniu Cloud)是一家成立于2011年的云计算公司,专注于数据智能场景的解决方案。其核心产品和服务包括对象存储、文件上传与下载、图像处理、音视频处理以及数据分析与处理等,广泛应用于互联网、移动应用、物联网、教育、医疗等多个领域。
pushplus(推送加)是一个功能强大的实时消息推送平台,它集成了微信、短信、邮件、企业微信、钉钉、飞书等多种推送渠道,只需调用简单的API接口,即可迅速完成消息的推送。该平台支持一对一、一对多和好友消息等多种推送方式,且支持多种消息模板,以满足不同用户的推送需求。
疲劳检测算法
闭眼和打哈欠检测
通过Dlib库中人脸68个关键点检测shape_predictor_68_face_landmarks.dat的dat模型库及视频中的人脸,之后返回人脸特征点坐标、人脸框及人脸角度等。

然后我们可以获得眼睛所在点的位置 如下图所示
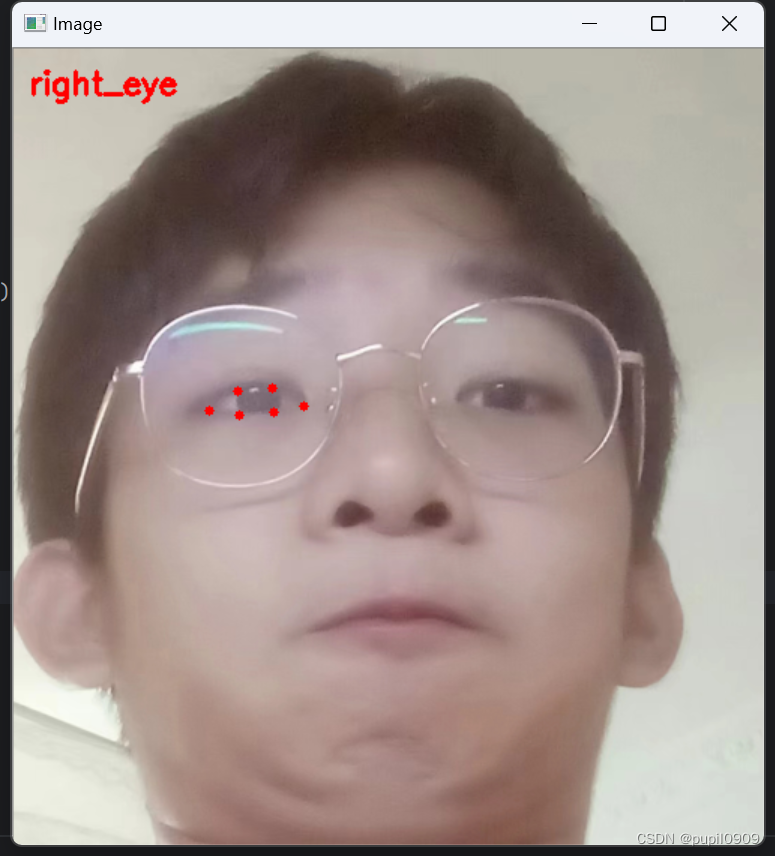

由于我们闭眼的时候p2和p6,p3和p5两点的距离会减小 p1和p4的距离会变大,根据这个特性我们可以通过下面的公式计算EAR的值 当我们闭眼时,EAR的值就会减小。所以我们只需要设置一个最低阈值,当EAR值低于我们的阈值时,就判断为闭眼。

同理,我们可以用相同的办法来判断学生是否在打哈欠。
点头检测
先在平面上用dlib对人脸关键点检测,再3D人脸模型匹配,求解3D点和对应2D点的转换关系,根据旋转矩阵求解欧拉角。检测过程中需要使用世界坐标系(UVW)、相机坐标系(XYZ)、图像中心坐标系(uv)和像素坐标系(xy)。一个物体相对于相机的姿态可以使用旋转矩阵和平移矩阵来表示。
 坐标系转换原理图
转换公式如下
世界坐标系转换到相机坐标:

相机坐标系转换到像素坐标系:

像素坐标系与世界坐标系的关系为:

图像中心坐标系转换到像素坐标系:

得到旋转矩阵后,求欧拉角:
然后我们可以设定最大阈值,当所测欧拉角大于所设定的最大角度时,就可以判断学生点头了一次。
代码实现
导入需要用到的软件包
from scipy.spatial import distance as dist
from collections import OrderedDict
import numpy as np
import dlib
import cv2
import math
import time
定位我们需要用到的信息点 嘴,左右眼 下巴
FACIAL_LANDMARKS_68_IDXS = OrderedDict([
	("mouth", (48, 68)),
	("right_eye", (36, 42)),
	("left_eye", (42, 48)),
	("jaw", (0, 17))
设置相机标定和三维重建所需的参数和数据
object_pts = np.float32([[6.825897, 6.760612, 4.402142],
						 [1.330353, 7.122144, 6.903745],
						 [-1.330353, 7.122144, 6.903745],
						 [-6.825897, 6.760612, 4.402142],
						 [5.311432, 5.485328, 3.987654],
						 [1.789930, 5.393625, 4.413414],
						 [-1.789930, 5.393625, 4.413414],
						 [-5.311432, 5.485328, 3.987654],
						 [2.005628, 1.409845, 6.165652],
						 [-2.005628, 1.409845, 6.165652],
						 [2.774015, -2.080775, 5.048531],
						 [-2.774015, -2.080775, 5.048531],
						 [0.000000, -3.116408, 6.097667],
						 [0.000000, -7.415691, 4.070434]])
K = [6.5308391993466671e+002, 0.0, 3.1950000000000000e+002,
	 0.0, 6.5308391993466671e+002, 2.3950000000000000e+002,
	 0.0, 0.0, 1.0]
D = [7.0834633684407095e-002, 6.9140193737175351e-002, 0.0, 0.0, -1.3073460323689292e+000]
reprojectsrc = np.float32([[10.0, 10.0, 10.0],
						   [10.0, 10.0, -10.0],
						   [10.0, -10.0, -10.0],
						   [10.0, -10.0, 10.0],
						   [-10.0, 10.0, 10.0],
						   [-10.0, 10.0, -10.0],
						   [-10.0, -10.0, -10.0],
						   [-10.0, -10.0, 10.0]])
line_pairs = [[0, 1], [1, 2], [2, 3], [3, 0],
			  [4, 5], [5, 6], [6, 7], [7, 4],
			  [0, 4], [1, 5], [2, 6], [3, 7]]
cam_matrix = np.array(K).reshape(3, 3).astype(np.float32)
dist_coeffs = np.array(D).reshape(5, 1).astype(np.float32)
估算给定的人脸形状点的头部姿态
def get_head_pose(shape):

	image_pts = np.float32([shape[17], shape[21], shape[22], shape[26], shape[36],
							shape[39], shape[42], shape[45], shape[31], shape[35],
							shape[48], shape[54], shape[57], shape[8]])
	_, rotation_vec, translation_vec = cv2.solvePnP(object_pts, image_pts, cam_matrix, dist_coeffs)
	reprojectdst, _ = cv2.projectPoints(reprojectsrc, rotation_vec, translation_vec, cam_matrix, dist_coeffs)
	reprojectdst = tuple(map(tuple, reprojectdst.reshape(8, 2)))
	rotation_mat, _ = cv2.Rodrigues(rotation_vec)
	pose_mat = cv2.hconcat((rotation_mat, translation_vec))
	_, _, _, _, _, _, euler_angle = cv2.decomposeProjectionMatrix(pose_mat)

	pitch, yaw, roll = [math.radians(_) for _ in euler_angle]

	pitch = math.degrees(math.asin(math.sin(pitch)))
	roll = -math.degrees(math.asin(math.sin(roll)))
	yaw = math.degrees(math.asin(math.sin(yaw)))

	return reprojectdst, euler_angle
设置好判断要用到的阈值 为防止误判,提高鲁棒性,这里增加了帧数阀值
# 判断闭眼
EYE_AR_THRESH = 0.18# 闭眼阈值 低于阈值判断为闭眼
EYE_AR_CONSEC_FRAMES = 2  # 帧数阈值 超过帧数才算一次
# 判断张嘴
MAR_THRESH = 0.8
MOUTH_AR_CONSEC_FRAMES = 3
# 点头
HAR_THRESH = 0.35
NOD_AR_CONSEC_FRAMES = 5
初始化计数器
# 计数器 每一帧判断+1
COUNTER = 0  # eye
mCOUNTER = 0  # mouth
hCOUNTER = 0  # head
sleep_times =0
# 超过三帧+1
hTOTAL = 0
TOTAL = 0
mTOTAL = 0
EAR和MAR的计算 用于判断闭眼和张嘴
#闭眼阀值
def eye_aspect_ratio(eye):
	# 计算距离,竖直的
	A = dist.euclidean(eye[1], eye[5])
	B = dist.euclidean(eye[2], eye[4])
	# 计算距离,水平的
	C = dist.euclidean(eye[0], eye[3])
	# ear值
	ear = (A + B) / (2.0 * C)
	return ear
#张嘴阀值
def mouth_aspect_ratio(mouth):
	A = np.linalg.norm(mouth[2] - mouth[9])  # 51, 59
	B = np.linalg.norm(mouth[4] - mouth[7])  # 53, 57
	C = np.linalg.norm(mouth[0] - mouth[6])  # 49, 55
	mar = (A + B) / (2.0 * C)
	return mar
调出人脸定位器和关键点检测器
# 加载人脸检测与关键点定位
print("[INFO] loading facial landmark predictor...")
detector = dlib.get_frontal_face_detector()  # 调用人脸检测函数 创建检测器对象
# 加载已训练模型可预测68点
predictor = dlib.shape_predictor(r'yourpath\shape_predictor_68_face_landmarks.dat')
# 读取RIO
# 眼
(lStart, lEnd) = FACIAL_LANDMARKS_68_IDXS["left_eye"]
(rStart, rEnd) = FACIAL_LANDMARKS_68_IDXS["right_eye"]
# 嘴
(mStart, mEnd) = FACIAL_LANDMARKS_68_IDXS["mouth"]
将一个dlib库的人脸关键点检测转换为一个NumPy数组
def shape_to_np(shape, dtype="int"):
	# zeros函数用于创建二维数组
	coords = np.zeros((shape.num_parts, 2), dtype=dtype)
	# 遍历每一个关键点
	# 得到坐标
	for i in range(0, shape.num_parts):
		coords[i] = [shape.part(i).x, shape.part(i).y]
	return coords
初始化帧率计算器 设定一次检测的最大时间
# 设定检测的时间间隔(秒)
detection_interval = 60
# 初始化帧数计数器
frame_count = 0
elapsed_time = 0
pTime = 0
打开摄像头 开始检测!
# 调用摄像头
print("[INFO] starting video stream thread...")
vs = cv2.VideoCapture(0)

while True:
	frame = vs.read()[1]
	if frame is None:
		break
帧率计算(可以用来后续优化代码,不用也可删去 ) 以及 粗略计算时间
# 查看当前帧率
	cTime = time.time()
	fps = 1.0 / (cTime - pTime)
	pTime = cTime

	# 增加帧数计数器
	frame_count += 1

	# 计算已过去的时间(秒)
	elapsed_time = frame_count / fps
处理图像(注释已写好在代码内)
	# 预处理 ()布尔值判断时候读取图像 []实际帧图像
	(h, w) = frame.shape[:2]
	width = 800
	r = width / float(w)
	dim = (width, int(h * r))  # 新尺寸
	frame = cv2.resize(frame, dim, interpolation=cv2.INTER_AREA)  # cv2.INTER_AREA,用于缩小图像。
	gray = cv2.cvtColor(frame, cv2.COLOR_BGR2GRAY)

	# 人脸检测 取得人脸框的四个坐标
	rects = detector(gray, 0)  # 0是采样次数
	# 采样次数增加可以使得检测器在更小的尺度上查找人脸,有助于检测到更小的人脸,但也会增加计算时间
	for rect in rects:
		shape = predictor(gray, rect)
		shape = shape_to_np(shape)

		# 获取坐标 计算闭合数值
		# 眼
		leftEye = shape[lStart:lEnd]
		rightEye = shape[rStart:rEnd]
		leftEAR = eye_aspect_ratio(leftEye)
		rightEAR = eye_aspect_ratio(rightEye)
		ear = (leftEAR + rightEAR) / 2.0
		# 嘴
		mouth = shape[mStart:mEnd]
		mar = mouth_aspect_ratio(mouth)

		# 绘制眼睛区域
		# 计算凸包
		leftEyeHull = cv2.convexHull(leftEye)
		rightEyeHull = cv2.convexHull(rightEye)
		mouthHull = cv2.convexHull(mouth)
		# 绘制轮廓 -1表示绘制所有轮廓 1表示轮廓厚度
		cv2.drawContours(frame, [leftEyeHull], -1, (0, 255, 0), 1)
		cv2.drawContours(frame, [rightEyeHull], -1, (0, 255, 0), 1)
		cv2.drawContours(frame, [mouthHull], -1, (0, 255, 0), 1)

	# 绘制人脸框
		left = rect.left()  # 绘制出来人脸框
		top = rect.top()
		right = rect.right()
		bottom = rect.bottom()
		cv2.rectangle(frame, (left, top), (right, bottom), (0, 255, 0), 3)

		reprojectdst, euler_angle = get_head_pose(shape)
		har = euler_angle[0, 0]  # 取pitch旋转角度
阈值判断以及数据显示
这里我们只需要简单的通过闭眼的时间判断就行了,所以不需要连续多帧判断
	# 阀值判断
		if ear < EYE_AR_THRESH:
			#COUNTER += 1
			#else:	#如果连续几帧都是闭眼的,总数算一次
			#if COUNTER >= EYE_AR_CONSEC_FRAMES:
				TOTAL += 1
			# 重置
			#COUNTER = 0
		cv2.putText(frame, "Blinks: {}".format(TOTAL), (10, 30),
			cv2.FONT_HERSHEY_SIMPLEX, 0.7, (0, 0, 255), 2)  # 字体类型,字体缩放因子,颜色,线条厚度
		cv2.putText(frame, "EAR: {:.2f}".format(ear), (300, 30),
			cv2.FONT_HERSHEY_SIMPLEX, 0.7, (0, 0, 255), 2)

		if mar > MAR_THRESH:  # 张嘴阈值0.5
			mCOUNTER += 1
			cv2.putText(frame, "Yawning!", (10, 60), cv2.FONT_HERSHEY_SIMPLEX, 0.7, (255, 255, 255), 2)
		else:
		# 如果连续3次都小于阈值,则表示打了一次哈欠
			if mCOUNTER >= MOUTH_AR_CONSEC_FRAMES:  # 阈值:3
				mTOTAL += 1
			# 重置嘴帧计数器
			mCOUNTER = 0
		cv2.putText(frame, "Yawning: {}".format(mTOTAL), (150, 60), cv2.FONT_HERSHEY_SIMPLEX, 0.7, (0, 0, 255), 2)
		cv2.putText(frame, "mCOUNTER: {}".format(mCOUNTER), (300, 60), cv2.FONT_HERSHEY_SIMPLEX, 0.7, (0, 0, 255), 2)
		cv2.putText(frame, "MAR: {:.2f}".format(mar), (480, 60), cv2.FONT_HERSHEY_SIMPLEX, 0.7, (0, 0, 255), 2)

		if har > HAR_THRESH:  # 点头阈值0.3
			hCOUNTER += 1
		else:
			# 如果连续3次都小于阈值,则表示瞌睡点头一次
			if hCOUNTER >= NOD_AR_CONSEC_FRAMES:  # 阈值:3
				hTOTAL += 1
			# 重置点头帧计数器
			hCOUNTER = 0

		# 绘制正方体12轴
		for start, end in line_pairs:
			cv2.line(frame, (int(reprojectdst[start][0]), int(reprojectdst[start][1])),
					 (int(reprojectdst[end][0]), int(reprojectdst[end][1])), (0, 0, 255))
		cv2.putText(frame, "Nod: {}".format(hTOTAL), (450, 90), cv2.FONT_HERSHEY_SIMPLEX, 0.7, (255, 255, 0), 2)

		for (x, y) in shape:
			cv2.circle(frame, (x, y), 1, (0, 0, 255), -1)
估计运行的时间和通过头部位置变化判断学生状态以及计数器重置
		if elapsed_time >= detection_interval or (hTOTAL > 10 and elapsed_time <= 20):  # 超过60秒 头部晃动多 则重置
			frame_count = 0
			TOTAL = hTOTAL = mTOTAL = 0
使用七牛云和pushplus
输出结果之前 我们先引用七牛云和pushplus 通过这他们 我们可以做到将正在打瞌睡学生的实时图片以及文字提醒发送到负责人(家长或是教师)的微信上。
七牛云
当我们对学生进行疲劳检测时,如果达到我们的判断条件,我们可以当即保存当前帧的图片到本地中,但是要发送到微信用户端上,我们需要先上传到云端,然后pushplus可以在云端获取图片的外链地址,发送微信用户。
1.注册
注册网址在此!!
2.新建储存空间
ps:在此之前先认证 绑定邮箱
3.获取key

复制好AK 和 SK

4.创建sent_picture_qiniu.py
# coding=utf-8

__author__ = 'jemy'


import qiniu

accessKey = "xxx"  # 请在这里填写您的accessKey
secretKey = "xxx"  # 请在这里填写您的secretKey


# 解析结果
def parseRet(retData, respInfo):
    if retData is not None:
        print("Upload file success!")
        print("Hash: " + retData["hash"])
        print("Key: " + retData["key"])
        # 检查扩展参数
        for k, v in retData.items():
            if k[:2] == "x:":
                print(k + ":" + v)
                # 检查其他参数
        for k, v in retData.items():
            if k[:2] == "x:" or k == "hash" or k == "key":
                continue
            else:
                print(k + ":" + str(v))
    else:
        print("Upload file failed!")
        print("Error: " + respInfo.text_body)

    # 无key上传,http请求中不指定key参数

def upload_without_key(bucket, filePath,filename):
    # 生成上传凭证
    auth = qiniu.Auth(accessKey, secretKey)
    upToken = auth.upload_token(bucket, key=filename)
    # 上传文件
    retData, respInfo = qiniu.put_file(upToken, filename, filePath)
    # 解析结果
    parseRet(retData, respInfo)


def sent_picture(filename):
    bucket = "xxx"  # 请在这里填写您的存储空间名称
    picture_path = f'{filename}'

    filePath = picture_path  # 请确保这是正确的文件路径
    upload_without_key(bucket, filePath,filename)
pushplus
1.注册
2.获取token
pushplus可以选择一对一发送消息和一对多发送消息,以下以一对一为例。
 我们只需要复制这个token就好了
3.创建sent_picture_pushplus.py
import requests


def sent(content,filename):
    api_url = 'http://www.pushplus.plus/send'
    content_with_image = f"{content}<br/><img src='http://sd08h1akz.hn-bkt.clouddn.com/{filename}'/>"
    payload = {
        "token": "xxx",
        "title": "xxx",
        "content": content_with_image,
        # "topic": "text",        # 如果需要群发,可以取消注释并填写topic
        "template": "html"
    }
    response = requests.post(api_url, json=payload)

    if response.status_code == 200:
        result = "发送成功"
    else:
        result = f"请求失败,状态码:{response.status_code}"
    return result
然后就都部署好啦 我们在主文件引用这些函数
import os
from sent_picture_pushplus import sent
from sent_picture_qiniu import sent_picture
输出反馈
先创建一个储存本地图片的文件夹
#设定图片保存的位置
folder_path = 'images/'
#没有这个文件夹就创建一个
if not os.path.exists(folder_path):
		os.makedirs(folder_path)
根据设定条件输出 并推送照片
		else:
			if TOTAL >= 580:  # 大概闭眼三十秒
				content = '闭眼了好久,可能在打瞌睡'
				cv2.putText(frame, "SLEEP!!!", (100, 200), cv2.FONT_HERSHEY_SIMPLEX, 1, (0, 0, 255), 3)
				filename = f'{folder_path}sleep_{frame_count:04d}.jpg'  # 使用四位数字的帧号
				cv2.imwrite(filename, frame)
				print(f"保存了瞌睡图片:{filename}")
				sent_picture(filename)
				sent(content, filename)  # 开启推送
				TOTAL = 0
			if hTOTAL > 10:
				content = '点头了好多次,可能困了'
				cv2.putText(frame, "exhausted?", (100, 500), cv2.FONT_HERSHEY_SIMPLEX, 1, (0, 0, 255), 3)
				filename = f'{folder_path}exhausted_{frame_count:04d}.jpg'  # 使用四位数字的帧号
				cv2.imwrite(filename, frame)
				print(f"保存了点头图片:{filename}")
				hTOTAL = 0
				sent_picture(filename)
				sent(content,filename)  # 开启推送
			if mTOTAL > 5:
				content = '打了好多次哈欠,可能困了'
				cv2.putText(frame, "exhausted?", (100, 600), cv2.FONT_HERSHEY_SIMPLEX, 1, (0, 0, 255), 3)
				filename = f'{folder_path}exhausted2_{frame_count:04d}.jpg'  # 使用四位数字的帧号
				cv2.imwrite(filename, frame)
				print(f"保存了打哈欠图片:{filename}")
				sent_picture(filename)
				sent(content, filename)  # 开启推送
				mTOTAL = 0
如果还需要显示当前的帧率以便优化代码的话
#显示帧率和秒数
	cv2.putText(frame, str(int(fps)), (70, 200), cv2.FONT_HERSHEY_PLAIN, 3,
				(255, 0, 0), 3)
	cv2.putText(frame, str(int(elapsed_time)), (200, 200), cv2.FONT_HERSHEY_PLAIN, 3,
				(255, 0, 0), 3)
	cv2.imshow("Frame", frame)
	key = cv2.waitKey(10) & 0xFF
	if key == 27:
		break
最后记得释放资源和关闭窗口
vs.release()
cv2.destroyAllWindows()
运行结果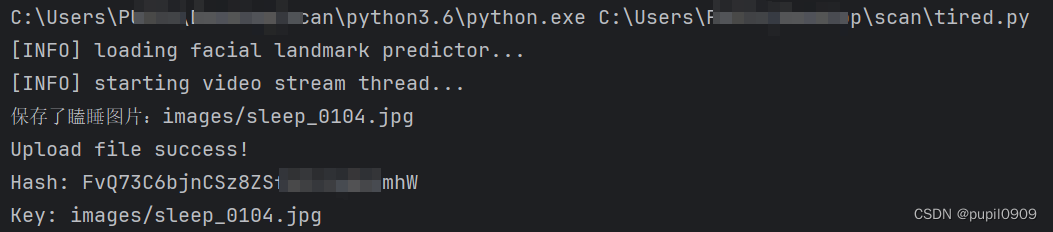


总结
将传统的疲劳检测和七牛云、pushplus相结合,我们可以很方便的将视觉的处理结果反馈给用户端,使单一视觉上的检测更进一步的贴近了实际的生活应用场景中,让用户可以及时得到信息的反馈。经过我们多次实验,这种发送图像的方法在正常的使用场景中几乎无法感知延时。相同的,后续也打算将更多的视觉项目与之结合,比如已经完成的基于YOLO深度学习的火灾烟雾检测、摔倒检测等等。对于疲劳检测的方法有很多,而本文使用的dlib的人脸检测只是其中一种,相比于其他深度学习图像的办法,两者各有优劣。目前有待改进的方向是,当机器人应用在多人且自身在移动的场景中时,又该如何选中检测对象并准确标点呢?


 1万+
1万+


 被折叠的 条评论
为什么被折叠?
被折叠的 条评论
为什么被折叠?
 到【灌水乐园】发言


