前话
距离上次学习Android已经过去了半年了,这半年我干嘛去了?
嘛相信大家也没兴趣了解,简单来说就是我学习了周边的知识技术,最后终于转回Android。
感觉开发一个Android需要很多知识吧,一个完整的Android网络应用=Java编程基础+Web后台开发+服务器搭建+Android开发技术+必要的美工基础
然后我只是泛泛了解了这些,就匆忙转回(就是感觉拖越久就越容易忘光)
很多基础我就不解释了,因为网上真的一大把。。。。。。
不废话了,下面正题。
准备
开发工具为Android Studio
安卓虚拟机使用Genymotion
过程
第一步,创建新的Android空项目

Application name:应用名,项目创建成功后会创建相应名的项目文件夹,该应用名后面可在AndroidManifest文件中更改
Company Domain:域名,对应包名,没错!我的博客新域名 pwcong.me

选择最低支持的SDK版本,低于选择版本的手机无法安装,防止低版本对某特安卓新特性的不适应
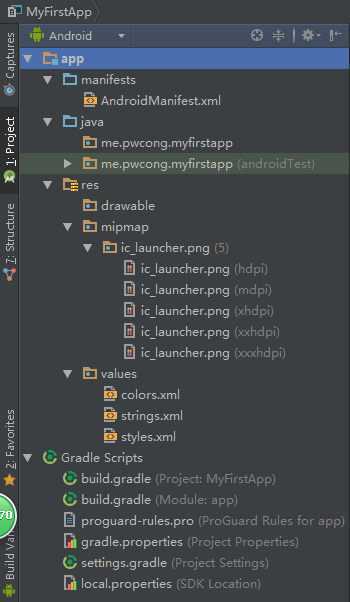
空项目目录如下图所示:
第二步,创建一个界面
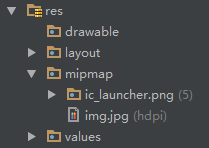
1.导入自己喜欢的界面图片到res->mipmap文件夹内
res文件夹中有drawable文件夹和mipmap文件夹,许多人会混淆图片存放位置放到哪里,官方解释是:
drawable/
For bitmap files (PNG, JPEG, or GIF), 9-Patch image files, and XML files that describe Drawable shapes or Drawable objects that contain multiple states (normal, pressed, or focused). See the Drawable resource type.
mipmap/
For app launcher icons. The Android system retains the resources in this folder (and density-specific folders such as mipmap-xxxhdpi) regardless of the screen resolution of the device where your app is installed. This behavior allows launcher apps to pick the best resolution icon for your app to display on the home screen. For more information about using the mipmap folders, see Managing Launcher Icons as mipmap Resources.
2.res文件夹右键添加一个Android Resource File,选择layout布局文件,在布局文件内添加image控件,设置image引用导入的界面图片
activity_main.xml源码如下:
<?xml version="1.0" encoding="utf-8"?>
<LinearLayout xmlns:android="http://schemas.android.com/apk/res/android"
    android:orientation="vertical" android:layout_width="match_parent"
    android:layout_height="match_parent">


    <ImageView
        android:layout_width="match_parent"
        android:layout_height="match_parent"
        android:id="@+id/imageView"
        android:src="@mipmap/img"
        android:scaleType="centerCrop" />

</LinearLayout>
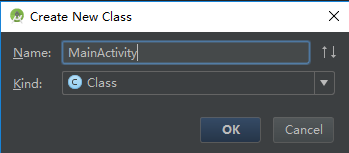
第三步,创建一个Activity绑定界面
MainActivity.java 源码:
package me.pwcong.myfirstapp.activity;

import android.app.Activity;
import android.os.Bundle;

import me.pwcong.myfirstapp.R;

public class MainActivity extends Activity {

    //该Activity创建时执行该方法
    @Override
    protected void onCreate(Bundle savedInstanceState) {
        super.onCreate(savedInstanceState);

        //绑定界面布局文件
        setContentView(R.layout.activity_main);

    }
}
第四步,编辑AndroidManifest文件
AndroidManifest文件源码:
<manifest xmlns:android="http://schemas.android.com/apk/res/android"
    package="me.pwcong.myfirstapp">

    <application
        android:allowBackup="true"
        android:icon="@mipmap/ic_launcher"
        android:label="@string/app_name"
        android:supportsRtl="true"
        android:theme="@style/AppTheme">

        <activity android:name=".activity.MainActivity">
            <intent-filter>
                //注意,以下两条标记程序的入口Activity
                <action android:name="android.intent.action.MAIN"/>
                <category android:name="android.intent.category.LAUNCHER"/>
            </intent-filter>

        </activity>

    </application>

</manifest>
最后,运行看效果
重点是程序如何进入第一个界面
上面是一个简单至极的实例,打开程序显示一张图片。
其中过程简单来说就是系统Launcher查找被标记为Main和Launcher的应用程序Activity来启动应用,就是AndroidManifest内的一段:
<action android:name="android.intent.action.MAIN"/>
<category android:name="android.intent.category.LAUNCHER"/>
两者作用如下:
- android.intent.action.MAIN:决定应用程序最先启动的Activity
- android.intent.category.LAUNCHER:决定应用程序是否显示在程序列表里
如果只有一个activity的应用程序只声明了 android.intent.action.MAIN ,没有声明 android.intent.category.LAUNCHER,运行将报错
如果存在多个activity都声明了android.intent.action.MAIN与android.intent.category.LAUNCHER,将会有多个图标显示在桌面上


 1592
1592

 被折叠的 条评论
为什么被折叠?


