


官方文档:https://doc.qt.io/qt-6/qtqml-index.html
【Runebook.dev】QML中文文档
QML 中文参考手册(Qt6)
0、相关博客
【官方】Qt Quick
QML入门系列
QML 三言两语
一套酷炫的QtQuick/Qml基础库和示例【TaoQuick-master】
QmlFlightInstruments

ChartJs2QML
RadialBarDemo

360qml: 使用qml实现的360主界面

qml-rules

QML绘图的三种方式
【Qt5】qmlplotting 【Qt6】QtQuickPlotScene


1. 概述
1.1 程序框架
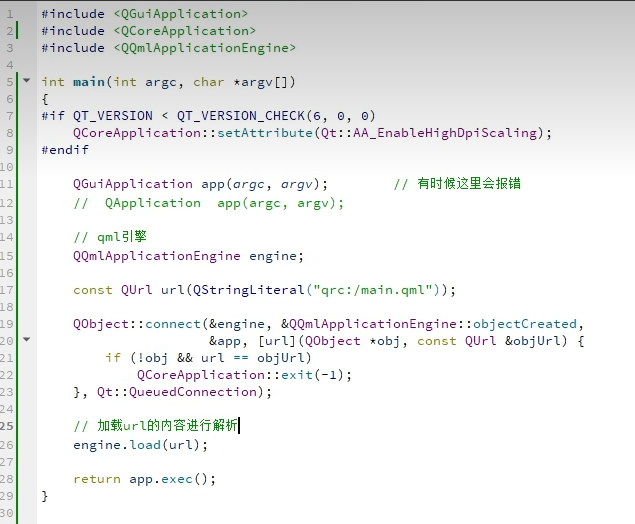
程序是通过qmlscene.exe来运行qml文件。
//main.cpp
#include <QGuiApplication>
#include <QQmlApplicationEngine>

int main(int argc char *argv[])
{
	QCoreApplication app(argc,argv);
	QQmlApplicationEngin engin;
	const QUrl url(QStringLiteral("qrc:/main.qml"));
	//const QUrl url(QStringLiteral("file///D:/project/learqml/main.qml"));
	QObject::connect(&engin, &QQmlApplicationEngin::objectCreated, &app, [url](QObject *obj, const QUrl &objUrl){
		if(!obj && url == objUrl)
			QCoreApplication::exit(-1);
	},Qt::QueuedConnection);

	return app.exec();
}
main.qml
//main.qml 每行可用;也可不用;   “on+信号”槽函数
//===类型值判断  ==只判断值
import QtQuick 2.12
import QtQuick.Controls 2.5

ApplicationWindow{
	id:window
	visible:true
	width:640
	height:480
	title:qsTr("Tabs")
	property int name: 1  //变量
	fuction aaa() {
		//consol.log("123");
		consol.log(name);
	}

	Button{
		id:button1
		x:200
		y:200
		text:qsTr("Test")
		icon.source: "qrc:/icon/up.png"
		//icon.source: "file:D:/pic/icon/up.png"
		onClicked:{
			console.log("1234");
		}
		onDoubleClicked: aaa()
	}
}
import QtQuick 2.12
import QtQuick.Window 2.12
import QtQuick.Controlsf 2.15
import QtQuick.Layouts 1.15

Window{
	width:640
	height:480
	visible:true
	title:"hello world"
	title:qsTr("Hello World")

	Item{
		id:root
		anchors.fill:parent
		Grid{
			id:grid
			columns:3
			Rectangle{color:"red";width:50;height:50}
			Rectangle{color:"green";width:50;height:50}
			Rectangle{color:"blue";width:50;height:50}
			Component.onCompleted:{
				consol.log(grid.x, ' ',grid.y)
			}
		}
		Button{
			text:"click me"
			onClicked:{
				console.log('btn clicked')
			}
		}
	}
}
2. qml中使用c++
有两种方式:
- 1、导出类 :将c++的类注册到元qml元对象系统中,在QML中创建该类的对象
- 2、导出环境:在c++构造一个带有qml上下文属性的对象,在QML中直接使用该对象
1、 导出类
导出类必须是继承自QObject的,然后注册QML类型、引入所注册类型,作为一个数据类型使用
//c++文件中
#include <QtQml>
qmlRegisterType<MySliderItem>("com.mycompany.qmlcomponents", 1, 0, "Slider");//第4个参数(qml中对应的类名)首字母必须大写,
//qml文件中
import com.mycompany.qmlcomponents 1.0
Slider {undefined
}
2、导出环境
#include <QtGui/QGuiApplication>
#include "qtquick2applicationviewer.h"
#include <QtQml>
#include "colorMaker.h"
int main(int argc, char *argv[])
{
    QGuiApplication app(argc, argv);
    QtQuick2ApplicationViewer viewer;
    //堆上分配了一个 ColorMaker 对象,然后注册为 QML 上下文的属性,起了个名字就叫 colorMaker
    viewer.rootContext()->setContextProperty("colorMaker", new ColorMaker);
    viewer.setMainQmlFile(QStringLiteral("qml/colorMaker/main.qml"));
    viewer.showExpanded();

    return app.exec();
}
在 main.qml 中不需要 import 语句,导出的属性可以直接使用,与属性关联的对象,它的信号、槽、可调用方法(使用 Q_INVOKABLE 宏修饰的方法)、属性都可以使用,只是不能通过类名来引用枚举值了。
3. c++中使用qml
//查找子对象的指针
QPushButton *button = parentWidget->findChild<QPushButton *>("button1");
新建一个 callQml ,添加 changeColor.h 、 changeColor.cpp 两个文件。
//main.qml 内容如下:
import QtQuick 2.0
import QtQuick.Controls 1.1
Rectangle {
    objectName: "rootRect";
    width: 360;
    height: 360;
    Text {
        objectName: "textLabel";
        text: "Hello World";
        anchors.centerIn: parent;
        font.pixelSize: 26;
    }
    Button {
        anchors.right: parent.right;
        anchors.rightMargin: 4;
        anchors.bottom: parent.bottom;
        anchors.bottomMargin: 4;
        text: "quit";
        objectName: "quitButton";
    }
}
//main.cpp
#include <QtGui/QGuiApplication>
#include "qtquick2applicationviewer.h"
#include <QQuickItem>
#include "changeColor.h"
#include <QMetaObject>
#include <QDebug>
#include <QColor>
#include <QVariant>

int main(int argc, char *argv[])
{
    QGuiApplication app(argc, argv);

    QtQuick2ApplicationViewer viewer;
    viewer.setMainQmlFile(QStringLiteral("qml/callQml/main.qml"));
    viewer.showExpanded();

    QQuickItem * rootItem = viewer.rootObject(); //取得根对象
    new ChangeQmlColor(rootItem);
    QObject * quitButton = rootItem->findChild<QObject*>("quitButton");
    if(quitButton)
    {
        QObject::connect(quitButton, SIGNAL(clicked()), &app, SLOT(quit()));
    }

    QObject *textLabel = rootItem->findChild<QObject*>("textLabel");
    if(textLabel)
    {
        //1. failed call
        bool bRet = QMetaObject::invokeMethod(textLabel, "setText", Q_ARG(QString, "world hello"));
        qDebug() << "call setText return - " << bRet;
        textLabel->setProperty("color", QColor::fromRgb(255,0,0));
        bRet = QMetaObject::invokeMethod(textLabel, "doLayout");
        qDebug() << "call doLayout return - " << bRet;
    }

    return app.exec();
}
4. GUI程序中嵌入qml
在Qt Gui程序中嵌入qml界面
在Qt Gui中嵌入QML(old)
QML嵌入到QWidget中方法(两种)
1.qml 文件import QtQuick 2.0
  	QQuickView *view = new QQuickView;
   	view->setSource(QUrl::fromLocalFile("myqmlfile.qml"));
   	view->show();
2.qml 文件import QtQuick 1.0
	QDeclarativeView *view = new QDeclarativeView;
 	view->setSource(QUrl::fromLocalFile("myqmlfile.qml"));
 	view->show();
可以用qquickwidget载入qml文件,集成到现有的widget项目中,我下面这两个app就是qml写的camera,其他都是widget。交互还是很方便的。
	QQmlEngine *engine = ui->quickWidget->engine();
    QQmlContext *context = engine->rootContext();
    context->setContextProperty("appPath", QUIHelper::appPath());
    context->setContextProperty("appName", QUIHelper::appName());
    QObject *obj = (QObject *)ui->quickWidget->rootObject();
    QMetaObject::invokeMethod(obj, "setOrientation", Q_ARG(QVariant, -90));
    connect(obj, SIGNAL(receiveImage()), this, SLOT(receiveImage()));
    connect(this, SIGNAL(snap()), obj, SLOT(snap()));
    connect(this, SIGNAL(select()), obj, SLOT(select()));
5. SceneGraph
帮助主题:Qt Quick Scene Graph
openGL: LearnOpenGL
玩转QtQuick(1)-SceneGraph场景图简介
玩转QtQuick(2)-默认渲染器
【官方】Qt Quick Scene Graph
【官方】QSGNode Class
Qt Quick Scene Graph 学习1:画线
Qt Quick实现的涂鸦程序
Qml组件化编程7-自绘组件(全)
QML核心渲染类说明(好)
5.1 QML绘图的多种方式
QML绘图的三种方式
Qt Quick 里不只 Canvas 可以自绘,绘图方式有:
(1)可以使用原始的 OpenGL(Qt Quick 使用 OpenGL 渲染)。
(2) QQuickItem+updatePaintNode(),构造QSGNode 来绘图。首先继承 QQuickItem实现 updatePaintNode 接口,接口中构造一个 QSGNode(可视节点使用 QSGGeometryNode ,需要包含 geometry 顶点和 material 材质两部分),然后将顶点坐标和颜色添加到该节点,最终会根据我们的顶点数据和着色器来进行渲染。有两点要注意,可视 Item 需要设置 setFlag(ItemHasContents, true);节点的某部分需要更新则需要设置 dirty 标志,如顶点更新了需要设置 node->markDirty(QSGNode::DirtyGeometry)。
(3)QPainter + QQuickPaintedItem 的方式。QPainter 接口相对成熟,而且不用了解 GLSL 这些知识(QQuickPaintedItem 就是先用 QPainter 绘制到纹理上,然后再作为一个 QSG 节点渲染这个纹理 )。QQuickPaintedItem 使用 Qt Widgets 里惯常的 2D 绘图方式,将你想要的线条、图片、文字等绘制到一个内存中的 QImage 上,然后把这个 QImage 作为一个 QSGNode 放在那里等着 Qt Quick 的渲染线程来取走它,把它绘制到实际的场景中。按照这种理解, QQuickPaintedItem 会多个绘图步骤,有性能上的损失!不过为了开发方便,有时候这一点点性能损失是可以承受的——只要你的应用仍然可以流畅运行。
Qt Quick 的核心是 Scene Graph , Scene Graph 的设计思想和QGraphicsView/QGraphicsScene 框架类似,一个场景,很多图元往场景里放。不同之处是 Item 的绘制:
(1) QGraphicsView 框架里是通过 View 的绘图事件来驱动 Item 的绘制,QGraphicsItem 有一个 paint() 虚函数,只要你从 QGraphicsItem 继承来的 Item 实现这个 paint() 函数,就可以往 QPaintDevice 上绘制了,逻辑直接;
(2)而 Qt Quick 的绘制,其实另有一个渲染线程, Scene 里的 Item 没有 paint() 这种直观的绘图函数,只有一个 updatePaintNode() 方法让你来构造你的 Item 的几何表示,当程序轮转到渲染循环时,渲染循环把所有 Item 的 QSGNode 树取出来绘制。updatePaintNode() 这种绘制的方式很不直观,它来自 OpenGL 或者 Direct 3D 的绘图模式:你构造图元的几何表示,别人会在某一个时刻根据你提供的材料帮你绘制,就像你扔一袋垃圾到门口,过一阵子有人会来帮你收走这种感觉。
(3)用惯 Qt Widgets 和 QPainter 的开发者可能会不适应上面这种方式,所以 Qt Quick 提供了一种兼容老习惯的方式:引入 QQuickPaintedItem ,使用 QPainter 绘制。 一般地,你可以这样理解: QQuickPaintedItem 使用 Qt Widgets 里惯常的 2D 绘图方式,将你想要的线条、图片、文字等绘制到一个内存中的 QImage 上,然后把这个 QImage 作为一个 QSGNode 放在那里等着 Qt Quick 的渲染线程来取走它,把它绘制到实际的场景中。按照这种理解, QQuickPaintedItem 会多个绘图步骤,有性能上的损失!不过为了开发方便,有时候这一点点性能损失是可以承受的——只要你的应用仍然可以流畅运行。
Qt中的自绘方案有这么一些:
QWidget+QPainter / QQuickPaintedItem+QPainter
Qml Canvas
Qml Shapes
QOpenGLWidget / QOpenGLWindow
Qml QQuickFrameBufferObject
Qml SceneGraph
Qml ShaderEffect
QVulkanWindow
5.2 渲染流程
用QSG_RENDER_LOOP环境变量可指定用渲染方式。
一种是在QtCreator项目选项卡中设置运行环境变量,另一种是代码设置,在main()的最开始,要在QApplication初始化之前,加上:
qputenv("QSG_RENDER_LOOP", "basic"); //basic windows threaded
There are three render loop variants available: basic, windows, and threaded. Out of these, basic and windows are single-threaded, while threaded performs scene graph rendering on a dedicated thread. Qt attempts to choose a suitable loop based on the platform and possibly the graphics drivers in use. When this is not satisfactory, or for testing purposes, the environment variable QSG_RENDER_LOOP can be used to force the usage of a given loop. To verify which render loop is in use, enable the qt.scenegraph.general logging category.
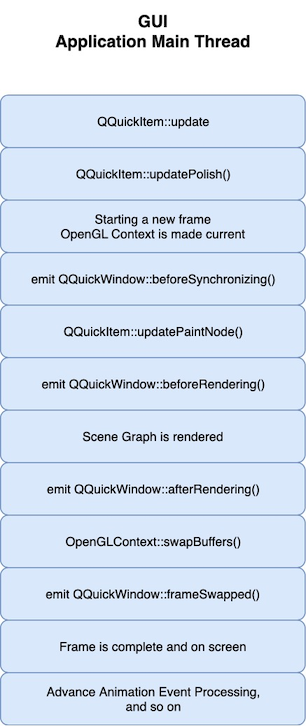
5.2.1 Threaded Render Loop (‘threaded’)
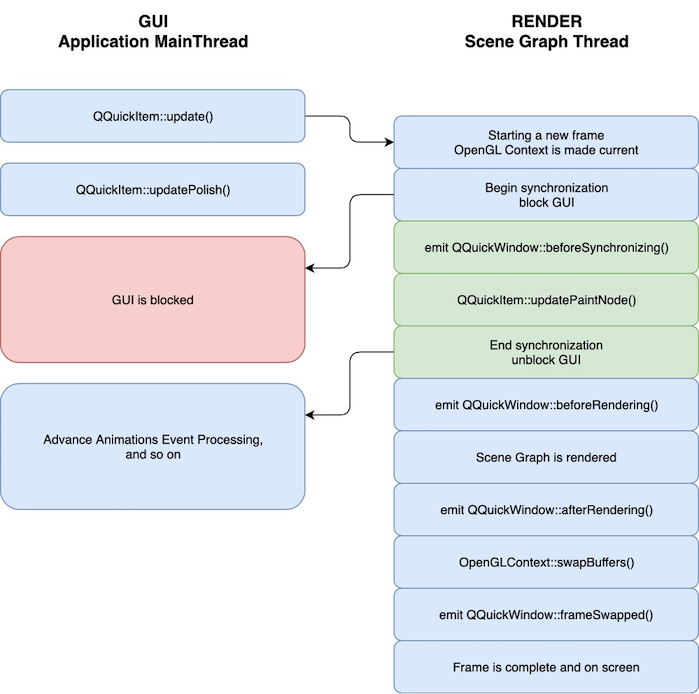
5.2.2 Non-threaded Render Loop (‘basic’)
5.3 QQuickItem子类中重载updatePaintNode()
QSG使用方式是在QQuickItem的子类中,重载updatePaintNode函数,并且设置 QuickItem::ItemHasContents 标志的方式,添加到“场景图”。
警告:至关重要的是, 原生图形(OpenGL,Vulkan,Metal等)操作以及与“场景图”的交互只能在渲染线程中进行,主要在updatePaintNode()调用期间进行,因为其是阻塞的,故只使用带有“QSG”前缀的类做渲染,数据处理放在别的线程中。
QSGNode *TaoItem::updatePaintNode(QSGNode *node, UpdatePaintNodeData *)
{
    QSGSimpleRectNode *n = static_cast<QSGSimpleRectNode *>(node);
    if (!n) {
        n = new QSGSimpleRectNode();
        n->setColor(Qt::red);
    }
    n->setRect(boundingRect());
    return n;
}
需要注意的是:updatePaintNode()函数虽然是在渲染线程中执行的,但此时主线程也阻塞了,故此函数内主要是绘制,而数据处理尽量放在其他的Node里。(具体见渲染流程)
The main thread is blocked while this function is executed so it is safe to read values from the QQuickItem instance and other objects in the main thread.
If no call to QQuickItem::updatePaintNode() result in actual scene graph changes, like SGNode::markDirty() or adding and removing nodes, then the underlying implementation may decide to not render the scene again as the visual outcome is identical.
Warning: It is crucial that OpenGL operations and interaction with the scene graph happens exclusively on the render thread, primarily during the QQuickItem::updatePaintNode() call. The best rule of thumb is to only use classes with the “QSG” prefix inside the QQuickItem::updatePaintNode() function.
Warning: This function is called on the render thread. This means any QObjects or thread local storage that is created will have affinity to the render thread, so apply caution when doing anything other than rendering in this function. Similarly for signals, these will be emitted on the render thread and will thus often be delivered via queued connections.

主要工作就是:添加顶点(geometry)和材质(material)
node->setGeometry(geometry);
node->setMaterial(material);
QSGNode *QSGLine::updatePaintNode(QSGNode *oldNode, QQuickItem::UpdatePaintNodeData *updatePaintNodeData)
{
    Q_UNUSED(updatePaintNodeData)
    //一个node包含geometry和material,类似于别的架构中的entity、mesh、material
    //node可以是要渲染的物体,也可以是透明度等
    //geometry定义了网格、顶点、结构等,比如坐标点
    //material定义了填充方式
    QSGGeometryNode *node = nullptr;
    QSGGeometry *geometry = nullptr;

    //第一次调用时为nullptr,后面每次会把原来的节点指针传进来
    if (!oldNode) {
        //QSGGeometryNode是一个便捷类,用于可渲染节点
        node = new QSGGeometryNode;

        //构造顶点,提供了三种简便设置------------
        //defaultAttributes_Point2D(); 普通坐标点
        //defaultAttributes_TexturedPoint2D(); 带纹理坐标点
        //defaultAttributes_ColoredPoint2D(); 带颜色坐标点
        //这里设置为了两个坐标点的结构,后面会设置坐标值
        geometry = new QSGGeometry(QSGGeometry::defaultAttributes_Point2D(), 2);
        //线宽
        geometry->setLineWidth(1);
        //绘制模式,setDrawingMode(DrawLines)相当于OpenGL的glDrawArrays(GL_LINES)
        geometry->setDrawingMode(QSGGeometry::DrawLines);
        //添加到node
        node->setGeometry(geometry);
        //此设置表示该节点拥有Geometry实例的所有权,并且会在该节点被销毁或重新设置时将其释放
        node->setFlag(QSGNode::OwnsGeometry);

        //构造材质,这里使用的纯色------------
        QSGFlatColorMaterial *material = new QSGFlatColorMaterial;
        //颜色
        material->setColor(QColor(255, 0, 0));
        //添加到node
        node->setMaterial(material);
        //此设置表示该节点拥有Material实例的所有权,并且会在该节点被销毁或重新设置时将其释放
        node->setFlag(QSGNode::OwnsMaterial);
    } else {
        //初始化完成后,后面的刷新会进入到这个逻辑里
        //这里我们可以更新geometry
        node = static_cast<QSGGeometryNode *>(oldNode);
        geometry = node->geometry();
        //可以重置坐标点个数,比如刷新了数据,调用update,就可以在此处重新设置
        //geometry->allocate(2);
    }

    //这个函数是同geometry构造参数对应的,相当于cast了一个内存块的指针
    //如果是自定义的geometry结构,直接geometry->vertexData()拿指针就行
    QSGGeometry::Point2D *vertices = geometry->vertexDataAsPoint2D();
    vertices[0].set(0,0); //点1左上角
    vertices[1].set(width(),height()); //点2右下角
    //设置dirty标志后场景图才会刷新对应内容
    //如果不设置dirty geometry,那么数据变化就不会刷新
    //(在此例里表现为拖动大小后没有刷新ui渲染)
    node->markDirty(QSGNode::DirtyGeometry);

    return node;
}
5.4 QSGGeometry
QSGGeometry 类为 Qt Quick Scene Graph 中的图形基元提供低级存储。
//静态成员函数-----
const QSGGeometry::AttributeSet &
defaultAttributes_ColoredPoint2D()		//
const QSGGeometry::AttributeSet &
defaultAttributes_Point2D()				//返回用于普通纯色矩形的属性集
const QSGGeometry::AttributeSet &
defaultAttributes_TexturedPoint2D()		//返回用于纹理 2D 几何的属性
void
updateColoredRectGeometry(QSGGeometry *g, const QRectF &rect)
void
updateRectGeometry(QSGGeometry *g, const QRectF &rect)
void
updateTexturedRectGeometry(QSGGeometry *g, const QRectF &rect, const QRectF &textureRect)
5.4 QSGMaterial
材质类包含渲染状态和着色器程序(The QSGMaterial class encapsulates rendering state for a shader program)。
子类:QSGFlatColorMaterial, QSGOpaqueTextureMaterial, QSGSimpleMaterial, and QSGVertexColorMaterial。
QSGMaterial 和 QSGMaterialShader 子类形成紧密的关系。对于一个场景图(包括嵌套图),有一个唯一的 QSGMaterialShader 实例,它封装了场景图用于渲染该材质的着色器,例如用于对几何图形进行平面着色的着色器。每个 QSGGeometryNode 都可以有一个唯一的 QSGMaterial,其中包含绘制该节点时应如何配置着色器,例如用于渲染几何图形的实际颜色。
QSGMaterial 有两个虚拟函数需要实现。函数 type () 应返回特定子类的所有实例的唯一实例。函数 createShader () 应返回特定于 QSGMaterial 子类的 QSGMaterialShader 的新实例。
最小的 QSGMaterial 实现可能如下所示:
class Material : public QSGMaterial
{
public:
    QSGMaterialType *type() const override { static QSGMaterialType type; return &type; }
    QSGMaterialShader *createShader(QSGRendererInterface::RenderMode) const override { return new Shader; }
};
6. QML多线程
7. TabBar
Qml底部导航 Github下载
qtquickexamples
8.常用属性
属性进行关联绑定时,在经过赋值后绑定也就解除了。
anchors.fill:parent
focus:true
KeyNavigation.Tab:NextEdit
Keys.onSpacePressed:{consol.log("text is space")}
gridient:Gridient{
	GrideientStop:{position:0.0;color:'green'}
	GrideientStop:{position:1.0;color:'red'}
}
color:Qt.rgba(Math.random(),Math.random(),Math.random(),1)	//js随机颜色
color:"#303030"
font.family:"Ubuntu"
font.pixelSize:22


 2070
2070

 被折叠的 条评论
为什么被折叠?
被折叠的 条评论
为什么被折叠?
 到【灌水乐园】发言


